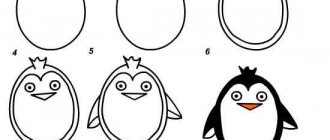
The main stages of depicting a matryoshka doll
According to Russian tradition, wooden toys that are nested inside one another have always been painted. The souvenir has many styles. The name of the painting is associated with the area where it was made. For example, Zagorskaya, Kirovskaya, Semenovskaya, Turinskaya and so on.
Using these instructions, you can learn how to draw a wooden toy either on paper or another base (egg, stone, etc.):
| Part of work | Execution Description |
| Head | Draw a small circle. To obtain smooth edges of a geometric figure, you can use a compass or a round object of various diameters - saucers, lids, cups and others. |
| Torso | Below, draw a second circle, but larger. Both circles should touch each other. |
| Form | To get the traditional shape of a wooden toy, the circles need to be connected with smooth lines, and the excess parts should be removed with an eraser. |
| Face | Draw a face inside the first circle, which is also shaped like a circle. On the face draw eyes, nose, mouth, eyebrows, and round cheeks. In the upper part of the face, draw hair covering the forehead. |
| Handkerchief | At the bottom of the face circle, draw a knot in the scarf. Separate the scarf from the body with wavy lines. |
| Toy decoration | At the bottom of the figure, draw a base on which the toy stands. In the center of the body, divide the upper part of the figure from the lower half with a semicircular line. Erase unnecessary lines and make the contours brighter. |
| Apron | Decorate the lower part of the toy with colorful patterns consisting of flowers and decorative lines. |
| Coloring | Give your face a light beige tint, make your cheeks red, and your hair light brown. The base of the toy should be brown, and the patterns should be bright. |
Before the children start drawing, you can show them a visual material with a picture of a nesting doll, and also lay out the manual on the tables.
Then perform the following steps step by step with a pencil:
- The first step is to draw a circle, which will be the top part of the nesting doll.
- Draw a lower oval and connect it to the head.
- In the central part of the upper circle draw a round face and hair.
- Draw eyes, lips and eyebrows on the face.
- Under the circle that represents the face, add a bow and an apron.
The matryoshka doll (the drawing for children must match the description) can be brought to life. To do this, you need to color her sundress and scarf. Young artists can find their favorite rich colors. The sundress can be decorated with floral patterns or bright berries. Or you can invite children to color a ready-made black and white image of a nesting doll.
On the topic: methodological developments, presentations and notes
Summary of a lesson on familiarizing children with their surroundings. Topic: “Toys. Getting to know the Russian nesting doll" - from a series of integrated lessons on the topic: "Matryoshka".
The activity will help introduce children to the folk toy - matryoshka. Integration of educational areas: "Cognition", "Artistic creativity", "Communication", "Music".
Long term project. For preschool teachers.
Application for the middle group of kindergarten, from the “Our Motherland” section.
Program content: Educational objectives: Tell about the most popular folk wooden toy, nesting dolls. Teach children to distinguish between different techniques for painting nesting dolls. Develop children's creative imagination.
Introduction to Russian folk culture should be introduced from early childhood.
Source
Simple drawing
To draw a simple drawing with your child, you need to follow several steps:
- Draw an egg with a blunt base.
- Draw a narrow stand on the base.
- At the top of the resulting oval, draw a circle for the face and bangs.
- Draw a face: eyes, nose, cheeks, smile and hair.
- Draw arms on both sides of the body.
To put on a matryoshka doll, you need:
- Draw 2 smooth lines under the circle of the face from the center to the sides. You will get a scarf.
- Draw the knot and ends of the scarf.
- At the bottom of the figure, draw the hem of the sundress.
- Draw any pattern on the apron: flower, berries, circles, and so on.
With paints
To paint a nesting doll with paints, you will need the following tools:
- a jar of water;
- brushes No. 3, No. 5;
- paints (watercolor, gouache);
- round objects;
- eraser;
- A4 sheet of paper;
- a simple pencil;
- cotton buds.
Matryoshka drawing for children with paints
To complete the drawing you need to complete the following steps:
- Place the sheet vertically and place round objects on it end to end so that there is a larger circle at the bottom and a smaller circle at the top. Trace both objects with a pencil.
- Connect the circles together.
- To make the toy stable, you need to draw a base from below.
- In order to draw the doll's face, you need to take another round object. Its diameter should be smaller than the head of the nesting doll. Place it on your head and outline it with a pencil.
- Next you need to draw the knot and ends of the scarf.
- Then mark the hair.
- The next element will be the hands. You need to draw the sleeves, mark the cuffs, outline the hands.
- The eyes and mouth can be depicted as three circles.
- Eyes: The pupil should be smaller than the iris.
- Draw the lips with a bow.
- Place a flower in your hands.
- Use wavy lines to make a border along the edge of the scarf and the hem of the sundress.
- Draw eyebrows, cheeks, a smile.
To paint the resulting toy, you need to mix shades of white and ocher.
The result will be a flesh color.
- Use the resulting flesh-colored paint to paint your face and hands.
- Before taking on a new color, you need to wait until the previous one dries.
- Paint the sundress with a bright color, without touching the lines of the scarf, hands and flower.
- Paint the scarf a different color.
- To make it easier for your child to draw patterns (polka dots, flowers) on the fabric of scarves and dresses, you can use a cotton swab.
- Use light paint to paint the shirt, core and lace of the sundress. And make the hem dark.
- Decorate clothes with straight and wavy lines, circles or other patterns.
- Color your hair and eyebrows brown, make your eyes blue, your lips scarlet, and your blush pink. You can liven up your eyes with highlights made using a toothpick and white paint.
The child can dress the doll in any modern outfit. This idea will awaken the imagination of the young artist.
Progress of continuous educational activities.
A teacher in Russian costume greets the children.
Educator. Come on in, guys! to see you , come in. (Gathers children around him)
.
Guys, would you like to be in a fairy tale ? (Answer)
.
To get there, you need to dress up: girls wear sundresses and scarves, and boys wear caps decorated with flowers. You are now beautiful girls and good fellows. And I will turn into a storyteller . So, 1, 2, 3 - turn around, you will find yourself in a fairy tale !
Educator. I, a storyteller , know a lot of fairy tales . turn any fairy tale Do you want to listen to my unusual fairy tale ? Sit down more comfortably. (Children sit on chairs)
.
What tale should I tell you ? (Looks through the reader)
.
I found it. You probably don't know this one. Guess the fairy tale , listen to the riddle:
Masha went into the forest with a basket.
I got a little lost there.
I came across a hut, ate some porridge, and went to bed.
And the owners of the food turned out to be... (Three Bears)
.
Children: yes, we know this fairy tale ! What's unusual here?
Educator: You may know the fairy tale... . But we will read it in a special way! that’s who will tell us this !
Different toys of different heights,
But they look alike
They all sit next to each other,
And just one toy! (Matryoshka)
Educator. You guessed it, well done! They will tell us the tale “The Three Bears”
nesting dolls, listen.
Many wooden, round-faced and ruddy dolls
They live on our table - everyone is called nesting dolls.
This toy comes with a surprise...
Each beautiful nesting doll has a smaller sister hidden in it, and how bright and elegant they are!
Since ancient times, the nesting doll in Rus' was considered a symbol of fertility, wealth and abundance. The matryoshka was a kind of amulet for the family - the keeper of the hearth. It was carved from wood, and then painted and “dressed”
in sundresses, scarves.
Russians loved this toy. Each matryoshka master has his own face, his own outfit and his own character. And each nesting doll with its smile warms the souls of people, gives them warmth and, as it were, reminds them that they should not forget all Russian traditions, customs, and holidays.
Educator. Here are the nesting dolls. Let's look at them, take one nesting doll.
— What patterns do artists decorate matryoshka aprons with?
— what color paints are used?
— What mood are the dolls in?
Educator. That's right, guys, the pattern consists of bright flowers, leaves, and berries. First, the artist draws the contours of the pattern elements with black ink and only after that begins to work with paints - red, green, yellow, blue, violet.
Educator. Guys, now you, beautiful girls and good fellows, will become artists and paint the nesting dolls yourself (children sit at the tables)
.
But not beautiful girls, but heroes of the fairy tale “The Three Bears”
.
Look, in front of you are templates of nesting dolls of different sizes - large, smaller, even smaller, etc. I suggest you join teams of 5 people. Each of you will portray one of the heroes of the fairy tale in the form of a matryoshka doll !
Choose your matryoshka base. Russian folk music is playing, children are working.
At the end, the children gather all the matryoshka heroes together, tell a fairy tale , find the most elegant, most beautiful, most cheerful, brightest matryoshka doll - the hero of the fairy tale .
Source
Simple drawing with felt-tip pens
A matryoshka doll (a drawing for children does not have to be completely filled in with a felt-tip pen) can be drawn with dashes of different lengths, dots, and squiggles.
The result will be a more accurate picture.
- Use a black felt-tip pen to draw a circle as evenly as possible.
- Below, on the outside of the circle, draw a knot and a bow.
- Draw hair inside the circle: 2 arcs, starting from one top point and ending on different sides of the circle.
- Draw 2 eyes in the central part of the head, and a smile just below.
Draw a big eight like this:
- Draw a semicircle above your head, 1 cm from it.
- Draw a second arc at the bottom of the sheet. Its size must be larger than the first arc.
- Connect the left edge of the upper arc with the left edge of the lower arc with a line curved inward.
- Connect the right edge of the upper arc with the right edge of the lower arc with a line curved inward.
This will create a toy figure.
Further:
- Draw smooth lines that form the edge of the scarf.
- Draw an apron, the upper part of which rests on the scarf.
- Draw hands on the sides of the matryoshka (between the apron and the edge of the toy). The sleeve line begins where the scarf ends and is formed from a small rectangle.
- Draw a flower in the center of the apron.
To color the sketch, you need to take felt-tip pens in the following shades: yellow, orange, beige, light and dark brown, green and red:
- Use a yellow marker to color the apron.
- Use an orange felt-tip pen to color the lower part of the nesting doll (dress).
- In order to paint your face, you need to choose a shade of flesh color.
- Use a light brown felt-tip pen to color your hair. Then take a dark brown felt-tip pen and draw several stripes through your hair to create shimmer.
- Color the scarf green.
- Color the flower on the apron red.
- Put red dots on the dress.
- Draw a spiral pattern on the apron in orange, bordering the apron in a circle.
- Color your hands with a flesh-colored felt-tip pen.
Colored pencils
Draw the outline of the toy in any way.
Next follow these steps:
- Draw the face and hair.
- Draw a scarf.
- Draw hands joined in the center.
- Draw a heart on the doll's chest.
- Draw an apron at the bottom of the figure.
- Draw small circles on the skirt.
- Decorate the scarf with small flowers.
- Paint the scarf, skirt, heart and lips red.
- Color the apron yellow.
- Make the flowers on the scarf, circles on the skirt, shirt and eyes blue.
- Paint the sleeves green.
Using gouache
Gouache will help your child learn to create beautiful and correct drawings. Since it dissolves well in water, you can dilute dried paint with water and easily correct mistakes. Or you can cover dark spots with light colors. The finished drawing does not get dirty.
Matryoshka has many options for painting. For children who love and know how to draw beautifully, it will not be difficult to show their imagination and create their own designer toy.
Step-by-step master class on creating a simple drawing:
- Outline the shape of the matryoshka head with a pencil - it is a circle.
- Divide a sheet of paper in half from top to bottom.
- Smoothly draw the shape of the matryoshka doll from the left side from the head to the bottom of its figure.
- Measure the distance from the outermost point of the curved line drawn in step No. 3 to the straight line dividing the sheet in half.
- Measure the same distance from the center line to the right.
- Do the same with other points of the curved line. This is done to ensure that the shape of the toy is symmetrical on both sides.
- Draw a curved line on the right connecting the marked points. This will create a mirror image of the left edge of the matryoshka.
- Connect the lower points of both lines with a smooth arc, forming the bottom of the figure.
- Draw a smaller circle inside the top circle. This will be the face of the toy.
- Draw a small circle under the face, which will be the knot of the scarf.
- Under the knot, draw 2 smooth straight lines going down and to the sides. This will be the bottom edge of the scarf.
- From the circle-knot, draw 2 small ovals to the sides, representing a bow.
- Draw arms on both sides of the matryoshka along the body.
- Draw a large flower in the center of the lower part of the figure.
- On the face, draw hair and eyes in the form of small circles. The mouth can also be made in the form of a circle.
The sketch of the toy is ready.
Now you need to take a brush and paints and decorate the workpiece.
- Paint the scarf and bow with red paint.
- Draw a mouth with the same paint.
- Dip the brush into yellow paint and paint the flower.
- The edges of the flower and the veins of the petals can be painted red.
- Place black stamens in the center of the flower. Use the same color to darken the outline of the flower in some places.
- Using a thin brush with black paint, draw the outline of the leaves around the flower, outline the hands, the scarf and the outline of the entire figure of the nesting doll.
- Color your hair and eyes black, draw eyebrows above the eyes.
- To draw a nose, just put 2 black dots.
- Use pink to draw cheeks that have a round shape.
- Paint the leaves on the sundress green.
- Place round red dots on the sundress.
- Paint over the empty space on the face and sundress with light yellow color.
Matryoshka (a drawing for children should be as interesting as possible) can be made in different ways. Instead of paints, you can take wax crayons or use them in combination with gouache. Since wax repels water, the image will not be covered with paint. If the layers are thick, you can mark patterns on them with a toothpick or fingernail.
GCD for drawing in the preparatory group “Merry dolls”
Marina Shekel
GCD for drawing in the preparatory group “Merry dolls”
Program content: continue to introduce children to the nesting doll as a type of folk toy (history of creation, features of appearance and decor, source material, the most famous crafts - Semyonovskaya, Polkhov-Maidanskaya, develop the ability to draw a nesting doll from life , as accurately as possible conveying the shape, proportions and design elements, develop an eye, a sense of color, shape, rhythm, proportion, cultivate interest in folk culture, aesthetic taste.
Zagorskaya matryoshka
This version of the pattern uses 4 primary colors - red or orange, yellow, green, blue:
- The drawing should begin by constructing a figure, which should be in the center of the sheet. It is necessary to mark on the paper the boundaries of the drawing at the top, bottom and sides. You will get a large frame.
- Draw a semicircle on top of the sheet. This will be the face of the toy.
- The body looks like an oval.
- Outline the head and body with a single line. Remove extra lines with an eraser. You will get the silhouette of a matryoshka doll.
- Outline a round face.
- Then draw a bow on the scarf and its bottom edge.
- Under the scarf on the neck, draw the upper part of the sundress.
- If it is difficult for children to draw hands, you can make a figure without them. Therefore, all that remains is to draw an apron with openwork embroidery along the edge.
- Outline the hairstyle. Usually this is a symmetrical bang.
- Outline the eyes, nose and mouth.
The initial stage of building the nesting doll is completed.
To make a toy in color, you need to follow these steps:
- Cover the scarf with blue.
- Blue color can be used to decorate an apron. For example, draw a strip along its edge and on the belt.
- To fill the sundress, you can use red.
- The apron can be painted yellow.
- Yellow can be used to color the face and neck.
- Paint your hair orange.
After the main color masses are filled in, you can move on to painting, consisting of dots, leaves and flowers.
It is more convenient for a child to make dots with cotton swabs.
- Place red paint on one cotton swab and yellow paint on the other and create flowers on a scarf of the same size using dots.
- Make the same flowers on the apron using red and orange.
- Place yellow dots on the apron stripe and blue dots on the openwork edge.
- You can choose red for the dots on the apron waistband.
- Beads can be made from dots of different colors.
- To make the petals, you need to take a thin brush and paint it with green color. Then, applying the entire thickness of the brush to a sheet of paper, form openwork foliage.
- You can create a leaf pattern by pressing the leaf with the entire surface of the brush or just the tip.
- Make eyes and cheeks using cotton swabs.
- Use a thin brush to make a bow on the lips, and outline the eyebrows, eyelashes and nose using a felt-tip pen.
- Trace all the details of the nesting doll with a felt-tip pen.
You can draw a matryoshka without an apron. In her hands you can place apples, a samovar, a pretzel, a mug, a teapot.
MAGAZINE Preschooler.RF
Abstract of GCD on artistic and aesthetic development in the senior group “Sergiev Posad Matryoshka” non-traditional drawing techniques(printing with signets, “poking” with cotton swabs “plasticineography” , drawing with wax crayons)
Goal: to teach children to decorate the silhouette of a nesting doll with new methods of non-traditional drawing: imprinting with signets, “poking” with cotton swabs, plasticineography.
Tasks
Educational
- To strengthen children’s ability to use non-traditional techniques in drawing: drawing with wax crayons, “poking” with cotton swabs, imprinting with signets, plasticineography.
- Introduce children to the history of the creation of the Russian wooden toy - matryoshka.
- To form ideas about the distinctive features of the form and painting of the Sergiev Posad matryoshka doll.
Developmental
- To develop in children a cognitive interest in folk art, in the matryoshka doll, as a souvenir, a symbol of the country.
- Develop creative imagination, aesthetic taste and independence when painting a template for a toy - matryoshka.
Educational
- Foster love and respect for folk art.
Materials: silhouettes of nesting dolls, cut out of white cardboard (1/2 A4 format) (the blanks are pre-coated with starch glue and dried), gouache, wax crayons, plasticine, brushes, signets (caps from felt-tip pens), cotton swabs, water glasses, napkins fabric, wet wipes, a set of painted nesting dolls, a laptop, a projector, a screen, a small postal box, a disk with a video recording of Matryoshka, “Ksyusha” from the Slavyanka company (in the form of small nesting dolls), an audio recording of the song “Russian nesting dolls” (authors A. Yaranova, D. Knyazev).
Preliminary work:
- conversation about the history of the appearance of the Russian folk wooden toy “matryoshka” , examination of illustrations depicting nesting dolls, examination of images of women’s Russian folk costumes and patterns on them;
- children visiting the Sergiev Posad Toy Museum with their parents, meeting with an artist who paints nesting dolls and observing her work;
- playing with nesting dolls, working with “Matryoshka” ;
- preparing the matryoshka silhouette - cutting it out of cardboard, coating it with starch glue, drying it.
GCD move
Motivational stage
The teacher asks all children to stand in a circle.
Educator:
Let's stand side by side, in a circle, Let's say "Hello!" each other. We are not too lazy to say hello: “Hello!” and “Good afternoon!” ;
If everyone smiles, a good morning will begin.
Children: Hello!
There is a knock on the door. The teacher opens the doors and then comes back with a package in his hands.
Educator: Guys, we have received a package. I wonder who sent it to us, and most importantly, what’s inside?
Opens the package. Inside is a DVD disc.
Educator: I think they sent us a video letter. Let's see?
He inserts the disk into the laptop and Matryoshka appears on the screen.
Matryoshka: you guys know that Matryoshkas live in large, friendly families. But here I am, alone and I have no one. But no one can live without a family: neither people, nor animals, nor even us - toys. I heard that you recently invited an artist to visit you, watched her paint nesting dolls, and learned from her. So I decided to ask you for help. I want me to have a family, and there are many of my sisters in it, dolls just like me. Help me please!
Educator: that's it! (addresses children)
- Guys, do you think we can help Matryoshka?
(children's answers)
Activity stage
Educator: Tell me how you will paint the nesting dolls, because there are many of you and everyone will paint the nesting dolls in their own way, but I saw that they are all the same?
Child: It wasn't always like this. The guide told us about this at the Toy Museum, where my mother and I went.
Educator: can you tell us about what you learned on the excursion?
1 child: the Russian nesting doll appeared many years ago in the “Children’s Education” in the village of Abramtsevo, which is located next to Sergiev-Posad.
Abramtsevo, Abramtsevo – An ancient place. There is a forest, a grove, a field, a bridge, a river...
There the masters decided to create a Matryoshka doll. So that She could only give joy to people!
2nd child: the first matryoshka was eight-seater, and it was painted in a “family” style. The largest matryoshka was holding a black cockerel in her hands and was dressed in an embroidered shirt, a sundress and a white bib, with a scarf on her head. More figures were placed inside. Some of them were painted as girls, and others as boys, one after the other. And the very last one was painted like a baby in diapers - a “diaper” . We saw this nesting doll in the museum.
Educator: Well done, you told us everything very well.
Draws the children's attention to the matryoshka figurines on the demonstration table and reads a poem.
"Matryoshka dolls from Sergiev Posad"
I am from Sergiev Posad. I am very glad to meet you. The artists gave me a Bright Russian sundress.
I have had a pattern on my apron for a long time. My handkerchief is famous for its multi-colored border.
— Guys, look at the works of modern masters who carefully preserve the traditions of painting. The Sergievo Posad doll differs from other nesting dolls in our country because of its simplified painting using red, yellow, green and blue colors. The outline of the face and clothing are outlined with a black line or burned out. The matryoshka's clothes are quite modest; small flowers are painted on the apron, without small details. Girls' hair color is mostly light, but they can also be dark. On her head is a plain scarf. The arms are lowered down or bent and then the doll holds in her hands a balalaika, a basket of fruit, some kind of pet or cockerel.
Physical education minute
One, two, three, four, five - they go one after another in a circle, and then we go to look for the Matryoshka dolls stop One - let's look for them at the top, hands up - look up Two - “Who is hiding below?” squats
Three - let's jump a little, jump Well, and four - stamp our feet, stomp Five - turn around once, spin around And smile at each other, hands "shelf" under the chin, shake our heads
But so that we can gather the whole family, they clap
It's time to draw nesting dolls! go to their places
Educator: In front of you, on the table, is the silhouette of a nesting doll, which you cut out in advance. We know that the nesting doll is made of wood, but the blank is white, why?
Children: because, first, the matryoshka blank is covered with starch glue and dried, and only then is it painted.
Educator: I see that you learned a lot from our guest, the artist, and remembered everything well.
- What should you draw first?
Children: first you need to outline and draw the face and hands with a simple pencil
nesting dolls, apron, hair, scarf.
Educator: what kind of face does the nesting doll have? Describe the color of the clothing details.
Children describe the nesting doll: the color and shape of the eyes, lips, cheeks, hair; color and decorative features of the sundress, apron, and head scarf.
Educator: just do not forget that the drawing must be done by lightly pressing the pencil. After you outline where the matryoshka's face and hands will be, you can paint its face. I suggest doing this with wax crayons. They will make our doll's face very gentle. But first, before such responsible work,
I need you to stretch your fingers.
Finger gymnastics
The matryoshkas walked along the path, “walking” with their fingers on the table. There were just a few of them, squeezing and unclenching their hands into fists. Two Matryoshkas, three Matryoshkas bend two fingers, then three, and another Matryoshka. raise the thumb of the other hand
up
Children draw the details of the nesting doll and paint the face. The teacher carries out individual work with individual children as necessary.
Educator: guys, after you have completed the first stage of work, we can begin to paint the sundress, shirt, apron and scarf.
- Think about what colors you will use to do this.
Children say that the painting of the traditional Sergiev Posad nesting doll uses the primary colors: red, yellow, green and blue.
The teacher invites the children to continue working, and the children color the matryoshka doll.
Educator: Children, you have finished the main work. I suggest you rest a little, and your nesting dolls will dry out a little and you can continue drawing.
Physical education minute
Friendly nesting dolls clap their hands. The boots are clapping, the nesting dolls are stomping on their feet. stomp to the left, to the right, bend to the sides, bow to everyone you know
The girls are mischievous, the dolls are painted. spinning
The children take their seats.
Educator: now you can paint the nesting dolls.
You and I already know many different ways of drawing - using different techniques and materials. Today I invite you to choose the way in which you will decorate your nesting dolls. This could be: a “poke” with cotton swabs, an impression with different stamps, “plasticineography” .
The teacher and children remember the sequence of work using different materials, and then the children paint their toys.
The teacher continues, if necessary, to carry out individual work with individual children.
Reflective stage
Educator: what wonderful dolls you made. You are real masters. What a big family Matryoshka will have now. I think she will be very happy about this.
— I really want to look at your work. Let's place them at our exhibition. Just be very careful.
Children place their works on a magnetic board and examine them.
The teacher draws the children's attention to the parcel that is on the table.
Educator: It’s time to prepare the parcel so that we can put our work there and send it to Matryoshka.
The teacher takes the parcel box.
— The parcel box has become somewhat heavy!
Shakes it easily
- Oh, there’s something there! Let's see?
The teacher invites the children to come closer and together they open the package. It contains a large matryoshka doll and a letter. The teacher reads:
“My good friends, I am grateful to all of you because I now have my own family.
You gave me happiness. Now the bad weather will go away. “Thank you!” I say - I’m giving you little matryoshka dolls!
They open a large nesting doll, and in it are sweets made in the shape of nesting dolls.
The song “Russian nesting dolls” (authors A. Yaranova, D. Knyazev) is played, and the teacher distributes food to the children.
After the lesson, the teacher, together with the children, puts all the work into a parcel and says that today he will send the parcel to Matryoshka.
Literature:
- Komarova T.S. “Lessons in visual arts in the senior group of kindergarten . Lesson notes. M.: Mosaic - Synthesis, 2009.
- Gavrilova V.G., Artemyeva L.A. “Decorative drawing with children 5–7 years old: recommendations, planning, lesson notes . — Volgograd: Teacher, 2010
| Next > |