Space crafts. How to make a rocket with your own hands
The easiest way to make a rocket for Cosmonautics Day is from a cardboard roll. In the photos below you will find a detailed master class on how to make this space craft with your own hands.
Make cuts on one side of the roll. Twist the strips into a cone and glue them together.
Use an extra piece of cardboard to make a rocket stand and engines.
Paint the rocket with paint. The space craft is ready!
Robot made of corrugated cardboard. Link
Robots made from cans
Robots made from cardboard boxes
Senior group. Senior preschool age. Children 5-6 years old
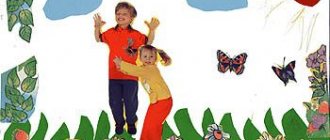
Collective application “Understanding the space of space” in the senior group
Dear Colleagues! On April 22, in our group, as in many kindergartens, we talked about Space, about its pioneers. Children read poetry and made up their own stories about Space. We decided to do a collective work on this topic. I suggested depicting the sun as solar...
Lesson notes on the application “Flight to the Moon” in the senior group Lesson notes on Artistic creativity Application “Flight to the Moon”
in the older group. Prepared and conducted by: Tokareva E.P. Goal: To consolidate children's knowledge about space and the moon. Objectives: 1. Clarify children’s ideas about the planet Moon as a satellite of the Earth. 2. Continue to teach children...
Paper application for Cosmonautics Day
A bright space-themed applique is presented in this lesson. It is made of paper. It depicts rockets that cross the infinite space of the Universe. You can do a similar craft with your children for Cosmonautics Day in kindergarten.
Offer to make it for preschool children or primary schoolchildren. The work is also suitable for collective creativity. Not only paper was used here, but also other material options, for example, foamiran, foil, cotton wool. By preparing and collecting many details, you will get the same bright specimen.
To complete the application, you must prepare:
- a set of colored paper and cardboard;
- cotton wool;
- handle;
- golden or silver foamiran;
- gold or silver foil;
- scissors;
- glue.
How to make a space applique from paper step by step
Step 1. Take paper and cardboard for work. Prepare a background of any color, for example blue. All parts must be placed on a rectangular sheet.
Step 2. Cut out the first part - the large rocket body. Use red or other paper. First draw a sketch with a pencil, then cut out along the contour.
Step 3. Start assembling, focusing on the dimensions of the parts. Glue the rocket body in the center at an angle.
Step 4. Add blue round portholes to the elongated hull.
Step 5. Glue cotton wool at the bottom to simulate puffs of smoke escaping from the nozzle.
Step 6. Additionally, cut out the blanks for the housings of the units from foil and paper of a different bright color.
Step 7. Glue the prepared parts in other places of the application. Complete the rockets with portholes.
Step 8. Glue an escaping flame to each figure from below. Cut out feather-like pieces from yellow and orange paper.
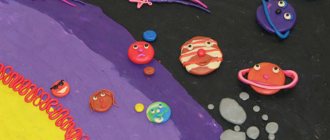
Step 9. The final stage is design. You need to simulate outer space using different bright elements. Firstly, you can cut out not only traditional stars, but also round ones; not only paper, but also silver foamiran is also suitable. Prepare figures of comets and meteorites, cut out a circle and stick it on as a planet. Draw craters and an orbit on it.
An interesting space-themed application using paper is ready. Any first grader, and even a child of the senior preparatory group in kindergarten, can handle it.
The craft is complicated by a large number of details, so I want to look at it carefully.
OD summary for application in the middle group “Rocket”
Lesson summary on application in the middle group “Rocket”
Target:
teach children to cut out shapes and glue them onto a sheet of paper.
Objectives:
- teach children to hold scissors correctly;
-develop a sense of composition in children: teach how to harmoniously place details on a sheet of paper, create a beautiful composition; - stick parts onto the surface of the sheet; - develop creativity and fine motor skills in children; - evoke positive emotions in children; - expand your horizons. Methodological techniques:
introductory conversation, demonstration of visual material, teacher’s story, physical exercises, finger gymnastics.
Materials:
black cardboard, silver rectangle, blue square, scissors, PVA glue, glue brushes, rags; visual pictures depicting space, a portrait of Yu. A. Gagarin, video “Rocket Launch”
Progress of the lesson
Flashback: Guys, April 12 is Cosmonautics Day. Do you know why our country celebrates this day? (No) - Because on April 12, 1961, a man flew into space for the first time. It was Yuri Alekseevich Gagarin, our compatriot. (the teacher shows a portrait of Gagarin) - During the launch, a flame broke out in the rocket engines, the rocket took off and disappeared into the blue sky. (video “Start of the ship”) Yuri Alekseevich was the first to see the entire Earth from space. (the teacher shows an illustration of the planet Earth from space) Play: Guess the riddle: She spread her scarlet tail and flew away into a flock of stars. Our people built this Space... (Rocket) So you and I are now going to build a rocket, but first, let's warm up.
Fizminutka
Everything is ready for the flight, (raise your hands forward, then up.) All the guys are waiting for rockets. (connect your fingers above your head, imitating a rocket.) There is little time for takeoff, (march in place.) The astronauts stood in a row. (stand up with a jump - legs apart, hands on the waist.) Bow to the right, (to the left, bend to the sides.) Let's bow to the ground. (bends forward.) The rocket flew. (jumping on two legs) Our cosmodrome is empty. (squat down, then rise.)
Now let's make some rocket appliqués. The black background is space. We will make rockets from geometric shapes. We take a silver rectangle - this is the body of a rocket without a nose - and paste it onto the background - the “night sky” is inclined at an angle as if the rocket is flying into space. Then we take the square and cut it diagonally into two triangles, leave one triangle unchanged - this is the nose of the rocket - and glue it above the body rectangle; We cut the second triangle in half into two small triangles - these are the wings of the rocket - and glue them to the sides of the body (bottom). Before we get started, let's stretch our fingers.
Finger gymnastics
In the starry sky, the stars are shining (we show the stars, fingers intertwined) An astronaut flies in a rocket (we depict the flight of a rocket: join hands at the top) The day flies, the night flies (we bend our fingers) And looks down at the ground (we depict a porthole)
Educator: Now let’s go to the tables. Let's get to work. (Children choose materials and create their own “Rockets” applications. The teacher helps.)
- Guys, look how wonderful the work turned out. How many different missiles do we have? Today, like real astronauts, we visited space. Did you like it? Children's answers.
Crafts for Cosmonautics Day. Flying saucers
It's very easy to make a flying saucer from disposable plastic or paper plates. For this Cosmonautics Day craft, select plates of different diameters and depths.
The finished flying saucer can be wrapped in foil
or paint it with silver spray paint. Don't forget to make signal lights for the flying saucer, for example, from buttons or rhinestones.
You can also make a flying saucer from an unnecessary CD and half a Kinder egg.
DIY Cosmonautics Day crafts. Starships, space stations
In this section we will tell you about one interesting way to make crafts with your own hands for Cosmonautics Day. A beautiful starship or space station can be made from waste material that you can easily find at home. Using a glue gun or double-sided tape, fasten all the parts of the craft together. Finally, paint your Cosmonautics Day craft with silver spray paint. Additional details can be painted with acrylic paints.
Here is another example of a similar craft for Cosmonautics Day. The body of the space station is made from an old aquarium filter, a wheel from a typewriter, a plastic bottle, remnants of pens and all sorts of broken toys, the wings are a cut floppy disk. Everything is covered with spray paint. Link .
If your space-themed craft made from scrap material doesn't have many small parts, you can simply wrap it in foil at the end. Look at this lunar rover made from a plastic jar and bottle caps.