November 29, 2016
Averyanova Sveta
A small child makes his first attempts to draw. He is interested in how to draw a squirrel with a pencil. You don't have to be an artist to help your child. There are special methods that allow you to quickly master the technique of depicting animals.
Using the step-by-step drawing method, you can easily depict any object on paper with a sufficient degree of similarity.
You can try to draw simple objects and animals (squirrel, fox, wolf, etc.) with a three-year-old child. Don't rush, don't criticize, and don't demand too much. If you criticize, your child may hate drawing.
Over time, if he is interested, the child himself will improve the technique of creating a drawing. With an older child, 5 or 6 years old, you can draw more complex drawings, for example, depict an animal on a tree. You can also start working with watercolors and gouache.
What do we need
For the lesson, prepare everything you need:
- sheets of white paper A 4;
- simple pencils;
- eraser;
- a set of colored pencils for coloring;
- templates of simple geometric shapes made of cardboard.
It is better to buy thick, slightly rough paper, since it will be difficult for a child to draw a squirrel on thin and smooth sheets. You can buy a soft pencil.
It’s also better to buy soft colored pencils; they color brighter, and you don’t need to press or wet them (some kids manage to put a pencil in their mouth before drawing so that it colors brighter).
Templates of geometric shapes (oval and others) are needed if the child does not yet know how to draw an oval, circle, square and triangle on his own.
The sizes of the figures must correspond to the details of the future squirrel drawing.
Painting
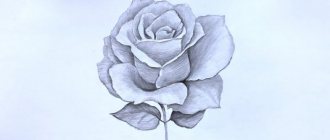
Now it’s time to add some color to the forest beauty to make it even more beautiful and realistic.
You need to prepare colored pencils and that’s it. The ears and back, as well as the edge of the tail, must be painted in rich orange. The body and legs should be painted with a lighter shade, and the tail should be painted the same color. The lightest shade should be used to decorate the ears, cheeks and fur on the animal’s paws, and part of the tail.
Such a squirrel will not leave children indifferent. They will also want to learn how to draw it, especially since it is not difficult.
How to depict
To understand how to draw a squirrel step by step for children, you need to think about why they should be interested in this? Maybe you saw a squirrel in the park on a walk, or you recently went to the zoo and fed the squirrel nuts.
Or maybe my mother read Pushkin’s “The Tale of Tsar Saltan.” The depicted squirrel should resemble the one the baby saw and be as close as possible to the real appearance of the squirrel (not a photograph, of course).
To make the drawing more or less realistic, show your child step by step how to draw a squirrel with a pencil step by step. You can draw on a sheet without templates, and give your child the shape template that he must trace with a pencil.
If the child does not want to draw pictures with templates, let him learn to draw straight lines of figures himself. Everything will not be so fast and easy, and not so beautiful, but it will be interesting! First we draw an oval. You can accompany the lesson with poetry:
We drew an oval, we didn’t know what would happen.
1. At the top there is a smaller oval - the head of an animal, of course!
Let's draw legs for the animal so it can jump on the grass,
2. We draw the tail as fluffy, like that of a fast squirrel.
Ears, eyes, nose, mouth - a squirrel came out, not a cat!
The finished drawing of a squirrel can be finalized using a simple pencil or colored with colored pencils, erasing the extra contours of the geometric shapes (circles, etc.) with which the image was drawn.
Here is a step-by-step drawing of a squirrel you should get at the end of the lesson.
If the baby is tired, do not insist that the drawn masterpiece be completed; you can return to finishing drawing the squirrel later or the next day.
Young children find it difficult to focus on anything for longer than ten minutes. Never conduct drawing classes in a bad mood.
Your child may think that it is the drawing that makes you feel bad. It is better to postpone the lesson until the child and you have a desire to engage in fine arts. Then the baby will work with pleasure, and it will be easier for him to draw.
There are other, more complex ways to draw squirrel pictures for children, but it’s better to start with the simplest.
How to draw a squirrel with a pencil
In the next lesson we will examine in detail the technique of drawing a squirrel with pencils. The work will differ in complexity from the previous examples; if you follow the instructions, you will certainly cope with the task. For work we will need:
- drawing sheet;
- soft pencil HB;
- eraser.
So, how can you draw a squirrel with a pencil step by step for children:
- First of all, you need to make sketches of the future squirrel. Let's draw the head. It will have the shape of a drop. The end should point down.
- From the head we draw the silhouette of the torso. We draw two lines and round them at the end. Add two thin ovals at the bottom and top for future paws.
- At the top of the head we draw two triangular ears. We place one in the foreground, the other behind it.
- To sketch the tail, draw an oval at the back of the body and a circle at its end. This will help further convey the complex curved shape.
- Let's move on to clarifying and drawing details. Start drawing the outline of the animal. Add zigzags to highlight areas with fur. Draw the fingers on the paws. The squirrel's front legs are very similar to human hands. Give them the shape of two ovals. You can add a triangle to the top of the brush. It will resemble a nut in its paws.
- Erase all auxiliary lines. Some contours can also be erased and fur can be added to these areas.
- Decorate the tip of the squirrel's tail. Here you need to draw long hairs, because the animal’s tail is very fluffy.
- Let's take care of the head. Draw the profile with clearer lines. Add a line for the mouth and outline the nose. Draw the middle of the ears, add fur along their contours. Shade the far ear immediately.
- The eye will be located under the front ear. Give it a round shape. Draw its features and draw a corner below. Shade the eye, do not forget that it needs to add a highlight.
- If you succeed in drawing the contours of the squirrel with a pencil, you can proceed to the design of the drawing. Add shadows at the bottom of the head and mustache. The contour of the back needs to be made more alive, add lines that will emulate growing fur.
- Paint over the nut located in the paws. Shade the hind leg with a pencil. Add shadows to the bottom of the front paw. Use broad strokes to decorate the central part of the body and the hind leg. Add a few details to the tail and carefully paint the rest of the space gray.
The drawing is ready. You have learned how to draw a squirrel using one simple pencil. But megamaster.info recommends not stopping there and trying to paint the next picture.
The simplest squirrel for children
If a novice artist wants to draw a squirrel, then he should use the simplest step-by-step technique. To do this you need to prepare:
- Simple pencil;
- Elastic band;
- Paper.
If everything is ready, then we proceed directly to drawing the animal:
- We start the drawing from the muzzle - draw a smooth line, add an ear in the form of a triangle and move on to the back.
- We draw the inside of the ear and nose, which is also depicted in the shape of a triangle. In the right place we place a slightly elongated eye with a pupil.
- We depict cheeks. To make the drawn line resemble fur, it must be drawn in a zigzag. Add a mouth between the top and bottom of the cheeks.
- Directly under the muzzle we draw the front legs, placing them one after the other.
We draw a zigzag line along the bottom of the paws. - We draw the squirrel’s hind legs, which should have a rounded shape at the top, and a flattened oval shape at the bottom. Create fur on the paws;
- We depict a fluffy tail using zigzags. It should start from the hind legs and go behind the back.
You can finish drawing the branch and move on to coloring. Younger children can only choose one color. And if a drawing lesson is held in an older group, then you can use several shades of orange.
What do you need to paint with watercolors?
Of course, it’s worth getting creative, and you also need to prepare some materials. To draw a squirrel, children need to take:
- paints;
- you will also need a very ordinary pencil;
- eraser;
- brushes of different sizes, but you can get by with just one;
- of course, paper, on which the squirrel will subsequently appear.
When these materials are prepared, you can proceed to the next step; step-by-step instructions are provided for this.
Draw a squirrel with a pencil
To draw a squirrel using only a simple pencil, you need:
- Prepare a base consisting of two equal circles, which should touch each other and resemble a tilted figure eight.
- From the point where the circles touch, draw a curved line (this will be the upper part of the thigh), and on the opposite side of the lower circle, draw a shorter line that will contact the tail.
- From the upper circle create a squirrel's muzzle and front legs with claws, add ears on top.
- Using a wavy line, form the curve of the back.
- Draw an eye, a nose and a slightly noticeable outline of the mouth on the head.
- Add a tail and remove unnecessary lines with an eraser.
All that remains is to “dress” the animal in fur, which is created using thick strokes. You can “give” a nut or other treat to the paws.
Forms of organizing drawing on an animalistic theme in the middle group
In long-term planning for visual activities for the middle group, the animalistic theme is presented in close connection with modeling. So, in the second semester, children sculpt a baby goat and then draw it. The same procedure applies to the “Homeless Hare” theme.
In addition, the work plan includes drawing on the following topics:
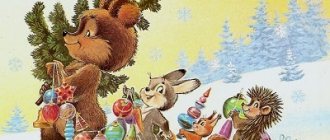
- “Bear” - can be in the form of a drawing of a character from your favorite cartoon “Masha and the Bear”;
- “Teddy Bear” - drawing from life (using a toy as a model);
- “Three Bears” - creating illustrations for a fairy tale;
- “Hedgehog” - based on the fairy tale by V. Suteev “The Magic Wand”;
- “Squirrel”, “Fox” - drawing according to plan (children remember the characteristic features of the animal’s appearance and depict it from memory);
- “Squirrel with a mushroom” - plot composition;
- “Cheerful Puppy” - based on S. Mikhalkov’s poem “My Puppy”;
- “Dog in a booth” - plot drawing;
- “Sister Fox and the Gray Wolf” - based on a Russian fairy tale;
- “The Three Little Pigs” - illustration for a fairy tale;
- “Wolf” - drawing characters from the fairy tale about Little Red Riding Hood;
- “Giraffe”, “Porcupine” - consolidation of material on familiarization with the environment on the topic “Exotic animals”.
In addition to individual work, the teacher can organize group drawing. Children are divided into groups of 4-5 people, each receives the task of depicting one animal, for example, a cow for the composition “Farm” or “Summer in the Country” on a silhouette of an animal cut out by an adult. After the teacher explains the algorithm of work, the children color the template and glue it onto an A3 size substrate. The teacher controls the correct arrangement of the elements. Children who have good drawing skills complete the elements of the environment: a fence, lawn, houses, etc. Alternatively, kids can draw animals as illustrations. For example, to the fairy tale “Wintermovie”.
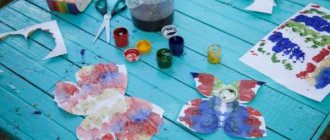
Photo gallery: examples of collective work
Collective compositions can be created using non-traditional techniques, for example, drawing elephants and giraffes with palms
An option for designing a collective composition with polar bears could be tracing the contours and coloring the templates with semolina
An option for collective drawing could be a composition template with exotic animals, which children color
Development of notes for a drawing lesson in the middle group
The drawing lesson includes three stages of working on the topic:
- introductory - up to 3 minutes - the teacher motivates the children to work, that is, updates their knowledge on the topic;
- main - up to 12 minutes - the teacher describes the procedure for completing the task, the children draw, to relieve muscle tension in the middle of the creative process, finger exercises and/or physical education are performed;
- final - up to 3 minutes - the teacher organizes a spontaneous exhibition of works, praises the kids for their drawings, children evaluate their works according to the “like/dislike” criterion and try to say why.
Table: Antonova M.V. Summary of a drawing lesson on the topic “Kitten” in the middle group
| Stage | Content |
| Introductory | Educator: - Guys, a guest came to us today, he asked not to name him. He wants to play the game “Recognize by Voice” with you. Let's try to recognize our guest? I turn on a recording of the cat's voice. A cat appears. Educator: (on behalf of the cat) - Hello, guys! Let's introduce ourselves, my name is Dymok. (Children say their names.) Teacher: (on behalf of the cat) - I came to you today for a reason. I want to ask you for help. My cat friends have a birthday soon. I wanted to please them, to draw them holiday cards with my friends on them. But I have many friends, but little time. Maybe you guys can help me? Educator: - What, guys, should we help Dymka? (Yes, we will help.) Educator: (on behalf of the cat) - Thank you very much for not refusing my request. Educator: - Smokey, but we don’t know what your friends look like. Educator: (on behalf of the cat) - I have photographs of them. Look! I place pictures of cats with different colored fur on the easel. Children look at the “photos”. |
| Basic | Educator: - Guys, go to the tables and choose pictures with pictures of kittens. Children sit at tables and choose coloring pictures. |
| Educator: - Guys, so that the fur of our kittens is fluffy, we will paint with a glue brush. Touch it, what does it feel like? (Hard, solid, rough) Educator: - Guys, look at how we will draw the kittens’ fur. We hold the brush correctly, the handle of the brush should be directed upward, the movements should be jerky. First, we use a poke to draw the shape of the cat along the contour, then, using a poke, we paint over the entire body of the cat. We put a little paint on the brush. When the cat is painted with a soft brush, you can complete the postcard as you wish. It could be: the sun, grass, flowers, sky, butterfly. Do you guys all understand how to draw? Then start drawing. Children draw, the teacher controls the drawing process, helps children in need. | |
| Final | Educator: - Guys, Dymka liked all your cards. And as a farewell, he wants to play the game “Cat and Mice” with you: Children stand in a circle, holding hands. The teacher sits on a chair in the center of the circle with a cat toy. Children walk in a circle and say words. The mice are dancing in a circle, The cat is dozing on the bed - Quiet the mouse, don’t make noise, Don’t wake Vaska the cat! When Vaska the cat wakes up, he will break up the whole round dance! The cat catches up with the children, the children run away to the chairs. |
| Quote from: https://ped-kopilka.ru/blogs/marija-vasilevna-antonova/konspekt-nod-po-risovaniyu-v-srednei-grupe-kotenok.html | |
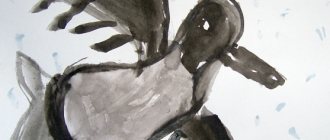
Video: open lesson on drawing with a poke on the theme “Bear” in the middle group
Abstract of the educational activity "Wild animals" Abstract of drawing "Squirrel"
Elena Timoshenko
Abstract of the educational activity "Wild animals" Abstract of drawing "Squirrel"
Senior group Theme " Wild Animals "
Abstract drawing " Squirrel "
consolidate and expand children's knowledge about protein (appearance, nutrition, behavioral characteristics to changes in the environment).
Learn to hold a pencil correctly;
a squirrel’s appearance .
Develop accuracy and neatness when working. The ability to bring something started to completion.
Foster a love of nature and respect for animals .
View the multimedia presentation “ Animals in Winter ”
, conversations about preparing
animals for winter .
Examination of illustrations and albums on the topic: “ Animals in winter ”
, compiling stories based on pictures.
Conducting didactic games “Who lives where?”
,
“Who eats what?”
,
Reading the works of V. Bianchi “Getting ready for winter”
and
"Teddy Bear
"
M. Prishvina “Squirrel Memory”
,
learning by heart the nursery rhyme “ A squirrel is sitting on a cart... ”
.
Handout. Sheets of paper with " Squirrel "
, colored pencils, wax crayons, photo illustrations or pictures of
a squirrel , poster “
Wild Animals of the Forest ” .