How to draw a weeping birch tree in the fall with your child step by step
Content
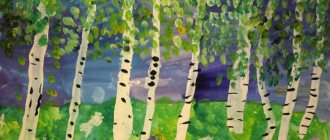
There is no more useful and enjoyable activity for children than drawing objects they know. In today's drawing lesson we will depict a small beautiful birch tree with autumn leaves. This is the easiest way for children in the older group, first graders or children who have moved to 2nd grade. Our birch tree is somewhat reminiscent of a fairy tale. Shall we draw?
1
Birch trunk
Thicker at the bottom, pointed at the top.
2
Bark
Most often it is white with black strokes.
3
Main branches
The branches growing on the trunk form the lush crown of the birch. One by one we draw a branch.
4
small twigs
Draw thin branches on the main ones that are lowered down.
The main branches grow upward, the small ones hang down.
5
Correcting the contours
We add volume to the main branches.
6
Add black
Use a simple pencil or black pen to shade the spots on the white bark. Draw small branches.
7
Leaves
A birch leaf resembles a small heart. Draw larger leaves on the lower branches and smaller leaves on the top. Leave the topmost branches without leaves, do not forget that we are drawing a tree in the fall. At this time the leaves fall.
8
Coloring
You can color with colored pencils or paints. Now you have learned how to draw another tree that can complement any autumn landscape.
You can do this online.
Choose how you want to paint.
9
Collage
Step by step instructions on how to draw a Russian birch tree.
If you see an error, please select a piece of text and press Ctrl+Enter.
evrikak.ru
Drawing a winter birch - Wise Owls
Drawing a winter birch
We have already drawn an autumn birch, now I propose to draw a winter birch . Why birch? Well, maybe because birch has very pronounced characteristic features that are easiest to convey to young children in their creativity. The article “Drawing a winter birch tree” was moved from my blog “My WunderKinder”.
Children over five years old can handle the work using the technique below. If your child loves to draw or nature has endowed him with artistic abilities, then you can offer to draw a winter birch tree for a younger child.
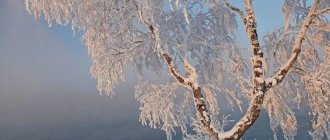
Observation of a winter birch
Before we start drawing, let's observe the winter beauty. It is best to choose a day when the trees are covered with snow. If you have the opportunity to go to the park on such days, you get the feeling of a fairy tale. Fairy-tale beauty - pay your baby’s attention to this expression. After all, our children themselves still stand outside our adult reality and the fairy tale is part of their childhood consciousness.
Such an observation can greatly excite a child’s imagination. Let him dream as much as he can, listen. Suggest that you imagine that you are in the winter kingdom of trees. Every tree is alive and has its own kings and princesses. Everything you dream up next depends on your baby and a little on you.
And of course, don’t forget that our main goal is to observe the birch tree . If you can’t go to the park or you’re unlucky with snow-covered trees, then you can always look at a photo with a winter birch tree.
We carry out observation by analogy with observation of birch trees in autumn, taking into account seasonal changes. If you conducted observations in the fall, you can ask your child the following questions: what has changed, at what time of year the birch liked it more and why. Read, or better yet learn, S. Yesenin’s poem “White Birch”.
The white birch tree under my window is covered with snow, like silver.
On the fluffy branches, like a snowy border, brushes blossomed like a white fringe.
And the birch tree stands in sleepy silence, and snowflakes burn in golden fire.
And the dawn, lazily going around, sprinkles the branches with new silver.
Preparing to draw a winter birch tree
You and I will need to prepare a blue-tinted album sheet in advance and make sticks with foam rubber at the ends.
Toning of the album sheet . To tint, we need to dilute blue gouache with water in a small container until the desired shade is obtained. Then we moisten a dishwashing sponge in diluted gouache and rub it across the landscape sheet without pressing. Then let the sheet dry completely. You can prepare 2-3 sheets in case your child is unable to draw a birch tree right away.
We make sticks with foam rubber . We will need a pencil, an old thin brush and a foam sponge. Cut off one fourth of the sponge and tie it to a pencil with threads. The other tampon should be smaller. Cut the other piece in half in thickness and also attach brushes without bristles to the wooden tip.
Drawing a winter birch tree
You will need: white gouache, black gouache, a simple pencil, an eraser, a squirrel or kolinsky brush No. 2, pre-prepared foam swabs and a tinted album sheet. Instead of a tinted sheet, you can use a blue sheet for the printer.
We start drawing a birch tree with a pencil sketch. How to do this is described in detail in the article “Drawing an autumn birch tree.” My son doesn't draw well, so I made a pencil sketch for him myself. He drew everything else himself. Well, or almost independently.
After the pencil sketch is ready (perhaps with your help), we take a brush, white gouache and paint the trunk and thick branches white.
Now we need black gouache. The child’s task is to outline the birch trunk with black gouache, draw thin branches and horizontal stripes on the trunk. The line should be as thin as possible. A thin line can only be obtained when drawing with the very tip of the brush. Invite your child to practice on a rough draft. Try drawing rough lines at different angles with your brush. Determine at what angle the line is thinnest.
While you are practicing, the drawing will dry out and you can continue drawing your birch . After the child finishes tracing the birch tree with black paint, you need to take a break. Invite your child to do physical exercises. a minute and finger gymnastics. For example:
Our scarlet flowers (Clench your fingers into fists and gradually open them) Bloom their petals
Our scarlet flowers (Gradually clench your fingers into fists) Close the petals
Repeat 2-3 times.
If the baby agrees, then you can continue drawing the birch . If he is tired, then you can finish the drawing later or the next day. All we have to do is finish drawing the snow cover. For this we need white gouache and foam swabs.
Using a thick swab we draw the snow cover under the birch tree, and with a thin swab we will cover the birch branches with snow. Covering branches with snow is a difficult and painstaking task for a child. Support your child with gentle, encouraging words. In general, make it a rule to talk a lot with your baby during your joint creativity. Encourage him, advise, suggest, and also do not forget to be interested in the opinion of the artist himself.
The technique for working with foam rubber swabs is simple: put paint on a foam rubber swab, test on a rough piece of paper to see if too much paint has accumulated on the swab. If everything is in order, we begin to apply paint over the branches of our birch tree. The less water there is on the swab, the more natural the snow will be. Do not press the tampon too hard onto the sheet of paper. The pressure should be light and short.
So our winter birch tree . Really, beauty?
See you again and good luck with your children!
podgotovichka.ru
MAGAZINE Preschooler.RF
State budgetary educational institution of Moscow "Gymnasium No. 1519" Summary of an open lesson on teaching drawing to preschool children Prepared and conducted by: teacher Samoshkina Elena Gennadievna Moscow 2014 Summary of a lesson on teaching drawing to preschool children. A number of studies devoted to the study of the developmental characteristics of children with mental retardation have noted specific developmental features that complicate the formation of visual activity. Such a disorder is characterized by a lag in the development of the emotional-volitional sphere, higher mental functions, motor sphere, and a decrease in the child’s knowledge and ideas about the world around him. Among such features we can highlight: the qualitative-dynamic originality of gnostic processes (slowing down the reception and processing of sensory information) and underdevelopment of the visual-spatial function; some features of psychomotor development (impulsivity, emotional instability, increased fatigue and exhaustion); lack of sensory integration and coordination makes it difficult to recognize objects and connect individual parts of a picture into a single semantic image; lag in motor development due to problems of muscle tone, immaturity of movement technique, lack of motor qualities, dysregulation of voluntary movements; decrease in the volume of short-term and long-term memory; disadvantages of the voluntary sphere (difficulty concentrating, switching attention, maintaining a task, working according to a model and instructions); general decrease in motivation for activity. Having considered the above-mentioned features of the development of children with mental retardation, it becomes clear that this work should be built using methods of correctional pedagogy and be purposeful. An important feature of teaching children with mental retardation is an integrated approach, which should include several areas: - diagnostic study of the child upon admission to the group to establish the characteristics of his development, clarify his starting capabilities and determine the learning conditions adequate to the structure of the disorders; establishing feedback with the pupil’s family for the purpose of consulting and collecting additional data about the child; interaction with a neurologist (psychoneurologist) to monitor health status; organizing classes according to a combined principle in such a way that several diverse tasks of development, education and training are solved within the framework of one lesson; conducting differentiated training, preliminary individual assistance before group classes, differentiation of assistance within the group; building training on a concentric principle; use of game motivation in all classes; control of psychophysical load both in intensity and duration, and in the sequence of presentation of tasks (intellectual and motor load, phases of active work and relaxation). When teaching children with mental retardation of preschool age, it is important to take into account their age and specific characteristics; the leading role in training should belong to the teacher. Theme “Autumn Birch” (preparatory group) Program objectives: continue to teach children to understand the content of the story. To develop children's attention and observation skills. Activate children's speech with figurative expressions and comparisons. Practicing the skill of question-and-answer speech. Practice relieving tension and being able to relax. Educational work. Learn to convey in a drawing the characteristic features of a birch (white trunk with black spots, thin curved branches, light crown), autumn color of foliage; teach the correct methods of using a semi-dry hard brush when drawing vertical strokes to depict foliage and horizontal strokes to depict black spots on a birch trunk; consolidate the skills of drawing thin curved lines with the end of a brush; through riddles, illustrations, drawings, to form in children’s minds the image of a slender white-trunked birch. Material. The teacher has an illustration with a picture of a birch, a sheet of paper to show individual methods of depiction, two brushes - soft and hard, and paints. Children have blue paper of saturated color in the form of an elongated rectangle, additional sheets of white paper for exercises in drawing thin lines and different ways of working with a hard brush; soft and bristle brushes, gouache paints. Progress of the lesson. The teacher hangs an illustration with a picture of a birch with the back side facing the children and says: “In this picture there is a tree that we will draw. But we’ll look at it after you guess two riddles about it.” A Russian beauty is standing in a clearing in a green blouse and a white sundress. When the children name the answer, he asks: “What is the name of the birch tree in this riddle? Why is she called a Russian beauty? What is the name of the birch tree's green blouse? What about a white sundress? Now listen to the second riddle: Alena is standing: green scarf, slim figure, white sundress. This riddle indicates another sign of birch - “thin figure”. What do you think is meant by these words? (A thin, tall trunk.) And what beautiful girl’s name is the birch tree in this riddle? Why is the birch tree often compared to a slender, tender girl in riddles, poems, and songs?” The teacher shows an illustration of a birch tree and asks the question: “What kind of birch tree did the artist depict?” List together with the children all the features that they will reflect in their drawings: a white transparent trunk with black spots, thin curved branches, a translucent crown with yellowed leaves. He says: “Today you will draw an autumn birch tree as the poet depicted it in his riddle poem, as you saw it on a walk. And in order for it to turn out like this, you must first learn to depict some of its parts on a white sheet of paper. Let's start by drawing thin, flexible, curved branches, tilted in different directions." The teacher shows and explains how to draw the branches of a birch: “Like other trees, the branches grow upward from the trunk, but then smoothly round and fall down.” He suggests using the end of a soft brush to draw several branches inclined to the right and left. The exercise can be done under the words “up, and round, and down” (pronounced drawlingly). Then the teacher exercises the children in depicting foliage using a vertical stroke with a hard brush. First, he shows how to take a little green and yellow paint, wipe off the excess on newsprint, and with quick movements, holding the brush vertically to the paper, paint the foliage so that the gaps between the strokes are visible. The next exercise helps children master the technique of drawing strokes with a semi-dry hard brush to depict spots on a birch trunk. He suggests looking at the illustration of a birch again and starting drawing. In the process of drawing, if necessary, it resembles the techniques of depicting a trunk, starting to work with the tip of the brush and gradually lowering it to a flat position. Asks about the length of the branches at the top and bottom of the tree. The color of birch foliage at the beginning of autumn may be partially yellow. Draws children's attention to the outlines of the birch crown. The teacher encourages children for making interesting additions to the drawings. He asks if it is possible to depict the grass under the birch tree with strokes of a hard brush. At the end of the ringing, the teacher encourages all the work and makes another riddle about a birch tree and suggests finding among the pictures the one that best matches the description: Wearing a white sundress, we stood in a clearing. The tits flew and sat on their braids. He asks which birch tree has braids - long hanging branches. Then several more drawings are examined in order to “find a birch tree that can be compared with a slender Russian beauty.” The teacher notes drawings with interesting additions that enrich their content. Relaxation exercise. a) “Fists” b) “Let’s inflate a balloon” c) “Magic dream”| Next > |
How to draw a birch » Prostoykarandash.ru
1. Draw a vertical center line indicating the birch trunk. We mark with a short horizontal stroke the place where the tree trunk branches into three main branches. We outline the main boundaries of the future image in the sheet: we draw inclined lines tending upward, along the movement of the plant’s growth, on the right and left, limiting the main group of branches at the top of the composition and at the bottom - at the extreme points of the hanging branches.
2 . How to draw a birch tree, focusing on the upper inclined lines, from the intended point on the axis of the trunk we draw light dashed lines that determine the directions of the three main branches.
3. On the main center line we mark the places where the birch trunk branches and the branches on the axes of the lateral branches. We easily and airily outline the thickness of the tree trunk and its branches, paying attention to their proportions relative to each other. We mark the location in space of additional, thinner branches with lines corresponding to their shape and movement.
4. How to draw a birch : checking with nature, on the center lines of the branches we mark with horizontal strokes the places where the birch branches branch into thinner branches. We outline the width of additional branches on the side branches of the tree.
5. From the places marked on the axes, draw the initial shape of small branches. We determine their location in space with straight, light strokes in the direction of their rhythmic movement.
6. How to draw a birch : draw the shape of small branches more softly, noting their thickness and emphasizing it in shadow places. Using smooth strokes we show the places of branches on the trunk and main branches of the tree.
7. Consulting with nature, we emphasize the plasticity of the trunk and branches of the birch, the branches in the foreground, with clearer strokes and lines, thereby revealing the original volume of nature.
8. On the trunk and branches, we mark the places of elements (spots) characteristic of birch on the tree bark with light dotted strokes.
9. How to draw a birch : along the trunk and branches of the birch - with light shading in the foreground and shading in the background - we outline our own shadows.
10. We emphasize the three-dimensional shape of the trunk and branches of the tree, enhancing the deeper shadows on the surface of the bark, emphasizing the places of branches.
11. Using light strokes we outline the birch leaves, combining them into a common mass and without specifically drawing each one separately.
12. at the last stage of how to draw a birch , we enhance the contrast of plans: we emphasize the foreground (branches, foliage) and soften the background, slightly shading and generalizing the image. Using chalk strokes we emphasize the whiteness of the surface of the birch bark in the illuminated part and highlight more clearly the characteristic black spots on the surface of the trunk, branches and twigs of the tree.
source: https://www.drulber.ru
Attention! You do not have permission to view hidden text.
prostoykarandash.ru
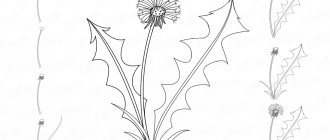
How to draw a birch leaf with a pencil step by step
Drawing lesson on how to draw a birch leaf, a birch leaf with an “earring” with a pencil step by step for beginners.
Here is our original.
First we draw a straight line, which is located in the middle of the sheet, then with very thin lines we draw this shape. Only then do we make the edges uneven and erase the previously drawn contour curves.
Now we draw the veins on the leaf and the outline of the earring in a very light tone.
Next, use very tight circular movements (curl method) to fill the entire space of the earring. Shade the leaf and the birch leaf drawing is ready.
See more lessons:
1. How to draw a maple leaf.
2. How to draw an oak leaf.
3. How to draw an acorn.
www.lesyadraw.ru
How to draw a birch leaf
Let's now look at the stages of drawing a birch leaf . Although it is not so often that you have to draw a birch leaf. But you also need to be able to depict a sheet correctly and beautifully on a sheet of paper. It even seems to me that the birch leaf is the easiest to draw.
After all, the leaf plate is shaped a little like a heart, and even a small child can draw a heart.
Therefore, there will not be much trouble in drawing a birch leaf. The main thing is to draw the sheet step by step ( step by step ).
- We will draw three leaves on one petiole. We draw a branched petiole, and on it leaves, which should resemble a heart in shape. After all, birch leaves are heart-shaped.
- After this, we round off the leaf sections and add cloves to these sections.
- And on the very main vein of the leaf we draw a few more veins.
That's all there was to it. Now you have not only learned to draw a birch leaf, but also learned that a leaf consists of petioles, a leaf blade and veins. And you already know that the birch leaf is heart-shaped. And the shape of the edge of the plate is jagged. Remember one more simple thing: the birch leaf has pinnate-reticulate veining. After you have drawn a leaf and at the same time studied its structure, start coloring. Take watercolors or colored pencils and finish your work.
www.stranainform.ru
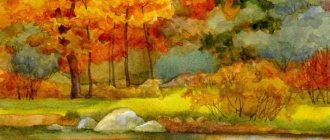
Drawing a birch tree in pencil for children in spring, master class + photo
This MK is designed for school-age children who decide to get creative by depicting a birch tree in the spring. Unlike the first option, this one involves an image of one curved tree with branches leaning down and bright green leaves growing on them, which have not yet become saturated.
The meaning of step-by-step work is to carry out all the instructions step by step. The diagram with a photo includes drawing a tree and leaves, as well as coloring it.
Drawing a birch from life
I have two lessons on this topic, and I will divide the topic into two articles so as not to overload with pictures. Therefore, read and learn to draw a birch tree using both.
How to draw a birch tree?
The answer suggests itself: from nature!
Moreover, I already drew and told you how to draw a poplar. Then I became very enthusiastic and was ready to move mountains. Or rather, draw forests. Which tree will be the next hero? Birch of course! “What Russian person doesn’t like birch trees?”
Where can I find a suitable beautiful birch tree? Was there a birch tree in the field? It turned out that near our city the fields are flat and there are no trees. You also walk in the forest - you look out... There seem to be white trunks in the distance, you approach - these are alder and aspen. The excursion into the forest was wonderful, but I didn’t find a birch tree. Okay, the city is full of them.
I have always been proud of our green city, but now, when I began to devote walks to finding interesting and beautiful ones, I realized that our city is not just green, but also very dense. Birches grow both together and apart, but not alone, but always in a row of other trees. All the streets are like a park. But to make it clear and beautiful, you need to choose a single tree, and best of all against the sky. Well, two such birch trees were found, thank God.
But keep in mind that you need to draw in the city, there are a lot of people around. And man is an inquisitive creature. It’s not so easy to sit alone on a folding chair and concentrate on drawing a tree (and even periodically photograph the picture), if people come up and are interested. However, my birches did not grow in the park and the people did not walk past idlely, no one asked me to draw their portrait, they just looked at my picture and praised me (thanks to them).
I appeal to all my readers: if you see a person who draws from life, then think, maybe he is shy for the first time and (probably, you shouldn’t bother him - attention is a flattering thing, if you are a seasoned artist and have already developed aplomb. And from unaccustomed the artist is very uncomfortable under the gaze of strangers. Well, you understand what I mean.
But let's move on to the first lesson.
First, we mark the trunk and large branches with a pencil. We outline the shape of the crown and then use large strokes to detail it.
Now who cares, I will continue to draw with a felt-tip pen. Although in the song the birch tree is called “curly”, depicting foliage, as is often customary for children with curls, is of course dishonest.
The birch crown is quite loose and the leaves do not merge into one mass. We will show you in detail.
In the light the foliage is simply green, but in the shade it is almost black. Things like this: in spring the leaves are light and fresh, but now summer is in full swing.
This is how the first birch turned out. And now I invite you to the second lesson “Drawing a birch 2”.
Marina Novikova told you how to draw a birch.
Tags: how to draw trees, drawing a tree, drawing lessons step by step
Summary of a drawing lesson in the preparatory group “Birch in Autumn”
Drawing lesson in kindergarten “Birch in autumn” step by step with photos.
Preparatory group Author: Andreeva Irina Emelyanovna, teacher, MADOU Kindergarten No. 9 “Alyonushka”, Birsk. Description: this master class is intended for preschool children, additional education teachers, and parents. Purpose: the work can be used as interior decoration or a gift. Intended for use by children aged 6 years and older. Goal: to strengthen children’s skills in drawing a birch tree. Objectives: - To consolidate children’s ideas about the signs of autumn; — Teach children to convey impressions of autumn in a drawing; - Cultivate accuracy, perseverance, cultivate love for native nature. Materials: palette, brush, glue, felt-tip pens, glass of water, napkin, orange cardboard, gouache, paper, scissors, birch tree template.
Progress of work
Organizational moment Guys, someone threw a letter through our window. Look at the letter. Maybe it’s a ray of sunshine. What tickles our face. Maybe it’s a sparrow. Dropped it while flying? Educator: Guys, do you want to know who wrote the letter to us? Educator: (reads the letter)
Hello guys! The forest boy is writing to you.
I want to ask you
a riddle , try to solve it. The field is empty, it's raining. The wind blows away the leaves. Fog is creeping in from the north, menacing clouds are hanging. Birds move south, barely touching the pine trees with their wings. Guess, dear friend, what time of year is it? -...
Children: autumn.
Educator: what signs of autumn do you know? Children: the sun rarely shines, birds fly south, the days get shorter, it rains often, it gets colder, animals stock up on supplies for the winter, animals change their coats. Educator: what happens to the trees in the fall? Children: leaves turn yellow, leaves fall off.
Educator: That's right. Leaf fall is an amazing and very beautiful natural phenomenon! In autumn the leaves change colors. And autumn trees dress in colorful, bright outfits. The first frosts arrive and leaf fall begins. This happens in September or October. Fallen autumn leaves cover the ground like a carpet and warm it in the cold winter. Lesovichok: I have another riddle . In a white sundress she stood in a clearing. The tits flew and sat on their braids.
Children: birch.
Educator: That's right, guys, this is a birch tree. She can be found everywhere, she is the first to populate new places and decorate the forest with lacy crowns. But the forest, consisting only of birches, is especially beautiful. Who knows what this forest is called? Children: birch grove.
Lesovichok: I really want to visit a birch grove. Educator: Lesovichek, now our guys will draw you a birch grove and you can take a walk there. Lesovichok: I’ll be only too glad. Fizminutka Birch trees have grown in the field It’s good to grow in the field! (Stretching - arms to the sides)
Each one tries, Reaches towards the sky, towards the sun.
(Stretching hands up)
A cheerful wind blew.
The branches began to sway immediately. (Children wave their hands)
Even thick trunks.
They bent down to the ground. (Hands on the belt, squat)
Right, left, back, forward.
This is how the wind bends the trees (Tilts to the right and left)
He turns them, he turns them.
When will there be rest (Rotation of the body)
The wind died down.
The moon has risen. There was silence. (They lower their arms to their sides)
Educator: guys, let's draw a birch tree. Educator: We’ll make a birch tree like this.
We will need: a palette, a brush, glue, felt-tip pens, a glass of water, a napkin, orange cardboard, gouache, paper, scissors, a birch tree template.
Use a black felt-tip pen to draw a birch trunk
Cut a birch trunk along the contour
Glue the birch trunk onto the orange cardboard
Prepare yellow gouache
crumple the paper
Dip paper into yellow gouache
Apply gouache to the birch with a poke
You need to apply yellow gouache at the birch root
The work is ready!
Finger gymnastics Here are the trees: Maple, rowan, linden, Oak, birch, elm, Ash, poplar, spruce, fir, We meet you in the forest. (Children show the palms of both hands with their fingers unclenched. When listing the names of trees, children bend their fingers first on one and then on the other hand)
Independent activity of children (individual assistance). Lesson summary Teacher: how beautiful your birch trees turned out. Well done.
Educator: what is the name of the forest where only birches grow? Now Lesovichok will be happy to walk in the birch grove. You can also make autumn trees in other colors.
Autumn trees decorate our group’s corner of nature.
Presentation on the topic: Birch in autumn
We recommend watching:
Synopsis of a comprehensive lesson for children of the preparatory group on the topic: Autumn Synopsis of the educational instruction in drawing for children of the preparatory group of a preschool educational institution. Autumn rowan GCD on cognitive development in the preparatory group on the topic “Autumn” Summary of SOD in the preparatory group on the topic: Autumn
Similar articles:
Scenario of the autumn ball in the senior preparatory group of the preschool educational institution
Summary of an autumn walk in the preparatory group “Observing a sparrow in autumn”
Summary of an autumn walk in the preparatory group “Observing pigeons”
Summary of a walk in the preparatory group “Observing a poplar”
Summary of the walk in the preparatory group “Observing seasonal changes in November”