Paper plate craft
How to make such a bird craft? Disposable plates are taken. They are painted with the necessary paints and eyes are drawn on their surface, and a paper beak is also placed. The bird's wings and tail are best cut out of paper or made from real bird feathers.
You can also stretch a thread near the bird’s eyes, by which you can hang it, for example, on a chandelier, to then take wonderful photos of the bird’s crafts.
Crafts addition
So that the craft does not seem empty, you need to create the right environment for the birds. For example, for a chicken craft, you can create scattered food around it.
To imitate it, real seeds glued to the base of the craft are perfect. However, gluing small parts is a very painstaking job that requires maximum care.
In addition, working with small parts is not recommended for children under 3 years of age without parental or teacher supervision.
You can also create a small house, make grass, sun and clouds. You can add virtually anything, the child must imagine the environment himself, there is no need to interfere with his creative impulses.
It only makes sense to guide him, telling him how to correctly make this or that detail for his craft.
Creating a house
The simplest thing would be to make one or more small bird houses in the background. To do this, you first need to cut out a square or rectangle that will serve as the base.
Next, you need to make a roof; for this, a triangle is cut out in size suitable for a square or rectangle. Its color may differ from the base, at the request of the child.
All this is glued to the base of the craft using a glue stick. Next, you need to make windows; for this, small squares are cut out of white or blue paper, which are then glued to the walls of the house.
To make frames, you can draw classic crosses on top of the window blanks with a pencil or felt-tip pen. All that remains to be done is the chimney, an integral attribute of village houses.
For this purpose, you need to cut a small strip from the same paper from which the roof was cut. Next, you just need to glue it to the roof in any place where it will be most convenient.
Application "Firebird"
To create such a craft, you will need pre-dried leaves of trees (linden, rose hips, birch, oak, etc.) of various colors, as well as large seeds, for example, pumpkins. Linden and birch leaves are glued onto a sheet of cardboard, which will serve as the body and head, respectively.
A fluffy tail is made from rosehip leaves; you can also add a small tree branch for a strong base. The seeds form the eyes and small details of the craft.
A tuft from some branch will help to completely decorate the “Firebird”. You can safely send this bird craft to an exhibition in a kindergarten.
How to make notes for a lesson on application
The lesson on the applicative type of art creation includes three stages:
- introductory to familiarize yourself with the topic, appeal to the experience of children - up to 3 minutes;
- the main one for carrying out preparatory work, preparing materials and tools, completing tasks and physical education for 10–15 minutes;
- the final one for assessing children’s work and reflection - up to 3 minutes.
Table: Kasatkina M.V. lesson notes on appliqué (work in pairs) on the topic “Birds on a branch” (fragments)
| Stage | The essence |
| Introductory | The teacher holds a book in his hands and invites the children to come up (the children stand in a semicircle around the teacher). - Guys, there is a riddle about a bird hidden in this book, listen carefully, I’ll read about it to you now, try to guess who we are talking about? … > |
| <… The teacher puts a picture of a titmouse on the easel. — Guys, is the tit a migratory or wintering bird? Children give the answer and prove it. - Look at what a wonderful tit flew in and sat on a branch (shows a sample). | |
| Educator: - Guys, it’s easier for both animals and birds to overwinter when they are together, so let’s not leave our tit alone and place a whole flock with her. - Tell me what the bird has? Children name the components of the bird's body. | |
| Basic | The teacher displays a mnemonic table on the easel depicting the sequence of carving a bird. - Guys, there are geometric shapes of different colors and sizes on the tray, let's tell you what parts we will cut out the tit from (from a black square - the head, from a yellow rectangle - the body, from a black rectangle - the wing, small parts - the tail, the eye and beak are already ready, you will finish drawing the bird’s legs with a pencil). If necessary, the teacher shows ways of working. |
| - Before we start work, we will rest. Children stand in a circle. Finger gymnastics “Flock of Birds” is carried out. When naming birds, bend your fingers. Sing, sing along, ten birds are a flock. - This bird is a nightingale, this bird is a sparrow. This bird is an owl, a sleepy little head. This bird is a waxwing, this bird is a corncrake. This bird is a little gray feather. This one is a chaffinch, this one is a swift, this one is a cheerful siskin. Well, this is an evil eagle. Birds, birds, go home! (Clench your fingers into fists.) | |
| The teacher removes the sample. — Guys, you will again do the work in pairs, so help each other, consult. Don't forget that before gluing, you should first place the birds on a branch. And please be careful with scissors, and our magic helper table will remind you how to work with them. The teacher sets up a mnemonic table “Working with scissors.” | |
| - Now get to work. Children perform the appliqué in pairs, the teacher helps, controls the children, helps. | |
| Final | At the end of the work, the teacher offers to clean his workplace and places a sample on the easel. “Our titmouse won’t be sad now, bring your work and we’ll have a whole flock of titmice.” Children exhibit their works and admire them. |
| Quote via: https://nsportal.ru/detskiy-sad/applikatsiya-lepka/2017/02/17/moi-zanyatiya | |
At the end of the lesson, the teacher should thank the children for their work and praise the results of their creativity
Video: lesson on collective application on the topic “Migratory Birds” in the senior group
Origami birds
It is very easy to make this craft using the well-known origami technique. The essence is this: strips are cut out of colored paper, which need to be folded into a knot so that their ends are different in length.
Using scissors, the head of the bird is cut out on one side, and the tail part on the other. These origami will perfectly decorate your home at any time of the year, and in winter they will remind you of warm days.
Cockerel and hen
- Take a white sheet of paper, a brush with paints, images with a pre-printed chicken and cockerel, colored paper, napkins of different colors, and you can’t do without a hole punch, glue and scissors.
- Prepare your future background: for this you need to paint a white sheet of paper and draw on it the background elements that you come up with.
- Illustrate the earth as well as the sky in your work.
- You can use colored paper to create images of a house, fence and other details.
Now cut out the birds.
- You can move on to decorating the characters of the craft - cut out feathers from colored paper, twist lumps from a napkin, a hole punch will be useful for making confetti.
- Glue the resulting plumage, now you can glue the birds to the background.
- If you wish, you can create a large work in a group, which will include an entire poultry yard.
There are many techniques for creating applications with images of birds. Using those presented in this article, you will create unique paintings that will decorate your child’s room, and the process of creating this masterpiece will give him a lot of positive emotions.
Also, all these techniques can be safely used for classes in kindergarten, all of them will develop the imagination of children and teach them to be neat, and will give them experience in running their own small project.
Birdhouses made from milk bottles
Don’t rush to throw away milk bottles and Kinder surprise containers, because you can make an attractive craft out of them. Round holes are cut in milk bottles, clothespins are glued to the bottom of the bottles, and the birds themselves are on them in the form of kinder boxes. Just decorate the birds' bodies with down or feathers, colored paper, and also draw eyes on them with a felt-tip pen, then the craft will be completely ready.
Feather birds
Feathers also make great bird crafts! For example, a craft made from a pine cone, paper and feathers will be an excellent interior decoration.
In order to make such a craft, we will need:
- Cone;
- Multi-colored feathers;
- Thick paper for making the head and paws;
- Glue gun.
Before starting work, the pine cone must be dried in the oven for 20-30 minutes. This will get rid of excess moisture and insects inside.
The dried cone can be painted with paints, or you can leave the natural color and texture. We glue the cut out parts of the paws to the bottom of the cone, and also glue the head to the pointed end of the cone. You can glue toy eyes to your head, or you can draw them yourself. Now all that remains is to attach the feathers. We carefully place them on glue. The more feathers there are, the more magnificent the bird’s “hair” will be.
Related article: DIY Chinese lanterns made of paper: diagrams with video
There is also another way to make a bird from feathers.
We will need:
- 2 sheets of cardboard (white and any color);
- Glue;
- Scissors;
- Feathers.
Cut out the silhouette of a bird from white cardboard. In our case, this is the firebird. The silhouette, starting from the tail, must be covered with feathers. You can stick them on top of each other. Then we glue the cutout with feathers to colored cardboard. The painting can be framed and will be a great decoration for any room in your home!
Peacock from bottles
You will need multi-colored plastic bottles, foil, thin plastic, a log, a metal rod, foam, a stapler and glue. The body of the peacock along with the head is formed from polystyrene foam. Small indentations are made in the intended places for the eyes.
The log will be used as a base; you need to attach the peacock's body to it using a metal rod.
Feathers are sold from cut plastic bottles of different sizes: the longest for the tail, the shortest for the neck and normal size for the rest of the body.
One part of the future feather is rounded, and notches are made on the other to give a more realistic look to the feather. The tail feathers can be decorated with cutouts made of thin plastic and foil.
Decorations can be attached with a stapler or superglue. A beak is cut out of a piece of red plastic. The “feathers” are glued with a slight overlap onto each other to the body with superglue. You can make the crest the way your heart desires, but it is better to use colored plastic to create it.
The recesses for the eyes are painted over with felt-tip pens of any color. It is convenient to use some kind of mesh to form the tail. Its collection begins from the bottom edge. The made tail is attached to the body.
Chickens
In order to make a craft with the image of funny chickens or other poultry, take a sheet of colored cardboard, cotton pads, a brush with paints, as well as glue and plasticine.
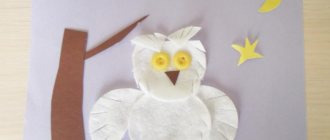
- The entire cotton pad will play the role of the head, as well as the body of the bird; if you separate half of the disc, you will get wings or a tail. Pre-paint them with paints and then glue them to the cardboard.
- All other elements (paws, eyes, beak) can be made from plasticine.
- To create a goose or chicken, you need to make a printout with a picture of a bird, and also stock up on a piece of cotton wool and PVA glue.
- Roll cotton balls to fill the image.
- You can also add colors to your work - paint some elements if necessary, add details.
- This way you will get a bird with plumage, the effect of which is created by cotton wool.
Flamingo from bottles
To make this product you need large plastic bottles (5 and 10 liters), a polymer pipe about two meters long, a corrugated pipe about sixty centimeters long, acrylic, wire, foam.
The base body is made from the largest bottle. In its bottom you need to cut 2 holes according to the diameter of the polymer tubes (future legs). Feathers are cut from smaller five-liter bottles and attached to slits in the body.
A neck is made from a corrugated pipe, which is inserted into the neck of a ten-liter bottle. The head is cut out of foam plastic. Eyes are drawn with a felt-tip pen and a black plastic beak is attached. It is better to start attaching the feathers from the very bottom to the mesh.
