Introduction
Birch is a unique symbol of our country. Beautiful and stately, birch is a wonderful tree that you can easily learn to draw with a simple pencil.
We show you in three simple step-by-step master classes how to make an easy drawing of a beautiful birch tree, even if you have never drawn!
You don't need any special equipment, just simple pencils and paper. After reading this article, you will be able to easily and simply draw a birch tree with catkins, a white birch tree in winter, a spring birch tree with leaves with a simple pencil.
At the end of the article you will also find a video with a master class, and photo references, according to which you can draw a birch tree step by step for beginners at home, on your own.
Winter landscape with birches in watercolor
Birches are especially beautiful in winter. Their white trunks look even thinner and more transparent, as if dissolving in space.
You can convey lightness and airiness using watercolors.
The tendency of this technique is that for work we take watercolor paints, which are first diluted with water before painting. Paints are applied in thin layers. Sometimes we additionally moisten the parchment.
The paper here is not just a canvas, but also a pictorial element: the background will become space and “air.”
If you love winter and nature, then this master class is just for you. We are starting to work on a winter landscape with birches.
Prepare the following materials:
- watercolor paints;
- paint brushes of different sizes;
- a small container of water;
- watercolor paper;
- masking tape;
- used plastic card.
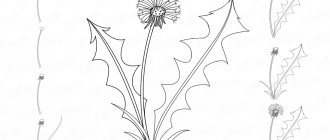
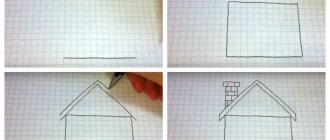
The easiest way to draw a birch tree
Stage 1 – make a sketch of the trunk, twigs and branches
Step by step drawing of a lush birch tree. We learn technique according to the scheme. We outline the trunk of our birch tree. We draw the base of the trunk thicker, the top thinner. Also, try to draw the tree not perfectly straight, since such trees do not exist in nature. We also outline twigs and branches. The lower the branches, the longer they are; the higher, the smaller and shorter they are, both in thickness and in length.
Don't forget to also mark the line of the ground where the birch tree grows from, and at the base you can mark a little grass.
Stage 2 – shading, drawing the bark
Using a 6B pencil, we begin to draw the bark of our birch tree. The lower part of the birch, the base, is always darker; there are practically no light places there. We apply the shading more vertically. Further, a little higher, we begin to apply more horizontal strokes. On the left and right, there are such stripes; you can also draw some small dots in the middle.
We make the left side of the birch a little darker to show that the light is coming from the right. For the branches, we also show a small bark at the base, and then we simply show the line, the plastic movement of our branches. Let's mark the grass a little. Try to press the pencil harder in some places and less in others. Don't forget about the bright areas of the birch, especially on the right side.
Stage 3 – draw leaves, shade
Next we outline the leaves. We will not draw every leaf. We draw them differently, it is not necessary that they all have an ideal shape - in some places they can be more pointed, in others more round. We draw a lot of them. Also, with a little light shading you can show the leaves in the background, but without drawing, just the general shape of the mass of leaves. Some leaves can be highlighted a little more strongly, some can be made on the contrary, light, barely noticeable, so that the plan is visible and the air is noticeable.
You can see how to draw a birch beautifully and quickly in the video at the end of this article.
Notes on art activities (drawing) in the preparatory group “Birch in Winter”
Irina Motorina
Summary of educational activities for art activities (drawing) in the preparatory group “Birch in Winter”
Program content: teach children to draw a slender birch trunk with a thin brush. Long, as if broken, hanging down, the main large branches. Branch - mother, branch - father, branches - children: branch - son and branch - daughter and small branches. Strengthen the ability to draw spots on a birch tree with the end of a brush without pressing. Develop smooth lines, visual attention, visual memory. Cultivate accuracy, perseverance, and leisureliness.
Material: sample, reproduction of the painting by Yuonn - “Winter Morning”, Grabar - “February Azure”, watercolor, brush No. 1 (“Mishutka”), water, birch branch in a vase.
Preliminary work: looking at birch branches on walks (pay attention to the many small branches and broken lines), paintings, illustrations, reading poems about winter birch by S. Yesenin, F. Tyutchev, A. Pushkin.
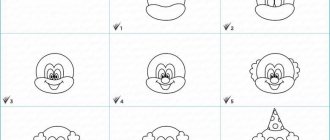
How to draw a birch tree in spring with earrings
Stage 1 – outline the drawing
In previous master classes we have already shown how to draw a birch, so in this master class we will tell you how to draw a branch with an earring so that you can add them to your drawing of a spring birch.
At the first stage, with an HB pencil we outline our branch, on which the earrings and several leaves will be located. We draw the twig as plastic, more rounded and smooth.
At the same stage, we outline the earrings. They have the shape of thin, elongated ovals. But some earrings need to be drawn slightly curved so that they don't look exactly the same. We draw earrings of different sizes, lengths and thicknesses.
Then, draw the leaves. In the same way, of different sizes, placing them in different directions - some grow from above, some from below.
Stage 2 – using shading to create a tone
Using a 4B pencil, using shading, we cover, first, the twig. We make it in different tones - in some places we apply a little more pressure, in others less. We emphasize it in the same way. On some sides we apply more intense pressure so that the branch is more voluminous. We also cover the leaves and earrings with a light tone. We try to make the leaves of different colors. Somewhere on one leaf you can show that it has both a shadow and a light side. Some leaves can simply be toned down so that they are in the background, in the shadows.
Stage 3 – apply shadows, draw details
In the same way, we draw leaves with a 4B pencil. Veins and darkening should be shown on the leaves. The darkening occurs along the edges, where the leaves should be sharp and uneven.
On the earrings we show small strokes and pencil strokes to show the texture of the earrings. And they should be darker than the leaves.
Thus, using this and the previous master class, you will get a birch tree drawn in spring with a simple pencil.
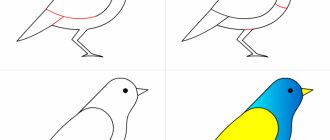
How to draw a winter birch tree
Stage 1 – draw the trunk and branches of the birch
Using an HB pencil we outline the line of the ground, making it uneven. Then, we outline the trunk of our birch tree. The trunk slopes slightly to the right, we make it plastic, not very even, with bends.
After this, we outline the bulk of the birch branches. We try to show the thickness of the branches.
Stage 2 – do shading and darkening
Using a 4B pencil we draw stripes on our birch tree. First we do a little shading on the right side of the birch, where we have the shadow part, and then we outline the stripes. Try to do them at different distances from each other. Somewhere you can place 2 together, somewhere separately one with a large distance, somewhere in the middle you can, on the left, on the right, of different shapes.
In the same way, we darken our branches a little. Try to draw the branches with different pencil pressure so that some branches, for example, those that are closer to us, are brighter. And those located further away looked less bright and more faded, and went into the distance.
Also, you can slightly outline a light falling shadow from the birch tree - it falls on our right.
Stage 3 – draw branches
Using a 4B pencil, we first outline the light branches hanging down, and then the more rigid and clear branches that are located closer to us.
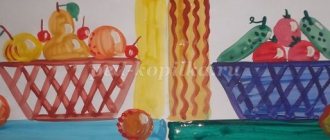
Drawing birches with gouache, an unusual technique
First, you need to know that landscape is a genre of fine art in which the main subject of the image is nature, where special importance is attached to the construction of the composition, as well as the conveyance of the atmosphere, the state of the air and light.
Get ready, we will learn to draw a beautiful landscape with birches. Now we will introduce you to one interesting way of painting with gouache.
For this work you will need very unusual materials:
- a circle cut out of a white sheet of paper;
- used plastic payment card;
- adhesive masking tape 1 cm wide;
- set of gouache paints;
- paint brushes;
- a sippy cup with plain water;
- scissors.
We draw a landscape step by step:
- We place the paper circle on the surface of the desktop on the backing. We cut the masking tape with scissors into five strips, approximately equal in length to the diameter of the circle. Cut one strip in half lengthwise.
- We glue the stripes as indicated in the diagram, first the wider ones, and then in the center of the composition, at an angle, thin strips of tape. Using the sticky edges of the strips protruding beyond the circle, we secure the circle to the work surface. Now is it clear that the areas covered with tape are the trunks of the birch trees in our picture?
- Next we work with gouache. Taking a medium-sized brush, paint the sky with blue gouache, using light strokes to paint the upper part of the circle with a smooth increase in the intensity of the blue color towards the very top edge of the sky.
- To the middle of the circle, paint the space between the trees with strokes using gouache paint in green tones: from light green to light green. In the middle part of the composition we diversify the palette of colors with orange highlights.
- And now we work in the same manner to the very bottom, applying dark green gouache to the very bottom of our drawing, smoothly creating transitions from one shade of green to another. The background forbs are ready. Now let’s add red and yellow colors with a few strokes. Look at the resulting picture from above, did you really see blooming summer grasses?
- And now, let's return to our birches.
- Carefully remove the tape. Inside the circle, the slender outlines of trees remained.
- Let's apply a characteristic black pattern to the white bark in an unusual way. Attention! Apply a little black paint to the edge of the used plastic card.
- We apply the painted edge to either side of the selected trunk and, pressing tightly, stretch the card to the other side. If you did everything correctly, you will get the effect of birch bark on the trunk. Great?
- We will do a similar procedure with other birches, changing the direction of action on some of them, for example, from right to left and vice versa.
- At the top of the birches we will draw branches.
- Paint them with black paint using a thin brush.
- Finally, we casually paint the branches with green paint to create foliage.
The result was a picturesque landscape. Through the whitish trunks of birches one can see the blooming, juicy May herbs, and the expanse of heaven soars upward! The work is really worth the result, but very little time is spent on it.
Let's move on to the next master class. We will learn to draw a winter birch grove.