GCD in the middle group on the topic: “Butterflies”, drawing.
05.28.18 Monday, 7-14.15
Lesson summary for the middle group
on the topic: “Butterflies”
artistic and aesthetic development, drawing.
Visual activities in kindergarten. Middle group T. S. Komarov p.38
Target:
to develop children’s ability to convey impressions of spring in drawings; develop the ability to successfully position an image on a sheet of paper; practice painting with paints (rinse the brush well, dry it, put paint on the brush as needed).
Tasks:
Educational:
to develop children’s ability to convey impressions of spring in drawings; develop the ability to successfully position an image on a sheet of paper; practice painting with paints (rinse the brush well, dry it, put paint on the brush as needed).
Developmental:
develop creative imagination, eye, sense of composition; develop children's constructive abilities; develop memory, logical thinking and attention; develop a sense of rhythm and a sense of color.
Educational:
cultivate self-confidence, accuracy, perseverance; evoke positive emotions in children, cultivate a sense of empathy; cultivate the ability to enjoy the overall result.
Preliminary work:
looking at illustrations in children's books; conversation about insects (butterflies); watching butterflies on walks.
Materials for the lesson:
sheets of white paper, brushes, gouache (color yellow, blue, red, green, brown), jars of water, napkins, brush stands.
Equipment:
multimedia system, presentation.
Progress of the lesson:
Educator:
Guys, what time of year is it now?
Children.
(Spring)
Educator:
And after spring, what time of year will come?
Children.
(Summer).
Educator:
In winter it snows in bad weather, but in summer? Why?
Children.
Educator:
Which weather do you prefer: sunny or cloudy?
Children.
Educator:
Let's show a sunny mood (
children smile, raise their hands up
), and now a sad mood (
sad face, wrap their arms around themselves
).
Children repeat after the teacher.
Educator:
Let's imagine that we are on a green lawn. Close your eyes. You feel the breeze blowing, it gets warmer and warmer.
Children close their eyes.
Educator:
Now open your eyes. Look what a wonderful flower meadow is in front of us, what beautiful flowers there are on it! (Slide 1).
Educator:
Let's find out who lives in this clearing by guessing the riddle:
Moved by the flower
All four petals.
I wanted to rip it off -
He took off and flew away.
(Butterfly) (slide 2,3,4)
Children.
(Butterfly)
Educator:
That's right, well done! It's a butterfly of course! Butterflies are amazing insects; they have very bright, beautiful, elegant wings. Butterflies decorate nature, many of them are beneficial by pollinating plants.
Look at the butterfly and tell me what the butterfly has the largest (wings)?
Children
.
Educator:
How many wings does a butterfly have? (Slide 5,6)
Children.
Educator:
What can you say about the upper and lower wings? (How are the upper wings different from the lower wings?) What do they look like?
Children.
Educator:
Look at the left and right side of the butterfly, what can we say about them? (That they are the same).
Children.
Educator:
The right and left parts of the butterfly are the same. Today I will teach you how to draw a butterfly quickly, so that the right and left parts are the same.
Educator:
What else does a butterfly have (torso)? What shape is the body? What color is the body?
Children.
Educator:
Which body part did we not name? (Head)
Children. (Head)
Educator:
What shape is the head? And what is the smallest (antennae)? What do the antennae look like? What bright, colorful wings. Seeing a beautiful butterfly lifts our spirits. Why does a butterfly need wings?
Children.
Educator
: They also say that a butterfly flutters, that is, it flies from one flower to another. Now let's rest a little.
Physical school
The flower was sleeping and suddenly woke up
, (torso to the right, to the left.)
I didn't want to sleep anymore
(torso in front, back.)
He moved, stretched,
(hands up, stretch.)
Soared up and flew,
(hands up, right, left.)
The sun will just wake up in the morning,
The butterfly is spinning and curling
. (spin around)
Educator:
Now guys, come to our magic workshop and I’ll show you how to draw butterflies.
The guys go to their desks, the teacher tells and shows how to draw a butterfly:
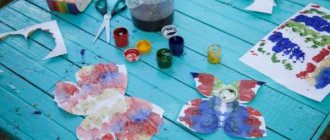
1. Take a sheet of paper, fold it in half, and unfold it.
2. To the right of the fold line, draw two wings: the upper one is large and the lower one is small.
Take a brush. Apply paint to the brush. We will draw the wings from the fold line to the right.
First we draw the large upper wing, then the small lower one.
Let's paint the wings with bright paint.
3.Fold the sheet along the fold line and smooth it with your palm.
4.Unfold – and you get a beautiful butterfly!
5.Draw the body, head and antennae with brown paint.
The teacher then, together with the children, begins to draw a butterfly, while at the same time helping those who did not succeed.
Educator:
Well done! Everyone did very well! Wonderful butterflies! And for butterflies to fly, they need to dry their wings in the sun.
We have a lot of butterflies, but not one of them is the same! All butterflies have names, let's come up with names for your butterflies too.
Materials and tools
For a future artist, first of all, it is necessary to organize a workplace:
- Be sure to have a wide table.
- Good lighting.
- Cups for pencils, paints and brushes.
Optimal organization allows you to focus on work and enjoy it. You should also prepare the following sets:
- Simple pencils of various sizes.
- Eraser.
- Colour pencils.
- Watercolor paints.
- Gouache.
- Brushes with different sizes and brushes.
Don’t also forget about sheets of thick paper and ready-made drawings from which you can find inspiration and ideas for creativity.
Butterfly using pencils
The second option involves using only medium-hard pencils (HB) and an eraser. It is better to start work with the wings.
- Draw a free-form shape that will resemble a butterfly's wing - this will be the front wing, since this time the butterfly itself will be positioned in profile.
- Draw the body, consisting of an oval and a circle, antennae, and paws.
- Already having the main contours, draw a second wing - slightly smaller than the first, as if it was wound behind it.
- Apply patterns and wavy lines to give the drawing a volume effect.
- Trace the outlines, and then fill in the pattern with the colors that seem appropriate to you. Combine shades the way you like, depending on your mood.
Coloring a picture
The butterfly is painted according to the scheme:
- The central points of the pattern are decorated with lighter shades.
- The edge areas are painted using dark and saturated colors, creating the effect of a three-dimensional drawing.
The image of a shadow in the picture also gives a similar effect. First of all, it’s worth determining where the light in the image should come from, and then using small, rough strokes to display the shadow under the butterfly’s legs.
Color of patterns and wings
Butterflies are usually bright, but you can also use discreet light colors, if desired. Felt-tip pens, paints, pencils, crayons, and their combinations are suitable for coloring.
Examples of using color
There are many acceptable options:
- For example, the abdomen is yellow, the patterns are blue, the main wings are blue, and the border of the pattern is blue, as are the patterns.
- Black belly and head, yellow wings, red and green patterns.
- Butterflies with blue, yellow, red, and multi-colored wings look beautiful.
- We paint the patterns on the wings in bright colors different from the main color, or use the main color with a darker or lighter tone.
- It is better to use a darker shade of the main color along the edges of the wings, and a lighter tone in the middle.
- The body of the butterfly is usually brown, gray, or black.
Realistic coloring
You can copy the color of real butterflies, for example cabbage butterfly, lemongrass, urticaria, watch them in nature, look at them in the picture.
"Peacock Eye"
A butterfly of amazing beauty, a miracle of nature:
- We draw large symmetrical circles on the front wings; you can take a coin and circle it.
- The second circles are located in the center of the first circle.
- We also draw circles on the lower wings, and one more in them.
- Stripes, small circles, both over the entire area of the wings and in already drawn large circles.
- We draw short transverse stripes on the body and color the head with a black felt-tip pen.
- We also highlight the contours of the patterns with a felt-tip pen.
- And we paint the second circle on the lower wings with black, leaving one or two circles white, characteristic of these butterflies.
- Now take a thin brush and paint the circle in the middle blue, leaving the edges of the large circle white. It's on the front fenders.
- On the lower wings, paint the remaining part of the circle blue.
- Next, you can paint over the remaining patterns with yellow.
- The main color of the wings is orange, add paint and paint over it.
- You can add red and yellow colors.
It will make a great butterfly.
"Hives"
The color of this butterfly consists mainly of orange and brown, as well as black and blue-gray:
- We draw the body of the butterfly with a dark brown color, and paint half of the lower wings with light brown.
- We paint the rest of it orange.
- The front wings are orange, the upper part of the border alternates with yellow and black stripes.
- Several dark spots over the entire area of the front wings.
- The border of the remaining parts of the wings is black, with blue or gray speckles.
Step by Step Drawing Instructions
There are a huge number of options for drawing a butterfly: from a simple pencil sketch to a real masterpiece with a composition of exotic butterflies. The following drawing techniques are currently used:
- Sketch with a simple pencil.
- Drawing with gouache.
- Image using watercolors.
- Matte butterflies drawn with pastels.
- Image of 3D models of butterflies.
For each method there are step-by-step instructions on how to draw a beautiful butterfly. You can also find video tutorials on drawing small details on various web resources.
Drawing with preschoolers
Drawing with children has its own characteristics. Preschoolers aged 3-5 years do not yet have sufficient drawing skills or working with a simple pencil. Therefore, for younger children, they use ready-made images that need to be painted with gouache, or they draw with paints, without a silhouette in pencil.
It is necessary to ensure proper use of brushes and pencils.
How to draw wings?
As you know, the butterfly has very delicate transparent wings that have many veins. Drawing veins makes the design more realistic, so be sure to draw them if you want the butterfly to look natural. They should be thin and symmetrical, but you can come up with patterns for the wings yourself.
If you want to copy a pattern, then use patterns with a photo of moths and transfer them to your drawing. Most often, a pattern in the form of eyes is depicted on the wings, which was invented by nature in order to make the butterfly more terrifying to its enemies.
Butterfly with watercolor paints
This kind of work already presents a certain complexity, so you will have to prepare for it. Make a familiar butterfly drawing with a pencil in advance, pressing lightly. The drawing should be large to make it easier to color later.
Prepare the following tools:
- Drawing paper
- Brushes
- Water for paints
- Palette
- Watercolor
Remember that the space around you needs to be controlled! Do not get your hands dirty, as this may ruin the drawing.
- Select the main color of the picture - most often it is red or yellow.
- Using smooth strokes from the middle to the edge, draw several smooth lines imitating wings. Sometimes just four strokes are enough.
- It is not necessary to wait for the previous word to dry completely if you choose a darker shade for the outline of the wings. Black, blue, purple are suitable for this. Outline the edges of the wings, pressing more not on the center of the wing, but vice versa. Try to create a smooth blur from dark to light closer to the middle.
- Leave the paint to dry and prepare a thin brush yourself. Use it to apply graceful patterns in random order. It is better if it is pointed closer to the body and free at the contour.
- For brightness, add small accents of white paint to the pattern after drying. This will give the butterfly a finished look.
https://youtu.be/IfafRscqwKchttps://youtu.be/ho3MNA5wtc8
_
Why draw butterflies?
Such a simple but exciting activity can be very useful for both children and adults. The wings of a butterfly are symmetrical, and this is often where the main difficulty in drawing lies. By drawing wings of the same size, the artist learns symmetry and develops his eye.
In addition, the butterfly is drawn structurally, its direction is extremely non-standard, and this also complicates the task. By determining the direction of the drawing, artists also train the perception of the depicted object.
Among other things, drawing butterflies perfectly develops thinking and imagination, which has a positive effect on the imagination. Ready-made butterfly pictures often turn out interesting and bright, so that many people want to repeat the drawing.
For the drawing to be successful, it is necessary to make thin, light lines; the drawing should not be heavy and massive, otherwise it will not convey the airiness of a fluttering moth.