Preview:
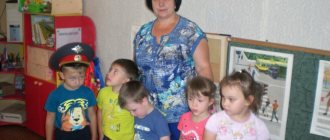
Drawing lesson for the middle group.
Theme "Beautiful napkins"
Goal: To teach children to decorate round napkins with patterns.
Children's goal: help Katya doll decorate the table for tea drinking.
Introduce children to the concept of “pattern”.
Show options for combining decorative elements by color and shape (dots, circles, spots, lines)
Develop a sense of color and rhythm in children.
Cultivate interest in folk arts and crafts.
1.Introduction to the game situation:
- Guys, we have guests today. These are parents, educators. Look at them, smile, wave.
- Now look at me. Eyes and ears are tuned, I’ll ask you about something interesting. Tell me please, do you like to visit?
- Today is Katya's doll's birthday, and she invites everyone to a tea party. What is tea drinking? Well done. Do you want to go visit her?
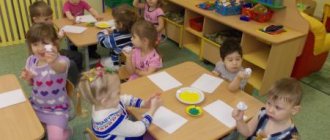
Approach the table on which there is a pre-made service set. Dolls are sitting on the sofas. Children stand around the corner.
Vosp.: Hello, Katya!
Katya: Hello children!
Vosp.: How elegant you are today, and what a wonderful table you have! Look kids, do you recognize it? Our set, which we sculpted as a gift for Katya.
Katya: Thank you guys, the service is wonderful. Very suitable for the holiday table.
Vosp.: Katya, where are the napkins on your table? Guys, isn’t it customary for us to set the table with beautiful napkins and towels? Do all mothers and grandmothers do this? To make it beautiful and festive?
Katya: Oh-oh, guys. I completely forgot about the napkins. I took them to wash and forgot about them. What to do?
Play: Children, you need to help Katya make beautiful, festive, painted napkins. Want to?
Katya: Oh, guys, can you?
Vosp.: Then you, Katya, sit with the guests for now, and the guys and I will give you another gift.
2. Visual activity.
- Guys, come to the tables and take your seats.
- I would like to invite you to paint your napkins with beautiful patterns.
- Guys, do you know what a pattern is?
- A pattern is the decoration of something with lines, dots, or circles. And this decoration creates a whole picture on napkins and towels. Which makes it very pleasant to look at them and makes the food taste better at the table. Want to see what patterns there are?
(remove the screen from the easel with samples)
- Guys, look, I think we can handle this pattern. Shall we try? (remove other patterns)
“Then prepare your ears so you don’t listen to anything, and your eyes so you don’t miss anything.” (Remove the sample, attach a blank circle)
- Let's take some brushes. Does everyone remember that we hold the brush with three fingers near the “piece of iron”?
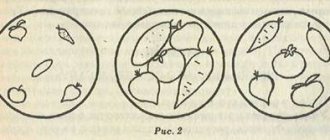
- Now let's take yellow paint and draw a circle in the middle of our napkin, the size of a small tangerine. The circle should be filled inside. (Draw on the sample)
- Whoever drew the circle, rinse the brush thoroughly and wipe it with a cloth so that it is dry.
- Now we take green paint and paint around our yellow circle to make these green patterns. (Show on sample)
Go and see how it turns out. Individually help/give advice to those who cannot cope.
- Now put the brushes on rags. They won't be needed anymore. (Collect brushes and water)
- Now look what I have. What is this? (cotton swab)
- Do you think you can draw with a cotton swab?
- There is even a way to draw like this. Dots. Let's try. To do this, you need to take a little red paint with a stick and put dots along the edge of our napkin. Look how beautiful it turned out.
- Now you try it. (Hand out sticks)
- And now, to complete our beautiful pattern, you can put one dot in the middle of the yellow circle.
- Whoever has done everything, put the chopsticks on a cloth. Take your beautiful napkin and bring it here to the exhibition. (Oval table). Then take a damp napkin, wipe the handles and you can admire our patterns.
(quickly help the other children, take the Katya doll and bring it to the table, call all the children)
Vosp: Katya, look at what beautiful napkins we painted for you!
Katya: Children, what great fellows you are! You did so great! Now tea drinking will become even more beautiful and tastier! Thank you guys!
Vosp: Katya, go to the guests for now! Guys, I want to invite you to the carpet.
- Tell me, who did we help today?
- How could we help Katya?
- Why do you think we succeeded? (because we know how to draw patterns)
- Well done! You've done it. You can go play.
Preparing for the lesson “Decorating an apron”
Decorative drawing classes for children aged 4–5 years are aimed at solving two main problems:
- develop brush skills,
- develop the ability to put together a pattern from simple elements.
Decorative drawing in the middle group is painting a blank with a brush and paints
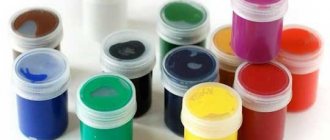
Paints and base for painting
- Gouache is the best option for painting an apron. The paint picks up well on the brush (without water), goes on smoothly, and the patterns come out bright and clear. Gouache can be painted on a white or colored background, the decoration will not merge with the base.
- Watercolor is acceptable. But only for drawing on a dense white base. The teacher carefully monitors how the children collect water and paint to remove excess moisture, otherwise they will drip onto the drawing or the patterns will spread.
Gouache is easy to apply to a brush, it is an ideal paint for five-year-olds
- The basis for drawing an apron is usually 1/2 A4 sheet: made of thick white paper, the teacher can pre-tint it with watercolors,
- from colored cardboard.
The teacher can cut out an apron blank for class
Sometimes children are asked to decorate apron blanks with colored pencils. It is not right. Colored pencils are used in the middle group for object drawing. In decorative drawing, kids can use a simple pencil to draw a stencil: they trace the apron on paper.
Techniques and drawing techniques
- Preliminary repetition and training of each technique: children “draw” circles and lines in the air with a dry brush,
- chalk on a blackboard (marker on a special board).
- leaves in a floral design: apply the brush with all its bristles to the paper and remove,
Important. The teacher monitors the completion of the practical task by the children. For those who have difficulty drawing, he shows techniques individually.
Children improve their gouache painting techniques under the supervision of a teacher
This is interesting. Painting an apron can be done with five-year-olds using an unusual technique. The guys will decorate the blanks using non-traditional materials and tools:
- wax crayons,
- cotton swabs or disks,
- pieces of sponge,
- fingers,
- stamps from vegetables or fruits.
It’s easy to make an unusual pattern on an apron by drawing with your fingers on wet paper
Combination with applique and modeling
When creating an “Apron” craft, drawing, applique, and sculpting techniques can be used. An apron painted with a pattern is perfectly complemented by various elements:
- pieces, strips of colored or wrapping paper,
- plasticine mosaic,
- strokes of plasticine,
- dried flowers, leaves,
- buttons, sequins.
The apron pattern can be complemented with a composition of autumn leaves, for example
Kids love decorating with stickers, glitter and other accessories. If access to these materials is opened at the beginning of practical work, the kids will make the craft in the form of an applique from all kinds of pieces and pictures. First, the children draw a pattern, and then the teacher brings a “magic box” with new decorations.
Individualization of tasks
Productive work and a good mood within the group are promoted by simple tasks aimed at satisfying the personal tastes and interests of the children:
- Take apart the apron blanks: round, triangular, with a frill - whoever wants which one.
- To decorate the apron, use colors and shades as desired.
- You can decorate the drawing with additional materials: applique, stickers.
For five-year-olds who show increased interest in drawing, the teacher complicates the overall task. For example, he asks to draw a flower arrangement in the center of the apron when the group draws one flower.
Children's work is not standard, each apron is unique and beautiful
Place of the lesson “Decorating an apron” in the drawing file
Decorative drawing in the middle group is conventionally divided into decorating blanks in the form of household items/clothing (sweater, mittens, dress, napkin) and painting in the style of folk crafts (Khokhloma, Gzhel, Dymkovo toy). The theme “Apron Decoration” is universal. Children can decorate an apron with a geometric/floral pattern or a folk ornament - this is determined by the teacher. A lesson is held in the middle of the school year, when the children study the topic “Clothing” and begin to get acquainted with folk art.
Theme options:
- "Mom's apron"
- "Magpie Apron"
- "Apron for Dymkovo toy"
- "A gift to my beloved grandmother."
While painting an apron for the Dymkovo young lady, the guys get acquainted with folk geometric patterns
Decorative drawing classes allow you to show children in a playful way that you can make plain things beautiful with your own hands or create a gift for a friend or relative. The introductory stage of the lesson is aimed at creating motivation in children to study patterns and create independent creativity.
Table: options for a motivating start to the lesson “Decorating an Apron”
| Motivational form | Content |
| Game situation | The teacher takes the children to the play corner and offers to show the scene “Katya the doll is waiting for guests.” The plot plays out the following points:
When the children bring the doll to the kitchen stove, the teacher draws attention: “Katyusha put on a beautiful, clean dress, but while cooking it can be splashed and dirty. What should I do? When the option was given that you need to put on an apron, the teacher hands the doll a white blank, she doesn’t like it. The guys will have to decorate an apron for Katya. |
| Poem reading and conversation | Children listen to the poem “An Apron for Mom.”
Questions for talking with kids:
|
| Studying visual material | This form is best for motivating folk patterns. Children look at an exhibition of objects made in the style to which the lesson is dedicated (Gzhel, Khokhloma or Dymkovo painting). For the lesson “Apron for a Dymkovo toy,” an exhibition of young ladies with different patterns on their aprons is selected: stripes, circles, leaves. Questions about the exhibition:
|
For five-year-olds, it is enough to consider several figures with different options for painted aprons
On the topic: methodological developments, presentations and notes
There on unknown paths Goal: .
To expand children's knowledge and understanding of the features of the appearance of a goldfish. Introduce an excerpt from “The Tale of the Goldfish” by A. S. Pushkin.
Teach children to respond to the poetry of A. S. Pushkin’s poetic lines.
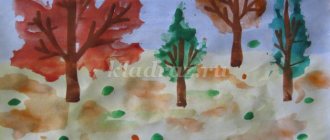
Target. Learn to convey your impression of the autumn beauty of nature. Develop artistic and creative abilities.
Target. Continue to form an emotional response to the work of art.
Goal: Learn to draw horizontal lines, consolidate the ability to hold a brush correctly, consolidate colors: blue and red, cultivate aesthetic feelings. Vocabulary work: Horizontal lines, long.
summary of a drawing lesson in the middle group.
Source
On the topic: methodological developments, presentations and notes
Topic: Let's decorate aprons for March 8th with a Tatar pattern Educational areas: artistic creativity, socialization, communication, music Type: harmonious development of children by means of art.
An open integrated lesson for artistic, aesthetic and cognitive development.
WILD ANIMALS. BEAUTIFUL NAPKIN Purpose: to develop the ability to recognize, name and distinguish the features of the appearance and lifestyle of wild animals; cultivate activity, independence, love.
"Beautiful napkins for Katya's doll."
Educational objectives: learn to create an image - a symbol of the Chuvash pattern depicting the sun, arranging the elements of the pattern and gluing them to the base. Developmental objectives: develop children's ability to place.
Summary of GCD in the junior group on artistic and aesthetic activities. “Let's decorate a napkin with a pattern.” Educator of the 1st category Novikova S.P. Tasks.-To consolidate with children the ability to draw mountains.
Source
Text of the book “Drawing with children 5-6 years old. Class notes"
Lesson 14. Autumn trees (Drawing with gouache)
Program content.
Continue to introduce different types of trees. Continue learning to draw two large trees of different shapes from memory. Learn to draw a trunk with diverging branches, write the drawing on a sheet of paper. Learn to draw tree leaves in different ways: by dipping, poking with a hard semi-dry brush, using spots. Practice mixing paints to get the desired color. Continue to learn to understand and analyze the content of the poem.
Demonstration material.
Subject pictures of different trees (oak, maple, aspen, rowan bush).
Handout.
Sheets of yellow paper, simple pencils, brushes, gouache, palettes, jars of water, rags.
Progress of the lesson
Beforehand, while walking with your children, look at the autumn trees.
Read M. Sadovsky’s poem “Autumn” to the children:
The birches unbraided their braids, the maples clapped their hands, the cold winds came, and the poplars were trampled. The willows by the pond drooped, the aspen trees began to tremble, the oak trees, always huge, seemed to have become smaller. Everything became quiet, shrank, drooped, turned yellow. Only the beautiful Christmas tree has become prettier for winter.
Ask the children:
– What time of year is described in the poem? (Autumn.)
- Why do you think so?
– What trees are listed in the poem?
Look at images of some trees with your children, pay attention to the different shapes of the trunks - they can be thin and thick, straight and curved, low and high; on the crown of trees - spreading or raised up; on the color of the leaves - some trees remain green for a long time, on others the leaves are bright red, on others the foliage is yellow or orange, etc.
Invite the children to draw on a sheet of paper with a simple pencil the trunks of two trees, different in structure. You need to paint over the tree trunks with gouache and draw the branches with the tip of the brush. And on the branches in different ways - by dipping, poking with a hard semi-dry brush or with spots (with the tip of the brush) - draw a multi-colored crown (green, red, yellow, orange).
Encourage the children to add the sky, clouds, and grass to the picture.
Topic of the week: “Our little brothers”
Lesson 15. Hedgehog (Imprint with crumpled paper)
Program content.
Learn to display the texture features of the depicted object. Develop imaginative thinking when solving riddles.
Handout.
Sheets of white cardboard, saucers with gray gouache diluted with water, crumpling paper, gouache, thin brushes, rags, jars of water.
Progress of the lesson
Give the guys a riddle:
Here are the needles and pins crawling out from under the bench. They look at me, they want milk. (Hedgehog)
Invite the children to draw a hedgehog in an unusual way - with a lump of crumpled paper.
Show how to crumple up a piece of paper, place the resulting lump in a saucer of gray paint and apply it several times in the center of the cardboard, creating a large “spiky” circle. When the paint dries, you need to finish painting a triangle-shaped muzzle and oval paws with a brush. You can “attach” mushrooms, apples, and autumn leaves to the back of the hedgehog. Draw the sky, grass, bushes, stumps, mushrooms, etc. around. Lesson 16. Squirrel (Drawing with sanguine)
Program content.
Introduce children to a new material - sanguine (a brown stick made from clay). Develop light, continuous movements when drawing with sanguine, shading (smearing) the contours to convey the animal’s fur. Teach children to depict animals using graphic techniques. Develop imaginative thinking when solving riddles.
Handout.
Half sheets of watercolor paper, sanguine, cotton swabs (for shading), napkins (place under your right hand).
Progress of the lesson
Introduce the children to a new material - a brown stick - sanguine. Tell the children that this crayon breaks easily, so they need to draw easily, without pressing. Give the children sheets of watercolor paper and encourage them to draw a few light lines with sanguine and then shade them with a cotton swab.
Give the children a riddle: Who deftly jumps through the Christmas trees and flies up into the oak trees? Who hides nuts in a hollow and dries mushrooms for the winter? (Squirrel)
Offer to draw the outline of a squirrel in sanguine (in profile). It is advisable to place a napkin under the right hand. Show the children how to draw a round head with a pointed muzzle, an oval body, front and hind legs, and a curved tail using smooth lines. To convey a fluffy fur coat, shade the contours with a cotton swab. There is no need to paint over the squirrel; the white background should show through.
At the bottom, you can draw grass with strokes, if there is space left - the silhouette of a tree.
To prevent the image from being erased or smeared, it must be sprayed with hairspray.
Ask if the children liked drawing with sanguine.
Topic of the week: “In the kitchen”
Lesson 17. Gzhel cup (Gouache painting)
Program content.
Introduce children to Gzhel. Learn to highlight the characteristic features of Gzhel painting, decorate the border of a cup with simple elements of painting (straight and wavy lines of varying thickness, dots). Continue learning how to mix blue and white paint to create a blue color.
Demonstration material.
Ceramic dishes of Gzhel masters (cups, saucers, jugs, vases, teapots, trays), samples of elements of Gzhel painting. Handout. Cardboard cup templates, white and blue gouache, thin brushes, palettes, jars of water, rags.
Progress of the lesson
Tell your children about Gzhel: for a long time in the village of Gzhel near Moscow they have been creating pottery and toys from clay, which are painted with blue paint on a white background.
Examine the patterns on the Gzhel cup with your children. Pay attention to the border: it can consist of repeating combinations of lines, dots, strokes, etc. The border is located at the top and bottom of the product. The central part usually depicts the simplest flowers from “droplets”, “strokes” and “curls”.
Show children an example of the rim patterns on a separate cup template. Please pay attention to the children that Gzhel painting is painted directly with a brush, without a preliminary pencil sketch.
Remember with your children how to get the color blue.
Give the kids cup templates and suggest, based on the sample, to decorate the borders with Gzhel painting. Lesson 18. Tea set (Drawing with gouache)
Program content.
Learn to draw dishes, come up with patterns yourself and decorate dishes in the same style. Strengthen the ability to place pattern elements on the surface of an object. Develop aesthetic perception, fantasy, imagination and sense of color. Cultivate compassion and kindness.
Demonstration material.
Porcelain set of cup and saucer, decorated in the same style.
Handout.
Landscape sheets, gouache, brushes, palettes, jars of water, rags.
Progress of the lesson
Read the poem “Advice” by R. Sefa to the children:
Cup and saucer quarreled. Now They will break, Soon In the kitchen, on the shelf, There will be fragments. And don’t quarrel in vain - It’s Very Dangerous.
Ask the children:
– Why do you think the cup and saucer quarreled? (Perhaps they began to argue about which of them was more necessary and beautiful.)
Together with your children, look at an identically designed porcelain cup and saucer. Please pay attention to the children that all the dishes in the service should have the same pattern and the same colors. Invite the children to draw their own cup and saucer and, so that they do not quarrel, decorate them the same way. Then the cup and saucer will not argue.
Children need to draw the silhouette of a cup and a round saucer and decorate it in the same style.
Topic of the week: “In the room”
Lesson 19. Carpet (Decorative drawing with felt-tip pens)
Program content.
Learn to draw patterns on the carpet in the form of long, non-touching lines. To develop children's aesthetic perception, fantasy and imagination. Cultivate a love for Russian songs. Practice combining colors. Develop artistic taste.
Handout.
Halves of album sheets, simple pencils, felt-tip pens.
Progress of the lesson
Read the Russian song to the children:
Our Katya embroidered three carpets, three patterned ones. I embroidered and embroidered, thought and thought. “Who should I give carpets to, Who should I please? I will give the first carpet to my dear father. And the second carpet is for my dear mother. And I’ll give the third one to my dear, beloved Brother.”
Ask the children who they would like to “embroider” a rug for. Offer to make a beautiful carpet.
On a landscape sheet, children draw a rectangular or square carpet with a simple pencil and draw different colored lines on it with felt-tip pens: wavy, zigzag, looping, etc. The edges of the carpet can be decorated with a fringe of short or wavy lines. It is advisable to use markers of different colors that match each other.
You can invite children to paint a blanket of multi-colored scraps with gouache paints.
Lesson 20. Patterns on a towel (Decorative drawing with colored pencils)
Program content.
Introduce children to the history of decorating clothes and linen with embroidery. Show the beauty of embroidered items made from geometric elements. Learn to compose and arrange a symmetrical geometric pattern.
Demonstration material.
Images of Russian folk clothing and embroidery on towels, tablecloths, napkins, sheets; samples of decoration with geometric embroidery elements.
Handout.
Paper rectangles 22x8 cm, colored pencils.
Progress of the lesson
With your children, look at illustrations of embroidery on Russian folk clothing, towels, tablecloths, napkins, and sheets. Tell the kids that before they didn’t know how to make such colorful towels as they do now. The fabric was mostly white. Therefore, women decorated their clothes and underwear with embroidery (show the children examples of decoration with geometric elements). Together with the children, determine what patterns could be embroidered: straight and wavy lines, crosses, squares, triangles, circles. Mostly red colors were used, less often yellow, green and blue. Consider the towel - symmetrical embroidery on it is placed at the ends, on both sides.
Give the children rectangles and encourage them to come up with their own symmetrical patterns and place them on the edges of the towel. Samples of geometric embroidery should be in front of children's eyes.
Theme of the week: “My wardrobe”
Lesson 21. Hat and mittens (Decorative painting with gouache)
Program content.
Learn to draw items of clothing. Continue to teach yourself how to come up with patterns and decorate clothes in the same style and color. Develop a sense of composition and rhythm.
Demonstration material.
Soft toys (fox, wolf, hare).
Handout.
Landscape sheets, simple pencils, gouache, brushes, palettes, jars of water, rags.
Progress of the lesson
Play out the situation that animals have come to you. They are always in the cold, and their paws and heads are cold. Invite the children to draw two mittens and a hat for them and decorate them so that it is clear that this is a set. Now the animals will not freeze.
The children draw their own hats and mittens, come up with patterns in the same style and use them to decorate clothes for forest guests.
Lesson 22. Alyonushka in a sundress (Decorative drawing with colored pencils)
Program content.
Continue to introduce children to the history of decorating clothes and linen with embroidery. Show the beauty of embroidered products. Learn to convey the characteristic features of Russian folk clothing - sundress and shirt. Develop respect for folk culture.
Demonstration material.
Colorfully illustrated book “Sister Alyonushka and Brother Ivanushka” (“The Frog Princess”, reproduction of V. Vasnetsov’s painting “Alyonushka”), Images of Russian folk clothing.
Handout.
Album sheets with a drawn girl in a shirt and sundress, with a wide ribbon on her head; colour pencils.
Progress of the lesson
Look at illustrations for fairy tales with your children. Pay attention to how the girls used to dress: in white shirts and long sleeveless sundresses that widened at the bottom. The collars and bottom of the sleeves of the shirts were decorated with embroidery. Sundresses in the center and at the bottom - with a pattern, buttons, ribbons, beads. A red ribbon decorated with geometric patterns was tied around the head. Usually girls wore blue sundresses, and red ones only on holidays.
Give the children album sheets with a drawing of a girl and ask them to come up with and place a red pattern on the sleeves and collar of the shirt.
Suggest placing an ornament in the center and along the hem of the sundress. Ask the sundress itself to be painted red, and the ribbon on the head to also be decorated with a geometric pattern.
Theme of the week: “Professions”
Lesson 23. Color spectrum (Drawing with gouache)
Program content.
Form an idea of how you can get orange, green, purple and brown colors. Learn to mix basic paints and create new colors. Actively use the words: artist, landscape, palette. Develop an interest in working with paints.
Demonstration material.
A doll dressed as an artist, a sketch of a landscape drawn in pencil.
Handout.
Palettes-ovals made of thick cardboard according to the number of children with the outlines of seven circles drawn on them; red, yellow and blue gouache, brushes, jars of water, rags.
Progress of the lesson
To find out who is coming to visit, ask the children a riddle:
The colorful sisters are bored without water. Uncle is long and thin. He carries water with his beard. And the sisters together with him will draw a house and smoke. (Brush and paints)
Ask the children:
– Who paints pictures with brushes and paints? (Children, artists.)
Play up the situation that an artist (a doll in disguise) comes to you. He brought an unfinished landscape.
“Guess,” says the guest, “where I painted this picture?” (Depending on the content of the landscape, children say - in the forest (or at sea, in the mountains, etc.).)
– Is my painting beautiful? - asks the artist. (Beautiful, but underdrawn.)
“That’s right,” says the artist. “I’m almost all out of paint.” Only red, yellow and blue gouache remained. But I need other colors too. Help me get other colors.
The teacher distributes palettes and gouache paints of three primary colors to the children. Children paint the first three circles with the available colors. And the fourth circle is painted with blue paint, and yellow on top - it turns out green. Ask the children how the color green turned out. The fifth circle is red, and yellow paint on top - it will turn out orange. Ask the children how the color orange came about. On the sixth circle, children mix red and blue gouache to create a purple color. Find out how the purple color turned out.
Present the children with a problem situation: how to get brown to depict tree trunks? (You need to mix all three primary colors on the seventh circle.)
In parting, the artist thanks the children:
– Thank you guys, now I can finish my picture.
In their free time, children can help the artist finish his landscape.
Lesson 24. Warm and cold tones (Drawing with gouache)
Program content.
Form an idea of cold and warm tones, teach them to distinguish between them. Practice mixing paints and creating new colors. Learn to draw a picture using a cold or warm range of colors. Continue to use the words: “artist”, “landscape”, “palette”, “cold and warm tones”.
Demonstration material.
A doll dressed as an artist.
Handout.
One and a half album sheets, gouache, brushes, palettes, jars of water, rags.
Progress of the lesson
Play up the situation that an artist has come to your class again.
Give the children half of the album sheets and let the artist conduct this activity.
The guest invites the children to draw three yellow, orange and red circles on the left half of the sheet, and blue, indigo and purple circles on the right half. The artist asks the children what the colors on one side remind them of (sun, fire, summer, trees, berries, etc.). That's right, these colors are summer, which means they are warm.
The doll asks the children what they can draw using the colors on the right side (snow, ice, puddles, rain, etc.). These colors resemble cold and are therefore called cold.
The artist invites children to draw two green circles between the circles with cold and warm tones. Asks the guys to think about whether they are cold or warm. To solve the problem, you need to add warm yellow paint to the first green circle, then the green color will turn into light green (this is the color of grass and leaves on trees), which means it is warm.
Add blue paint to the second green circle to create a dark green color reminiscent of a cold sea. This means dark green is a cool color.
The guest reads a poem by G. Sapgir to the children:
The grass has green words, And they are barely audible. And the wind has blue words, And they make your head spin. And the sun has so many clear words, Red songs, Golden poems! Today I call all my friends to listen to the sun, wind and grass.
The artist hands out album sheets to the children and invites them to draw a picture using either warm or cool tones. Or you can divide the sheet in half and draw a warm pattern on one side and a cold one on the other.
Theme of the week: “Zoo”
Lesson 25. Elephant (Palm drawing)
Program content.
Continue to introduce the technique of palm printing: dip your entire palm in gouache and make an imprint. Develop imagination, teach to see a new image in a familiar object. Strengthen the ability to complement the image with details using a brush.
Handout.
Half album sheets, wide bowls with blue gouache diluted with water, gouache, brushes, jars of water, palettes, rags.
Progress of the lesson
Read B. Zakhoder’s poem “Elephant” to the children:
More than anyone else on land, he is a very, very kind elephant. Apparently, even among animals, the one who is kindest is greater.
Offer to look at your palm and say if it looks like an elephant. (The palm will be the body, the thumb will be the trunk, and the remaining fingers will be the paws.)
Children need to dip the inside of their palm into a bowl of gouache and place their palm with outstretched fingers looking down on a landscape sheet (for convenience, you can temporarily place the sheet “upside down”).
When the palm print dries, you need to paint a thin tail and a long trunk with a brush with blue paint, and highlight the ears and eyes with blue paint. You can give the elephant a carrot or banana in its trunk. Lesson 26. Children in a cage (Drawing with wax crayons and watercolors)
Program content.
Learn to draw animals with a simple pencil, conveying their characteristic features, practice conveying shape and proportions. Practice coloring an image with wax crayons, making strokes in one direction, without gaps, using different pressure on the chalk. Continue to strengthen the ability to tint a sheet of paper with watercolors.
Demonstration material.
Pictures of animals (giraffe, tiger cub, zebra, etc.).
Handout.
Landscape sheets, simple pencils, wax crayons, watercolor paints, brushes, jars of water, palettes, rags.
Progress of the lesson
Read to the children several poems by S. Marshak from the “Children in a Cage” series, while simultaneously posting pictures of these animals:
Giraffe
Picking flowers is easy and simple for small children, but for those who are so tall, it is not easy to pick a flower!
Tiger cub
Hey, don't stand too close - I'm a tiger cub, not a pussy!
Zebras
Striped horses, African horses, It’s good for you to play hide and seek in the meadow among the grass!
With your children, look again at the pictures of a giraffe, zebra, tiger and other animals. Note that all animals have a body, which can be depicted as an oval. Head with an elongated muzzle. The giraffe has a long, thin neck, the zebra has a smaller and wider neck, and the tiger has a short neck. All animals have four legs. The giraffe has long paws, the zebra has shorter paws, and the tiger has powerful, wide paws. Highlight the features of the tails: the giraffe and zebra have a tassel at the end, the tiger has a thick rope. Talk with children about the colors of animals. Pay attention to the children that the zebra has a mane.
Show the children the sequence of one of these animals on a separate sheet of paper. You should start with an oval body, then draw in the head, neck, legs and tail. Offer to draw one or two animals as desired with a simple pencil, following the same sequence, and then paint over them with wax crayons.
It is better to make the background with watercolors, drawing a horizon line and painting the lower part with green (grass), and the upper part with blue (sky).
Of course, if a child wants to draw other zoo inhabitants, they should under no circumstances be prohibited from doing so.
Theme of the week: “Theater”
Lesson 27. Three bears (Drawing with sanguine)
Program content.
Continue to introduce children to sanguine. Learn to draw sanguine in chalk and shade lines. Continue practicing graphically depicting animals standing on their hind legs. Strengthen the ability to write an image on a sheet of paper and arrange animals in the desired sequence.
Handout.
Watercolor paper, sanguine, cotton swabs (for shading), napkins (place under your right hand).
Progress of the lesson
Read the riddle of V. Stepanov to the children and ask them to guess what kind of fairy tale it is:
Cups three and three beds. There are also three chairs, look, and there are actually exactly three residents living here. As you see, it’s immediately clear: It’s dangerous to visit them. Run away quickly, little sister. Fly out the window like a bird. Tale by L.H. Tolstoy's "Three Bears"
Remember that Papa Bear was the biggest, Mama Bear was smaller, and their son was the smallest.
Offer to draw with sanguine the contours of three bears standing on their hind legs. Remind the children that sanguine breaks easily, so they need to draw with it easily, without pressure. It is advisable to place a napkin under the fist of your right hand. Show the children how to first draw a big bear with smooth lines - a round head, an oval body, elongated paws. To convey the bear's fluffy fur coat, shade the contours with a cotton swab. There is no need to paint over the bear; the paper should be transparent.
Children first need to think about where and what kind of bear will be drawn.
Below, you can draw grass with strokes, if there is space left - silhouettes of trees.
To prevent the image from being erased, you need to spray it with hairspray.