Application for the younger group on the theme “Spring”
From the age of 2, children are able to work creatively with paper and natural materials. Thematic applications and crafts give younger preschoolers an idea of the changing seasons and the awakening of nature.
Snowdrops
To make cute snowdrops, you need cotton pads, colored paper and cardboard. The application does not require templates, but if necessary, an adult must help the child.
The process of making the first flowers of spring:
- Take pale blue cardboard - this is the spring sky.
- Cut out leaves from green paper.
- Shape the cotton circles into snowdrop buds and make petals.
- Using a green marker, draw flower stems on the cardboard.
- Glue the leaves and buds.
Spring sun
To make rays of bright sunshine, the child uses his hands, places them on a cardboard base, and the adult traces his fingers with a pencil. If the cardboard is not colored, but white, the preschooler paints the resulting rays with a yellow or orange marker, or gouache paint, and cuts them out with scissors. You should get at least 6 blanks.
Next you need to cut out a large yellow circle - this is the sun. Glue it to the sky-colored cardboard, leaving the edges unglued. You can also use a plastic plate and paint it with yellow gouache. To complete the application, all that remains is to slip the rays of your hands under the edges of the circle and glue them. To make the resulting sun really look like spring, you can draw eyes and a smile on it.
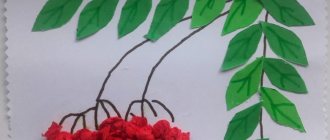
Chestnut flowers in spring
To make an applique, you need blue cardboard, a branched tree branch, and popcorn without dye.
The branch needs to be pasted onto the sky background. For better adhesion to the cardboard, press the workpiece with a weight. Glue roasted corn flakes to the branches - these are chestnut flowers. Leave the application to dry.
Greenery in spring
It will be very interesting for preschoolers to grow fresh herbs on their own; with the help of crafts, they will learn how nature comes to life in the spring.
Give the pupils egg shells with the top cut off and prepare the planting substrate. Let each child draw a funny face on his shell. Then he will pour soil inside, moisten it with a spray bottle, and plant the greens. You can use a lawn mixture: it takes root well and germinates quickly. By placing the shells on the windowsill in the spring, children will watch the seedlings develop every day.
Early spring
Tree branches collected on a walk can be used to create a spring landscape.
Children cut out the earth from brown paper, the remaining snow here and there from white paper, and the spring sun from yellow paper.
All this is glued to cardboard.
They also stick on branches, which become young trees in the landscape composition.
Finally, all that remains is to glue pre-cut small green leaves to the branches.
Original crafts for March 8
Not everyone will immediately believe that you used cardboard egg packaging for this craft.
If you come across candies packed in paper baskets, do not rush to throw them away.
You can make an unusual photo frame from thin twigs
Another original surprise is a homemade necklace. Even a child can handle it by giving his mother or sister such an unusual accessory.
If you are making a fastener, you can cut a not very long rope for the base. But if the clasp is not planned, we measure out such a length so that you can then put this decoration over your head.
We fix the colored thread on the rope with a knot and continue winding. We fix it with glue.
Decor may vary.
We fix the thread with wire, winding the required amount onto the rope. He cuts it off with pliers.
Decor in the form of tassels made of bright threads will look original.
An old board can be used to create a beautiful, unusual panel. To do this you will need several dozen nails, thread and wire.
Application on the theme “Spring” in the middle group
Among preschoolers of the middle age group, the lesson on applique “Spring” from scrap and natural materials is of great interest.
Spring landscape made of plasticine
The teacher draws a simple spring landscape with a pencil on white cardboard sheets. Distributes blanks to students. Children take multi-colored plasticine, tear off pieces, smear them on cardboard, creating a picturesque landscape composition: blue sky, bright sun, soft green grass, a running stream with a homemade boat on it, blossoming leaves on trees, flying beetles and butterflies.
If you have natural material - pebbles, shells, cones, pieces of bark, then you can use that too. Mother-of-pearl beads and rhinestones are also suitable for decorating a landscape.
Salt dough spring
Instead of plasticine, you can use salt dough to create a spring landscape. Children will enjoy working with the new material and will learn its properties. To prepare the dough, you need white flour and finely ground salt (you can even grind it into powder with a mortar) in equal proportions. Water should be added little by little as you stir, so that the mixture does not become too liquid.
The benefit of salt dough is that it discourages the child from trying everything he works with. After licking the material a couple of times, the baby will no longer want to put anything in his mouth.
You can sculpt anything you want from salt dough: flowers, leaves, ladybugs, butterflies. For ease of work, it is advisable to have stacks and a rolling pin on hand, as well as a bowl of flour for wiping your palms. Children glue the molded blanks onto cardboard to create a three-dimensional “Spring” applique.
It takes at least 2 days for the application to dry. It needs to be placed where it is dry and warm. The dried applique can be beautifully painted. You can use watercolor, gouache, acrylic, even oil paints.
Mimosa
A mimosa branch is a symbol of spring; it can be made from millet cereals. Let the children draw branches on white cardboard with a brown felt-tip pen, cut out tree leaves from green paper according to a template, glue them, and draw the outlines of the inflorescences with a pencil. The teacher should help the students by showing illustrations of a real mimosa. The inside of the contours must be lubricated with glue. To complete the application, all that remains is to generously sprinkle the glued surface with golden millet.
Maslenitsa
Introducing students to Maslenitsa, held at the beginning of spring, the teacher can offer to make a thematic application that reflects the attributes and mood of this folk holiday.
The base is a circle made of cardboard, it symbolizes pancake - the main Maslenitsa dish. To it at the bottom you need to glue an “accordion” made of multi-colored paper - this is the fluffy skirt of Maslenitsa. Above it is necessary to glue the hands and head in a scarf. To finish, draw a smiling face for Maslenitsa.
Application for Victory Day with kids
- Our whole country is preparing for the great holiday Victory Day
. - The guys do it with their teachers, parents, and
- models, exhibitions, drawings, crafts.
- But what can be done with children 2.5 years old?
- How to explain to them what Victory Day is?
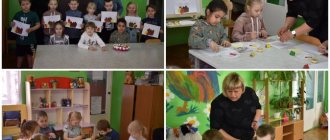
Today in Yuzhno-Sakhalinsk it was very cold, it was raining, we had nowhere to rush.
We got down to business, and this is what we came up with.
During a quiet hour, I made blanks for the appliqués: I cut out clouds, St. George ribbons, and flowers. Well, we traced the bird-palms together, and I immediately cut them out in front of the children. Pigeons are birds of peace!
I tried to tell the children, in a form they could understand, what Victory Day is: this is a holiday that everyone loves, expects, there will be a lot of flowers and balloons. All people will go to the parade, and in the evening there will be fireworks!
Most children like to glue, many are ready to re-glue everything! How glad they were that this was not all, we would still glue flowers.
I am glad that the children understand, are trying to finish the work, are already running to the reception with drawings, and know that we are going to do an exhibition.
Today Arkasha’s mother, Elena Anatolyevna, joined us. Looking at the photo, you can see how happy the son is that his mother is gluing flowers with him. Happy moments!
The work turned out wonderful! Simple, but completely independent, I only helped to glue the ribbon evenly in the beak.
- Dove - a symbol of peace
- You are a symbol of peace and goodness,
- My Dove is white and free!
- Remind people it's time
- End the war already!
- Fly above the clouds!
- Let everyone hear us:
- Only peace is more important than all fundamental
Application on the theme “Spring” in the senior group
Kindergarteners of the older age group must develop the skill of working with colored paper, stationery, and plastic materials. They should already have knowledge that flowers bloom on trees in the spring so that fruits form in their place in the summer, that birds return from the south to hatch their chicks in their native lands.
Application "Spring" made of colored paper
To create an applique, you need to prepare a thick paper sheet for the background, a set of colored paper, an insert from a gift box of chocolates, markers, glue, scissors, and a simple pencil.
Instructions on how to make the “Birds in Spring” applique:
- Cut out a tree branch from brown paper. Glue onto the cardboard base.
- Cut out a beige or yellow circle - this is the base of the bird's nest. Glue it onto the branch.
- Cut the candy liner into thin strips. Glue randomly along the contour of the circle. You will get a real nest.
- Cut out the yellow sun and its rays. Glue onto cardboard above the branch.
- Make leaves from green paper. Stick it on the branch.
- Make chicks that will sit in the nest. From colored paper, cut out the body, head, beaks, wings, paws, eyes. Draw the pupils with a marker.
- Glue the finished chicks to the nest.
For another version of the “Birds in Spring” applique, see the following video.
Spring bouquet
Plasticine crafts are useful for developing finger motor skills. Let the children roll thin ropes from red, yellow or orange plasticine and twist them like a snail. You will get flower buds. Next, you need to cut out a large circle from colored paper and fold it so that it looks like a bouquet bag. It remains to glue the plasticine buds to its upper free part. If you have mother-of-pearl beads, you can decorate the center of the buds with them.
Tit in spring
Older preschoolers will find it interesting to work with yarn. For applique you need threads that match the color of the tit: yellow, white, black, gray, blue, green.
Draw an outline image of the bird on the cardboard.
Cut the yarn into small pieces in separate piles according to color.
Show your child a realistic picture of a tit.
Let him coat each section of the outline with glue and sprinkle it with pieces of yarn of a suitable color.
Spring nightingales
Spring is associated with the arrival of birds. Make the following craft with your child:
- Cut out silhouette blanks of nightingales from light paper.
- Make bird cages. Glue a ring - the base - from a wide strip of colored paper.
- Attach thin paper strips to it, making a dome-shaped lattice structure.
- Place the paper birds inside the cages.
- Hang the nightingales on a string in the children's room or in the playroom of the kindergarten.
Beautiful DIY crafts for March 8th
On such a long-awaited day, every girl dreams of receiving a memorable gift. If you want it to be remembered and preserved for a long time, then make a gift with your own hands.
Memory is stored in photographs, and beauty can be presented in the form of a photo frame. The volumetric frame is made of thick cardboard.
Materials:
- Thick cardboard
- Scissors
- Glue
- Decor
- Ruler
To make a neat and even frame, print the template on a printer. Transfer it to thick cardboard, which will be the main material for creating a photo frame.
We will need two of these workers.
Using a ruler, make folds
We assemble the frame along the folds.
Assemble the corners with glue
We need to make two identical frames
You can assemble these two parts together using a cardboard piece, tape, or buy a special furniture clip.
The rest of the decor on the outside of the frame depends on your imagination and the materials you have available.
Application on the theme “Spring” in the preparatory group
In the older age group, children are already familiar with more complex techniques for creating applications.
Apple tree branch in spring
The paper applique “Spring” allows children to get acquainted with creating three-dimensional images by folding paper. To practice, find a large and well-branched tree branch.
Next, make paper blanks of apple blossoms:
- Take white paper squares with sides of 5 or 7 cm. Fold in half twice.
- Holding the corner of the fold with your fingers, cut out a heart from the workpiece.
- Open the resulting flower. Do not straighten it too much, it should remain voluminous.
- Make the leaves in the same way. Just fold the green square once, not twice. And cut out not a heart, but a semi-oval.
- Glue the tree branch to the cardboard base. And to it - made leaves and flowers.
Swallows
Swallows arriving in the spring hatch their chicks. The lesson introduces preschoolers to creating crafts from pompoms.
To make a house for swallows, you need to cut a plastic plate in half. Glue the halves together, cover the front with glue, sprinkle with hay, sawdust, and other materials to imitate a bird's nest. Next you need to teach children how to make pom-poms. Let them use this method to make the heads of the chicks looking out of the nest, glue on the eyes and beaks.
Do-it-yourself topiary for March 8: examples with photos
Gifts for March 8th can be varied, and if you know that your mother or grandmother loves all sorts of home crafts and decor, then a beautiful topiary could be an ideal option.
If you take a ready-made option as a basis, but bring a little of your imagination into it, taking into account the tastes of the person who will receive this gift, you can get a real masterpiece.
Lovers of coffee and flowers will not remain indifferent when they see this version of topiary.
We found ready-made roses from foamiran, then they can be used to create a heavenly topiary. You can supplement them with sisal balls, twigs, pearls, cones
Topiary can be made in the form of a number that is directly related to the holiday.
Make a bright topiary using flower blanks made of paper or thin cardboard.
Corrugated paper will help you create a beautiful and lush decorative tree.
Studying anatomy
Older children will be interested in studying human anatomy using the applique as an example. This game will not only develop fine motor skills and perseverance, but will also introduce children to the structure of internal organs.
Depending on age and level of training, the number of organs may vary. To play you will need:
- template (contours of the human body);
- organs (brain, stomach, lungs, liver, heart, intestines and others);
- diagram with the location of organs on the template and their names;
- glue.
The essence of the game is to introduce the child to internal organs.
- Each organ is taken in turn. Its name is clearly pronounced and shown on the diagram where it should be located. For older children, the purpose of this organ is explained.
- The child takes the organ shown and glues it onto the person’s stencil for appliqué.
- The actions are repeated with each organ.
If this is not the first time an acquaintance with the internal structure of a person occurs, then the child can be asked to independently glue the organs onto the template.