Tasks:
"Cognitive development":
- consolidate and generalize the signs of early spring; revive ideas about the first spring flowers.
— to cultivate in children a love of nature, to develop an interest in learning about nature;
“Artistic and ethical development”:
- practice cutting a circle from a square, rounding the corners; cut the circle in half to create a semicircle.
— develop skills in working with paper, making neat, precise folds;
- develop imagination and creativity in children.
“Speech development”:
expand children's vocabulary on the topic: “Flowers”,
develop children's coherent speech
Materials: scissors, glue, brushes, napkins, blue and green colored squares
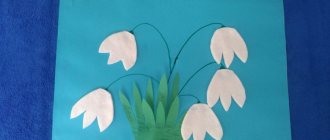
Primrose and crocus – spring rebirth
Its name is translated from Latin - “first”. Primrose blooms in all the colors of the rainbow. People call it rams or golden keys. They say that these “keys” open the door to summer.
There is also a superstition that primrose can open hidden treasures. A maiden dressed in white robes and holding a golden key in her hand sometimes appears in the fields. And if you pick a primrose with her, the flower receives a magical gift of finding underground and opening treasures.
Simultaneously with the primrose, and sometimes even before it, the lovely crocuses open their blue eyes.
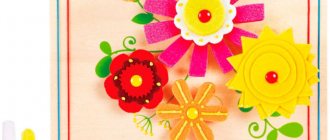
Goals♦ Teach children to work in a new technique for performing three-dimensional applique - creating an image using twisted strips of paper.
♦ Continue to learn how to combine various appliqué techniques to create a beautiful, harmonious composition, using previously acquired knowledge.
Lesson materials
♦ Illustrations depicting flowering meadow plants.
♦ A sample of an appliqué made from twisted strands of paper, made by the teacher on the eve of class.
♦ A4 cardboard in various colors.
♦ Scraps of various fabrics with large floral patterns.
♦ Colored paper.
♦ Paper napkins - white or colored, cut into 4 parts.
♦ Landscape paper, cut into small squares (with a side of 7 cm).
♦ PVA glue (it is better if it is in tubes with a narrow spout).
♦ Brushes for glue.
♦ Scissors.
♦ Various waste materials: pieces of foil, cotton wool, foam rubber, corrugated or velvet paper, neatly folded in small boxes.
♦ Paints - gouache or watercolor, paint brushes, jars of water.
Progress of the lesson
Preparing for the lesson.
The teacher asks the attendants to place oilcloth napkins on the work tables (they are used so as not to stain the tables with glue: it is necessary to teach children to work carefully); paper or cloth napkins for blotting up glue (and for drying dirty hands); scissors, tubes or bottles of glue. The teacher lays out all the materials needed for work (cardboard, scraps of fabric, landscape paper cut into small squares (about 7x7 cm), waste material, paints) on a separate table, accessible from all sides, and to which Children can come freely.
Part 1
Explaining new ways of working
Educator:
- Dear guys, today on my table you see a bouquet of spring flowers - dandelions. Beautiful? But dandelions look even more beautiful in a meadow, in nature - where they grow. Unfortunately, these flowers do not last long in vases and quickly fade. But in the meadow, in the clearing, they will delight us for a long time, like little suns peeking out of the green grass. But the flowers that we will make today will not wither and will delight us for a long, long time. Because we will make these flowers from paper, fabric, cotton wool, foam rubber.
Today I want to tell you about another interesting applique method that we have not used yet. Look at this flower. (The teacher demonstrates a sample of the appliqué he made from twisted strands of paper.) What do you think this flower is made of? From paper twisted into a flagellum. I'll teach you how to do it.
First you need to make a tourniquet from a napkin. What do you think, why exactly from a napkin and not from landscape paper? That's right, because the napkin is softer, the rope from it will be thinner, it can be folded and bent in any direction, at any angle.
So, I take a thin napkin. It can be white, or it can be colored. If there are no colored napkins, the finished flower can be painted in any color with gouache or watercolors.
To work, we need a fourth of the napkin. I roll it into a tube, and then roll the flagellum out of the tube, pressing it tightly with my fingers. I smear glue on one side of the flagellum and stick it on a sheet of cardboard, rolling it into a spiral, or making one petal out of it, or the middle - it all depends on what kind of flower you are planning to make.
What kind of flowers do you think would turn out well if made this way? (Dandelions, clover, roses.)
You can use another method of application. It is good for depicting daisies. I cut out the center from yellow paper, the petals from white. First, I glue the petals onto the cardboard, but not completely, but only on one, inner edge. Then I press the petals with the yellow round center. And then I carefully twist the petals onto a pencil, hold it a little, remove the pencil - I get curved daisy petals.
Let's remember how else you can make flowers for applique? Look, there are scraps of fabric with a floral pattern on the table. You can cut a flower directly from the scrap and paste it into your composition. How should it be cut so that the edges of the flower do not fray, so that the sloppy edges of the threads do not stick out from them? That's right, first you need to glue the entire piece of paper onto landscape paper - a small piece of paper, wait for it to dry a little, and only then cut out the flower.
You can make flowers from pieces of cotton wool, foam rubber, foil - from everything that you see on the table.
Now think about what will be depicted in your composition. Maybe it will be a large flowering meadow. There are a lot of flowers on it, and they will all look small and small. What can such small flowers be made from? (From lumps of corrugated paper, pieces of cotton wool, foam rubber.)
Or maybe, against the general background of a flower meadow, you will depict 1-2 flowers larger in the foreground.
Or maybe your background will consist of a piece of fabric with a floral pattern? What material will you use to make the grass?
Think this through. Mentally imagine what will be in your composition, how it will look as a whole. Also think about the order in which you will do the work. After that, go to the table and select everything you need to realize your plan.
Part 2 Getting the job done
While doing work, the teacher plays soft music. He helps children with advice, reminds them of various work techniques, rarely resorting to demonstration and effective help.
After finishing the work, the teacher asks several children to talk about their work according to the following plan:
1. What are you up to?
2. What did you get?
3. Why did your plan change?
4. What techniques did you use in your work?
5. Do you think there are any shortcomings in your work and what are they?
"Daisies"
Preschool children will enjoy making this application because it is not difficult to complete. The result will be a colorful craft.
You need to prepare:
- drawing “bouquet of daisies”;
- pencil, PVA glue, scissors, brushes, paints (preferably acrylic);
- colored woolen threads, matching the color of the flower in tone;
- frame.
Master Class:
- First, prepare a frame for the future picture. On thick rectangular cardboard, draw a frame of the desired thickness and cut out the middle. Paint the resulting product (light-colored paint is best). Leave until completely dry.
- Make small flat buttons from threads (the diameter should match the width of the frame) from woolen threads (color at your discretion) and paste them over the entire area of the frame.
- It is enough to finely chop the woolen threads. Place the thread mass into separate containers: white for the petals, yellow for the center of the chamomile, two shades of green for the leaves and stems.
- Place a stencil of the design on the base and carefully trace it with a pencil.
- Carefully grease the centers of the drawn daisies with glue and thickly glue pieces of yellow thread.
- Make the petals in the same way using white threads.
- Create stems in a similar way using dark green threads.
- For the leaves, use threads of a lighter green tone.
- Insert the picture into the frame. This is both a good gift and an interesting home decor.
Applique is a type of creativity accessible to all ages. A huge range of available materials, such as paper, fabric, plastic, cereals, glass, allows you to create beautiful products.
Appliqué practice is very beneficial for a child’s development. Since this is most often a collective work, the child learns to create together, while helping and accepting help.
Children's imagination, thinking, and imagination also develop, and the quality of attention, perseverance, and perseverance gradually increases.
The application in its own way is a guarantee of friendly creative relations between parents and children.
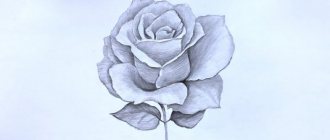
Amazing paintings
Flat applique is the simplest version of creating an original panel of dried flowers. All parts of a dry plant can be used: shoots of various curves, leaves, inflorescences, seeds.
The base for the applique is often covered with fabric or painted with watercolors.
Thick cardboard quite often acts as a similar base for small crafts, since it has excellent adhesion to any glue and is well processed with various paints.
Often, burlap is used at the base of the picture, which is used to cover the canvas. Many craftsmen use this material based on its environmental friendliness. Such applications are suitable for beginners who love floral art.
Postcard “Gift for Mom”
A preschool child can handle this work independently. Dad's help is welcome. For the background of the card and flowers, you should choose light, soft colors. For work you will need:
- Cardboard, which will play the role of the base of the product.
- White and colored paper (the color scheme should be adjusted with the child).
- Narrow satin ribbon of a suitable shade.
- Glue, scissors, pencil.
You can start making the gift. It is important to follow the sequence:
- colored cardboard needs to be folded in half (you should decide in advance on the size of the future postcard);
- next step: cutting out tulip buds; small multi-colored paper rectangles are folded in half, the silhouette of the petals is lightly drawn from the fold with a pencil and carefully cut out;
- cut narrow stems and leaves from green paper;
- the bottom of the tulip bouquet can be cut out separately: cut a rectangular strip of green paper from bottom to top, leaving the upper part of the part intact;
- fold all the received elements into a bouquet, placing it beautifully on the base, and glue it;
- a satin ribbon bow will be a wonderful decoration for a bouquet;
- as an addition - small white circles placed above the flowers.
When working on a postcard, it will be useful to give your child more freedom to realize his imagination.
The “flowers” theme is quite common in appliques due to the variety of design options available to adults and children.