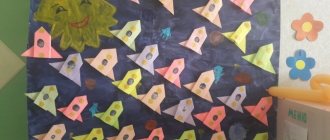
Volumetric rocket using applique technique
In the preparatory group, children are quite capable of fantasy work if they are given a general theme. Try voluminous appliqués too. Volume can be achieved using different techniques. For example, an origami rocket will look like this: You can also achieve volume if you add allowances to the rocket parts on which to stick them: Another option for a three-dimensional picture: An idea for collective children's work - a quilling drawing with rockets, such an applique will also be three-dimensional, but its Perform in stages: This type of applique is suitable for older and middle-aged children; it will be difficult for kids to make a three-dimensional figure.
To assemble a conical rocket figure, you can use simple geometric shapes, or you can use a stencil. If a child can easily handle scissors, then you can use a stencil diagram.
Such a rocket can be glued to the base or left as a separate figure.
From the sleeve, create a three-dimensional rocket with a real name and attach it to the base:
Progress of the lesson:
Educator: Guys, I want to invite you to go on a trip. Where do you think we can go with you? (Children's answers)
.
Educator: Do you hear someone knocking on our door? Who is this? (Children's answers)
.
(Surprise moment “Alien”
). Guys! The alien arrived to us from Mars, he invites us to visit him. Want to take a trip to Mars?
Children's answers.
Educator: But only astronauts can go into space. What do you think astronauts should be like? (Children's answers)
.
Educator:
To become an astronaut
There's a lot to learn.
To be proven and skillful,
Very clever, very brave.
Educator: Are you brave and strong, like real astronauts? You need to start every day by watching cartoons while lying on the couch, right? (Children's answers)
.
Educator: Exactly from exercise. Then we start charging. The alien will now show us real space exercises. Astronauts, start, stretch your arms and legs:
Once - we got up, pulled ourselves up,
Two - bent over, straightened up,
Three claps overhead, and then two jumps,
Inhale and exhale - breathe deeply,
They sat down quietly and easily.
Educator: Well done guys, now you have become real astronauts. Let's go into space together with our guest. Only, I don’t know what we can go on. Help us solve the riddle, and we’ll find out what we’ll use to go into space?
On an airship,
Cosmic, obedient,
We're outrunning the wind
Let's rush to... (rocket)
Educator: That's right guys, just one rocket is not enough for us to fly into space. Let's sit down at the tables and everyone will make a rocket for themselves. (a calm, quiet cosmic melody sounds)
Educator: Look, everyone has rocket parts on their table. What parts does a rocket consist of? (Children's answers)
.
Educator: Let's start work. Take a blue rectangle and apply glue to it. Glue onto cardboard; then take a large red triangle and glue it on top of the rectangle; Now we glue small red triangles on the sides of the rectangle. So we got rockets.
Now we can go, grab your rockets and stand behind each other. The alien will take us around Mars!
Children take their work and stand one after another. Calm cosmic music sounds. The teacher leads the children around a cut-out image of Mars.
Educator: Guys! Look, this is Mars! Look how beautiful he is, and what color? What shape?
Children's answers.
Educator: The oxygen in our spacesuits is running out, we urgently need to return to Earth. Goodbye Alien! Well done! We made real rockets in which you can go into space!
How to supplement the work
Outline of a lesson on application in the second junior group
When the basic rocket applique of geometric shapes is ready, it can be supplemented. It is appropriate to use as details:
- Stars.
- Planets.
- Portholes on the rocket body.
- Cosmonauts in spacesuits.
- Aliens.
You can use improvised decor. Stars are glued shiny sequins (they come in different shapes and shades), buttons are portholes, beads are decor on a rocket or distant planets, etc.
You can make an application on a previously prepared background. For example, a child, independently or with the help of adults, makes a drawing of space with paints or pencils. As a result, the “space” work looks interesting, picturesque and extraordinary. By combining several different techniques, children learn to fantasize and master the basics of composition and color combination.
With the finished work, a child can decorate his room, take it to school for a competition, or congratulate relatives on Cosmonautics Day. In any case, making an applique on a space theme will help a child develop hand motor skills and develop his sense of taste.
Compositions “We are astronauts”
Lesson summary on application for the middle group “a rocket is flying”
Cosmonautics Day is a broad topic. You can visit the planetarium or arrange a role-playing game of astronauts. And, of course, these are thematic works, including applications. You can create a composition where the creator himself will be the space explorer - to do this, take a photograph of the required size and “dress” it in a suit, and create a night sky around it with all the attributes, including a rocket.
You can immediately remember Belka and Strelka: You can approach the craft creatively and come up with your own cosmic plot, or you can use a stencil. This picture would be a good gift for Cosmonautics Day. You can use a photo of your dad or grandfather. You can also do it if you like to knit.
How to make an astronaut helmet with your own hands
No astronaut can be in space without a helmet. If your child is attracted to space and wants to feel like a real astronaut, then he can do it in a suit
To do this, it is important to make not only an outfit, but also a helmet as part of it.
Materials:
- Inflatable ball
- Glue
- Enamel silver
- Film
- Paper
- Scissors
- Insulation material
- Hot gun
Wrap the inflatable ball with film.
We glue the ball with pieces of paper using PVA glue or stationery glue.
Do this in several layers.
Tape the ball so as not to touch the valves, then you can simply deflate the ball.
When you have made several layers of paper, leave the ball to dry.
We cut out the holes through which the helmet will be put on and the holes for the eyes.
Using spray paint to cover the helmet
Use insulating material to decorate your helmet. Glue it along the contour of the eye hole. Glue the antennas to the top of the helmet. You can use a table tennis ball as a ball.
If desired, you can decorate the helmet by gluing multi-colored elements.
Many years ago, a tradition developed on April 12 to remember the first man who flew into space, to tell children about this feat and about the structure of the Universe. For this holiday, you can make beautiful and bright crafts on the theme of space from paper, plasticine and other available materials.
Progress of the lesson
Guys, we have guests today, let's say hello to them.
I want to ask you: Do you like to travel? (Yes)
Let's take you on an unusual journey with the help of a magic screen. (Slide 1)
What do you see on the screen? (children's answers)
And, probably, you guessed that I am inviting you on a space journey. Guys, please tell me what holiday we will soon celebrate in our country. Yes, well done, you answered my question correctly. (Slide 2)
And, indeed, on April 12 we celebrate Cosmonautics Day.
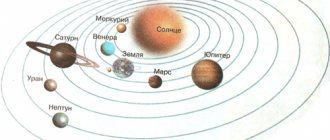
In 1961, the first man flew into space. This was the first in the whole world, our Russian man - cosmonaut. Do you know his name? This is Yuri Alekseevich Gagarin. (Slide 3)
Guys, let's look at the pictures and decide what is better for us to go on a space journey (Slide 4)
Of course, we can do this on a rocket. But for this we need to make it. And today we will cut out rockets like these (I show the finished rocket)
Everything you need for work is on your desks.
(Music turns on)
In order to cut out a rocket, we need this piece of colored paper. We fold it in half and begin to cut out the silhouette of a rocket from paper folded in half. Look how to do this: I cut off the corner from the fold line, then I cut the paper in a straight line downwards, but I don’t cut to the end, but I turn it to the right and cut to the end of the leaf and then from the corner I cut to the middle like this. Look again at how to cut it. I paste the cut out rocket onto the “outer space”
, then I glue the porthole, cutting it out of a square, cutting off the corners, and adding ready-made yellow stars, and tearing off pieces from red paper for the fire. I show you a finished sample of work.
Now we take scissors; while working with scissors, do not forget the rules for handling sharp objects. We handle it carefully so as not to hurt ourselves or injure the person sitting next to us. Cut out the rockets. Great. Now we unfold the rocket and put it aside until we need it. Take a small square of colored paper and cut out a circle, cutting off the corners - like this. This will be a porthole - a window in the rocket. You have the stars ready, and you will make the flame from red paper using the cutting method.
Everyone did an excellent job with this task. Now let's connect all the cut out parts to make a rocket. We take colored cardboard and glue our rocket, glue a window on top of the rocket, from where we can see outer space. When taking off, the rocket emits a flame of fire. Glue it just below the rocket. Then we glue the remaining parts. What details do we have left? Yes, it is true that there are many stars in space.
Well done, well done, now let's rest. Let's have a space exercise session.
Physical school
I want to become an astronaut, (raise your hands up)
I put on a spacesuit, (sit down and gradually stand up)
I'll fly on a rocket (join hands above head)
And I will open all the planets! (make a big circle with your hands)
Are you wearing spacesuits? are the rockets ready? Prepared to launch the rocket
You are ready? Attention! Everyone get ready to launch. I start the countdown: 5,4,3,2,1 launch... (Slide 5) And we are in outer space...
(Slide 6)
Guys, we have a unique opportunity to look out the window and see outer space.
– Cosmonauts, be careful, we are monitoring space objects and bodies. What do you see? children's answers - Very beautiful and unusual.
How to make a rocket step by step
To make an applique of a rocket from geometric shapes, you will need the simplest stationery:
- Colored cardboard (for the base of the work).
- Colored paper (for the rocket top, body and fire).
- Paper scissors.
- Glue stick.
- On the reverse side of colored paper, shapes are drawn - a rectangle (this is the body), a triangle (this is the top of the rocket), several elongated triangles (this is the fire). That is, the diagram of a paper rocket is a combination of these three elements.
- Each of the parts is smeared with glue (the wrong side) and pressed against the cardboard. If it is difficult for a child to follow the composition, you need to help him.
- The glued parts are wiped with a cloth using gentle smoothing movements. This will allow the paper to stick evenly, and excess glue will remain on the fabric.
DIY crafts for Cosmonautics Day in kindergarten
From an early age, children begin to become interested in the wonderful expanses of space. Studying space is much more interesting in practical classes. From scrap materials you can make a craft for Cosmonautics Day. The kindergarten often conducts classes or organizes competitions and exhibitions.
The first thing kids perceive when they hear about space are the stars and the moon. Therefore, it will be easier for them to start with these items.
You can make the moon and stars in different ways.
You can make three-dimensional stars and planets from gelatin and cereals.
Materials:
- Gelatin
- Water
- Cereals
- Varnish
- Star shapes
We need to heat half a glass of water and add gelatin. Cook it over low heat for about 3 minutes.
Then add the cereal to the water with gelatin.
Spread the foil on the table and place the mold on top. Pour a mixture of cereals and gelatin into it.
Insert ribbon or string.
When the craft is dry, remove the mold and coat with varnish.
You can use stars, a round shape, or the image of the month as forms for crafts.
It is best to give children of kindergarten age simple crafts that are done fairly quickly and do not require complex processes.
Making a bright planet, part of the solar system, is not difficult. To do this, you can use a regular foam ball and an old unnecessary disk.
Take also paints and a brush. Cut the foam ball into two equal parts.
Glue a disc between the halves.
Cover the top of the ball with glue and sprinkle it with semolina.
Paint the top with bright colors.
You can fasten all the parts with a toothpick or glue them with a hot gun.
(in senior speech therapy group)
Software tasks:
- clarify and activate vocabulary on the topic “pets”,
- learn to navigate on a sheet of paper,
- indicate the direction of movement with the words: “left”, “right”, etc.,
- fix the main colors;
- fix counting within 10 (direct and reverse), names of geometric shapes, introduce trapezoid and rhombus;
- develop logical thinking, memory, imagination, creativity, learn how to perform general composition in appliqué;
- cultivate accuracy in work and good feelings.
Equipment:
pet toys, tickets, sets of geometric shapes, rockets, sheets of colored paper, mugs, cards with drawings of robots, pencils, brushes, glue, napkins, oilcloths, rocket parts, starry sky.
The course of direct educational activities.
1. Introductory part.
Attention! Attention! Everyone! Everyone! I hasten to inform the guys who love science fiction and adventure that mysterious and exciting events await us today. We are about to make a fantastic flight into space, where you will meet miracles and unknown discoveries. Guys, what can you fly into space on? (On a rocket!)
2. Consolidation of what has been learned.
Who controls the rocket? (Cosmonauts.)
Who was the first astronaut on the planet? (Yu. Gagarin.)
Yes, the first person to go into space was Yuri Alekseevich Gagarin, but Belka and Strelka went there even earlier. Who do you think it is? (These are dogs.)
Guys, are dogs domestic or wild animals? (domestic)
That's right, well done!
3. Didactic game “Who’s missing?”
In order for us to go on a flight, we need to test our memory, because many tests await us in flight, let’s play the game “Who’s missing?”
Look carefully at the animals, are they domestic or wild?
Marina, count how many animals there are.
Denis, who's first?
Natasha, who is standing last?
Now close your eyes, I will remove someone, and you must name who is gone.
Well done, fully prepared for the flight.
4. Rocket trip.
And now I will give you tickets that you need to decipher and take a seat according to the ticket.
Misha, who is on your ticket? (Cows.)
How many? (two.)
Look for the number 2 and take your place. (Children take seats according to their tickets.)
So, everyone took their seats, fastened their seat belts, and adjusted their headsets.
(Music. Rocket launch.)
5. Didactic game “Determine the route of the rocket”
And here we are in space. Now you are all commanders of the ship and control your rocket. And the rocket will be a circle, space will be a blue sheet of paper. Place the circle on the bottom piece of paper. The rocket rises quickly, but falls sharply down. Where is the rocket? (At the bottom.)
Now she flies to the upper right corner. Where is the rocket now?
(Children change the route according to the teacher and, answering his questions, say where the rocket is: in the center, in the upper left corner, etc.)
Guys, you showed aerobatics! Well done!
6. Didactic game “Fix the hole”
Oh, guys, something flashed behind the rocket window. So this is a shower of meteorites. They collided with our missile and damaged it.
Now you are all engineers and designers. We need to repair our spaceship.
What color is our rocket?
(In front of the children is a rocket with holes in the form of geometric shapes. There are geometric shapes on the tray. Children put and identify those holes that are suitable for repair.)
Now name the figures that you needed for repairs
(children call).
7. Introducing new geometric shapes.
Children, you have two figures left on the tray that are of no use to you.
Tell me, who knows what they are called?
(If they cannot answer on their own, the teacher invites them to count the sides and angles.)
Yes guys, these are quadrilaterals because they have four corners.
(Then the teacher introduces the children to new figures: rhombus and trapezoid, showing them.)
Guys, the task was very difficult, but you all did it well.
I'm very glad for you. And now I propose to leave our rocket and rest a little.
7. Physical school
And now you and I, children, (Marching in a circle.)
We're flying away on a rocket.
Rise up on your toes, (Rise up on your toes, pull your hands up, clasping them.)
And then hands down. (They lower their hands.)
One, two, stretch. (They reach up again.)
Here's a rocket flying up. (They run in circles on their toes..)
8. Didactic game “Fix the robot”
We rested a little, we return to our rocket, our flight continues. Oh, guys, while we were away, we got a letter. From whom do you think? (From aliens.)
Yes, from aliens. Let's read it.
Dear children - earthlings, we turn to you with a huge request. Our robot assistants have broken down. We kindly ask you to fix them.
(the children are given cards with two robots drawn on them: one is working, and the second is missing some parts. The children must see and complete them.)
Guys, the aliens sent you photographs of the cosmic sky in gratitude for your help.
9. Application “Rocket”
And I suggest you make our rocket out of geometric shapes and glue it to this photo. First, the silhouette of the rocket needs to be laid out on the table and then pasted on. (Independent work, individual assistance.)
These works will remain with you as a memory of our journey.
10. Return to Earth.
Guys, a signal has been received from the Earth’s space center to return home to Earth.
Now, pay attention! The descent and countdown begins. Close your eyes and count in a low voice 5
to 1. — The rocket made a soft landing thanks to the well-coordinated and friendly work of the crew. Thank you all very much!
11. Summary.
Guys, did you enjoy our trip? What did you like most? (Children's answers.)
An application for Cosmonautics Day for kindergarten is a great opportunity to tell children about a huge breakthrough in the development of all mankind - the first flight of our Soviet man into the vast and unknown space.
While the children are working on the application, the teacher can read them interesting passages from the biography of Yu. Gagarin and talk about the process of his preparation for a rocket flight. Or you can arrange a thematic exhibition from the applications and ask the children to independently prepare a short story about space.
This option is appropriate if only the senior group created an application for . The older group of children already have the skills to prepare and deliver messages.
To create an applique, we suggest using different materials - then it will be much more interesting for the kids to work. So, you may find it useful:
- cardboard (plain or coated, as well as golden foil);
- cylinders from disposable towels or toilet paper rolls;
- colored paper;
- semolina;
- office glue (PVA);
- scissors, pencils, stationery knife, ruler and other auxiliary tools.
Let's get started!
We take a sheet of black cardboard as the basis for our application.
We arm ourselves with a stationery knife and pick up a cardboard roll.
We cut the roll into two halves - this way, one roll can be used to create two works.
We cut out narrow triangles (about three pieces) from blue paper and bend them in half (lengthwise). You can immediately cut triangles from the folded sheet, then they will turn out smoother.
Glue the triangles to the base of the half roll.
Make the free part of the cardboard roll slightly pointed.
Glue the rocket onto a black cardboard sheet.
Cut out a petal from golden foil cardboard or foil. We cut out a petal of the same shape, but larger, from red paper.
Glue the golden petal inside the red one.
Now we fix this composition at the base of our rocket - we get tongues of flame.
Cut out a ring from red paper and stick it on the front of the rocket.
Take a sheet of golden cardboard. You can replace it with foil, but cardboard is easier to work with.
Cut out the sun from this sheet.
Glue the sun to our picture.
We make another planet from silver cardboard - with a ring. Glue that too.
We arm ourselves with semolina.
For convenience, scatter it on a flat surface (for example, a plate).
Lubricate the surface of our space with glue and sprinkle with semolina.
We got a wonderful landscape - a rocket rushing into the distance between the planets and placers of the Milky Way.
The application for Cosmonautics Day is ready! The kindergarten preparatory group can easily cope with this work, since they already know how to handle all the materials and tools.
Watch how to make a wonderful application for Cosmonautics Day in the video: