Step-by-step creation of drawings by children
The most important thing in learning any type of creativity is constant practice. Before learning to draw complex, intricate paintings, a child must gain an understanding of simple shapes and the basics of composition.
They should not limit the imagination and desires of the young artist, but only guide.
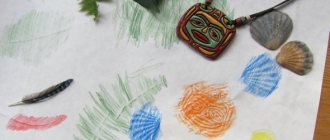
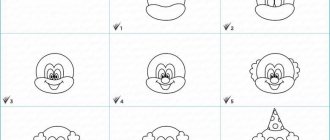
Snowflakes and winter ornaments
The image of snowflakes develops imagination and abstract thinking well.
Procedure:
- Draw a circle. Place a dot in the center.
- Focusing on it, cross out the circle horizontally, vertically and twice diagonally - you should get 8 lines inside. This will be the base of the snowflake.
- The blank is filled with circles, lines, zigzags, polygons and other shapes, creating an individual pattern. Similar actions are performed with each beam, maintaining symmetry.
It is worth giving your child creative freedom and the opportunity to draw according to their individual skill level.
Winter motifs in drawings.
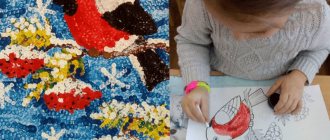
Red Apple
Images of fruits and berries are the basis of most educational programs. Using their example, the child understands the basics of lighting and darkening, and color selection.
Steps for drawing a block:
- Draw a circle. Adjust the shape of the top and bottom parts to create the silhouette of an apple. Draw a line (“dimple”) in the upper part, mark the stalk and leaf.
- Apply the first layer of watercolor. It should be light, almost transparent. The apple can be decorated in green, yellow, red colors or a combination of shades at the child’s discretion.
- Color the fruit in a basic tone, skipping areas of highlights.
- Starting from the top of the apple, apply shadows, adding specks of paint and gradually stretching them with a brush.
Having completely painted the base, they begin to draw the stalk and leaf, thicken the outline and other finishing touches.
Fruit still life.
Watermelon gouache
Drawing a watermelon is another easy way to become familiar with basic shapes in painting.
Step-by-step instruction:
- Draw a triangle. Erase one of its sides and replace it with a semicircle, and also make the opposite vertex rounded.
- Inside the resulting outline, select the peel and the layer between the peel and the pulp.
- Paint the main part of the watermelon red. Highlight the layer between the pulp and the peel in green, making a smooth transition.
- Color the peel deep green. Add some dark stripes.
Lastly, you can add a few dark brown and yellow watermelon seeds.
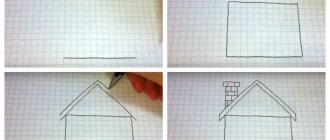
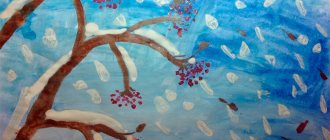
Drawing landscapes
Using paints, it’s easy and quick to paint landscapes - from forests and mountains to the sea or the night sky.
The specifics are different, but the technique remains the same:
- Draw a pencil sketch. It should be as simple as possible and indicate only shapes, without details.
- Paint the background with primary colors: for example, sea and sand or field and sky. Draw large objects such as plants or mountains.
- Apply shadows and highlights. Add surroundings: clouds, waves on the water, etc.
Lastly, small details are completed: seagulls in the sky against the backdrop of the sea, fruits on the trees, etc.
Landscape with colors.
Flowers with paints
Drawings with flowers are easy to make, give scope for the child’s creativity and always turn out bright and beautiful.
Step-by-step instruction:
- Draw the outline of the flower on the paper. When painting with paints, it should be a silhouette without small details.
- Paint the petals with the main color. Then take a dye several shades darker and apply it to the ends. The border of shades is blurred, making a smooth transition.
- Paint the middle of the bud with a lighter tone. Make a transition with strokes from the center to the tips of the petals.
- Draw the core and several stamens.
At the end of the work, add stems and leaves
They are made sketchy, without details, so that the main attention is drawn to the bright bud
What paints are best for children's creativity?
When teaching a child to draw from scratch, it is important to choose the right paints. The most common types used for children's creativity:
The most common types used for children's creativity:
- Finger paint. Made from food coloring and water. Safe for health, easy to wash off, wash and clean from any surface. They have a thick consistency, so they stick well to your fingers and lie smoothly on paper. Suitable for babies aged 6 months and older.
- Watercolor. The most common option for beginning artists, which is most often used in kindergartens and schools. Watercolor paints are made from environmentally friendly materials, are easy to use, and have a bright and rich palette. They easily mix with water and lie on paper in translucent layers, while maintaining richness and juiciness.
- Gouache. Suitable for children aged 5-7 years. It has a dense texture and bright colors when applied to paper. The composition can be either safe or containing toxic substances. For children it is better to choose the first option.
- Oil paints. Valued for ease of use, ease of mixing, and durability of the pattern. They dry without changing color, unlike acrylic or watercolor. Made from vegetable oils. Since economical consumption is important when using such pigments, they are best chosen for children 6-7 years old who are already familiar with the basic rules of painting.
- Acrylic paints. Manufactured from synthetic components. They dry quickly, are easy to dilute and mix, and are suitable for drawing not only on paper, but also on wood or fabric. Acrylic paints are chosen for children 6-7 years old who have already mastered the basics of watercolor painting.
It is better to avoid too bright, acidic tones. Colors should be moderately saturated. The optimal set for a child 6-7 years old is 12-20 shades. Before purchasing, it is recommended to check the paints: they should be moist, uniform in texture, without a sharp, pronounced odor.
Watercolor paints.Recommendations from psychologists and teachers
According to Daria Nikolaevna Koldina’s notes (which are available online), teachers do not recommend overloading children during drawing classes, otherwise, instead of enjoying a rich and interesting life, the little one will suffer from fatigue and frayed nerves. If perseverance is not one of the child’s virtues, then there is no need to force him to study, since he must come to this on his own.
As for the break between school lessons and drawing classes outside of school, psychologists recommend that it be at least an hour. Thus, a five- to six-year-old preschooler will be able to “switch” and begin another type of activity with renewed vigor.
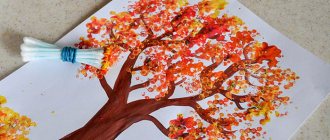
Easy drawings with paints for beginners in watercolors step by step
The best option is to draw a landscape. For example, this sunset in pink tones.
In order to make such a drawing, in addition to a blank sheet of paper and a brush, you will need to prepare four colors of paint: pink, blue (ultramarine), dark yellow and black.
We start with yellow, mix the paint with water, making the color saturated. After this, we begin to paint the sheet with a brush.
So, the background was applied. Now, as in the final version, you need to draw the sun. In the place where you plan to do it, wipe the area with a dry cloth. Making a white circle. The result should be the following.
Now add pink to the yellow color and mix to get an orange color. We put this new color on top of the yellow, but so that there is a yellow halo around the sun.
Now we take only pink paint and apply it in a third layer so that the sky has a slightly more pink tint.
Applying blue skies
You need to add a little blue color to the upper part of the sky. We apply ultramarine at the top of the picture. If the blue color begins to mix with the previously applied yellow, you can remove the previous shade with a cloth and apply the blue directly. Before each application of paint, the brush must be wiped with a cloth so that it is dry.
Now mix pink and ultramarine. The result will be a violet or purple hue. We apply it below the blue color. Subsequently, this will give the sky a more evening appearance.
Now, using the same pink and blue colors, we make a darker, rich purple shade. Here you will have to experiment with the amount of paint. Before applying the finished shade, apply it to a strip of paper. If you are happy with the color, then paint it; if not, we continue mixing further.
Using the resulting color scheme, we draw stripes of clouds parallel to the horizon.
We will also draw several stripes of clouds on the right side of the picture, where the sun is. So that the clouds are not very contrasting, they need to be blurred a little. To do this, take a dry brush and blur the painted purple clouds with it.
If the previous stages were drawn on wet paper, then subsequent drawings should be done on a dry sheet. Therefore, we wait for some time for the sheet to dry. After it becomes dry, we begin drawing the horizon. Take a light purple color and draw a horizon line with a thin brush tip.
Now the upper part of the drawing, above the horizon line, needs to be made somewhat pinkish. Take the pink color and apply it. To make it softer and more blurry, add a little water and “smear” the pink paint with water.
Then we move to the lower part below the horizon line. We draw the water and the shore. Since we have a sunset, a pink evening, we will paint the water pink.
After the water we move to the shore
To do this, take the intense purple we used to paint earlier and mix it with black paint. We get a dark shade for the shore, which we use to paint under the waves. We also make a few dark strokes for the water itself.
All that remains is to apply a few adjustments in the sky area; if you are not satisfied with it, use a dry brush under the horizon to blur the paint, making it look like glare from the sun on the water. That's the whole drawing. Perhaps something won’t work out right away, but with patience you can get the hang of it, and then everything will go like clockwork.
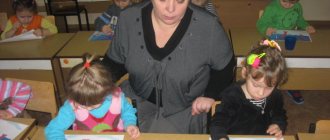
Workspace organization
In order for a preschooler to be able to draw at home, he needs to prepare a workplace. The child must see the entire image, so to draw, you should take an easel or draw on the floor. Special attention should be paid to lighting, since the light should fall from the opposite side from the hand with which the baby is drawing.
An example of organizing a workplace for children
As for working materials, the water should be on the right (if the baby is left-handed, then on the left), the paints should be above the drawing or near the water, and the palette for mixing colors should be in the hands. If the palette stands near the paints, then during the work you can accidentally drip onto the painting, ruining it.
What should drawings be like for children 6-7 years old and older?
In the drawings of preschoolers and children aged 6-7 years, a clear plot and design begins to be visible. The basis for it is often everyday and social situations from the child’s experience: communication with family, playing with friends at school and kindergarten, visiting a store, hospital and other public places.
Often, motifs from fairy tales or cartoons can be traced; the child depicts literary characters, animals, and familiar places. Children 6-7 years old also draw household objects: furniture, dishes, etc.
The picture of a child reflects his inner state and worldview
Child psychologists advise paying attention to the general mood of the image: it should not be aggressive or depressive.
The constant presence of such motives (sad or quarreling people, large teeth and claws in animals, etc.) may indicate psychological problems.
If the drawings do not meet these criteria, there may be both psychological and physical problems, such as vision problems, neurological disorders, or poor fine motor skills.
Free drawing.
Image techniques
Popular methods and techniques of depiction are represented by the use of nature, reproductions of paintings, a sample or any other visual aid. A nature is an object or phenomenon that a child must draw in the process of direct observation. At early preschool age, children can already perceive an object in the totality of its qualities.
But it is worth noting that depicting an object using a template or from life requires the ability to analyze the relationship of individual elements and their location in space.
Speech development in children of senior preschool age
Human
Detailed instructions for drawing a person with a simple pencil. An approximate version is shown, which is used to determine a child’s drawing skills, creative abilities, and testing in preparation for school. The process is divided into several stages. The author shows how to learn to visually divide a blank sheet of paper and mark future lines with dots to obtain the correct proportionality of the human body. Explains in detail the need for the ratio of the thickness of the arms and legs. Gives practical advice on how to correctly draw shoes, clothes, and with strokes turn a mitten into 5 fingers.
Features of training in different periods
It is necessary to take into account the characteristics of learning at different periods of a child’s life. Until the age of two, a child can only draw doodles. The kid cannot and does not try to depict anything, he simply moves the pencil over the paper and enjoys the process. During this period, parents only need to encourage and praise the baby, and also make sure that he does not put the pencil in his mouth.
From 2 to 4 years
At the age of 2 to 4 years, a child can master the finger drawing technique. The baby needs to be taught to hold a pencil and a brush. It should be shown how to draw lines, how to close a line into a circle, how to draw spirals.
Children aged 3-4 years already watch with interest how adults draw and try to imitate them. Parents should draw together with their child, showing him how to draw the simplest shapes - a sun, a mushroom, a house. Encourage the child's desire to imitate. Be sure to praise even for minimal successes.
At 2 years old it is worth using finger paints and pencils. At the age of 3-4, it is worth introducing a child to gouache, teaching him how to color pictures, and tracing drawings with dots.
From 5 to 7 years
At the age of 5 to 7 years, a child should already be confident in handling pencils and brushes. Children of this age can color ready-made pictures and draw simple geometric shapes - circle, square, triangle. You should develop the skill of horizontal and vertical shading.
To develop a taste and desire to draw, it is worth looking at illustrations with your child, including reproductions of paintings by famous artists. It is useful to introduce children to non-standard drawing methods.
At 5-7 years old, a child’s drawings should represent plots rather than individual objects. Children enjoy drawing both familiar objects and characters and imaginary ones.