Necessary materials
- A simple pencil (for depicting objects with a clear outline);
- Sheet A4 (base);
- Eraser (can erase erroneous details);
- A set of colored pencils (painting the main elements);
- Set of helium colored pens (outline highlighting).
Now, let's move on to the most interesting part - learning step-by-step instructions for drawing princess outfits from fairy tales. We suggest that you familiarize yourself with three detailed lessons for beginning artists.
Decorative decoration of the outline of a dress in an art lesson in the middle group
The process of drawing in preschool age helps to form various skills and develop abilities:
It helps train the eyes and hands and develop flexibility in the hand.
The success of the lesson “Let’s decorate a doll’s dress, drawing, middle group” is based on the teacher’s use of the correct techniques and forms.
Step-by-Step Guide to Drawing a Dress #1
- To begin, analyze and outline the location of the drawing on the paper (it is best to choose the center so that it does not feel noticeably shifted up and down).
Advice! Start drawing and coloring from top to bottom, not the other way around.
- Next, draw a V-shape that will form the model's neck. You will need to draw two straight lines that connect together. Outwardly, it looks like the so-called “daw”. Extend one line to highlight the top of the dress.
- From the above two lines, draw lines to the left and right from different sides. The result will be wide straps - the frame of our outfit. To achieve an elegant silhouette, you need to draw two curved lines leading down. The bust is adjusted with small touches.
- The next step is shaping the waist. To do this, draw 2 straight lines in the vertical and horizontal directions to create a small rectangle.
- Run a long stitch on each side to outline the scale of the skirt. Connect the resulting lines together in a chaotic manner to create curved skirt flaps.
- Now all that remains is to add a little realism to the resulting sketch. Add pleats - long vertical strokes at the bottom, as well as small pleats under the bust that will highlight the figure.
- You can decorate the belt with a bow in the middle. To do this, draw an oval in the middle and draw two lines crosswise. Then add some folds.
- Pull down two air ribbons that will go straight from the middle of the bow. You need to draw 2 chaotic lines that need to be connected to each other.
- Decorate the sleeves with wavy lace. Draw wavy lines at the top of each wide strap.
- If desired, the young artist can widen the sleeves by adding a few folds.
- If you are planning a dress in the style of fairy tales (for example, Cinderella), then you can add lace frills near the neckline. They are drawn in the same way as sleeves: draw wavy lines.
- The next step is to remove unnecessary auxiliary lines using an eraser.
- The final stage is to paint over each element with colored pencils. The choice of colors depends entirely on the child’s imagination. The resulting drawing is complemented with decor, the head and torso are painted on, or simply left as a sketch of a dress.
GCD move:
Lena dressed up the doll :
I made her a new dress,
Lace was attached to the hem and sleeves.
All the toys praise the doll : “What a beautiful outfit!”
Look at the dolls with the children, pay attention to the dresses they are wearing. Consider illustrations of patterns on dresses . Ask the children which dress they liked best and why.
to decorate an outfit for the doll too . Show them a dress ,
explain that it needs to be decorated with a pattern . Remember the elements of the pattern (leaves, rings, dots, lines, cells, flowers, etc., show them at the board, think about how they will decorate the dress .
Examine all the finished drawings and, together with the children, note the most beautiful patterns.
Arrange an exhibition of ready-made dresses .
2. Komarova G. S. Visual activities in kindergarten. – M., Mozaika-Sintez, 2006.
Summary of the final lesson “Let's help the doll Masha” Topic: “Let's help the doll Masha” Goal: Summarizing the knowledge children have acquired over the year Objectives: Educational: To cultivate a desire to help the playmates.
Game physical education activity “Let's decorate a Christmas tree in the forest” Purpose: 1. Strengthen walking skills by stepping over objects. 2. Practice balance, crawling under arches. 3. Learn to jump.
Complex lesson for 3-year-old children “Visiting the doll Gala” Goal: formation of a holistic picture of the world, formation of elementary mathematical concepts. Objectives: continue to form concepts.
Summary of the lesson on FEMP “Let's tie a bow for the doll” Municipal government preschool educational institution of the Khanty-Mansiysk region “Kindergarten “Firefly” in the village of Shapsha” Prepared by:
Summary of continuous educational activities in decorative drawing “Let's decorate a dress for a doll” (middle group) Summary of continuous educational activities in decorative drawing “Let's decorate a dress for a doll” (Based on Dymkovo painting).
Notes on speech development in the first junior group “Let's embroider a dress for a doll” Notes on speech development in the first junior group. Topic: “Embroidering a dress, blouse, skirt for Tanya’s doll.” Compiled by the teacher.
Lesson on artistic and aesthetic development in the younger group. Joint composition “Let's dress a tree in a little white dress” Theme of the week: “Hello, winter-winter” Title: “Let's dress a tree in a little white dress” Age group: 1st junior group Program.
Summary of a drawing lesson in the first junior group “Let's decorate a dress for a tumbler doll” Topic: Let's decorate a dress for a tumbler doll Objectives: 1. Continue teaching children to draw rounded shapes; 2. Consolidate knowledge of color, shape; 3. Develop.
Master class “Lace dress” Today I present to your attention a master class “Lace dress” made from paper, round, openwork napkins. Best to use.
Lesson on speech development for middle-aged children “Let's decorate the Christmas tree with fairy tales” “Let's decorate the Christmas tree with fairy tales” Goal: Development of coherent speech in preschoolers. Objectives: educational: Teach children to describe animals and name them.
Source
Detailed instructions for creating dress No. 2
The second master class will describe the evening version of the dress, which anyone can easily and simply depict on a piece of paper.
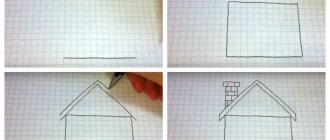
- In this case, we need to start by drawing a stamp on which our outfit will hang. The stamp is a hanger with a slight thickening in the middle. The sketch is usually drawn with a simple pencil and outlined with a black pen. Draw thicker lines at the top and thinner ones along the edges. There must be a hook in the middle.
- Then we draw thin straps on both sides and a curvy neckline of the bodice. To add volume, we mark the back of the model with a slightly curved line.
- Shaping the waist. To do this, draw two strokes tapering towards the belt line.
- From the waist we draw a ball skirt in the shape of a bell.
- To emphasize the beauty of the dress, let's draw the final curve. Additional folds should be added to mark the inside.
- Now you can start painting over the chic evening dress for the girl. The main tone is chosen to be calmer (for example, sky blue or light purple). Typically, artists paint over the entire dress, and later focus on bright details. Do not press hard on the pencil, draw smoothly.
- The remaining elements are drawn in bright colors, outlined with colored pens.
- A good idea is to add beads or mesh, a belt and other additional elements. Beads can be scattered throughout the outfit: draw circles of different sizes.
- Now the dress is ready. Turn on your imagination and you will get a beautiful outfit for the bride, birthday or any other celebration. By changing the color palette, fittings, decoration and appearance, the artist will be able to develop his creative qualities.
Where to begin
To understand how to draw a dress beautifully, you need to understand what it consists of. To do this, it is worth explaining to the child that we are talking about a female type of clothing with floor-length fabric to cover the body and almost the entire part of the legs.
- The dress consists of a bodice and an underskirt based on one or several parts.
- For example, the crop top look is built on a short top and skirt.
- But it is possible to add a corset, partlet, kirtle, petticoat, stomaki, robe.
- Used for everyday purposes and official public appearances.
It all comes down to what the girl wants to draw. Perhaps this is a copy or invention of your own product as an amateur modeling.
In any case, it is necessary to support the child’s impulse and provide the necessary information, pencils and paper.
A good option is to learn to use computer programs for freehand drawing, thanks to the mouse.
Dress drawing lesson No. 3
The third instruction will help you study in detail how to draw an evening dress for a doll or a real person.
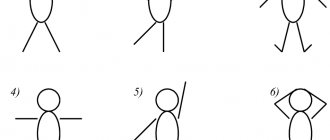
- Let's start with the simplest thing - the image of the base of the figure. Because it is very difficult to draw without maintaining certain proportions. Draw a vertical line and draw an oval on top, which means the upper part. Remember that all auxiliary lines must be drawn with a simple pencil without pressure.
- From the oval, draw two curved lines that will give the shape of a fashionable princess dress.
- Our ball gown will be without sleeves and straps, so let's start marking the chest. In the upper part, just below the neckline line, two curved strokes should be drawn, reminiscent of a “daw”.
- The next step will be to remove unnecessary lines using an eraser (vertical line and part of the oval).
- The design of the skirt depends entirely on the preferences of the creator. Add monograms at the bottom of the skirt. To do this, draw smooth curves and twisting lines.
- If desired, you can decorate the dress with a small bow on the side along the waistline. Draw an oval in the middle and draw two lines crosswise. Then add some folds. A bow will come in handy.
- In this case, there are no traditional options and rules for choosing colors. Each dress can be a different color. For example, pink or yellow. Play with colors.
Thus, after reading our step-by-step lessons, you can once again be convinced that even a child can complete every step of drawing a dress. We hope that the recommendations and advice will help you in the future. Have fun creating!
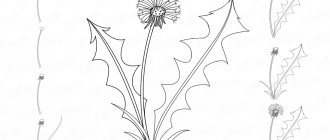
How to draw a skirt
Now move on to drawing the hem of the dress. You can depict a lush hem, shaped like a bell. The hem will end with a wavy line - this will make the dress seem even more magnificent.
Draw some waves more voluminously by drawing the back side of the fabric. Draw folds from the waistline to the middle of the hem.
The stripes will go towards the bottom, only they will be oriented to the waves of the lower edge of the dress. You can draw a couple of additional folds where you want to give more volume and realism to the image.
Reflection
Having examined the work and praised the children, we continue to communicate with the students in an atmosphere of trust. Questions used:
– What did you like most about coloring?
Important . At a younger age, children perceive critical comments more painfully, therefore, having identified an error in the work, you need to explain what inconvenience it brings to the game character.
A decorated exhibition of painted dresses will make children feel proud of the good deed done for the doll, and they will learn to decorate better at an older age.
Source