Preparing for the lesson “Decorating an apron”
Decorative drawing classes for children aged 4–5 years are aimed at solving two main problems:
- develop brush skills,
- develop the ability to put together a pattern from simple elements.
Decorative drawing in the middle group is painting a blank with a brush and paints
Paints and base for painting
- Gouache is the best option for painting an apron. The paint picks up well on the brush (without water), goes on smoothly, and the patterns come out bright and clear. Gouache can be painted on a white or colored background, the decoration will not merge with the base.
- Watercolor is acceptable. But only for drawing on a dense white base. The teacher carefully monitors how the children collect water and paint to remove excess moisture, otherwise they will drip onto the drawing or the patterns will spread.
Gouache is easy to apply to a brush, it is an ideal paint for five-year-olds
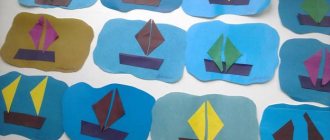
- The basis for drawing an apron is usually 1/2 A4 sheet: made of thick white paper, the teacher can pre-tint it with watercolors,
- from colored cardboard.
The teacher can cut out an apron blank for class
Sometimes children are asked to decorate apron blanks with colored pencils. It is not right. Colored pencils are used in the middle group for object drawing. In decorative drawing, kids can use a simple pencil to draw a stencil: they trace the apron on paper.
Techniques and drawing techniques
- Preliminary repetition and training of each technique: children “draw” circles and lines in the air with a dry brush,
- chalk on a blackboard (marker on a special board).
- leaves in a floral design: apply the brush with all its bristles to the paper and remove,
Important. The teacher monitors the completion of the practical task by the children. For those who have difficulty drawing, he shows techniques individually.
Children improve their gouache painting techniques under the supervision of a teacher
This is interesting. Painting an apron can be done with five-year-olds using an unusual technique. The guys will decorate the blanks using non-traditional materials and tools:
- wax crayons,
- cotton swabs or disks,
- pieces of sponge,
- fingers,
- stamps from vegetables or fruits.
It’s easy to make an unusual pattern on an apron by drawing with your fingers on wet paper
Combination with applique and modeling
When creating an “Apron” craft, drawing, applique, and sculpting techniques can be used. An apron painted with a pattern is perfectly complemented by various elements:
- pieces, strips of colored or wrapping paper,
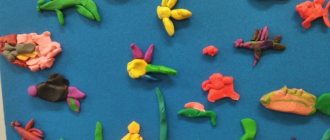
- plasticine mosaic,
- strokes of plasticine,
- dried flowers, leaves,
- buttons, sequins.
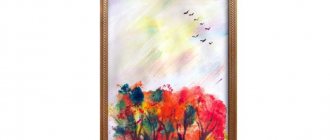
The apron pattern can be complemented with a composition of autumn leaves, for example
Kids love decorating with stickers, glitter and other accessories. If access to these materials is opened at the beginning of practical work, the kids will make the craft in the form of an applique from all kinds of pieces and pictures. First, the children draw a pattern, and then the teacher brings a “magic box” with new decorations.
Individualization of tasks
Productive work and a good mood within the group are promoted by simple tasks aimed at satisfying the personal tastes and interests of the children:
- Take apart the apron blanks: round, triangular, with a frill - whoever wants which one.
- To decorate the apron, use colors and shades as desired.
- You can decorate the drawing with additional materials: applique, stickers.
For five-year-olds who show increased interest in drawing, the teacher complicates the overall task. For example, he asks to draw a flower arrangement in the center of the apron when the group draws one flower.
Children's work is not standard, each apron is unique and beautiful
Place of the lesson “Decorating an apron” in the drawing file
Decorative drawing in the middle group is conventionally divided into decorating blanks in the form of household items/clothing (sweater, mittens, dress, napkin) and painting in the style of folk crafts (Khokhloma, Gzhel, Dymkovo toy). The theme “Apron Decoration” is universal. Children can decorate an apron with a geometric/floral pattern or a folk ornament - this is determined by the teacher. A lesson is held in the middle of the school year, when the children study the topic “Clothing” and begin to get acquainted with folk art.
Theme options:
- "Mom's apron"
- "Magpie Apron"
- "Apron for Dymkovo toy"
- "A gift to my beloved grandmother."
While painting an apron for the Dymkovo young lady, the guys get acquainted with folk geometric patterns
Decorative drawing classes allow you to show children in a playful way that you can make plain things beautiful with your own hands or create a gift for a friend or relative. The introductory stage of the lesson is aimed at creating motivation in children to study patterns and create independent creativity.
Table: options for a motivating start to the lesson “Decorating an Apron”
| Motivational form | Content |
| Game situation | The teacher takes the children to the play corner and offers to show the scene “Katya the doll is waiting for guests.” The plot plays out the following points:
When the children bring the doll to the kitchen stove, the teacher draws attention: “Katyusha put on a beautiful, clean dress, but while cooking it can be splashed and dirty. What should I do? When the option was given that you need to put on an apron, the teacher hands the doll a white blank, she doesn’t like it. The guys will have to decorate an apron for Katya. |
| Poem reading and conversation | Children listen to the poem “An Apron for Mom.”
Questions for talking with kids:
|
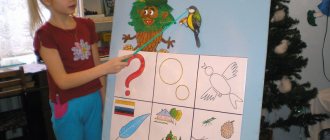
| Studying visual material | This form is best for motivating folk patterns. Children look at an exhibition of objects made in the style to which the lesson is dedicated (Gzhel, Khokhloma or Dymkovo painting). For the lesson “Apron for a Dymkovo toy,” an exhibition of young ladies with different patterns on their aprons is selected: stripes, circles, leaves. Questions about the exhibition:
|
For five-year-olds, it is enough to consider several figures with different options for painted aprons
Making a pattern
Making an apron pattern with your own hands is very simple. You just need to follow the procedure:
- First you need to take measurements;
- We make a sketch of the future product;
- We draw up a drawing of the pattern, observing the dimensions, or you can use a ready-made model from the application with patterns, which can be found in many sewing magazines;
- Now the apron design needs to be transferred to the fabric, remembering to leave seam allowances to minimize mother waste;
- If you were able to complete all of the above steps without errors, then you can start cutting the fabric.
When making any thing with your own hands, the well-known folk wisdom becomes especially relevant: “Measure twice, cut once.” It follows from this that before you start cutting the fabric, check again that the contours of all the parts are transferred to the fabric correctly, and the grain threads and the pattern are in the right direction. To create versatile pieces, you will have to make two patterns in a mirror image or flip one so that you get the correct fabric pieces. Otherwise you will have two left or two right parts.
Often in old publications you can find instructions that an apron can be sewn in any shape, but it must have pockets. Many modern aprons have this element, but this does not mean that you will have to include it in the pattern of an apron you make yourself. It all depends on the housewife’s personal view of this element and her position regarding convenience. A pocket wouldn't hurt, because you can store useful little things in it. Others, on the contrary, will consider it inappropriate due to the fact that garbage will constantly accumulate there, which is high time to get rid of.
Summary of the lesson “Decorating an apron” in the middle group
The outline includes not only planning the activities of students in the classroom, but also indicating the educational significance and material resources:
- Target.
- Tasks.
- Preliminary work.
- Equipment and materials.
- GCD plan: Organizational moment - 1 minute.
- Visible information stage - 3–4 minutes.
- Practical part - 13–14 minutes.
- Display of works, summing up - 2 minutes.
Important. The practical part should contain 1-2 dynamic pauses: finger play or physical education. Children 4–5 years old find it difficult to engage in one activity for more than 4 minutes.
Children love to show drawings, be sure to discuss their work, praise them, arrange exhibitions
Table: summary of GCD for decorative drawing according to the Federal State Educational Standard in the middle group “Decorating an apron”
| Author | Mokrousova T. |
| Tasks |
|
| Equipment |
|
| GCD move | Hello guys. Autumn and I are waiting for you. But for some reason she is very sad? Autumn, why are you so sad, aren’t you glad to meet us again? - Well, I really love coming to visit you. And I’m sad because guests are supposed to come to me tomorrow, I’ll bake a cake and I’m very afraid of getting my new dress dirty. - No need to be upset. Come on, Autumn, let's ask the guys what needs to be done so as not to get dirty? Children's answers. - That's right, guys, you need to put on an apron. - Look, Autumn, we have aprons and we are ready to help you. But they are not decorated at all. The guys and I will help you color it for you. Do you guys agree? — I have several aprons with different patterns, let's look at them. —What is this apron decorated with? —Where are the stripes on the apron? — Do you know how to draw a stripe? You need to place the entire bristle of the brush on the paper and draw a line from left to right without lifting the brush from the paper. — What is the pattern between the stripes? - That's right (leaves and flowers). How are they located on this apron? - What a great fellow you are, of course, one leaf is on the right, the other is on the left, and between them is a flower. What do the flowers look like? - That's right, into circles. What color are the leaves? - Well done, green, of course. And the flowers? - Great, well done, the flowers are red. - How can we draw leaves? You need to attach the brush with all its bristles to the paper and remove it - now our leaf is ready. - How to draw a flower? — Let's look at the pattern of the second apron. Is it similar to the first one? - That's right, guys, this apron has a different pattern. Three flowers in the middle, and between them two leaves. Let's look at both aprons again, how are they similar? — That’s right, the elements of the pattern are the same: leaves, flowers and stripes. — Tell me, where will you start decorating your apron? — That’s right, of course, with stripes, and between the stripes we’ll draw a pattern of leaves and flowers. We draw stripes from left to right, without stopping with one movement of the brush and without tearing the brush off the paper. Draw the stripes further apart from each other. Don't forget to leave room for the pattern. - Think about how your pattern will be located, how many flowers and leaves you will draw. Physical exercise “We pressed our hands to our shoulders” - Those who have already come up with a pattern, start drawing. Keep your back straight, the tips of your tassels pointing upward. - And Autumn and I will watch you draw. If anyone needs help, Autumn and I will help. Let us remind you how to bathe a brush, how to apply paint to a brush, and remove excess paint on the edge of the jar. - Now let's look at our work. You too, Autumn, look. Do you like our aprons? - Of course, I like it! “We’re giving you these aprons so that you don’t get your dress dirty when you bake a cake for the guests.” - Guys, now let's say goodbye to our guest. - Now we need to clean up our workplace. - You guys are great, you did a good job. What do you remember most? Guys, were we able to help Autumn? How did we help her? What did you like about the lesson? What was difficult for you to do? How did you help Autumn? What have you learned? Autumn thanks everyone for the wonderful aprons. |
| Quote from: https://www.maam.ru/detskijsad/dekorativnoe-risovanie-po-fgos-v-srednei-grupe-ukrashenie-fartuchka.html | |
The guys decorate aprons for guests - Autumn
The lesson notes can be drawn up in the form of questions and phrases that the teacher will pronounce. The only remark is that the author should have broken down the GCD progress into stages. Based on the column of questions, it will be difficult to quickly determine at what point the lessons stopped. Ideally, you need to practice decorative drawing techniques with gouache. But watercolor is cheaper, so the author does the right thing by reminding children how to handle this paint.
Theme options
According to the traditional drawing program for the middle group, the topic “Decorating a Sweater” is offered to students in November. This is logical, since the cold season comes when people change into warm clothes. The teacher is invited, at his own discretion, to replace this activity by decorating the skirt with a young lady’s haze. Nevertheless, it is quite possible to decorate a sweater with a Dymkovo pattern - then the topic of the lesson will sound more specific and the children will practice certain techniques of decorative and applied art.
Another option for decorative drawing is “Let's decorate a sweater with snowflakes” (this activity can be done when the first snow has already fallen, so it will be more interesting for the kids). At the same time, the teacher offers blanks (preferably blue, light blue, purple), and the children decorate them with simple snowflakes.
The theme can also be designated as “Lace Sweater”. To do this, the teacher prepares color templates in rich tones, which preschoolers decorate with white gouache - it will create the appearance of openwork knitting.
White paint realistically depicts the openwork knitting of a sweater
Shortly before one of these classes, the teacher offers the kids the topic “Decorating an Apron,” where they decorate a simpler piece (October). It is also advisable to practice with children in advance in decorating other simpler silhouettes, for example, a scarf, hat, napkin, handkerchief. Also very useful will be the preliminary application - “Decorate a napkin” (September): the children will be able to practice compositional skills (arrange the pattern not chaotically, but in a certain order, evenly filling the middle and corners with elements).
Painting with stencils
Painting is a quick and easy way to update a kitchen wall. You can paint it in one or more colors. The last option is convenient and easy to implement using stencils. With their help, you can make a beautiful pattern or inscription, creating your own style.
For example, here the wall was painted black, and then the inscription was applied in white using a stencil.
You can also create geometric patterns. Moreover, in this case, you can make the stencil yourself using masking tape.
Master class on how to make patterns and drawings on the walls
And another option for stencil painting:
Also, painted walls can be decorated with additional decorative elements. For example, this kitchen apron was painted using stencils, and then hearts were glued on top, which go wonderfully with the chosen pattern:
Love the tile pattern but don't want to bother laying the tile? Then try options to imitate it. For example, here is a wonderful example of painted white tiles. All you need is paint and precise markings of the wall.
Tile
Create a mosaic backsplash with your own design using small tiles in different colors. For example, in this case, dark brown floor tiles were needed.
You can also create a mosaic pattern by breaking large tiles into smaller pieces before attaching them to the wall. The result is similar to the previous one, but more chaotic, without clear lines.
If you like more formal shapes and colors, then pay attention to this combination of small tiles in white, brown and gray:
When using very small tiles, it seems that the colors transform into each other and shimmer. In the example in the photo, a dark color scheme was chosen, but with such tiles you can experiment with even the brightest colors.
The shape of the tile has a great influence on the result, for example, taking a hexagonal tile instead of a square one immediately achieves an original effect. It is especially good to take hexagonal tiles, which have some color transitions, like here from white to gray:
Using tiles you can achieve a 3D effect. To do this, lay the tiles not side by side at the joint, but overlapping each other, creating volume. For example, like in this case:
How to sew an apron 5th grade technology, in detail.
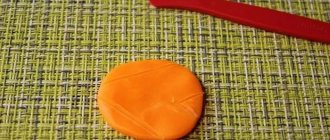
To begin with, as with sewing any product, you need to create a pattern. We have already told you above how to take measurements. So. Our pattern will consist of 2 rectangles 50*35 - the bottom of the apron, 20x22 cm - bib, 14x14 cm - pocket, 2 parts 6x40 cm for the straps and belt.
1. Fold the fabric in half. Pin the pattern onto the fabric using pins. We pin the top of the apron at a distance of 2 cm from the top.
2. Next, along the fabric, pin the remaining parts of the pattern, 1 cm each for a seam allowance.
3. Using chalk, pencil or soap, outline all the details of the future apron, adding 1 cm to the sides per seam.
4. After all the details have been applied to the fabric, they need to be cut out without breaking the pattern off from the fabric.
The apron is ready to open.
5. Let's start sewing the apron. Let's start with the straps. Fold each piece in half face to face. Next, take the iron and iron it thoroughly. Then take a ruler and, using a pencil, draw lines along the edge at a distance of 0.5 cm.
6. Next we sew the edges. We leave one narrow edge unstitched. This is necessary in order to turn the straps out.
7, Turn it inside out. We do the same with the second strap. After the parts have been turned out, they need to be ironed thoroughly.
8. Take the bib piece and unfold it. We place one part of the strap on the fold of the bib, and the second part on the edge, 1 cm from the edge.
9. Cover with the other half of the bib and pin in several places, namely: the top of the straps and on the side. You need to pin it on the side so that the strap does not get caught in the seam.
10. Sew the parts. The seam lines are indicated in the picture with black arrows.
11. Turn the bib inside out and iron it out. The bib is ready.
12. Take our pocket, secure it with pins and sew it on, leaving the entrance to the pocket open.
13. Fold the bottom of the apron 1 cm inward and stitch. For greater convenience, the seam can be ironed first.
14. After all the parts are ready, they need to be sewn together. Find the middle of the belt and the middle of the bib. We put the bib into the belt and sew it on. This is the detail you should get.
15. We sew the lower part of the apron in the same way.
Okay, let's iron everything. The apron is ready!