Matryoshka bookmarks | Country of Masters
It looks like one, big, But there is a second sister sitting in it, And you will find a third one in the second one. Taking them apart one by one, you will reach the smallest one. Inside them all is a little one, a tiny one. All together - a souvenir... .
This Matryoshka bookmark can be made with children.
Matryoshka is a Russian wooden toy in the form of a painted doll, inside of which there are similar smaller dolls. The number of nested dolls is usually three or more.
This is us in person.
The Russian wooden doll was called Matryoshka. In the pre-revolutionary province, the names Matryona and Matryosha were considered one of the most common female names, based on the word “mother”. These names were associated with the mother of a large family, who had good health and a portly figure.
Subsequently, it became a household word and began to mean a turning, detachable, colorfully painted wooden product.
Now - the back.
Let's take a cardboard, a template and trace it. Let's cut it out.
Now let's cut out the details of the scarf. You can make it according to a template, or you can print the scarves on colored paper and cut them out.
These are blanks for scarves. You need to choose the right size and draw the ends: for the front and back. See samples above.
Having cut out the front part of the scarf, glue it to the cardboard body.
We cut out two circles from paper of the desired shade for the face (I did it with a hole punch, because my nesting dolls are small). Glue it in the middle of the scarf. Circle hole punches 2.5 cm and 1.5 cm.
The same size as the face, cut out circles for the hairstyle, the desired color.
Cut the circle in half. This is the hairstyle. If the children are older, you can make the hairstyle more intricate: openwork, with bangs...
Glue to the top of the face. The eyes, nose and mouth can be completed, cut out of paper and pasted on.
We turn the figures “backwards” towards us. We take the tape, onto the ends of which double-sided tape was previously glued. Remove the protective film of the tape and attach the tape to the top of the Matryoshka.
We cut out the back part of the scarf and glue it onto the Matryoshka head, hiding the tape under it.
We decorate the scarf with appliques both at the back and at the front.
You can glue pockets, buttons, and frills onto the Matryoshka sundress. Bookmarks are ready.
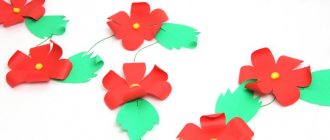
A string of nesting dolls / Applique / In needlework
This string of nesting dolls, decorated with paper with multi-colored designs, will become not just a letter, but a beloved gift.
Tools and materials:
— Precision collet knife — Scissors — Backing for cutting — Metal ruler — Glue stick — Adhesive tape — Preferably: 1 punch (diameter 6 mm). - 1 sheet of white drawing paper A4 (180 grams) - Sheets 21 cm wide (origami paper or paper insert): 1 sheet of turquoise, 1 sheet of orange, 1 sheet of anise - Sets of colored paper in different shades - 1 strip orange paper 160 grams (2 x 34 cm) - 3 sheets of deco patch paper with a small pattern - 1 envelope
Making a postcard
Card 1, preparation.
1. Cut out templates of 5 torsos, 5 scarves, 5 collars and 5 heads, as well as the largest flower (100% scale). Place a sheet of turquoise paper on a sheet of white paper and distribute the shape templates. Secure all templates with adhesive tape. Cut out 2 layers of paper at the same time.
2. Cut small rectangles of different sizes from deco patch paper and from sheets of multi-colored paper. Glue various rectangles onto the orange strip so that they overlap slightly, like tiles on a roof.
Card 2, assembly.
Carefully cutting out from thin paper, make sure that the blade of the precision knife is tilted correctly. Hold the remaining pieces firmly in place with one or two fingers of your other hand and carefully watch the movement of the knife blade. After cutting out the outline, you can correct some details using thin scissors.
1. Cut out 5 collars and 5 scarves from different sheets of deco patch paper. Fold sheets of paper into quarters to cut out pieces for multiple cards at once. Cut out flowers from the third sheet of deco patch paper. Cut out the centers of the petals and save them. Cut simple petals from orange and anise paper.
2. Glue the head, scarf, and then the collar. Place flowers with cut out petals on the largest figures. On the small ones, make rosettes from a heap of petals cut from deco patch paper. Decorate large flowers with anise and orange petals. Trim the overhangs off the edges.
3. Connect white and blue matryoshka figures to each other. Glue the nesting dolls in a row one after another in descending order onto a strip covered with pieces of paper. Secure it between the white and blue sides of the figures. Alternate one nesting doll on the front side and the other on the back. Decorate the back side of the nesting dolls by gluing whole flowers or parts of them mixed together. Bend the strip like an accordion, following the matryoshka dolls as a guide. Make an oblique cut on it at the base of each nesting doll.
4. Photocopy 5 templates onto a sheet of plain A4 paper. Cut them into envelopes using a classic postcard sized envelope as a template. Bend and glue the flaps.
TIP: Once you have photocopied the different sized heads, you can use tracing paper to transfer them onto a sheet of white paper and give each one a personal touch (smile, hair, eye color, etc.) using a felt-tip pen.
Source: “Applique. Origami"
The author has not added information about himself
Item
: labor training
Date:28,30.04
Subject:
Application "Matryoshka"
Target:
- using the example of the history of the creation of the matryoshka doll to continue acquaintance with traditional folk crafts of Russia
- continue to develop skills in independent work with paper and cardboard using the applique technique
- develop the creative potential of students in collaborative group work
Equipment:
- collection of nesting dolls
- illustrations with nesting dolls (grouped by painting style)
- large format templates - outlines of matryoshka dolls
- glue, brushes, rags for dipping
- instrument nameplates
Preparatory work:
- children cut out drawings of flowers, leaves, twigs, various patterns, etc. from scrap and scrap packaging in advance.
During the classes.
I. Organizational moment. Lesson motivation.
Today in class we will meet with a toy. This toy is not simple: it is known all over the world. True, the translation of the word - the name of this toy - cannot be found in any dictionary in the world. But everyone knows what it is. For example, in Germany they call her differently: “Grandmothers”, “Mommies” or even “Aunt Olya”.
But in Rus' they came up with a riddle about this toy:
Wooden girlfriends are so similar to each other. There are many of them or a little, But their names are all... (MATRYOSHKA)
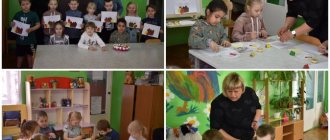
II. Exhibition of nesting dolls.
Teacher:
Here they are, Matryoshka dolls, All of them are cute... All with scarlet cheeks Under colorful scarves, Smart, pretty, a little like you...
— Guys, have you noticed that at our exhibition the beautiful dolls are arranged in “families”, “groups”. Why do you think? (Children's guesses)
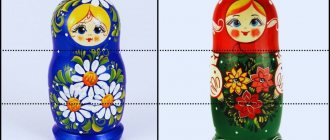
It turns out that in truly folk crafts, several main styles of painting and making nesting dolls can be distinguished:
- Semenovsky (Semenovo) (Fig. 1)
- Vyatsky (Vyatka) (Fig. 2)
- Merinovsky (village Merinovo
- Zagorsky (Sergiev - Posad - Zagorsk) (Fig. 3)
- Polokhovsky (village Polokhovsky Maidan) (Fig. 4)
Rice. 1
Rice. 2
Rice. 3
Rice. 4
III. The history of the creation of the nesting doll.
Teacher: But where did this name come from - matryoshka? (children's statements)
— Some historians claim that this name comes from the beloved and common names in Rus' Masha, Manya, Matryoshenka; others - that this name comes from the female name Matryona (translated from Latin mater - mother), and still others believe that the name “matryoshka” is associated with the name of the Hindu mother goddess Matri...
- Well, the most important thing is this doll with a secret:
Is this a dream or reality - I can’t understand at all. There was one nesting doll here, and now there are seven of them. Seven wooden dolls, multi-colored and ruddy, live on our table, they are all called matryoshka dolls. We played, frolicked and all fit into one!
— The first Russian nesting doll was carved and painted in a Moscow toy workshop only in the 90s of the 19th century, based on a model brought from Japan. This Japanese example, made with great humor, consisted of many figures of the Japanese sage Fukuruma inserted into each other - a bald old man with his head stretched up from numerous thoughts (Fig. 5).
Toy turner Vasily Zvezdochkin carved the first Russian nesting doll. From the walls of the “Children's Education” workshop, founded by philanthropist Savva Mamontov, came a beautiful, rosy-cheeked maiden painted in gouache with a rooster in her hands, which became the first nesting doll made in Russia. The sketch for its painting was created by the artist Sergei Malyutin, who personally painted the matryoshka doll. The first nesting doll was eight-seater - inside the big girl there was a smaller boy, and so on - boys and girls alternated, and the smallest, “indivisible” doll was a swaddled baby.
Rice. 5
IV. Making an application.
— Which nesting dolls did you like best? Why?
— Would you like to create your own nesting doll together with your friends? Such a matryoshka will be called the author's one. Why do you think? (The class is optionally divided into groups or brigades; each group receives a large-format template - a blank with the outline of a matryoshka doll)
— We will work using the appliqué technique. List what tools we will need.
(As the children answer, the teacher attaches signs with the names of the tools to the board; the order of the work is discussed)
Let's call the kids! We offer you a game: Take the tools and bring the nesting doll to life!!!
V. Exhibition of student works.
Each group demonstrates its own nesting doll. Children offer names for their “author’s” style of decorating the doll. Organizing a public exhibition of works (in the classroom, corridor, on the floor)
Possible assignment after class:
- select interesting material for the “Russian Matryoshka Book of Records”; If desired, messages “From the history of the “costume” of the Russian nesting doll”, “Secrets of the nesting doll museum”, etc. are prepared.
Matryoshka dolls - applique from candy wrappers
Julia (moreidey.ru) 2013-01-26
- Various crafts
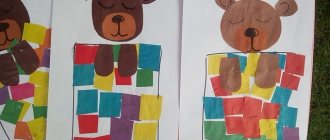
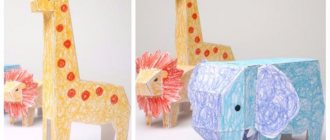
Matryoshka dolls are a children's craft made from candy wrappers and cardboard using the appliqué technique.
Matryoshka dolls - applique from candy wrappers
You can make a “Matryoshka” craft with your children from cardboard and candy wrappers.
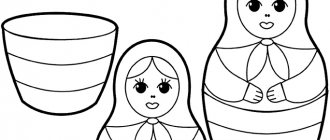
Adults need to prepare a matryoshka template in advance: print it out or draw it on paper. You can use this coloring book as a template (source: www.raskraska.com/raskraski/26).
A child who already knows how to glue and cut can do the rest himself.
How to make a “Matryoshka” craft from candy wrappers and cardboard
- Cut out a matryoshka doll from colored double-sided cardboard. This can be done in two ways: cut out the template, trace it on cardboard, and then let the child cut out this outline, or attach the template to the cardboard with paper clips and let the child cut out the matryoshka doll from the template and from the cardboard at the same time.
- Color the face of the matryoshka doll on the template with felt-tip pens and cut it out from the template.
- Cut out a circle from a candy wrapper of the same diameter as the apron of a nesting doll on a template (since cutting from a candy wrapper is more difficult than from paper, children under 4-5 years old may not be able to cope with this task. In this case, cutting out a circle from a candy wrapper helps them adult).
- Using the template, cut out the ends of the scarf tied in a knot from the same colored cardboard. If it is still difficult for a child to cut out such details, you can skip this point.
- Glue a face, a circle of candy wrappers, and the ends of a handkerchief tied in a knot onto a cardboard nesting doll.
You can make several smaller nesting dolls in the same way.
I suggest watching a master class on another craft with nesting dolls (from Kinder surprise containers and plastic eggs), crafts from candy wrappers and other waste materials.
Happy creativity! Only for readers of the site “MORE creative ideas for children” (https://moreidey.ru). Yulia Sherstyuk
All the best! If the site materials were useful to you, please share a link to them on social networks - you will greatly help the development of the site.
Posting site materials (images and text) on other resources without the written permission of the author is prohibited and punishable by law.
Matryoshka dolls using the Kinusaiga technique
Japan has presented many interesting techniques to handicraft masters, and kinusaiga is one of them. Its essence is to cut grooves in the foam and thread pieces of fabric into them. This technique is more complex than the previous ones, so it can be offered to children of high school age.
For stronger fixation, the center of the flaps is glued to the foam with glue. This technique is a great way to decorate a box. Polystyrene foam with ready-made grooves along the contour of the pattern is glued to a cardboard base or directly to the lid of the box. Then pieces of fabric are inserted according to the design and the product is decorated with ribbons, braid or beads.
Crochet matryoshka pattern for applique
This is an INSTANT DOWNLOAD - a pattern of a cute nesting doll. Skill level: easy.
Template in .pdf format, with step-by-step instructions and detailed photographs of each individual process. Please note that Adobe Reader is required to open this template.
The pattern includes instructions for creating a cute crochet applique that can be used in countless ways...decorate and personalize your favorite items such as hats, t-shirts, bags, school bags and anything else you can think of.
Matryoshka size: 1 1/2 inches wide x 3 inches high
The size can be varied by using thinner or thicker yarn and hook types. The colors can be changed to suit your personal preferences. The pattern is designed for worsted yarn and uses American/English crochet terms.
This crochet pattern is available for instant download. Once your payment has been received, you will receive an email with a download link and your order details. If you have any problems, please contact me at any time.
By purchasing this pattern, you agree to the following: This pattern is copyrighted. It may not be copied, sold, transferred, or distributed in any form, but you may give away, donate, or sell finished items.
.
Summary of direct educational activities in the senior group “Matryoshka”
Lesson notes on the application “Matryoshka”
MBDOU No. 62 “Rodnichok”
Authors: Kazachkova Elizaveta Sergeevna - teacher,
Dvoretskaya Elena Arkadyevna - teacher
Age:
senior group
Subject:
"Matryoshka"
Purpose of the lesson:
To promote the ability to create an image of a folk toy (matryoshka) using the appliqué technique.
Tasks:
1. Teach children to analyze a sample to identify characteristic features
(Components: face, hands, sundress, scarf)
2. Teach children to consciously select matryoshka parts in the chosen color scheme.
3. Continue training in work planning.
4. Teach how to capture an idea in an original artistic image.
5. Continue teaching how to cut out an object using a stencil and carefully stick on the applique elements
Equipment:
paper, fabric, glitter, scissors, glue, brush, pencil.
Bibliography:
Arapova S.V. Fine arts training. Integration of artistic and logical. - St. Petersburg: KARO, 2004. - (Modernization of general education).
Gusakova M. A. Application. - M.: Education, 1982.
Dubrovskaya N.V. Invitation to creativity: teaching preschoolers the technique of appliqué and collage. - St. Petersburg: “CHILDHOOD-PRESS”, 2004. - 128 p.
Progress of the lesson:
Organizing time.
Hello guys.
What could such a box be filled with?
Of course, with old Russian things. I'll tell you a secret. The box is filled with toys.
So, let's open the box? I'm looking for a wonderful toy. Guess which one?
We're at the fair
They brought you a chest - a gilded barrel. That chest is not simple, and the goods in it are painted. We take it out for display - And we tell a story about it.
A scarlet silk scarf, a bright sundress in a flower, resting the hand on the wooden sides. And inside there are secrets: Maybe 3, or maybe 6. She didn’t blush a little (children’s answers...? Matryoshka)
Presentation and conversation.
Now I’ll tell you guys about this wonderful toy – a matryoshka. After all, you probably have such a house and a toy?
Who has?
The first Russian matryoshka was an eight-seater: a girl with a black rooster was followed by a boy, then a girl, and so on. All the figures were different from each other. The last one, the eighth, depicted a baby.
Initially, this doll didn’t even have a name. But when the turner made it out of wood, the artist painted it with bright colors, then the name appeared - M?atryona. Perhaps this is due to the fact that at various evenings tea was served by a servant with that name. Why was everyone’s favorite Russian doll-toy called “matryoshka”? Many believe that this name comes from the female name Matryona, very popular at that time in Russia. The name Matryona, translated from Latin, means “noble woman.” Looking at the matting doll, the image of a portly, noble and toy really appears.
Step-by-step instruction
The “matryoshka” applique in the preparatory group is an excellent activity that will help preschool children learn how to work with templates and acquire skills in handling fabric and other materials.
Making an applique from fabric is not a difficult job. First of all, children should prepare their workspaces by removing everything unnecessary and leaving only the necessary materials and tools on the tables. Using a template, you need to cut out a matryoshka figure from cardboard.
Next you will need fabric. Using a template, a matryoshka costume is cut out of it and glued to the base. After this, you need to cut out the head and also glue it to the base. Separately, cut out a round face from light fabric. Using felt-tip pens, draw eyes, a nose, a mouth, rosy cheeks on it and glue it to the base. Additionally, the craft can be decorated with braid, sparkles, sequins, etc.
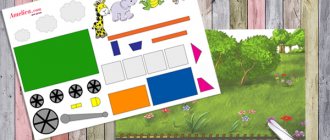
Matryoshka. Template for children's crafts
Children's craft “Matryoshka” + template
Matryoshka, or as Americans call it Russian doll, is clearly in fashion now. A huge number of various variations on the matryoshka theme can be found on the Internet. While preparing for a lesson with children at the children's club (I had to replace our beloved teacher before the New Year), I found an idea for an unusual nesting doll : either a postcard or a toy. We sculpted it with the kids and their mothers. What was it about moms who was especially delighted?