DIY spring lilies of the valley
But what a beautiful spring card with lilies of the valley can be made using the quilling technique.
Spring card with lilies of the valley
Spring applique “lilies of the valley” made from pasta
Stunning, very delicate lilies of the valley made of ribbons and beads.
A charming spring birch tree is made from colored paper and a cardboard roll.
Birch from a cardboard roll
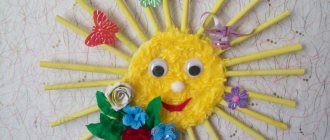
Spring crafts on the theme “sun”
This spring craft “sun” made from felt serves as a wonderful educational tactile material for kids (there are beads around the perimeter of the sun that are so nice to touch).
Spring craft “sun” made of felt
And this wonderful sun is made from the warmest material - salt dough.
Salt dough sun
An unforgettable magical totem sun drawn on a paper plate.
Sunshine on a plate
DIY spring cards
This very delicate spring craft is made using the origami technique.
Spring craft using origami technique
A spring bouquet with a tulip is perhaps the brightest and easiest craft to make.
Spring bouquet with paper tulip
Such a bouquet can be glued to a cardboard base - then we will get a beautiful spring panel. If we place it on paper folded in half, we will get a beautiful spring card.
Spring panel with a tulip
A paper bouquet for March 8 can be made even simpler by gluing flowers directly onto the base.
Paper bouquet for March 8
To make a beautiful spring card with a flower, read our article “Do-it-yourself voluminous card.”
Spring card with flower
Spring flower (video):
A beautiful spring card with tulips and lilacs can be made using the quilling technique.
Spring card with tulips and lilacs
This card can be made for any spring holiday as a gift!
Spring card using quilling technique
You can make a very beautiful spring craft “spring meadow” from colored paper. To do this, take a sheet of green paper, bend it and make cuts of different lengths on the fold.
Making cuts
Give the edges of the sheet a slightly rounded shape. We bend several notched parts in the direction opposite to the main fold of the sheet. Glue the workpiece onto a folded sheet of paper, leaving the cut parts free.
Workpiece with notched parts
We place the base at a right angle. We decorate the curved parts with flowers. Glue the flowers, butterfly and leaves to the bottom and back of the craft. We should get a very interesting three-dimensional paper craft.
Volumetric paper craft
The real spring kingdom of insects is made from plasticine on a cardboard base.
Spring kingdom of insects
Here's a wonderful spring stand you can make from a candy box.
Spring stand
You can make a very beautiful craft by combining the pattern and the “tulips behind the fence” appliqué.
Tulips behind the fence
The spring craft “tulips behind a fence” turns out to be very bright and beautiful. We add volume to the tulips using colored lumps of crumpled paper.
Spring craft “tulips behind a fence”
Our adult readers will surely enjoy the spring craft “quilling snowdrops”.
Spring snowdrops using quilling technique
Watch a detailed master class on spring decoupage:
Spring decoupage
This spring refrigerator magnet made from ribbons will be a wonderful gift and home decoration.
Spring ribbon magnet
Using the origami technique you can make a very beautiful bouquet of yellow tulips from paper.
Origami paper tulips
See how to make origami tulips using a slightly different technique:
Break appliqué technique
The essence of this type of creativity is visible in its name. The technique is very simple, even very young children can easily master it. The parts are not cut out, but rather torn off the sheet of paper. It is a great help that there is no need for scissors, although you can cut small strips from a large sheet and tear off pieces from them. So here's how it's done.
Option one. Suitable even for very small children. At the preparatory stage, the adult chooses a drawing - an outline, on the basis of which the craft will be made. You can draw it yourself or use templates from the Internet. The picture is applied to the background (cut and pasted). Note! Since there will be a lot of sticking on top, the thickness of the background must be significant, so we recommend choosing a dense base of a suitable color. Next, we connect the children. Choose the color of paper to fill the drawing. Then the child tears off pieces of arbitrary size from the desired sheet, as it turns out.
The next step is to fill the outline with pieces. Take a piece, smear it with glue (it’s more convenient to use glue - a pencil) and glue it to the base one to the other, gradually filling the space. When everything is filled in, the craft is ready. Usually this is a monochrome product, similar to a mosaic.
Option two. Suitable for children of senior kindergarten or primary school age. You choose an idea, something that you will implement with your child in the creative process. Here you can choose work of any level of complexity. Then the child does everything himself under your guidance. Take cardboard of the desired color and draw an image. You can draw it yourself, or use a stencil. Next we select the paper. We tear off pieces of the same color and fill the space in segments. When everything is filled in, the work is ready.
“Fox” applique made using the cutting technique
You will need:
- White base
- Chanterelle pattern
- Paper in three colors: orange, black and white
- Glue
Execution stages. Trace the stencil or draw the fox yourself on a white base.
Take orange paper and tear it into random pieces.
Applying glue to each piece, we gradually fill the outline of the fox entirely. If the craft is being done by small children, it is better to cover the entire chanterelle - the base - with glue and stick the dry pieces from bottom to top.
Tear off two small, approximately identical pieces of black paper—the eyes—and glue them onto the fox. Another part will be needed for the spout. Tear off a small piece from a white sheet and make the tip of the fox's tail. Our fox is ready.
You can also not prepare pieces of paper in advance, but tear them off from the strip at the gluing site. Watch the video to see how this is done.
Necessary tools for creating an application
All children love the process of working with paper. For the applique you will need thick cardboard, scissors, glue, paper (depending on the theme of the craft). It is also better to stock up on wet wipes in order to wipe your hands or excess glue from work in time. It is better to choose pencil type glue - it does not spread and is easy to use. And most importantly, if the child is getting acquainted with the appliqué technique for the first time, then the work process with such glue will not distract the child from the main essence - creating a picture, and as you know, children are impatient.
