Lesson technology cut applique
Teacher: Guys, today we will look at interesting works and try to repeat them. Shows ready-made cut-out appliqués. Teacher: Do you know what such work is called? That's right, applique. This word is translated from Latin as “attachment.” This type of art has been known since ancient times; appliqués were made from pieces of leather, paper and fabric, which were glued to a base. The applique was used to decorate clothing, household items and home interiors. Take a close look at the pictures. What material is the applique made of? What gives it such edges? Yes, you can use your hands instead of scissors. Teacher: Let's also learn how to make cut-out appliqué. Let's make a birch tree. To do this you need:
- choose a background,
- glue a birch trunk to it,
- draw branches with a pencil,
- prepare leaves from colored paper by tearing them off,
- glue the leaves to the tree.
Torn paper may end up smooth or with fluffy edges. Try tearing the paper in different ways - lengthwise and crosswise, you will notice a certain pattern. Teacher: I suggest you get ready for work.
Teacher: Let’s quickly repeat the safety precautions together.
Teacher: Now it remains to check whether all the material for work is available.
Children's independent work on making cut-out appliqué. Teacher: Your works turned out to be wonderful, I hung them in the office. Now continue the sentence:
- Today's lesson was interesting for me...
- I learned...
- I wanted …
- I found out that …
Cleaning workplaces. The trash is thrown into the bin, the glue is closed, and the remaining paper is folded into a pile. Teacher: Guys, you did a good job today. Thank you, you are great!
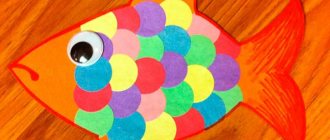
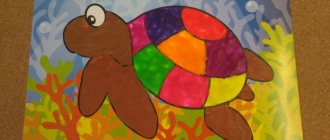
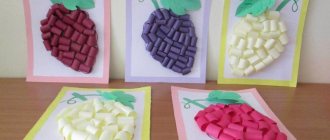
Examples of finished works
For inspiration and ideas, you can look at drawings on the Internet with your children. Examples can be found on various creative sites; it will also be useful to look at art galleries and choose a simple drawing for a further “broken” imitation of the original.
The product of children's creativity can be simple and unpretentious. But this is a very effective means of activating imagination and various skills. And children get great pleasure from working with colored materials. In the process of painstaking work, children become diligent, neat and patient, which is very useful for further development.
Lesson notes, broken applique
- The introductory part is to demonstrate the finished applications and ask the children if they know what technique the work was done in. Tell the children about the applique and the material for it.
- Studying new material - types and techniques of application.
- Preparation for work - physical training, preparation of the workplace. Check with the children whether they have the necessary material to complete the work using the cut appliqué technique. Tell children about safety rules while working.
- Completion of work by students.
- Results – an exhibition of works and comments for each work.
- Cleaning after application.
- Conclusion - ask the children what new they learned in today’s lesson, what they learned. Thank the children for their efforts.
Decorating the work
Ready-made compositions can be supplemented with decorative materials. Tasks can be different - in level of complexity, topic, scale and amount of materials. The broken applique in the older group will differ in execution from the younger one, so the process can be complicated.
To decorate their work, children can use a variety of available and purchased materials:
- shells, pebbles, pebbles (small);
- dried leaves and flowers;
- beads and seed beads, glass beads, small rhinestones (with precautions and under adult supervision);
- threads, ribbons, bows and wool;
- buttons, buttons;
- parts of old toys.
Children can frame the result of their efforts and present it to a competition or exhibition. But the main thing is that the kids enjoy the creative process. If the painting decorates the interior, the children will be very pleased.
Templates for cut appliqué
First class cut-out applique, details with photo
Mushroom Material:
Progress:
- Cut two ovals from colored paper. One will be the stem of the mushroom, the other will be the cap.
- Trace ovals on paper with a pencil.
- Tear off any excess paper around the ovals.
- Tear each oval into small pieces.
- Lubricate the paper with a glue stick and glue the base of the mushroom. Do the same with the hat.
Broken applique second class, details with photo
Ladybug Material:
Progress:
- Print out the ladybug template on white paper.
- Fill the body with red using finely torn paper of the appropriate color and glue.
- Using black paper using the tearing technique, glue the spots onto the back and make a muzzle.
- Glue on the eyes from white paper.
Decoration of the composition
When the painting is ready, you can decorate it using all kinds of materials to give it a finished look and make the work unique.
- A few shells, dried flowers and leaves, ribbons, bows, buttons, beads, beads, rhinestones are perfect for this (adults should supervise the children’s work, especially if small parts are used in the process of creating a masterpiece).
- The resulting creation can be inserted into a beautiful frame. And then the child can safely participate in competitions with his works.
All these ideas will help you and your children create real masterpieces using a minimum of materials. And most importantly, this is a very fun and interesting process that can become leisure time for the whole family.
The finished work can become a wonderful interior decoration, and you can also present it at any children's craft competition. Such educational crafts will be very useful for teaching in kindergarten.
There are a lot of different techniques of varying complexity; you can choose something suitable for the creativity of children of different ages, from the youngest to the preparatory group.
Broken applique third grade, details with photo
Bullfinch Material:
Progress:
- Draw a silhouette of a bullfinch with a pencil.
- Using the cutting technique, prepare red pieces of paper.
- Glue these pieces immediately around the breast, and then fill everything inside.
- Prepare black scraps of paper.
- Glue them over the outline of the silhouette of the bullfinch, then continue gluing inside.
- Glue paper eyes onto the bird.
- Draw or cut out a branch from paper on which the bullfinch will sit and glue it.
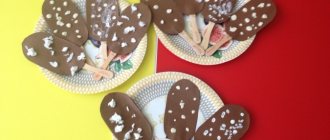
Bunny made of paper
To create such a craft, pre-prepared templates with images of animals are perfect. In the photo of the broken appliqué you can see a bunny; thanks to the use of this technique, an interesting texture is created, the character looks more voluminous.
To create beautiful crafts, you can take templates by cutting them out of magazines, old coloring books, or print them from the Internet. You can also draw the figure yourself on paper or cardboard.
Crafts technique:
- Tear off the paper strips and then finely tear them into pieces.
- Glue these elements like a mosaic onto a pre-printed or drawn image.
- Try to make small distances between the pieces so that they do not overlap each other.
- The nose and eyes can also be torn from dark-colored paper or drawn on.
- Makes a great craft!
Broken applique fourth grade, details with photo
Winter Material:
Progress:
- Using the cutting technique, make a tree trunk. Glue to the background. When choosing a background, avoid white.
- Paint the house with paints.
- Finely tear the white paper - it will appear as snow.
- Using glue and small white pieces, cover the trees, house, and street with “snow.” You can glue small pieces throughout the picture, creating the appearance of snow falling on the city.
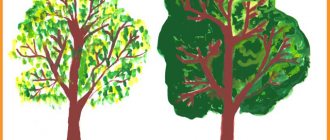
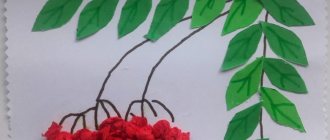
Cut-out birch applique, step by step with photo
Material:
Progress:
- Tear out a birch trunk from white paper and glue it to the background.
- Using the same technique, make branches and attach them to the paper with glue.
- Tear small black strips of paper and glue them to the trunk.
- Tear a lot of identical small leaves from green paper.
- Lubricate the places for the leaves with glue and glue the leaves to the paper.
Hedgehog applique, step by step with photo
Material:
Progress:
- Draw a hedgehog figure on the background sheet.
- Finely tear the paper for the muzzle and body.
- Lubricate the face with glue and attach the brown scraps.
- Glue black pieces of paper to the body.
Sunflower cut-out applique, step by step with photo
Material:
Progress:
- Using a simple pencil, draw a sunflower on a white sheet of paper.
- Using the tearing technique, finely tear black paper and glue it into the core of the sunflower.
- Make a sunflower hat using small yellow pieces and glue.
- After tearing green paper, cover the trunk and leaves of the plant.
Using napkins for applique
If you tear a napkin into small pieces and stick it on, you will create a volume effect and the craft will turn out airy.
If you are doing a craft with the image of trees, the trunks are cut out or drawn, and the leaves will be light, made from napkins. Pieces of napkins can also be rolled into balls.
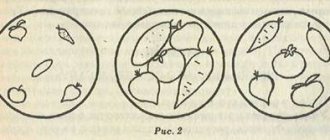
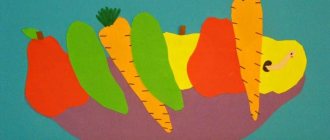
Cut-out applique vegetables, step by step with photo
Material:
Progress:
- Draw the outlines of vegetables on white paper and cut them out.
- Glue vegetables to the background.
- Tear many small pieces of the appropriate color for the vegetable.
- Apply glue to the vegetable template and glue on all the small scraps.
Cut-out applique pond with baby frogs, step by step with photo
Material:
- Colored paper
- PVA glue
- Pencil
Progress:
- Prepare small rectangles that will make up the parts of the frog’s body.
- In the background, mark the silhouettes of frogs with a simple pencil.
- Finely tear the green paper and glue the leaves to the silhouette.
- Make eyes and mouth from pieces of a different color.
- Using the cutting technique, prepare a lot of small blue pieces of paper.
- Apply glue to the area under the pond and glue blue pieces of paper.
Cut-out applique bear, step by step with photo
Material:
- Colored paper
- Glue
- Simple pencil
Progress:
- Draw or print a bear template on brown paper.
- Attach it to the background paper and trace it with a pencil.
- Carefully tear into identical small pieces and glue them to the outline.
- Glue the bear's feet and ears from yellow paper.
- Make eyes and a muzzle from colored paper.
Example of a craft “Autumn Tree”
Let's look at a sample of a broken autumn tree applique. This is a simple and very beautiful option for children in the middle or senior kindergarten group.
For work you will need materials:
- glue stick;
- set of colored paper: yellow, orange, brown, green, blue;
- cardboard base (you can use white paper);
- additional decorations in autumn style: golden beads, small stones;
- a cloth for wiping off glue.
Work algorithm:
- Invite your child to apply the drawing to the base. Let it be a large tree with a lush crown. You can draw the sun and clouds in the sky, and bushes and paths on the ground.
- Next, select the main shade for the wood - yellow, orange, brown. The paper is torn into pieces and evenly pasted inside the contours of the tree. Dark colors are used for the trunk, light colors for the crown.
- They cover the sky with blue pieces, leaving space for clouds.
- The sun is decorated in yellow. Thin rays can be drawn with a pencil or felt-tip pen.
- The finishing touches are glued on – pebbles on the ground, beads on the tree as fruit.
The picture is ready, it can be framed. You can also wipe off any excess glue on the image before the glue dries completely.
Landscape application, step by step with photo
Material:
- Colored paper
- Pencil
- Glue
- Paints
Progress:
- On a white background sheet of paper, draw a landscape: the contours of a field, a river and trees.
- Use small scraps of green paper to make foliage for trees and grass for the field. It is better to take two shades of green. Glue the paper to the background.
- Their pieces of blue and light blue paper make a river and clouds. Secure with glue.
- Cover the sun with small yellow pieces.
- Color the remaining background with paints.
When making an application it will be easier to use a template. If you are good at drawing, you can draw the base on paper. When working with children, do not forget to remind them about safety precautions when working with scissors and glue.
Principle of operation
To complete the application, you can follow simple universal rules:
- Choose the basis for the future work. This is most often cardboard, white or colored. The main thing is that it does not get wet from the glue and can withstand the weight of the future composition. An alternative is thick white paper.
- They think through the composition and idea of the future film. The drawing is applied with light strokes onto the cardboard.
- Choose shades of color for the drawing, the overall color scheme.
- Prepare pieces for applique. They need to be cut into different sizes, but it is better to help the baby with this process. At the beginning he will try to do everything “right”, then it will become easier. It is important to tear the paper carefully, then the drawing will be beautiful.
- Take a glue stick and fill the space of the applied pattern with scraps of colored paper. First, large pieces are glued on, and the area is finished by gluing small pieces.
- The surface of the entire pattern is glued in advance, then the small pieces are simply pressed.
- The finished application will look like a mosaic, especially if there are small gaps between the pieces.
Advice: it is better for a teacher or parent to observe how carefully the child glues the composition in order to direct his strength in the right direction in time. It is important not to go beyond the edges of the drawing.