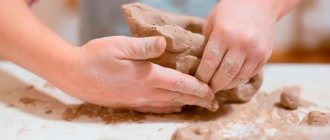
For children of preschool age, you can come up with many entertaining activities, a special place among them is occupied by modeling from plasticine. Thanks to this type of creativity, parents will be able to instill in their child a love of creativity, develop fantasy, imagination, and fine motor skills. In addition, by making figures from plasticine, the baby learns to be independent.
Appetizing donut
For work, prepare:
- a plastic mass of bright colors;
- stack-bulk, spatula.
Let's start our master class.
- Form into a yellow ball.
- Flatten it by pressing the center with a round tip.
- Remove excess from the back side.
- Make a cake from the pink mixture.
- Cover the main workpiece with it. Make a hole.
- Roll out different plasticine flagella. Place them in the freezer for a few minutes.
- Removed from the cold, the parts are cut into small pieces. This will be the sugar sprinkle.
- Decorate the top of our baked goods with it.
What you need to have
It is advisable to select plasticine that is pliable and soft enough so that the child can change the shape of the element without effort. A wax or other safe mass will do. There is no need to look for multi-colored products - the main thing is that the shades mix well and are bright. Be sure to buy white and black materials to demonstrate to your little one how the transformation of color saturation occurs.
At the first stages of classes, you need to prepare for work:
- rolling board;
- images printed on cardboard or plastic;
- sticks, molds;
- decorations to give the drawing a festive look;
- pastry syringe (it’s easy to squeeze out sausages);
- wide tape (useful for gluing a drawing before work, so that it becomes convenient to quickly correct mistakes);
- wet wipes to wipe plasticine-stained hands.
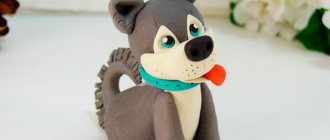
Husky
Everyone knows this wonderful breed of dog. Their charming eyes and unusual colors leave no one indifferent. How to make an animal from plasticine? By following simple instructions, you will master this type of creativity:
- Roll a gray plasticine ball.
- Carefully draw two triangles at the top. Make the same shapes from white and attach to the intended location.
- Cover the lower half of the workpiece with the same shade.
- We make an oblong oval - this will be the muzzle.
- Make a black nose, blue eyes and attach everything to the face.
- We design the red tongue. We attach it below the muzzle. We fix the ears.
- Taking a stack, work out the main features.
- Let's move on to the body. We insert toothpicks into the base and secure the head.
- The dog's belly is white. Two small gray sausages are the front legs. Their lower part is light.
- Curl the ponytail into a crescent shape. Use a plastic knife to sell the fluffiness.
- All that remains is to design the collar. Draw it once all the main elements.
This is such a beautiful dog we got. This craft can be done together with the children at home or in a master class in the preparatory, middle group of the kindergarten. Modeling for preschoolers is a good idea for joint creativity. What else can you make from plasticine?
Clay or plasticine?
Undoubtedly, clay crafts are more durable, but there is also more hassle with clay. This includes not only washing the young sculptor after work; if you want to preserve the clay product, then it must be fired after sculpting. Plasticine leaves virtually no marks on your hands, does not require firing or coating after completion of work, and can also be reused.
Consumables
As with any other activity, you need to first prepare all the necessary elements. The main thing is that you need high-quality mass for modeling in a preschool educational institution. It is convenient to create any kind of toys from Playdo. Now it is in greatest demand. Airy plasticine leaves your hands clean. It is softer and does not crumble. It is very convenient to work with him. Additional tools:
- Special board;
- A small rolling pin for rolling out. They also have curly patterns;
- Various molds.
Stores sell ready-made kits that contain everything you need, even more. Mixers, toasters, pizzeria - these are some of the popular sets.
Plasticine and modeling dough for little ones
- Salt dough or play dough is great for making imprints of various objects. To do this, roll out the dough on the table and try running a hair comb over it, poking it with a felt-tip pen cap, imprinting parts from a construction set, or running a machine over it. You can try to combine several prints in one picture.
- When walking with your child, look for leaves that are suitable for prints so that they have large veins. Place the back side of the leaf on the plasticine and run a rolling pin over it, carefully remove the leaf and watch how surprised the child is. You can make the dough in different colors, for example, mix red and yellow, then the leaves will look like autumn leaves.
- You can also print a piece of lace in the same way. Then you can cut out figures from this dough, they will be completely embossed with lace
- Get out your cookie cutter kits and stamp them on the dough. You can make a whole picture, for example, print a sun circle on top, add rays to it with imprints of a pen, plant a Christmas tree at the bottom, a bunny under it, etc. You can not print the figures, but cut them out entirely
- Modeling kits come with rolling pins of different textures that leave interesting imprints. But you can make these rolling pins yourself. To do this, take a cardboard cylinder from under napkins or foil, apply a pattern on it with a pencil, and go over the pattern with a glue gun on top. When the glue hardens, it will harden and you will have your own rolling pin, leaving unique patterns
Other ideas
What else can be molded from light and pliable plasticine? After watching the video tutorials, you can easily create funny figures. For example, create a lion cub basking in the sun. Or the lazy Seal. Make a muzzle from a gray circle. For the body you need a thick sausage. Insert the backrest into it and connect it to the head. Decorate the flippers and face. The technology resembles the design of a dolphin. Use a sharp stick to create a relief silhouette.
Turtle
Make a small plasticine craft with your child; with step-by-step instructions you will very quickly master the entire manufacturing process. A funny turtle will complement your collection of crafts.
How to sculpt:
- Prepare several circles of different sizes using a brown and green base.
- Use a brown circle to form a “shell” for our turtle.
- Flatten small circles from the brown base and attach them to the “shell”, forming a characteristic color for this animal.
- Sculpt legs and a head from a green base and attach to the prepared body.
- Make indentations on the muzzle where the eyes will be placed, draw a nose and mouth.
- Then attach the eyes too.
Species diversity
Initially, there are two types: based on paraffin or wax. They are divided into:
- Medium density mass. Used for normal work. Easy to knead, holds any shape;
- Soft (waxy). Great fun for kids. It does not need to be kneaded first. Easy to smear;
- Sculptural. It is designed for children over five years old. It is designed for modeling wireframes;
- Ball. Does not stain hands or surfaces.
Plasticineography
Plasticineography is an unconventional drawing technique. Paintings made using this technique contain convex objects made from plasticine.
Using plasticineography and combining it with other creative techniques, original and unique works are created.
The benefits of this type of creativity for a child’s development include the benefits of drawing and modeling. In addition, when a child creates a picture from plasticine, he rolls out and smears the plasticine, thanks to which he learns to feel his hands better and control them more confidently.
Princess
You need to be as careful as possible and try hard to create such a beauty. We start with a beige oval. It should be sharpened on one edge to highlight the chin. Press down gently, creating hollows for the eyes. We create the face itself: eyes, nose, mouth. We make a cone for a skirt from a turquoise block.
Note!
- Do-it-yourself owl - how to sew an owl, an owlet, an owl silhouette from fabric. Simple ways to create crafts
- Autumn crafts for the autumn holiday from leaves, fesalis, plasticine, vegetables - come up with a creative name, create masterpieces
- What craft materials to use for creativity: non-traditional, foamed, soft or natural pieces made by yourself
The hem is made in the shape of a bell. Show off your waist by cinching your figure. From short pieces we weave a yellow braid for Elsa from plasticine. Recommendation: In fact, the pattern of sculpting a person is quite complex; in the preparatory group, children will cope together with the teacher.
We connect the neck and chest with a beige layer. Add puff sleeves to open parts of the arms. We draw stripes on the skirt and decorate it with numerous homemade rhinestones. After connecting all the details together, adjust them to achieve a natural look. The hairstyle can be complemented with a crown.
Sausages with spirals
Preschoolers can already make simple plasticine compositions. To do this, you need to roll the material into thin rods. This requires maximum patience, attentiveness and accuracy - such character qualities are developed by such activities. By combining multi-colored stripes, children depict cosmic pictures with stars, a winter forest, the underwater world, and autumn trees. You can make beautiful canvases if you place three-dimensional drawings.
A more complex form of creativity is the rolling of plasticine flagella into a spiral reminiscent of flowers. Using such blanks, you can put together a chic bouquet, depict a fluffy dog or a curly birch tree.
The palette in such drawings will be much richer, the work will be much more beautiful when plasticine of similar shades is rolled together, but without achieving color uniformity. To obtain a festive candy, you will need to carefully twist a pair of thin bright flagella (obtained by squeezing out of a syringe). Then they need to be rolled into a spiral.
Athlete
Let's look at the technology for making crafts for boys. How to make a football player out of plasticine mass? How to blind him? Don't panic if your child sets such a task for you. After reading our lesson, you can easily complete the task together. It doesn’t matter which team your son is a fan of, he can change the color of the uniform at his discretion. Let's show it using blue paraphernalia as an example.
- We create an oval lump from blue timber. Deforming it with our fingers, we try to give the silhouette of the body.
- The triangle makes shorts. The stack needs to be cut in the middle to show the pant legs.
- We attach short sleeves to the shoulders.
- Roll out flesh balls into hands. We draw finger stripes. We attach them to the body.
- By adding white stripes along the end parts of the tracksuit.
- Let's move on to the head. We sharpen the oval at the bottom for the chin. We attach the nose, eyes, eyebrows, mouth, ears. You can show unshaven stubble with black strokes. Making hair.
- All that remains is to build the legs and white knee socks. Black sneakers will complete the look. You can complement the composition with a soccer ball. Every boy will be delighted with such a useful activity.
Operating rules
Learning the plasticineography technique occurs quickly. Children simply need to tear small pieces of the desired color from a piece of material, and then make small balls out of them. These elements need to be glued to a sheet of paper with an image drawn on it in the right place. After placing the next part of the picture on the surface, lightly press it with your finger. This procedure is convenient because it allows you to correct mistakes without any extra effort.
When a child creates a plasticine image on a canvas, it is necessary to follow this procedure. In your work, use only bright material that can be easily given the required shape. This will make it easier for pens that are not yet too strong to create exclusive drawings.
To consolidate the acquired skills, separate the stages of training: first show how to press on the material, then practice smearing it. Then combine both methods in the game.
Plasticine ship step by step
Modeling in kindergarten for children 2-3 years old should consist of large elements. Toy vehicles will be a good option for the creative process. For a sailboat you need three masses of different colors:
- From the beginning we make the bottom of the vessel. It will be shaped like a petal.
- Next are several thick and long sausages for the sides. You choose the height yourself. We connect the elements together.
- Add two pieces of bottom color to the end sides. The base is ready.
- Attach two white sails in the shape of curved rectangles to a toothpick or wooden skewer.
- All that remains is to attach the red triangular flag to the top. You can attach a yellow anchor to the bow of the ship.
There are a huge number of ships. Try to build a large frigate, barge, warship with a plasticine cannon. In kindergarten there is enough time to show your imagination and imagination.
Drawing with scratches and dents
This technique can be used even by three-year-old children. First, any surface must be covered with a layer of plasticine. Then hand the child a thin wooden stick and invite him to use it to draw any patterns on the material. For older children, such a tool will help to detail the finished image, giving it realism by creating additional volume.
Fine scratches are made by fluffy spruce paws and the luxurious tail of a red fox. With a sharp stick, it’s easy to draw thin scales covering the body of multi-colored fish. Children can use special molds to squeeze out finished figures on a smeared layer of plasticine. Preschoolers love to create amazing ornaments in a similar way. To do this, instead of solid silhouettes, small stamps are used, which can be pasta and decorative buttons. A tool that has a hemisphere at the tip is convenient for making indentations in the locations of the eyes of fairy-tale characters or animals.
The technique of drawing with plasticine is a great option for creative games with kids. Using this technique, children are able to create original greeting cards for parents, New Year’s crafts, and competition tasks. There are extremely many different techniques and little tricks in making plasticine canvases; there is huge scope for the imagination of the young artist.
New Year's crafts from plasticine
Such accessories will be useful for competitions in children's institutions and at various exhibitions of homemade craftsmanship. They will also help you feel the approaching Christmas holidays. They will create a fabulous atmosphere. You can try working with polymer clay. The main thing is to carefully follow the instructions.
What's New Year without a snowman?
To make them, you need to roll two balls: a large one and a smaller one. Paws - two sausages. Make an orange carrot. Black eyes and a smile. The product will be complemented by a bright scarf, hat, headphones, and mittens. It all depends on your imagination.
Santa Claus
Pull the big red ball into a cone. We make a light frill of the fur coat, a black belt with a yellow tie. Using a stack, cut out a wavy edge on a white piece. This will be a beard. Let's create a cap. All that remains is to attach the hands, eyes, and big nose. Instead of a mouth there is a black semi-oval.
Christmas tree
The simplest idea. Roll out a long green sausage. The longer it is, the taller the tree. We lay the workpiece in a spiral. Make many balls of different sizes from colored molding mass. This will be a Christmas tree decoration.
Can be decorated with beads and rhinestones. Sprinkle the finished figurine with glitter.
For children from the older group of kindergarten, you can create a step-by-step master class on sculpting deer. They will fit perfectly in a carriage with Santa Claus and his assistants.
Topic: Modeling in kindergarten. Modeling work in the junior and middle groups
Topic: Modeling in kindergarten. Modeling work in the junior and middle groups.
Plan
- The importance of modeling in the development of preschool children……………..
- Organization and equipment of modeling classes………………………..
- Modeling in the younger group……………………………………………………………………
- Learning objectives;……………………………………………………………..
- Contents of the program;…………………………………………………….
- Methodology of the program………………………………………………………..
- Modeling in the middle group……………………………………………………………..
- Learning objectives;…………………………………………………………….
- The content of the work;………………………………………………
- Method of work…………………………………………………………….
- Make a lesson plan for modeling for the younger group………………..
- Create a lesson plan for modeling for the middle group………………..
- Literature………………………………………………………………
- The importance of modeling in the development of preschool children
Modeling is one of the most emotional productive types of visual activity for preschool children. Modeling for children is, first of all, a game, and a child plays everywhere and always with pleasure.
Modeling is of great importance for the training and education of preschool children. It has a beneficial effect on the all-round development of the child. It promotes the development of visual perception, memory, imaginative thinking, and the instilling of manual skills necessary for a child. Modeling, like other types of visual activity, forms aesthetic tastes, develops a sense of beauty, the ability to understand beauty in all its diversity. Modeling also affects the mental development of the child. Mental activity during modeling classes is manifested in the fact that the child finds and uses expressive means, and for this he will need to compare his work with a toy.
Modeling, by its nature, requires, on the one hand, developed sensations and perceptions, and on the other, it itself improves these perceptions and sensations. It is believed that vision is leading in the knowledge of objects in the real world, but in the first stages of development in children, the support for vision is the touch of an object.
THEM. Sechenov noted that the hands determine the shape of objects differently than the eyes, and determine it more completely, due to the fact that we can apply the palms of the hands to the side surfaces of objects, which are always more or less hidden from the eyes, and the back ones, which are no longer accessible to the eyes. . In modeling, the child must reflect material properties - their volume, shape, density and texture.
During modeling, the child develops fine motor skills, but that’s not all, because motor skills are directly related to the child’s speech function and they develop in parallel, which means we conclude that modeling helps the child’s speech development. It also affects the strength and mobility of the fingers, the coordination of movements, which is also quite a significant advantage.
The child learns concentration, concentration, determination and perseverance, which is especially important for mobile and active children. Thanks to modeling, the child learns shapes and volumes, comprehends figures, and begins to sort objects by similarity.
It is also very important that modeling helps develop a child’s imagination and imagination, which, in turn, teach the child thought processes. In sculpting, as in any creative activity, the focus on the final result is clearly expressed.
Modeling promotes the harmonious development of a child’s personality, helps create an environment of emotional well-being, and ensures the development of children’s abilities for aesthetic activities.
When working with children, three types of modeling are used: object modeling, plot and decorative.
- Organization and equipment of modeling classes
Any activity of children, and especially artistic activity, requires an appropriate organization of the subject-development environment. The organization and equipment of classes should also contribute to the aesthetic education of children.
First of all, cleanliness, order, and neat arrangement of materials must be observed. Accessories should be laid out on tables so that they are convenient and easy to use. Such an environment will make preschoolers want to study, they will try to preserve and maintain beauty and order. Visual aids must be made at a high artistic level.
Equipment for modeling also depends on the age of the children. It is important to organize the lesson correctly, select the appropriate material and equipment to make the lesson successful. The choice of material for modeling depends on the age of the children.
For modeling in kindergarten, soft plastic materials can be used - clay, children's colored plasticine, technical plasticine. It is also possible to use non-traditional plastic materials of your own making - this is dough and paper pulp. Each of the listed materials has its own characteristics that must be taken into account when creating children's creative works in modeling classes.
More often, children sculpt from plasticine, because... preparing clay requires special conditions, time and effort. This has its disadvantages and advantages. Clay as a material is a little more expressive than plasticine, it is more flexible, and works made from clay are more artistic. Also, after firing, clay products can be painted (that is, work on creating clay crafts is carried out in several stages).
Plasticine is easy to prepare for use. It is multi-colored and can be easily used many times. But works made from plasticine are not so expressive, because... plasticine is less flexible and requires good development of the small muscles of the hand (sometimes it is difficult for a child to roll out the plasticine and divide it into pieces). Therefore, it is advisable to warm up the plasticine before class so that it is softer.
And one more new product - model mass for modeling. It is surprisingly soft, light and pleasant to the touch, which is very important for children's hands.
Modeling equipment includes frames. When working with preschoolers, these are ordinary sticks of different lengths and thicknesses. Using a frame helps to better depict animal legs and make figures.
During the sculpting process you need to use stacks. They can be wooden, metal, plastic. The stack is used for processing parts in cases where it is difficult to do by hand; The stack removes excess clay from the mold and makes cuts. Stacks can be given to children from the middle group.
To successfully teach children to model, it is good to have small boards that are placed on the table. Their size is determined by the size of the sculpt. If the figure is 15 X 10 cm in size, then the board can be 35 X 22 cm in size. If the figure is larger, then the board should be larger. The most convenient board shape is a circle, but it can also be square.
In addition, special stands are used to demonstrate the sample, and stands with shelves are made for the exhibition of children's works.
- Modeling in the younger group
In modeling, children learn about the properties of the materials they use. It can be clay, plasticine, dough. Kids also remember what objects can be sculpted from them. Hand motor skills develop, thanks to which they can separate small-sized lumps from a piece, roll them out with their palms, and sculpt objects consisting of three or more parts.
- Learning Objectives
.
Teaching modeling in the first junior group mainly comes down to general educational tasks.
Arouse interest in sculpting, introduce children to the material, its properties (soft, plastic - you can tear it off, make something out of it), children sculpt: stick, sausage, round ball, apple, pancake, flatbread, ring, teach how to use it correctly clay (do not throw it around, sculpt at the table), teach the simplest technical techniques (tear off, roll out, connect), learn to sculpt simple objects (sticks, ball).
2nd junior group
Generate interest in modeling. To consolidate ideas about the properties of clay, plasticine, plastic mass and sculpting methods. Develop the ability to roll out lumps with straight and circular movements, connect the ends of the resulting stick, flatten the ball, crushing it with the palms of both hands. Encourage children to decorate sculpted objects using a stick with a sharpened end.
Develop the ability to create objects consisting of 2-3 parts, connecting them by pressing them against each other.
Strengthen the ability to carefully use clay, put lumps: sculpted objects on a board.
Invite children to sculpt simple objects consisting of several parts (tumbler, chicken, pyramid, etc.). Offer to combine the sculpted figures into a collective composition (tumblers dance in a circle, apples lie on a plate, etc.)
Create joy from the perception of the result of your own and common work.
- Program content
The modeling program for the first junior group is not planned quarterly, since it is necessary to conduct repeated classes so that all children master the skills of sculpting a cylinder and a ball within a year. Basically, the teacher focuses on half a year.
2nd junior group
The classes are substantive in nature, we lead children to subject-plot modeling, as a result of collective work (this is the unification of sculpted images with a single theme. Each child sculpts one object, then all objects are combined on a single plane “Mushrooms grow in a clearing”, “Snowmen are dancing at the Christmas tree ").
I quarter:
- teach children shaping movements to obtain a cylindrical shape, teach them to coordinate work with both hands (sticks, pencils, columns, candies, sausages)
- teach children to connect the ends of the roller to make a ring (donut, bagels, wheels, dryers);
- teach children to roll out a cone-shaped shape (carrot) between their palms by pulling out one side;
- learn to sculpt round objects, roll a ball of clay in a circular motion (balls, balls, apples, cherries, nuts);
- teach children to sculpt objects consisting of several parts (pyramid, snowman), placing one part on top of another and pressing it down (connecting parts).
II quarter:
- teach children to flatten a ball to make a disk (pancakes, flatbreads, cake, decorating with small balls;
- learn to pinch the edges of the mold, pull back and flatten the edges of the mold with your fingertips (saucers; pinch the cut to make dumplings; pies - pinch the scallop on top).
III quarter:
- teach children to sculpt objects consisting of several parts, of the same and different shapes (mushroom, tumbler, pyramid, matryoshka, basket). After children have mastered making a ball, cylinder, or disk, they can move on to depicting objects consisting of several parts. Children make an airplane, a snowman, a tower of balls, rings or disks, a tumbler bear, a tumbler doll, a tumbler bunny and a bird. It is still difficult for children in this group to create objects from a large number of parts, to place the parts in the required structural order, so it should be suggested to fashion a snowman from only two balls: a large and a small one, and an airplane from three rolls of clay.
IV quarter:
-in the summer, the knowledge acquired throughout the year is consolidated.
- Working method
1st junior group
Children are divided into small subgroups, 5-6 people. The lesson is held for 5-8 minutes with each subgroup. From the second half of the year, classes are held frontally. The main technique is a demonstration and a detailed explanation of one’s actions (“I take a piece of plasticine on my left palm, cover it with my right palm and roll it back and forth...). Similar explanations are heard in every lesson. You can conduct classes demonstrating the process of depicting objects familiar to children. Using gaming techniques and playing them out. As they acquire skills in working with clay, children can sculpt according to their own plans, but at the same time remind them that we were sculpting before (for example, breadsticks, sausages, pencils, balls, etc., and now sculpt who will do what) . Positive assessment of children's activities.
All children's works are placed on a stand so that children have the opportunity to admire them for a while.
Teaching methods are visual and effective. The children first imitate the actions of the teacher, repeating the formative movements. Modeling classes in the first junior group are substantive in nature, that is, children sculpt individual figures that are not connected by a plot. The teacher gives the task until the children master the methods of modeling.
SECOND JUNIOR GROUP
In the second younger group, tasks of a visual and technical nature are associated with further teaching children to distinguish and sculpt a ball, cylinder, disk, orient in size, and compose simple figures from them.
- Information-receptive and reproductive (we examine in detail, examine the sample).
- Demonstration (we use a full demonstration, with reinforcement of sculpting techniques and form-building movements), you can attract children.
- Inspection and examination (we start from the larger one, i.e. from what we will attach to).
- We widely use the artistic word.
- gaming techniques (playing out the objects they will sculpt).
- We use advice and encouragement.
- When analyzing children's work, we admire the results (we are not talking about the quality of the craft yet).
All teaching techniques used by the teacher are aimed at developing mental activity and independence using a variety of modeling methods.
Types of classes: object modeling, preparation for plot modeling (according to plan, only under the supervision of the teacher). Decorative modeling is not carried out in this group, but children should be taught the elements of decorating sculpted objects
Methods: constructive, sculptural.
Techniques: kneading, dividing, joining, rolling (straight), circular rolling (flattening and pressing), pressing, flattening, joining. New techniques: pulling, pinching, pinching, coning and using embellishments.
- Modeling in the middle group
In children of the fifth year of life, the muscular system of the arms has become sufficiently strong, their vocabulary has expanded, and in connection with this, the regulating role of speech has appeared (they plan their work, understand the teacher better). Children begin to identify the functional characteristics of an object, this facilitates the process of depiction. Children become more attentive to the lesson process. However, the result of the work is still little different from the younger group, because Children do not yet master the methods of representation. Children do not have a clear idea of objects and shapes, structure, proportions are violated, there is no clarity in conveying the form, parts are not firmly held together (fastening by smoothing).
- Learning Objectives
Generate interest in modeling. To consolidate ideas about the properties of clay, plasticine, plastic mass and sculpting methods. Develop the ability to roll out lumps with straight and circular movements, connect the ends of the resulting stick, flatten the ball, crushing it with the palms of both hands.
Encourage children to decorate sculpted objects using a stick with a sharpened end.
Develop the ability to create objects consisting of 2-3 parts, connecting them by pressing them against each other.
Strengthen the ability to carefully use clay, place lumps: sculpted objects on a board.
Invite children to sculpt simple objects consisting of several parts (tumbler, chicken, pyramid, etc.). Offer to combine the sculpted figures into a collective composition (tumblers dance in a circle, apples lie on a plate, etc.): Arouse joy from the perception of the result of your own and the common work.
- The content of the work
Progression of the program by quarters:
I quarter
—
learn to separate pieces of plastic material, roll them with straight or circular movements between the palms and on a board (oilcloth), flatten the resulting shapes
Thus, at the beginning of the year until approximately December, children depict familiar objects, clarify their shape, and improve sculpting methods.
II quarter
-learn to sculpt objects from a whole piece (vegetables, fruits), figures consisting of several parts (doll, cat, rabbit, bear)
- teach children to sculpt a snowman from three parts (the initial condition for the basic proportions of the human figure)
- teach children to sharpen and round the end of the column with their fingers, pinch the edges of flat cakes to create a more beautiful and full shape (carrots, cheesecake, pie, cookies)
III quarter
Main goals:
-teach children to pull back clay when sculpting small parts (chicken, bird, fish)
- learn to bend the edges of a flattened shape while modeling dishes, firmly fasten the parts, covering the fastening points.
-press it with your fingers to obtain full objects,
- teach children to divide clay into the required number of parts.
- teach children to sculpt dishes. To do this, they show new methods: pressing and pulling (bending)
Methods: pressing round and cylindrical shapes (glass, mug) with your fingers, bending the edges of a flattened shape (plate, dish, tray)
- teach a new method of sculpting - smearing.
IV quarter
In the summer, the material covered is consolidated; children sculpt all the objects they learned to make during the school year. The teacher explains and shows the method of modeling, full or partial.
Children sculpt: sticks, pencils, columns, candies, puff pastries, chains, pretzels, balls, vegetables, fruits, dishes, clothes for dolls, the column on which the bird sits can be decorated with high or in-depth relief.
- Methods and techniques
When working with children in the middle group of kindergarten, three types of modeling are used: object modeling, plot modeling and decorative modeling. Each of these types has its own characteristics and tasks.
In object modeling, the child deals with real volume and does not need to resort to conventional means of representation. Children sculpt vegetables, fruits, figures of animals, birds, and utensils with interest.
Plot modeling is carried out only in the senior and preparatory groups. In the middle group, children are just getting started with plot modeling and accumulating the necessary knowledge and skills.
Decorative modeling in the middle group is aimed at introducing children to folk applied art, its different types, including small decorative sculptures by folk craftsmen.
To successfully complete and consolidate the program throughout the year, the teacher selects appropriate teaching techniques. At the beginning of the year, according to the program, children repeat the material they have covered: they engage in modeling, work on the form.
The main technique for teaching modeling in the middle group is direction.
- Examination, examination (color, shape, position in space, mood).
- Use of partial display (with the assumption of different options, modeling methods, it is possible to use sketch diagrams when explaining tasks).
- We consolidate the explanations by going through formative movements.
- We widely use artistic expression (fairy tales, poems, riddles).
- When examined, each of the parts is compared with a geometric, volumetric body or with those objects that children know well.
- We use game motivations; search questions (what needs to be done to get the bird to peck).
- When analyzing work, we teach us to see our shortcomings (we note both positive and negative aspects, and involve children in analyzing work). Analysis of children's work is carried out after class, a walk or in the evening. Children should always be warned about this.
Modeling techniques: rolling (column), rolling (ball), finger pressing (decorating a pie), pinching, flattening, joining.
Added: smearing, pinching, pulling, smoothing.
Plasticine food
Small details like these will come in handy in developmental activities. The child will know the types of vegetables and fruits and name the colors correctly. You can play out the dinner feast. You will need to make some dinnerware. The easiest way is to make plates. It is enough to roll out the real figure, raising the sides a little.
The scrambled eggs will look appetizing in the resulting plate. To create it, flatten the white dough with jagged edges. Place a slightly crushed yellow circle on top. Sprinkle with green shavings. Breakfast is ready. A cup of coffee and a homemade sandwich will complement the whole composition. Bon appetit!
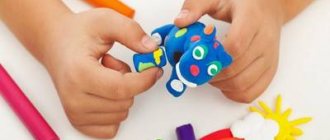
Don't know what useful things to do with your child during the holidays? The best solution is educational activities, creativity, and sports. Work instills in children perseverance, attentiveness, and the ability to concentrate. Modeling from plasticine is one of the most exciting pastimes. Once you start, it’s hard to stop.
Children with poorly developed hand motor skills must practice this skill. There are so many things you can come up with from plastic material. Real professionals can even make full-size models of equipment and cars. For beginners, our master classes will be enough to create their own unique masterpiece.
Memo to parents: how to make modeling enjoyable and useful?
To make a craft from plasticine, an adult will not need a lot of work and time, especially if he has a step-by-step guide at hand. But it is much more difficult for a child, because he has not yet had time to familiarize himself with his capabilities and does not know that he needs to work on fine motor skills in order for him to do well. Therefore, parents need to familiarize themselves with several recommendations that will help instill in their children a love of modeling, as well as teach them how to make interesting crafts.
- We need help. But parental help should be in moderation. A child will not be able to make even the simplest craft on his own if his parents do all the work for him. But it is necessary to help cope with new material. The parent’s task is to teach how to warm up, knead in hands, lay out layers for stencils or fold parts together. It is better if mom or dad do their craft in parallel, demonstrating and slightly stimulating the children.
- The development of imagination cannot be hindered. An adult may well act according to instructions, but it is difficult for a child to limit himself to certain stages of guidance. Therefore, while the baby is trying to make crafts from plasticine, he needs to be given freedom, allowed to make his own changes, even if the parents are absolutely sure that in the end the figurine will turn out ugly.
It is also extremely important to take a direct part in creating crafts from plasticine. This way the baby will understand that this activity is meaningful, not only for him, but also for adults. And this will help him be more responsible and attentive to crafts, despite the fact that the activity requires painstakingness, concentration and perseverance.
Modeling from plasticine: the best photo ideas for original works
Please repost
0
Applications
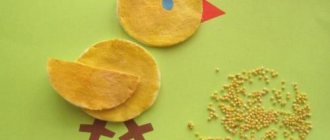
In applications, plasticine is used to make individual parts convex and voluminous. Any picture immediately comes to life and looks much more interesting!
Photo: podelunchik.ru
10 ideas on how to make a lapbook with your own hands