Stylized images of the sun always evoke a positive reaction from children and adults. The image of the luminary is associated with warmth, the spring awakening of nature and a pleasant summer vacation.
Crafts in the form of a cheerful, bright sun at the end of winter, after the boring cold, when since ancient times people celebrated Maslenitsa and prepared for the arrival of spring, are especially uplifting.
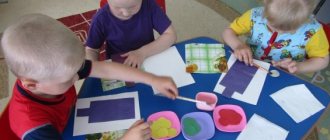
At this time, many kindergartens and schools hold competitions on the theme of national holidays and children are asked to make homemade sun crafts with their own hands, which the little ones learn to do together with older family members.
Various craft options
In children's creativity there cannot be two identical works, but making a sun still requires a certain set of elements that can be made from any materials. The main detail of the craft is always the central disk of the celestial body.
Then you need to make and attach to it many stylized rays diverging in different directions from the center of the circle. At the same time, it is important to decide how the product will be attached - glued to paper or cardboard, hung on a string or placed on a stick for festive events.
If desired, on the disc itself you can depict a human face with a playful smile and freckles.
Pedagogical development
Author:
Olga Gennadievna Mitrofanova
Position:
teacher
Educational institution:
MBDOU "Kindergarten No. 256"
Settlement:
Barnaul city, Altai Territory
Name of material:
Summary of organized educational activities in the middle group "The Sun is Visiting"
Topic:
Summary of educational activities in the middle group " Visiting the Sun"
Date of publication:
09.12.2019
Section:
preschool education
Municipal budgetary preschool educational institution
"Kindergarten No. 256"
Summary of organized educational activities
"Visiting the Sun"
Age group:
average
Author, position:
Mitrofanova Olga Gennadievna, teacher
Summary of the final OOD in the middle group
"Visiting the Sun"
Target:
generalization and consolidation of children’s ideas received during
- create conditions for strengthening children’s ideas about the seasons,
parts of the day, wintering and migratory birds;
- promote the consolidation of ideas about geometric shapes;
- continue to encourage children to intonationally highlight the sound in a word and assign
this sound to the corresponding iconic image;
— contribute to the expansion and activation of children’s vocabulary.
- promote the development of visual attention, perception, speech hearing,
- create conditions for the development of the ability to generalize and draw conclusions.
contribute
FORMATION
in mutual understanding,
goodwill, independence, initiative;
- create conditions for stimulating creative imagination, accumulation
positive emotional experience.
depicts chickens, magpie, hare, duck and hedgehog); hats for children: snail,
magpie, hare, duck, hedgehog, month, sun; "garden"; ball; pictures “Wintering and
migratory birds"; cards with pictures of vegetables; cards with numbers;
"Creek"; "duck house"; geometric figures; "tree"; pictures in titles
which have the sounds “p” or “p”; starry sky and stars; "House of Sun";
pictures depicting the sun or clouds; musical accompaniment.
Preliminary work:
reading the fairy tale “Visiting the Sun”, talking about
seasons, a conversation about migratory and wintering birds, a conversation about vegetables and
Craft for the little ones
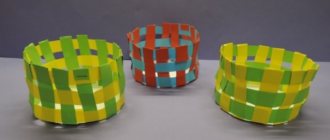
The simplest and most understandable craft for preschool children may be a paper sun craft.
To work you will need the most common set of materials:
- colored or corrugated paper in yellow, orange or red;
- glue in convenient packaging so that it is safe for the child to use it;
- special scissors for child labor;
- cardboard or a piece of thick paper to give a rigid shape to a craft or a base for applique.
To create a solar disk, you need to draw it on colored paper using any round object of the required size, which can be a saucer or plate. To draw the border of the rays, you will need to draw a circle of larger diameter.
The rays can be made from bent strips of paper, braid, fingers circled on paper of a different color and pasted in a circle, or bright corrugated paper.
MAGAZINE Preschooler.RF
Summary of a lesson on application in the middle group “And the Sun has clear rays”Prepared by teacher Yakovleva E.S. 2022 Municipal budgetary preschool educational institution "Shemurshinsky kindergarten "Romashka"
Program content:
Educational objectives: learn to create an image - a symbol of the Chuvash pattern depicting the sun, arranging the elements of the pattern and gluing them to the base.
Developmental tasks: develop children’s ability to place shapes throughout the sheet, as well as the ability to compose a simple pattern of geometric shapes on a square; develop aesthetic taste.
Educational objectives: to cultivate interest and emotional responsiveness to the means of artistic expression of works of Chuvash applied art.
Vocabulary work:
Activate children's vocabulary with words: rays, sun, pattern.
Methods and techniques:
- A surprise moment - the Ilembi doll invited the children to visit.
- Examination of the pattern on the doll's dress.
- Questions:
-What does the pattern look like?
— Does the pattern look like a sun?
- What does the sun have?
4. Game “Sun Rays” (children lay out rays on the floor from satin ribbons to the model of the sun).
5. Making napkins for the doll’s girlfriends.
6. Demonstration of a sample method of action.
7. Laying out the pattern details on the prepared square.
8. Physical school.
9. Encouraging children.
10. Instruction, reminder.
11. Examination of symbol patterns on a multimedia installation
12. Outdoor game “Sun and Rain”
Preliminary work:
- Drawing the sun
- Learning the outdoor game “Sunshine and Rain”
- Learning physical education
Material and equipment
- Doll in national costume
- Fine model of the original pattern (symbol of the sun)
- Napkin with a pattern.
- Cards with drawings of patterns and their semantic meaning.
- Hoop covered with fabric.
- Colored ribbons.
- Attributes for an outdoor game (sun and cloud)
- Handout: red cardboard 15*15 cm, yellow and green pattern elements 2 pieces each, glue, napkins.
Progress of the lesson:
Educator: Guys, we have guests today, say hello! (Children say hello). Now come to me and see who is waiting for us? This is a doll. Her name is Ilembi. Let's come closer and see how elegant she is. Guys, the doll has a beautiful dress, and unusual patterns are embroidered on it.
Children look at the doll and the patterns on the dress.
Educator: What does this pattern look like? (children's answers). Well done! And it seems to me that this pattern resembles the sun. The sun has rays and this pattern also has rays. The rays look in different directions to keep everyone warm. Does this pattern look like the sun?
Children: Yes!
Educator: Guys, Ilembi is telling us something. Ah-ah-ah, I understand. She reminded me of an interesting game. Now you and I will play it, and the doll will sit next to you and watch.
Educator: I have a circle. Now we will make a sun out of it. Look how big the circle is (puts it on the floor). There is a circle, but what is missing?
Children: Luchikov.
Educator: That's right, the sun doesn't have enough rays. We will make rays from ribbons. Our doll has these ribbons. Look, here they are (takes out colored ribbons that are on a tray and shows them to the children). We will lay out the rays like this: first we will lay out a yellow ray, then a green one, then again a yellow one, and so on until we have laid out all the rays; Our rays are straight (shows how to lay out ribbons on the floor). Come to me, I will give you ribbons (hands out ribbons to children).
The game "Sunshine"
(children lay out rays from colored ribbons on the floor).
Educator: Look what a beautiful sun we have created! Well done! Now, guys, help me clean everything up (children help clean up the attributes). Our doll has a beautiful scarf! (Takes out a napkin that is located on the doll’s apron.) Look.
Children look at the napkin.
Educator: There is a sun on this napkin. And he has rays. The rays are colored, on a napkin they are located one after another. Our doll has girlfriends, but they don’t have such beautiful scarves. Can we help the doll make handkerchiefs?
Children: Yes!
Educator: Sit down at the tables, guys. Place a handkerchief in front of you, and now arrange the rays on it as on my handkerchief
Sets up an easel on which the sample is placed.
Educator: The rays look in all directions, up and down, right and left. Guys, are the rays different colors or the same? (Children's answers). That's right, rays of different colors. And on our handkerchiefs we will arrange the colors in order: yellow, green, yellow, green.
Children lay out the details of the pattern on their blanks.
Educator: Spread out? Well done! Now let's play. Stand near your chairs.
Physical school is being held.
Guys, let's call the sun!
Sunny, little bucket, (they wave their hands invitingly)
Look out the window! (one hand above the head, the other under the chin - depict a window)
Your kids are crying (pretending to cry)
They jump on the pebbles. (jump up)
Educator: We played, now sit down at the tables, let’s glue our rays. First, take the top yellow ray, turn it over, and spread it with thin glue. Spread glue over the entire ray; Carefully, evenly place the ray in its place, pressing it with a napkin. Then we take the green ray, then the yellow one, and now the green one again. Glued? Well done!
Educator: Take your tissues and leave the tables. Look how many beautiful scarves you have made. Give them to Ilembi doll so she can give them to her friends. How happy the doll is. We have the sun on our scarves and the sun on our dress.
Children place their work on the high chair where the doll is located.
Educator: Look at this big screen, everyone.
Displaying illustrations of patterns-images on a multimedia installation
Educator: What do you see on the screen? That's right, it's a tree, and this is how you can show a tree on a handkerchief. This is a pattern. This is a house, and this could be a house on a handkerchief. This is also a pattern. Say in unison: pattern.
Children (in chorus): Pattern.
Educator: Well done! Patterns may vary. Next time we will make other patterns on handkerchiefs. Guys, the sun has come through our window. Here it is (takes out attributes for the game).
The outdoor game “Sunshine and Rain” .
Educator: Did you like making handkerchiefs today? Did they turn out beautiful? Next time we will make other patterns on handkerchiefs? Say goodbye to the doll and the guests.
The children say goodbye and leave.
| Next > |
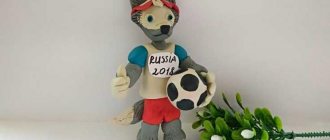
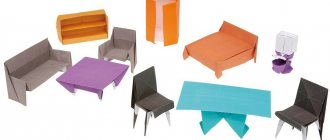
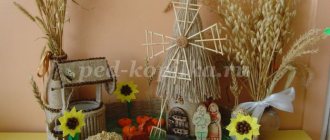
Volumetric work on a stick
To make a craft for a 5-6 year old child in kindergarten, for events dedicated to Maslenitsa, you can use cardboard and colored paper. Two disks of different diameters are cut out of cardboard, gluing one of them onto the other.
On a smaller circle you can draw the eyes, mouth and nose, which will be in the center of the product. The rays are made from multi-colored paper, which can be yellow, red, orange, or golden. Fragments of paper are folded like an accordion, the assembled edge of which is attached to the outer diameter of the circle blank.
Depending on the size of the Maslenitsa sun craft, it can be made on a stick or skewer to decorate a festive dish.
Original ideas
Look carefully at familiar objects: they themselves will tell you how to use them for other purposes.
The yellow foam sponges are just begging to be reshaped.
Why not cut out the sun? Even if all the sponges in the set are of a different color, they can be easily repainted with gouache, watercolors or acrylic paints.
From cardboard and clothespins
It is not at all necessary to turn new things into crafts. Do you have a few old wooden clothespins lying around your house? Let the child turn them into bright sunrays, and at the same time repeat the numbers and counting.
Adults need to cut out a cardboard circle and apply numerical marks along the edge at the same distance, for example, from 1 to 10. Write the same numbers on clothespins.
And the baby will be happy to combine the same numbers and will be surprised to discover that magic has happened: now he has the sun in his hands! Clothespins can be replaced with ice cream or sushi sticks.
From paper and threads with braids
Children associate the sun's rays with different objects, for example, hair. Since this is hair, then different hairstyles must be made from it. The sun with pigtails, ribbons and hairpins looks very perky, and if it also winks with its eyes, it will definitely make you smile.
For this craft you will need a hole punch, cardboard, knitting or floss threads, scissors, accessories for decorating hairstyles, paper for cutting out eyes, nose and mouth:
- First, a circle of arbitrary diameter is cut out of cardboard, and holes are made along the edge using a hole punch.
- The yarn is cut into pieces, the length of which is twice the length of the finished rays.
- One or more threads are folded in half, a loop is inserted into a hole on the cardboard, then a free tail is threaded into this loop. You should get a fringe.
- All that remains is to turn the fringe into braids and enliven the middle - attach or draw eyes, make lips.
Made from tires and plastic bottles
Giving a second life to unnecessary things is very simple: old car tires and empty plastic bottles are used to create an elegant park composition. True, children themselves will not be able to do it, since dangerous objects are used during assembly: screws, screwdrivers, knives.
You will also need paints that are not afraid of weather conditions:
- So, you need to cut out the future “face” of the craft from plywood, plastic panel or linoleum.
- Its radius should be greater than the radius of the inner part of the tire, so that it is convenient to glue or screw it with self-tapping screws.
- Bottles do not have to be selected according to size and shape: they can be different, but they must have caps.
- Screw the caps to the rubber, and then screw the bottles into them.
- If you plan to hang the sun, then the rays should be all over the circle; if you want to place it on the ground or a stump, then there is no need to place bottles along one of the segments of the circle.
- All that remains is to paint and decorate the resulting base as you wish.
Applique of autumn leaves
It’s not for nothing that autumn is called “golden”. The leaves on the trees actually turn gold.
Not only yellow leaves are useful for crafts; red, brown, and ocher leaves are also suitable.
Even three-year-old children can handle a simple applique made from natural materials:
- You need to glue a circle onto the cardboard, and glue leaves around the perimeter.
- Leaves can only be collected or dry.
- Older children are able to implement more complex ideas: making rays multi-layered, or “planting” a craft on a barbecue skewer.
From disposable spoons
An exciting activity is making something unusual from non-standard materials. Non-standard materials for crafts include plastic cutlery.
If you lay out plastic spoons in a circle and attach the orange center on top with hot glue, you will get an unusual sun. For this option you will need two packs of identical spoons of 12 pieces.
Much more spoons will go into the sun, the rays of which will resemble pineapple scales. In this case, the spoons can be of different sizes. For example, the inner circle will be formed from teaspoons, and the outer circle from dessert spoons:
- First you need to separate the handle from the head of the spoon.
- On the prepared circle, the diameter of which is one centimeter less than the diameter of the finished product, draw a few more circles.
- The heads of the spoons will be placed along these circles.
- Glue each head using a glue gun; Moment glue is also suitable.
- When only the center remains empty, you can begin to design the face.
- It is important that the diameter of the face is slightly larger than the diameter of the empty circle in order to hide the uneven edges left by the removed plastic handles.
- The face can be made from cardboard, disposable plate, foamiran, foam rubber.
From palms and disposable plates
A disposable plate is the ideal middle ground for a future craft. Firstly, it is dense, and secondly, it is round. Paint the plate with suitable shades, revive it and start forming rays.
Children like to trace their own palms, and these palms will act as rays. Several palms must be attached to the edge of the plate either using PVA glue or a stapler. The more palms, the brighter and more unusual the product will be.
Any creativity is a way to develop imagination, and what is especially important these days is that it successfully competes with gadgets. Crafts in the shape of suns are a good way to spend time with your child and unobtrusively master basic mathematical and spatial concepts.
Bright sunshine is an excellent gift for a person who wants to cheer up; it can be used to decorate a child’s room, a group in a kindergarten, or a school classroom.
Handy household items for crafts
As a basis for making sun crafts, you can use ready-made round plastic products, such as lids from various containers or disposable plates. To paint such products in the desired colors, you can use acrylic paints and a type of glue suitable for plastic, one of which is silicone.
The face of the luminary can be drawn using paints and markers, both on the inside of the plate and on the outside. Rays in the form of palms drawn and cut out of cardboard are attached along the edge of the plate with a strip of glue.
When gluing the application to a wall or cardboard, you can use rubber gloves of appropriate bright colors instead of cardboard palms. It can be interesting to work with the use of multi-colored cocktail tubes.
CD - discs for making the sun
Used computer disks are suitable for making sun crafts for kindergarten or junior school. It is advisable to choose two discs with a yellow tint, which are placed together with the sides with the inscriptions, so that the iridescent coatings are on the outside.
Thanks to the holes in the center, two discs can be tied together with a beautiful thick thread or braid. From the same threads you can continue the rays, braiding them into tight braids. At the end of the work, the center of the disk is sealed with a circle of colored paper with a face drawn on it with felt-tip pens.
GCD “Story application with drawing elements “Visiting the Sun”
Story applique with drawing elements
"Visiting the Sun"
Target:
develop creative imagination through applique.
Tasks:
Teach children to draw simple stories based on fairy tales.
Practice the technique of cutting round shapes from squares of different sizes.
Foster independence, confidence, initiative.
Preliminary work.
Reading the fairy tale “Visiting the Sun”, conversation on the content. Looking at illustrations in children's books. Conversation about the sun. Mastering the technique of cutting round shapes from squares by rounding the corners.
Materials, tools, equipment
Sheets of white and blue paper for the background, yellow or orange paper squares of different sizes: the largest for the sun, medium in size for the body of a duckling and chicken, the smallest for the head (thus, each child should have a set of one large , two medium and two small squares); scissors, glue, glue brushes, colored pencils and markers, paper and cloth napkins.
Two or three versions of the composition “Visiting the Sun” for showing to children.
Contents of the lesson.
The teacher reads to the children an excerpt from the fairy tale “Visiting the Sun”:
One day a large cloud covered the sky. The sun didn't show for three days. The chickens are bored without sunlight.
-Where did that sun go? - They say. “We need to return him to heaven as soon as possible.”
-Where will you find him? - the hen cackled. - Do you know where it lives?
“We don’t know, but we’ll ask whoever we meet,” answered the chickens.
The hen collected them for the journey. She gave me a bag and a purse. In the bag there is a grain, in the purse there is a poppy seed.
The chickens have left. They walked and walked and saw: in the garden, behind a head of cabbage, a snail was sitting. She is big, horned, and has a hut on her back.
The chickens stopped and asked:
- Snail, snail, do you know where the sun lives?
- Don't know. There's a magpie sitting on the fence - maybe she knows.
“And the magpie didn’t wait for the chickens to come to her.” She flew up to them, chattered, and crackled:
- Chickens, chickens, where are you going? Where are you going? Where?
The chickens answer:
- Yes, the sun has disappeared. He was not in heaven for three days. Let's go look for him.
- And I will go with you! And I will go with you! And I will go with you!
- Do you know where the sun lives?
“I don’t know, but the hare maybe knows: he lives next door, across the border!” - the magpie chattered...
Then the magpie chattered, the chickens squeaked, the duck quacked, the hare flapped his ears, and the hedgehog tapped with his stick:
- Red bucket sun, look out, shine it!
- Who is screaming under the window? - asked the sun. - Who is stopping me from sleeping?
- It’s us - chickens, a magpie, a hare, a duck, and a hedgehog. We came to wake you up: morning has come!
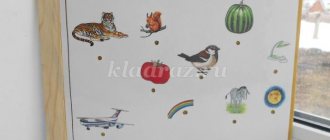
The teacher invites the children to make appliqué pictures about how the chicken and duckling woke up the sun. Shows options for a plot composition (“The sun and a chicken with a duckling”) and paper blanks - yellow or orange squares of different sizes. He asks what size squares are best to cut out a sun and a chicken and duckling. Alternately shows large, medium and small squares. Children guess that they need to cut out the sun from the large one, the torso from the medium-sized ones, and the head from the small ones. The teacher clarifies the children's understanding of the technique of cutting a circle from a square by rounding the corners. It is advisable to first cut out the largest circle for the sun and glue it at the top of the sheet, and then cut out and glue the chickens. First he shows an unfinished applique - a composition of 5 circles: at the top in the center is the largest circle-sun, below on the sides are the silhouettes of a chicken and a duckling (circle-torso + circle-head). Then he demonstrates the completed compositions and advises you to complete the details according to your ideas: for a chicken with a duckling - beaks, eyes, wings, tails, for the sun - rays and a face.
- Now guys, stand up! They quickly raised their hands up, to the sides, forward, back, turned to the right, left, sat down quietly, and got back to work.
Children choose paper for the background and begin to create their appliqué paintings.
Soft toy “sun”
From multi-colored felt or other soft and thick material, you can cut out two circles of different diameters, the edges of which can be beautifully decorated in the form of stylized rays so that they are not too thin and long.
You can place a round piece of foam rubber or synthetic padding in the middle, which will provide volume to the product. The smaller part can be glued to the larger one along the edge of the filler. From material of other colors, eyes and smiling lips are sewn or glued onto it.
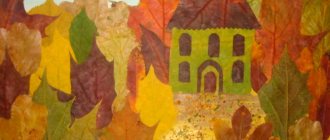
Application made from natural materials
On a sheet of sky-colored office paper you can make an applique from ready-made elements collected during an autumn walk in the park.
Beautiful, bright dried yellow leaves from maples, birches or reddish ones from park shrubs and fruit trees can be successfully used for an applique in the form of a sun, where the center is made of rounded crimson leaves, and the rays are made of yellow and even greenish leaves with carved edges.
Crafts for a country house
An image of the sun made from plastic bottles, wheels from an old children's bicycle, or a picture of the sun cut out of plywood can be used to decorate your home area. A sun craft for a dacha looks original, woven from wicker and installed in the middle of a flower bed or decorating the wall of a veranda.
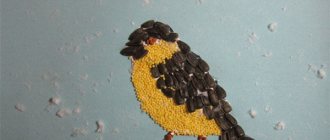
You can knit an original rug in the shape of a smiling sun to decorate your home or bathhouse. In the kitchen you can place a panel in the form of a stylized celestial body made from salted dough or pasta of various shapes.
In this case, the spaghetti will perfectly represent the rays, and the middle will be round pasta. Natural products are treated with a primer and coated with paint. You can finally seal the work with water-based varnish.