First option
- base sheet
- brushes and watercolor
- cotton pads
- glue
- plasticine
- Prepare the main working material. Paint with gouache and mark the barnyard where the chicks supposedly walk. You can just take colored cardboard.
- Dye cotton pads yellow. Cut them in half or trim rounds to give the body the desired shape.
- Glue the blanks on the base plane.
- Complete your creation with plasticine parts. You can create a beak, eyes and paws from this material or complement the composition of the work with plant details.
We provide several variations of the design of compositions on this theme.
Second way
A simplified way to create chickens or geese will be possible even for the smallest.
- Draw or print a picture of a bird.
- Paint the comb, paws, eyes, etc.
- Take regular cotton wool and tear it into small pieces.
- Using craft glue, attach the white lumps in the places where the feathers should be.
Third option
A more complex method for older children.
Create an original background on a landscape sheet that will match the theme of the work. In extreme cases, the sky and grass will suffice.
Mark with a pencil where the rest of the elements will be located. Cut out parts of the house from colored sheets and glue them to the base, which should already be dry.
Download a black and white drawing of a chicken and a rooster from the Internet. If you know how, you can draw it by hand on a white sheet. Cut out the silhouette.
Prepare colored elements that will correspond to the sizes and shapes of body parts: wings, comb, body, tail feathers, etc.
Glue the blanks and decorate the top with colored paper pieces.
All this work can be done collectively, entrusting the child with the responsible work of gluing the parts in the right places.
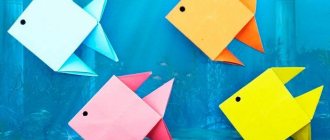
Firebird
A fairy-tale character who looks as fantasy suggests. An ideal composition for beginners.
Firebird
The process of creating such a craft perfectly develops the imagination, because the character is magical and very bright.
- To make the head and body, cut out a ten-centimeter square piece from colored paper.
- Form a square into a triangle and bend along the larger side.
- Now expand the square - it is divided into four sectors.
- To get the body of the bird, glue both edges overlapping.
- The belly is the larger side, and the smaller side is the back.
- To create a chic ponytail, cut nine nine-centimeter strips - curl them or leave them straight.
- Glue three stripes to the back, six will serve as material for making wings also on the back.
- You can also make both the tail and wings using the palm technique.
- You can cut out eyes and other small details from colored paper or draw them.
- Attach the bird to the background on a branch of colored paper, decorate the background by painting it and gluing parts from colored paper.
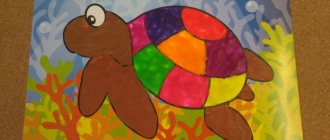
The second method is mosaic
- Choose different colors, but similar tones. For example, different shades of red or orange.
- Cut into pieces close to square, rectangular, triangular shapes, but of different sizes.
- Glue them onto plain cardboard to create the desired image.
This is what a craft made using this method looks like.
Wild birds
This is a method of embodying the lifestyle of untamed winged creatures, as children see them. Most often, such compositions depict keys flying to the south, as well as caring mothers in a nest with babies or in search of food among the foliage of a tree.
A three-dimensional image will be able to convey all the beauty as much as possible.
- The base must be solid. You can simply take a plain sheet of cardboard or paint it, adding elements that correspond to the character of the product (leaves, flowers, clouds, etc.)
- Fold white A4 in half and along the fold draw the shape of a bird from the side - head, elongated neck, raised wing, tail.
- Cut along the outline and glue on one side only.
- Create several of these birds, preferably of different sizes, so that they are not identical.
- After the glue has dried, “straighten the feathers” of the jamb - slightly twist the part of the wing that is not glued to the outside so that it puffs up. A few cuts symbolizing plumage will also not hurt.
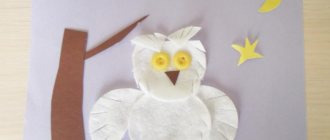
In winter, it will be relevant to implement the idea of winged animals that do not fly to warmer climes. The birds at the feeder will remind you of caring for our little brothers. Bullfinches and tits can be easily recognized by the bright colors of their plumage, and your plans can be realized with the help of decorated cotton pads.
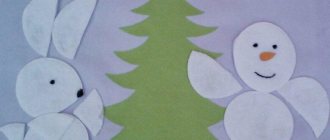
Crafts made from dry leaves
To create a firebird from dry leaves, prepare dry leaves, a glue gun, paint, and a sheet of cardboard.
- For the background, paint cardboard or use colored cardboard.
- Spread the paper and carefully arrange the leaves, and then color them.
- Now dry the leaves. Apply hot glue to the cardboard and glue colorful leaves.
- To do this, there must be an adhesive layer on the cardboard sheet, as well as spot-applied glue on the leaves.
- First, form the shape of a tail, then a larger leaf that stands out in shade - this will be the body of the firebird.
- Paws and eyes can be made from colored paper or cardboard.
- The magic bird is ready!
other methods
Tear-off - the picture is assembled from small multi-colored pieces. This technique trains perseverance because it takes much longer than the others. Additionally, fine motor skills are developed, since working with small elements is very painstaking.
Volumetric - the nest is often depicted on a paper plate or papier-mâché craft. The materials from which the product will be made can be very diverse: cotton wool, feathers, threads, dry grass, felt, paper, etc. It all depends on the child’s capabilities and imagination.
The combinations are countless. The miraculous embodiment is practiced not only in kindergartens, but also by art history professionals.
“Birds-palms”
Children are amused by the process of holding their own palms. By the size of this outline, you can compare how much the little one has grown over a certain period of time. But it is much more interesting to keep a palm decorated by its owner. You can also embody a fabulous firebird or a peacock with an open tail.
- Trace the outline of your palm with a pencil.
- Cut it out.
- Attach the blank to multi-colored cardboard and draw a pattern around it.
- Cut the resulting template.
- Glue your palm onto it so that the thumb is the neck, and the remaining spread fingers are the feathers.
- Attach the wing.
- Draw the missing elements with paints or pencils and decorate them with them.
Master class on making the “Sparrow” applique in the middle group
Maria Brovkina
Master class on making the “Sparrow” applique in the middle group
Master class on making the “Sparrow” applique in the middle group
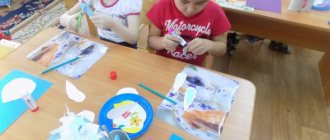
International Bird Day is celebrated annually on April 1. We do not ignore this holiday. This year we had an entertainment activity where the children of our middle group “Fidgets” strengthened and enriched their knowledge about birds, their characteristics, habits, and nutrition. We played outdoor games and put together puzzles.
And we finished the lesson by making a tear-off appliqué “Sparrow”.
—make an applique using the “Sparrow” tear-off technique
- learn how to make a product according to a sample,
-develop compositional skills,
- develop fine motor skills of the hands.
-colored and white paper,
We take sheets of colored cardboard, in different colors, and cut each sheet in half.
Cut out the silhouette of a sparrow from white cardboard.
We apply the sparrow silhouette to sheets of colored cardboard cut in half and outline the silhouette.
Cut white and brown paper into strips 1.5 cm wide.
Now for each child we distribute half of the colored cardboard, glue, strips of white and brown paper.
Children tear off pieces from stripes of two colors and paste them along the contour: white for the breast, brown for the body of the bird.
We then use a long strip of brown paper to make a branch for the bird and a leg.
Our application is ready!
Master class on making a collective application “Easter Basket” Good day, dear colleagues! I present to your attention a master class of collective work on the Easter Basket applique.
Children's master class on making the "Narcissus" applique Dear colleagues, I bring to your attention a children's master class on making the "Narcissus" applique. Goal: Continue to teach children.
Master class on making an applique from cotton pads “Snowdrops” Cotton pads are another material for creating various applications. From them we decided to make snowdrops - the first flowers of spring. For the manufacture of.
Master class on making an applique from rice “Autumn Tree” Master class on making an applique from rice “Autumn Tree” For work you will need: 1. Blue cardboard, 2. PVA glue, brush.
MAGAZINE Preschooler.RF
Zinatullina Svetlana Aleksandrovna – teacher Municipal Autonomous Preschool Educational Institution “Kindergarten No. 293 of a combined type” Lesson on cut-out appliqué in the second junior group. Topic: “Friends for a sparrow” Program content: 1. Introduce children to cut-out appliqué. 2. Learn to tear colored paper into small pieces and stick them without going beyond the edges of the outline. 3. Consolidate knowledge about the parts of a bird’s body, flowers, and the ability to carefully use a brush, glue and napkin. 4. Develop children's horizons and fine motor skills. 5. Foster a love of nature and birds. To evoke an emotional response in children to the problem of birds. Materials: toy sparrow, tape recorder, phonogram “Birds singing in the forest”, easel, sheets of A5 paper with a drawn outline of a sparrow according to the number of children, rectangles made of brown colored paper, beaks and eyes made of black colored paper, tassels, paste, rag napkins , oilcloths and glue jars. Progress of the lesson. Children sit at double tables covered with oilcloths and blanks, brushes and jars of paste laid out on small plates. Guys, look who came to our lesson (shows a toy sparrow). That's right, well done, it's a sparrow. And who is the sparrow? Well done! This is a bird. Oh, something must have happened to the sparrow, listen to how he chirps... (the soundtrack with the plaintive chirping of the sparrow starts) “Sparrow, what happened to you? "(The teacher listens) Guys, the sparrow told me that he has no friends and family: no dad, no mom, no sister, no brother. Let's help our sparrow find a family and friends? Children: “Yes!” Guys, let's stick some friends for the sparrow! Look closely, what does he have? Children's answers... Correctly, he has a head, torso, legs, beak and eyes. What is the sparrow covered with? Well done boys! It is covered with feathers. What color are the feathers? Well done guys, right! They are brown. How can we depict feathers on our sparrows? Children's answers... If the children find it difficult to answer, explain to them that you can tear a sheet of paper into several pieces and we will get a very fluffy sparrow. Give the children sheets of paper with a drawn outline of a sparrow. Guys, let's take a brown piece of paper and tear it into many small pieces, the smaller the better, the fluffier our sparrows will be. Now we will take one piece at a time, turn it over with the white side up, spread them with glue and glue them onto the body of the sparrow, without going beyond the outline. And now we will take the brushes near the piece of iron with two fingers, and the finger on top should play like this (to help children who did not take the brushes correctly). We take the required amount of glue, wipe off the excess on the edges of the jar and spread the first brown piece, glue it with a sparrow, without going beyond the outline, etc. Glue all the brown pieces. Look, little sparrow, how well done our guys are, what beautiful and fluffy sparrows they make (to help children experiencing difficulties). What are you telling me, little sparrow? Do you want to play with the guys? Guys, leave the tables, let's go play with the little sparrow. Physical exercise "Sparrows and the car." The little birds flew away, little birds. Everyone was flying, everyone was flying, flapping their wings! (children run, flapping their arms) So they flew, flapping their wings, flew onto the path, pecked grains (children sit down, “peck” grains) A car runs down the street, Puffs, hurries, blows a horn: “Tra-ta-ta, beware , beware! Tra-ta-ta, watch out, move aside!” (children run away from the car). Well done! All the sparrows ran away from the car, it didn’t run over anyone! Let's now look at our works, what is missing in them? That's right guys, well done! All that remains for our sparrows is to glue on their eyes and beaks. Take the brushes in your hands (check if they are correct). And first glue the eye, and then the beak (to help the children do this correctly). Sparrow, look what a big family we’ve created for you and the boys. Anyuta, who did you stick for the sparrow? And you Pavlusha? (ask all the children who they labeled). How fluffy your sparrows turned out. The sparrow says thank you to the children and gives a gift for their efforts, then flies away. Guys, what did we do in class today? What kind guys you are, you helped the sparrow find a family. Did you like the lesson?| Next > |
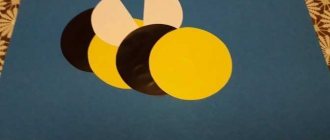
Winter application “Bird feeder” with template
Winter applique “Bird Feeder” is made of paper and cotton wool. This is a simple winter themed creative activity idea for kids.
Materials used:
- Blue cardboard for the base;
- Brown, red, yellow, and white paper;
- A simple pencil, a black felt-tip pen, scissors, a glue stick;
- White cotton wool (can be taken from cotton pads);
- Decorative hole punch for snowflakes.
Application made of colored paper for Sparrow elementary school. Templates. Master class with step-by-step photos.
Application made of colored paper for primary schoolchildren
Application made of colored paper “Little Sparrow”. Master class with step-by-step photos.
Author: Nechaeva Elena Nikolaevna, primary school teacher, KSU “Secondary school No. 21, Saryozek village” Osakarovsky district, Karaganda region Kazakhstan Description: The guys really like to do appliqué. The master class is designed to work with primary school children and for those who like to work with colored paper. The material can be used in labor lessons or in circle work. Goal: developing the ability to perform interesting works from colored paper. Objectives: to teach how to correctly select the color scheme of paper for applique; observe safety precautions when using scissors at work; develop imagination, fantasy, creativity; cultivate perseverance and accuracy while performing work. Materials and tools necessary for making an applique: cardboard, colored paper, scissors, glue, pencil, black felt-tip pen or marker, templates, sample work.
Everyone knows the sparrow. And, it would seem, what could be interesting about such a familiar bird? This bird is found in many fairy tales and is loved by Russian folklore. Guess where the name of the sparrow came from: “Strike the thief!” Oh, that’s how it turns out, “beat the thief.” So the sparrow is our thief! What is he stealing? Probably grains, crumbs from pigeons, dogs, cats and even people. The character of this bird is nimble, agile, cunning, pugnacious, and brave. cocky. But scientists believe that our sparrow is not our thief at all. They say that the word "sparrow" comes from the ancient "thief". From this “thief” the words we know as “fence” or “gate” come from. Why then “throw and beat”? Because a sparrow is a bird that sits on fences and gates and has lived next to a person for a long time. That's why the sparrow! Gray, small, funny, jumps next to me, I'll pour crumbs for him, I'll drive the cat away.
You tweet more cheerfully, My good sparrow. “I was returning from hunting and walking along the garden alley. The dog ran ahead of me. Suddenly she slowed down her steps and began to sneak around. I looked into the distance of the alley and saw a young sparrow with yellowness around its beak and down on its head. He fell from the nest (the wind strongly shook the birch trees of the alley) and sat motionless, helplessly spreading his barely sprouted wings.” This is what I.S. Turgenev writes in his story “Sparrow”. So our sparrow fell from the nest, he is still very small, he cannot fly at all. Let's make an applique from colored paper and make a little sparrow. But first, let's remember safety precautions when working with scissors: Use scissors with rounded ends. Store the scissors in a specific place, with the sharp ends facing away from you. Pass the scissors rings first with blades closed. You can't cut on the go. When working with scissors, it is necessary to monitor the movement and position of the blades during operation. Do not use blunt scissors or loose hinges. Do not hold scissors with the blade facing up. You have templates on your tables, using them we will cut out all the details of our sparrow. Choose colored paper for your applique. For this work we will need templates.
Making the “Little Sparrow” applique: 1. Take cardboard and cover it half with green and half with blue paper - this is grass and the sky.
2. Trace the sparrow’s pants according to the template, cut them out and glue them onto the grass, approximately in the middle.
3. Trace the sparrow’s abdomen according to the template, cut it out and glue it onto the panties.
4. Trace and cut out the left wing of the sparrow and glue it.
5. Next, trace and cut out a scarf from bright colored paper and glue it.
6. We trace the right large wing of the sparrow according to the template, cut it out and glue it on the right side.
7. Cut out the small right wing of the sparrow and glue it onto the large wing.
8. Cut out the tail according to the template, cut it out and glue it.
9. Next, we will outline and cut out the head, and glue the head.
10. Glue the cut out top of the hat above the head.
11.Next, trace and cut out the ears of the hat. Glue it to the top of the hat.
12.Glue a bell to the hat.
13. Next, cut out the white eyes and glue them onto the sparrow’s head.
14. Glue black eyes onto the white eyes and small white circles on them.
15. Cut and glue the beak.
16. Glue on the pink cheek.
17. Cut out the paws according to the template and glue them onto the sparrow.
Our sparrow is ready, you can make a flower meadow by gluing flowers to the grass.
We recommend watching:
Practical advice and knowledge on teaching preschool children how to design from paper Do-it-yourself colored paper applique for 1st grade children. Cat Applique made of colored paper for children 7-8 years old with templates. Mouse Spring applique for children for the holiday of March 8th. Templates. Master class with photos
Similar articles:
Application for children 5-6-7 years old. Lilac in a vase
Applique Cockerel made of colored paper
Volumetric applique made of colored paper “Sunflower” for children in grades 2-3 step by step with photo
Paper contour mosaic