Experts recommend developing a child with the help of fine arts. It is not necessary to use only pencils and felt-tip pens, because modern techniques are rich in their variety. Creativity should definitely be introduced into a child’s life so that in the future his thinking will develop in a comprehensive manner. You can find interesting unconventional drawing techniques for children in our article.
Child development through drawing
Artistic representation is the first opportunity for a child to develop on the creative side. Any artistic process is closely related to thinking and logic; the child thinks through every little action to make his creation perfect. In addition, this process perfectly develops creative thinking, fine motor skills of the fingers, attentiveness and concentration on one action. Any artistic work perfectly develops creativity: fantasy and children's imagination.
“Use of non-traditional drawing techniques with children of primary preschool age”
“Use of non-traditional drawing techniques with children of primary preschool age.”
Children of primary preschool age, due to their age characteristics, are quite restless and impatient. It is difficult for them to hold attention for a long time, to focus on something. A variety of art materials, as well as the opportunity to experiment with new and interesting ways of drawing, also help to interest children. The use of non-traditional drawing techniques is suitable for classes with young children. Five minutes - and the job is done! And this is exactly what kids need: a fascinating process and a vivid result.
“The origins of children’s abilities and gifts are at their fingertips. From the fingers, figuratively speaking, come the finest threads - streams that are fed by the source of creative thought. In other words, the more skill in a child’s hand, the smarter the child.”
Drawing with non-traditional techniques allows us to take into account the individual developmental characteristics of children (shyness, uncertainty, sloppiness), and helps each child find an activity to their liking. The opportunity to use various tools and materials (painting and graphic) in drawing gives children freedom of choice. Slide number 4.
You can draw with colored pencils, felt-tip pens, wax crayons, pastels, charcoal, sanguine, sauce, gouache, watercolors, acrylic paints, ink, etc.
To make classes more effective and interesting:
• Before class, create a positive emotional mood among the children.
• Teach children to be careful while working.
• Be sure to praise children.
• Be kind and respectful to children.
· Use a variety of finger exercises.
• Remember safety! You must be sure that children will not harm themselves with the objects used in class.
Finger gymnastics is also a very important part of the process. It must be carried out without fail. It should also complement your lesson and correspond to the topic of drawing, be understandable and interesting for the children.
Finger painting.
We all know very well where children begin to get acquainted with something new. Naturally, from tactile contact, until we examine, smell and touch these colors, they will remain a mystery to the child. Yes, and this is one of the easiest ways to draw. Finger, paint and sheet... draw. There’s nothing simpler to think of, and even more beautiful are the children’s paintings, which depict raindrops or grains for chickens in random order.
Nowadays there is a large selection of paints specifically for finger painting - they are easily washed off and washed. You can make these paints yourself. Dilute the gouache with a small amount of water and add a drop of detergent to it, or you can boil 1.5 tablespoons of starch with a glass of water, cool, put it in containers and add food coloring to each container. Safe, inexpensive, easy.
Material:
album sheet, paints, bowl of water, napkin.
Progress:
1 Show the children how to place dots on a sheet of paper with a finger, draw strokes, draw lines. If necessary, then take the child's hand in your hand and draw dots with him.
2. When changing color, wash your finger in a bowl and wipe with a cloth.
The easiest way to draw dots is with your finger. Children really like to decorate previously prepared objects with dots: dots on a ladybug, apples on a tree, etc. or complement the plot of a picture: draw bunny tracks in the snow, millet for chickens, etc. To begin with, you can try your hand by offering your child draw with your finger on a tray with sand, salt, semolina.
Palm drawing.
Unusual and original compositions are obtained using the child’s palms. One touch of your palm to the sheet and you're done! It is worth adding a little imagination and additional details and you get a true masterpiece.
Material:
landscape sheet, wide containers (it is very convenient to use disposable plates), gouache diluted with water (or finger paints), a bowl of water, napkin, gouache, brush.
Progress:
1. First, you should teach your child how to make prints with a dry palm.
2. Next, the child’s palm is lowered into the plate with paint; if the child is unable to do this on his own, then you help him.
3. After this, the child makes a print with the inside of his outstretched palm on the paper. Depending on the idea, the fingers can be spread out or pressed against each other; if you want the palm to be turned down, then you need to turn the sheet over when the print has already been made.
4. After the print has dried, add details that will complete the image.
The prints produce a variety of birds, sea and ocean inhabitants, trees, flowers, animals, etc.
You can also complicate the work, you can connect your thumbs together and make an imprint of two palms at once, you get a butterfly. And you can also experiment.
Use not only the child’s hands, but also the child’s legs.
There can be many print options. You can make prints with the back of your fingers (a seahorse), your thumb (the body of a butterfly, a fish), or the side of your fist (a human footprint).
.
Drawing with a foam pad.
So, after getting acquainted with paint and finger painting, it is good for children to use a foam rubber swab, with the help of which the child will gain the necessary skill to prepare for painting with a brush.
The tampon can be taken in different shapes, depending on the tasks you face. It can be rectangular, rounded, square, round, etc.
. To begin with, we use paint of one color, and when changing colors, change the tampon.
Material:
foam swabs, multi-colored gouache (diluted to the desired consistency), album sheet, bowl of water, napkin.
Progress:
1
.
We show how to take a foam swab by the tip, and lower the other end, soaked in water, into a container of paint.
2. You can draw circles, dots, strokes with a foam rubber swab, or paint over an object along the contour.
You can paint with a foam pad in the same way as with a brush.
You can try painting inside the stencil. To do this, place a stencil on the sheet and apply paint using a foam swab. We remove the stencil and get the finished result.
.
Stamp
I suggest stamping in a non-traditional form, making them yourself from vegetables. It is convenient, interesting and fun for children and economical. Depending on the task and the skills of the children, working with the stamp may vary. It is most convenient for kids to hold in their hands not round, but oblong vegetables (potatoes, carrots, beets).
Progress:
1. We take a little gouache of the desired color and, holding the stamp vertically, make “stamps” on top, placing them in different places on the sheet depending on the task.
2. When the paint has dried, draw or complete the necessary details.
Options for work: you can draw the balls that the kitten played with in secret from his grandmother, various flowers (depending on which ones you cut out), fireworks in the sky, etc.
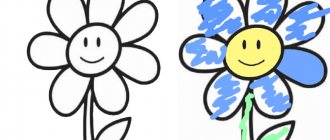
"Scrawls" coming to life
Three-year-old children, having picked up a brush and paints, very often draw “scribbles” in the form of spots. There is nothing wrong with this, because such a “scrawl” can easily be “revitalized.”
Material. Landscape sheet, gouache, brushes, jar of water, cloth.
Progress
1. The child draws a random spot on a piece of paper.
2. The adult, together with the child, comes up with what this “scrawling” looks like.
3. We complete the details to bring the work to the intended image.
Work options. Such spots can be turned into animal faces or animals themselves.
Dear colleagues, I have focused only on some of the methods of unconventional drawing, I hope that you will appreciate my modest contribution, and I am sure that you will find many more interesting and exciting drawing techniques for kids.
“Childhood is an important period of human life, not preparation for a future life, but a real, bright, original, unique life. And how the child spent his childhood, who led the child by the hand during his childhood years, what entered his mind and heart from the world around him, this decisively determines what today’s child will become.”
Conclusion: drawing in unconventional ways with children helps them better understand the world around them; with the help of such drawings, children express their experiences and emotions. Such activities contribute to the development of a sense of beauty, form diligence, develop fine motor skills, attention, and memory. The most important thing is that children enjoy these activities, every little artist creates an original and unique masterpiece every time!!!
By letting the child feel and try everything himself, we expand the boundaries of his knowledge and creative horizons. After all, a baby stained with paint can easily be washed with water and soap, but the suppressed desire to create may never wake up. Let's help our children not to lose their natural talents.
Get text
Creative drawing methods and techniques
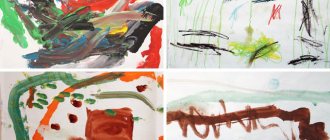
Non-standard drawing techniques for children will help make artistic activities fun and interesting. Such methods will make joint creativity fun and will evoke extremely positive emotions in children and adults. In the future, the child himself shows interest in children's painting. The drawings can be anything - careless, dirty and even multi-colored. The main thing is full involvement and keen interest in the process of joint activity.
Drawing with a cut of vegetables and fruits
For cut painting you need to prepare: paper, watercolor or gouache, cut halves of fruits and vegetables. You can use any products: apples, pears, potatoes, cucumbers, carrots, in other words, everything you have in the house. Non-standard drawing techniques for children with sections are fascinating for both children and their parents.
The required amount of dye is collected on the product - you can even prepare a separate container for them, and then you can start making stamps with cuts.
An adult can draw the basis for the cuts himself - tree branches, animal body, house. The kid himself will make stamps in any places he likes on the sheet. The finished drawing may not turn out right the first time, but the main thing here is patience and skill.
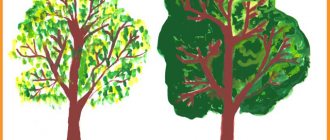
Drawing with leaves
For the sheet technique you will need any leaves of bush and deciduous trees, brushes, as well as a piece of paper and watercolors. You can practice this technique at any age, even from two years old.
The kid chooses a few colors he likes and then applies them to the leaves. Then the watercolor should be allowed to dry a little so that it does not spread, after which it can be transferred to paper.
From leaves you can create absolutely any picturesque composition - trees, flowers, sun and even a forest.
Drawing with a toothbrush
A fairly simple and common way of artistic activity. For it, in addition to a standard drawing set, you will need an old toothbrush. With a brush you can draw almost anything:
- Beautiful spruce branches;
- Volumetric azure waves;
- Beautiful rays of the sun;
- Flower petals. Brushes with a toothbrush make great cloves.
An adult can help the child by drawing the base themselves, so that the child can complete parts of the drawing with a toothbrush. The brush should be placed perpendicular to the paper, after which you should move the teeth of the brush with your finger to create a pinpoint spray.
Splatter painting
A very fun and entertaining art technique. For this you will need: watercolor, gouache, dried leaves or grass templates, paper and an old toothbrush. It is very important to follow the correct technique:
- Moisten the brush with water and the chosen color;
- Shake off excess liquid;
- Place the template on paper;
- Start randomly splashing different colors.
The images come out very lively, colorful and interesting. The spray direction can be chosen in different ways - vertically, horizontally or even diagonally.
Card file of drawing classes in the second junior group for May
Reshitko Yulia Vladimirovna
Card file of drawing classes in the second junior group for May
week: Victory Day.
Type of activity: drawing
GCD No. 33. “Victory Day”
.
Objectives: 1. The ability to draw simple plots according to plan. 2. Identify the level of visual skills. 3. Cultivate interest in visual and artistic activities. 4. Develop children's creative abilities
Motivation: Many years ago people lived just as peacefully. They plowed the land, sowed grain, played and studied. One terrible morning, bombs began to fall on peaceful countries - a war came, which brought a lot of grief. The entire people stood up to defend the Motherland. The war is over, and every year our country celebrates a holiday - Victory Day.
The eternal flame symbolizes the eternal memory of the exploits of brave soldiers. Let's look at the eternal flame.
Let us also create our own monument “Eternal Flame”
? How can you and I do this, let’s think together?
Questions: Who fought in the war? Who is a soldier? What feat did the people accomplish? What does the eternal flame symbolize? What is the Victory Parade? What is the immortal regiment?
Reflection: Well done guys! We worked together. What was difficult about the lesson ? Who did we talk about today? We will put soybean works at the exhibition.
Source: N. N. Leonova St. Petersburg childhood-press 2014 artistic and aesthetic development of children in the primary and secondary groups
Topic of the week: Insects.
Type of activity: drawing
GCD No. 34. “Bees”
.
Tasks: 1. Create a composition based on a green leaf. 2. Improve the technique of painting with gouache , the ability to combine two drawing - a brush and a cotton swab. 3. Cultivate the ability to see the beauty of nature, understand its fragility, and the desire to protect it.
Motivation: The teacher brings a hive model to the group .
Educator: Guys, look at this house. Who do you think lives in it?
Now I will tell you a riddle. You will guess it and find out whose house it is.
She keeps buzzing, buzzing,
Circles above the flowers.
She sat down and took the juice from the flower,
The bee prepares honey for us
.
That's right, a bee (shows a bee figurine)
. And this is her house. It's called a beehive.
- Let's look at the bee. - Guys, how many bees live in our hive? (One)
. - That's right, alone. She is very bored living alone in such a spacious house.
- Therefore, I propose to help our bee make friends. Shall we help?
Questions: - What does a bee have? (Wings, legs)
. What does a bee eat?
Where does the bee live?
Reflection: Guys, look what beautiful bees we have made. Now our bee will not be bored at all in her hive. Well done boys! We worked together. What was difficult about the lesson ? Who did we talk about today? We will put soybean works at the exhibition.
Source: N. N. Leonova St. Petersburg childhood-press 2014 p. 82 artistic and aesthetic development of children in primary and secondary groups
Topic of the week: Flowers are blooming.
Type of activity: drawing
GCD No. 35. “Elegant nesting dolls”
.
Objectives: 1. The ability to carefully paint over a plant pattern using finger paints. 2. Develop a sense of symmetry and composition. 3. Arouse interest and cultivate respect for the work of folk craftsmen. 4. Foster a caring attitude towards folk toys and an interest in decorative and applied arts.
Motivation: The cheerful music “Russian nesting dolls” is playing. The teacher attracts the children's attention. Guys, I want to tell you a riddle, and you listen carefully and guess: Wooden girlfriends. They like to hide in each other, wear bright clothes. They are called (matryoshka dolls)
.
Guys, you guessed the riddle correctly, and we have such a toy in our group .
Children and their teacher look at the nesting dolls. Well done! Do you want to play with a matryoshka doll? It's fun to play with her. You can even open it.
Open it a little, there is still a nesting doll inside. Where is she?
Guys, I have a lot of nesting dolls, but they are not painted. What can we do to make them beautiful like these? They need to be painted correctly. And today we will paint I chose the colors for my matryoshka - red and yellow, my nesting doll turned out very bright and elegant.
Do you want to help the nesting dolls become beautiful? Let's paint their sundresses together.
Questions: Guys, what is the nesting doll made of? What is she wearing? How is the matryoshka painted? What's on her head? And what color is the handkerchief? A smart sundress, there are flowers on the sundress, what color are the flowers? And what color are the leaves for the flowers?
Reflection: Guys, look how beautiful our nesting dolls have become! We ended up with a whole round dance of nesting dolls. Let's get into a round dance and dance. Dance “Merry Matryoshkas”
to the music.
We worked together. What was difficult about the lesson ?
Who did we talk about today? We will put soybean works at the exhibition. Source: N. N. Leonova childhood-press 2014 p. 74
Topic of the week: Summer.
Type of activity: drawing
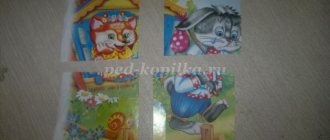
GCD No. 36. Drawing based on the fairy tale “Two Greedy Little Bears”
.
Objectives: 1. The ability to divide a whole into equal parts by drawing a line through the middle of a circle. 2. Improve the ability to draw circles of different sizes with a pencil and paint over part of the image. 3. Cultivate interest in fairy tales.
Motivation: - Guys, we have guests. Guess who?
He is brown and clubfooted, he catches fish with his powerful paw, and he also loves honey.
Who can name a sweet tooth? (bear)
These are the cubs that came to us, and what did they bring? (Cheese)
- Yes, they found it, but they can’t divide it.
“But our cubs don’t want to be stupid, they have reformed.” Now they are not greedy.
— So they came to us with a request to draw new illustrations for a fairy tale, where they are kind and friendly. Shall we help the bear cubs?
Questions: - Guys, from what fairy tale? Do you remember why they were greedy? Is it good or bad to be greedy?
- Greed made them what? (Stupid)
First let's look at the bear. What body parts does it have? The largest is the body, it looks like an oval. What shape is the head? What size? What color is a bear's fur? What is she like?
Reflection: The cubs lived in the thicket, turning their heads,
Like this, like this - they twisted their heads. The cubs were looking for honey,
Together they rocked the tree, like this, like this - together they rocked the tree,
And then they danced, raising their paws up, like this, like that, raising their paws up! What wonderful bears you have made.
There are no greedy people in our fairy tale. I am very glad that you are friendly, kind guys.
A good friend will not come out of greed,
You can't even call him a friend,
So, honestly, guys, I’ll say:
I never make friends with greedy people!
We worked together. What was difficult about the lesson ? Who did we talk about today? We will exhibit our works at the exhibition.
Source: N. N. Leonova childhood-press 2014 p. 76.
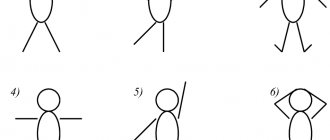
How to teach a three-year-old to draw a man
A 3-year-old preschooler draws each detail separately. In his opinion, he can connect the two main parts. That’s why three-year-olds’ little men look like “heads.”
A child does not come to such images overnight. First, the baby must learn to confidently draw circles with a pencil. Then he may be “struck by the idea” of drawing two lines extending from the circle. This is already a clear attempt to portray a person, and then you will need the help of an adult to designate the eyes (dots), mouth and nose (dashes) on the face.
It is important to know that three-year-old children depict only those parts that are especially significant to them. Therefore, at first, the little man in their drawings consists only of a head and legs. After the adult shows the baby the details of the face in the drawing, he will also try to depict them.
The eyes and mouth will appear first on the face. A three-year-old child will not remember the existence of a nose for a long time.
Closer to 4 years, the image of a nesting doll or a snowman is taken as a basis. The preschooler draws two circles, one of which is smaller (head), the other larger (torso). Next, the eyes, nose, mouth, arms, legs (dashes) are drawn. Children begin to learn more complex drawings of a person at the age of 5.
How to interest a child
To attract your child to drawing, you need to think about what motives might prompt children to take up the activity.
Basically, three motives are triggered:
- imitation of an adult;
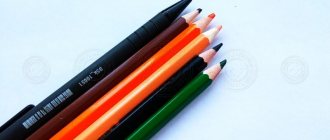
- interest in drawing supplies,
- the desire to act - to depict something on a sheet of paper.
These are the motivators you should focus on. Show the child how a house, sun, flower, tree, etc. appears on a blank sheet of paper. If the preschooler has already practiced with a pencil, offer him paints or crayons. You may be interested in non-traditional techniques (painting with your palm, finger, branch, tube).
The following techniques will be useful in the future:
- game motivation (for example, a toy chicken enters into a dialogue with a child and asks him to draw her baby chickens);
- artistic word (an adult can come up with a riddle about rain and invite the child to draw it).
With the efforts of an adult, even the most indifferent child will be affected by at least one of the methods. In most cases, children 3-4 years old willingly respond to an invitation to draw.