Drawing techniques with paints and pencils
All drawing techniques involve the use of different materials depending on the age and capabilities of the child. We give paints, crayons, felt-tip pens to very young children, and pencils, etc. to older children.
I list all the techniques in order of increasing complexity.
Free drawing
My son calls this kind of drawing “scribbles”.
We introduce the child to drawing materials and give him the opportunity to experiment. At the same time, there is no need to give any tasks to draw something specific.
Practice free drawing as often as possible at any age of the child. It perfectly develops imagination.
Painting a sheet
We give the child paints, crayons, etc. and we suggest drawing:
- grass for the cow,
- water for fish,
- sand, snow.
The child needs to paint over the sheet, and not draw individual blades of grass, etc. Even a one-year-old can cope with this task.
It's also great to use paint rollers here - plain or shaped.
Shading an element
We draw a base (small images of animals and various objects) and ask the child to hide them by painting them over:
- hide the mouse, bunny, fish, bug;
- hide the moon and stars, the sun, the car.
With very young children it is interesting to do this with a sponge; with children over 2 years old it is useful to paint over elements with pencils.
Drawing points
Pre-draw the basis for the drawing - a bird that the child will feed, a bush on which berries will grow, etc.
Invite your child to draw: grains, berries, snow, raindrops, a bagel with poppy seeds, freckles, polka dots on a dress.
Drawing lines
- Direct: rays of the sun, stems of flowers, tops of carrots, fence, cage, path, rails, paws of bugs, needles of a cactus, teeth of a comb.
- Wavy: boat waves, worms, octopus legs, car tracks, hair.
- Broken: slides, a fence, icicles, a road with turns, thorns for a hedgehog.
Draw circles, ovals
Balls, apples, candies, Christmas tree decorations, beads, balloons, rowan berries, berries, bubbles, eggs, cones.
Drawing Spirals
Invite your child to draw: a snail's house, smoke, a bee's flight, curls, sheep's rings, threads.
Finishing the drawing
Antoshka really likes to play this game: I say that one boy drew different figures, but did not finish them, and I suggest that my son finish them. He does this with great pleasure. This is how we finish drawing:
- geometric figures;
- I draw a road (a broken line) and Antoshka repairs it,
- any simple and understandable drawings.
Drawing simple stories
This is the most difficult stage in mastering drawing. Here the child combines different drawing techniques according to the instructions of an adult.
Take turns asking your child to draw different elements that will eventually turn into something specific. But give your child as much freedom as possible.
The purpose of such drawing is to show the child how the finished image appears step by step.
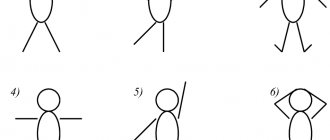
Zigzag design
Rays in the form of a cardiogram look unique. To depict the sun in this way, you will need the following:
- landscape sheet of paper;
- a simple pencil;
- eraser;
- set of markers.
You should start working by placing a sheet of paper in front of you. The next steps will be:
- Draw and color the circle in yellow, if desired, add a face and arms to the sun.
- Clearly draw the contours.
- Use orange-yellow shades to outline the rays in the form of jumps in the cardiogram. The jumps should be of different lengths and with different frequencies. Colors for coloring can be used from bright yellow to dark red.
Coloring pages Sunny. Download and print the best pictures for children
A bright, positive, sweet sun cannot but bring a smile and joy. Do you miss the sun and its warmth? Then hurry to the sun coloring pages section. Boys and girls from 2 to 9 years old will learn new information about the sun with interest and color it bright yellow (or maybe not yellow?)
A funny sun, a cartoon sun, a simple sun coloring page - all this and even more awaits you in the section of our sun coloring pages.
Choose, click on the picture, save to your computer, send for printing. And now your friend is ready for color experiments! And markers, pencils and paints will help you with this!
How to paint a watercolor sunset
Consumables:
- Watercolor paint in red, orange, yellow, green, blue and purple (can be from a tube or cake or by hand)
- water
- Round brush in a convenient size for you
- Second brush for scrubbing or scrubbing surfaces with water (optional)
- Paper
- Paper towels for drying brushes
- Scrap paper for color testing (optional)
Step 1:
Get your supplies locally. You'll want to have everything at hand so you can continue without any pauses to grab supplies. Take a picture in which you will paint a sunset.
Step 2:
Decide where you want to start: purple or red.
Author's Note: I find it easiest to work in color order, but it doesn't matter which end of the spectrum you start on. For the purposes of this tutorial I will be using red as my starting color.
Step 3:
Start by drawing a red line. You can paint it horizontally or align it vertically if you find it easier to paint up and down with a brush. If you didn't use masking fluid, give the areas you don't want covered a fairly wide berth. If you wish, you can “test” the consistency of your paint on a nearby piece of paper.
Step 4:
Scrub the brush to remove the red color and dry it with a paper towel. Then draw a line of orange directly adjacent to the red, touching it very lightly. The paint will begin to bleed; Everything is fine. If it bleeds too much, you can clean the brush (or use a second brush) to gently brush the area with water to smooth out the bleeding.
If you prefer to keep the colors more separate, give each color a few minutes to dry slightly before adding the next color. On the opposite note, if it doesn't bleed enough, you can clean your brush, add a little water and gently "smudge" (technical term there) the painting so the colors blend to your liking.
Note. As you work, the "bleeding" may look messy or patchy between colors. This can really work as an asset in the finished product, adding an irregular and natural feel to the sunset.
Step 5:
Continue using the remaining colors until you have added all the colors of the rainbow. You can draw straight lines of each color, or you can draw thicker lines of the more well-known sunset colors: red, orange, yellow. Or you can give it a night look by increasing the purple area.
Sources
- https://gidrukodeliya.ru/kak-narisovat-solnce
- https://FB.ru/article/438772/kak-narisovat-rassvet-karandashom-i-kraskami
- https://dochkiisinochki.ru/risunok-solnce.html
- https://art-bogema.ru/uncategorized/kak-narisovat-zakat-akvarelju/
- https://rus.beashandmade.com/how-paint-watercolor-sunset-18783
Finger painting
As I already said, we started painting with finger paints around the age of 1 year. And they did it in the bathroom. Then we switched to paper.
Finger paints are safe and do not require the use of water. You can replace them with gouache.
The simplest thing you can do is draw dots with your fingers:
- grains for birds, peas;
- apples, berries, cones, balls for the Christmas tree;
- watermelon seeds;
- raindrops, snow, animal tracks;
- spots for giraffe, ladybug, leopard.
You can draw dots with your fingers using ready-made templates.
DOWNLOAD TEMPLATES for finger painting in one file.
And of course, let the baby smear the paint all over the sheet with his fingers and palms.
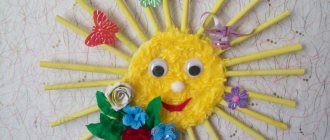
Drawing of the sun with rays and grass with a flower. Master - outdoor chalk drawing class.
Coloring the sun with a smile and rays with chalk during a walk will cause unforgettable delight in a child. To do this, you will need multi-colored crayons, and wet wipes for hygiene.
First of all, we draw a circle of the sun, which we immediately color. Then we draw out the rays, it is better if the length of the rays is of different sizes. And we add a smile and eyes to our sun. To complete the picture, you can add green chalk to the grass. The grass can be drawn with zigzag lines or dashes that will look like individual blades of grass. Draw a flower on the grass.
In the middle between the sun and the grass we sketch the petals, from the flower to the grass we draw a line, maybe not a straight line, which will serve as a stem. And on the stem we must depict the leaves of the flower. Each detail is painted over with chalk in the appropriate color. This drawing cannot be taken with you, but it will delight you with the process of creation on subsequent walks.
If you forgot to take crayons for a walk, but promised your child to draw, don’t despair and don’t be scared, this can be done with sand and a twig. The sun and a smile appear on the sand; the rest of the details of the drawing can be thought out in the process.
Drawing is a special form of artistic activity where a child expresses himself in different ways. And if an adult participates in coloring the sun with a smile and rays, then in addition to beneficial development, children develop a positive emotional attitude.
Sunny coloring page
25 interesting children's coloring pages with the image of the sun.
To print the coloring book, select the desired image, right-click on it and save to your computer. If you do not have the opportunity to print the Sunny coloring book, then you can click on the picture and open it on the entire monitor, attach a sheet of paper and trace the outlines with a soft pencil.
How it said, “Hey baby, hi!”
The cloud is hiding behind the forest, The sun is watching from the sky. And so pure, kind, radiant. If we could get him, We would kiss him. G. Boyko
The sun came through the window into the bathtub, It saw soap and a washcloth... It decided to wash itself, wash off all the freckles, It rubbed its cheeks and ears with soap... Soap is crying, rubbing its eye with a finger, Will the sun soon go further, The sun laughs at the soap in response, Look at the sky - there are clouds no! L. Grzhibovskaya
“The sun is a coin,” the stingy one grumbled. “No, it’s a frying pan!” - the glutton cried. “No, a loaf,” the baker said. “Compass,” said the sailor with conviction. “The sun is a star,” the astronomer announced. “A good heart,” the dreamer decided. A. Eskova
I rise with the sun, I sing with the birds: - Good morning! Happy clear day! - That's how nice we sing! E. Blaginina
Triangular rays
One of the most common options for drawing the sun among children is a luminary with neat sharp rays. The rays are isosceles triangles with long sides and a short base. It is possible to draw such a sun using any materials; the only required accessories will be a simple pencil and a ruler.
The work process is as follows:
- On a sheet of paper located in a convenient position, draw a circle with a pencil, which will be the base of the sun.
- Mark four points on the outline of the base circle at equal distances from each other.
- Using a ruler, draw rays originating from the marked points. Add segments forming triangles to the resulting lines on both sides. You should get a figure similar to a compass. Such actions make it possible to make the sun symmetrical and neat to the maximum.
- Draw more similar rays between the triangles, filling the entire space around the base.
- Design and color the drawing as you wish.
Drawing the sun is interesting because you can depict the rays in different ways, use a variety of materials, add unique elements, and make an original design. And the most interesting thing is that using any option, you get a bright and beautiful drawing.
Drawing “Sun” for children and parents)
Summer Rate the author (2 ratings, average 5 out of 5)
Add a comment Cancel reply
Comment <textarea id=”comment” name=”comment” cols=”45″ rows=”8″ maxlength=”65525″ required=”required” placeholder=”Comment”> By clicking on the “Submit Comment” button, I give consent to the processing of personal data and accept the privacy policy.
Please enter your answer in numbers:
5 × two = You might also like
Military aircraft, drawings for children The collection includes pictures of military aircraft from the times of the USSR
Beautiful pictures for children “Butterflies” Beautiful drawings “Butterflies” for children already
Pictures about sports for children Hello, friends. Today on our blog "
Drawing for children “Flower”. The largest collection! Today on our blog there are pictures for children "
- home
- All blog articles
- Privacy Policy
</текстареа>
Sun, houses and monsters: what do a child’s drawings really mean? — 7sisters.ru
Psychologists have discovered what lies behind children's drawings
There is a lot going on in a child’s life that he is unable to express in words. This is especially difficult for parents - how to understand how your child feels if he/she does not want to engage in conversations? At such moments, you can let your son/daughter draw. Rest assured, you will receive a hint about your emotional state. Surely you have noticed that psychologists quite often ask children to draw something and based on these “pictures” they draw certain conclusions
Still, when interpreting a drawing, it is important to ask the child about some things. For example, if a monster is depicted on paper, then it is important to ask whether it is the embodiment of fear and horror or not (cartoons are now being created with vampires as the main characters). Psychologists have compiled 5 interpretations of the most common children's art
So what is your child thinking?
Monsters/Vampires In general, monsters are powerful creatures. If a child places a figure in the center of the picture, it means he wants to be strong, but something disturbing still torments him
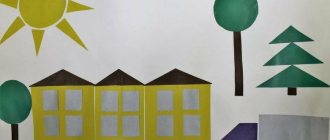
Important: if you asked your son or daughter to draw a person, and a monster appears on the paper, most likely your child has a negative opinion about himself. Houses
Most often, the image of a home for a child is how he imagines his life in the family. If children are worried, then instead of a typical picture on paper, a prison may appear. As the house grows older, details appear, subsequently turning from two-dimensional to three-dimensional.
If the grown-up offspring continues to draw a square with a triangle on top, pay attention to this. These kids are emotionally weak
By the way, the more windows a child draws, the more open he is to the world. The Sun
If the picture shows full sun, it means the child is absolutely happy and has a positive assessment of the surrounding reality. The sun drawn in the corner of the sheet can indicate that the child is under pressure within the family. If the outlines of this celestial body are just visible behind the clouds, then this can be regarded as a sign of incipient depression. Rainbow The most “positive” drawing is a colorful rainbow. Indicates that your child is full of positivity. Strange images of family members
It’s one thing when a child draws a family holding hands with smiles, and another thing when they are engulfed in flames or drowning in a pool. If you see some kind of terrifying image, it is quite possible that your child saw a program on TV that impressed him and depicted it on paper. This pattern may also be associated with the child's anxiety about the tragic loss of a family member. Or your child harbors some kind of grudge against you. Excessive use of one color Blue means depression, red means anger, gray can indicate color “blindness”. However, all children have their own favorite shades, and this must be taken into account.
Sun, houses and monsters: what do a child’s drawings really mean? was last modified: May 25th, 2016 by Nastya Krivkova