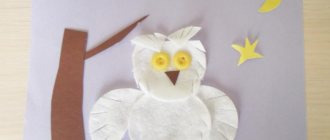
Today, the assortment of stores offers a large number of various educational games. But when it comes to buying such a game for our little one, we often face several problems. Firstly, the majority of games are aimed at older children. Secondly, it is not always possible to find a game of the type we would like, so that it corresponds to the interests of our child. Thirdly, the prices for such toys are often not affordable for everyone. But one game is not enough for a child; he needs to develop in different directions. But you can easily make a series of simple educational games yourself, spending very little time and money on it.
Such games are unique and exclusive. They keep the warmth of a mother's hands and are made specifically for her baby. And if you allow the baby to take part in their production as much as possible, then the games will bring double benefits and will be even more interesting to play. So, moms, let's get to work!
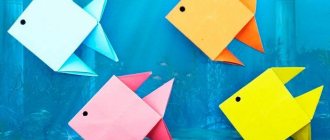
Cutting pictures
These are the very first puzzles that you can make for your baby. They are good because they do not require much time, but they bring great benefits.
First puzzles. Cardboard puzzles are very useful toys that develop a child’s intelligence in several directions at once. By putting together a puzzle, a child learns to think logically, trains imagination and spatial perception. Equally important are perseverance, patience, the ability to concentrate, and the ability to finish what you start. If your baby is still too small and cannot assemble store-bought puzzles, make homemade ones for him. It couldn't be easier to do this. Take some cards and cut them in half. It’s good if the plot of the picture is close and interesting to the baby. First, give the baby two parts of one postcard and offer to connect them together to make a whole picture. When your child can easily complete the task, mix the halves of two or more postcards. The task will immediately become more complicated, because first the baby will have to find two parts of one postcard, and only then connect them. For the clever little ones, increase the number of cards and cut them into six or more pieces. When the baby learns to handle fragments of the correct, identical shape, cut the picture into pieces of different shapes and sizes.
Circles-squares. Cut out large geometric shapes from colored cardboard: circle, square, rhombus, triangle, rectangle. Cut them in half. Invite your one-and-a-half-year-old baby to put together a figurine in two parts, and at the same time remember what it is called. Older kids will be able to independently select the necessary fragments and make figures from them. You can make several shapes of different colors. Then the baby will need to first select all the fragments of the same color, and then put them together into the desired shape. This simple game will solve several didactic problems at once: it will introduce you to color and shape, and train spatial thinking and fine motor skills. You can also talk to the baby about the whole and the parts by dividing the cardboard “cake” between the doll and her “guests.”
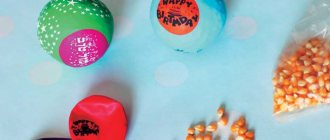
Whose tail? For this game you will need pictures of birds, fish, animals from old books, magazines, postcards. Cut out the figures, stick them on cardboard and carefully cut off the animals' tails. That's it, the game is ready. Lay out the tailless animals and their “accessories” in front of the baby and tell a fairy tale about how the animals got tired of their tails and decided to swap with each other. They changed and changed, all the tails got mixed up, and now they can’t find whose tail is whose. Of course, the kid will agree to help them and find the loss. You can get creative and play differently - pick up new tails for the animals. And at the same time, talk about why tails are needed in general.
Collect the bunny. For this game, draw silhouettes of bunnies (dragons, cars, etc.) on sheets of cardboard in six colors, cut them out and cut them into 4-6 pieces. Make a cube with sides of different colors and six small cardboard cards of the same colors. Let the child choose what color bunny he will collect. As a reminder, he receives a card of the same color. Let's start the game. We throw the dice one by one. If “our” color comes up, we take a piece of “our” hare. If not, we skip the move. The player who puts together the picture of his color the fastest wins. When your child can easily cope with the game, invite him to collect two or even three pictures at the same time.
Windows. Select several large, colorful pictures from magazines, preferably with large details. Using a large stencil, draw several circles or squares in different places of the picture and cut them out. Paste the picture with holes onto a sheet of white paper. The baby puzzle is ready. Invite the baby to find where the pieces “fell out” from. The younger the child, the larger the figures should be and the smaller their number. If your baby likes to put the fragments in their places, make a whole series of similar puzzles for him, increasing the number of cut out fragments and decreasing their size. Fortunately, the production of such games takes only a few minutes.
DIY fabric toys
Soft cubes
It sounds strange, doesn’t it, because everyone is used to the fact that cubes are something wooden, plastic or any other hard polymer. But such heavy toys, if handled carelessly, can cause injury to the baby, not to mention the destruction that they can cause if they “successfully” hit, for example, a favorite vase; besides, they feel the same in their group.
At the same time, soft cubes, in the absence of the above disadvantages, will please not only the baby, but also his mother, and even his favorite vase.
Compound:
- any fabric material, any colors, it can be satin, calico, corduroy, felt, satin, velvet (the more varied, the more interesting it will be for the child),
- padding polyester,
- fishing bells of different sizes,
- letter stencil or any applique.
The fabric is cut into 10x10 cm squares with small seam allowances. Next, each square is worked out, a picture or letter is sewn on, after which all the pieces are sewn into a cube, leaving one edge unsewn, through which the toy is stuffed with padding polyester and a bell is inserted, then sewn together with a hidden seam by hand.
You can also put a plastic egg from a Kinder Surprise with beans, peas or cereals into the cubes as a rattle. It is also possible to use various rustling films.
They build pyramids from soft cubes, play football with them, put words or a puzzle out of them, in general, everything that the imagination suggests, these crumbs are not afraid of anything.
Fleece balls
These little fleece toys are truly adorable and even easier to make than the blocks, plus they're perfect for tactile stimulation with their strips running all the way around. Babies love them because they are very soft and easy to put in their mouth.
Soft pyramid
A slightly more difficult option to implement, but also more functional. You can not only examine, feel and chew, but also string it on a stick.
DIY children's toys made of fabric do not require special care; you just need to wash them in the washing machine, and they are ready to play again.
Fabric toys
How to make “Walkers” for a baby
Walking games with cubes and chips are a constant hit in children's board games.
But all the games that you can buy are not suitable for little ones who cannot count to six. But if your little one already distinguishes between one and two, you can easily modify any game. Make a new cube with one dot on three faces and two on the other three faces. Such a cube will allow you to play any purchased game, because you will only need to move one or two steps forward, and the baby will cope with this. But it will be even more interesting if you and your child come up with and make your own game. Its topic depends on the interests of the baby. Maybe it will be an underwater odyssey, maybe a rally, or perhaps fun adventures with your favorite cartoon characters. On a sheet of paper (it’s better if it’s large), draw a path with circles (they can be made using a stencil). This is your main path. Now design the playing field as you wish. You can draw by hand. You can paste pictures from old books or read children's magazines. If you don’t want to spend too much time thinking about it, buy stickers with cartoon characters. Little princesses will surely love this homemade game about their favorite Barbie doll. Fortunately, there are plenty of stickers with it on sale. And if you spend a little more time and make task cards, the game can become truly exciting. To do this, buy a pack of paper (preferably cardboard) for notes and on each piece of paper write some task: guess a riddle, answer a question, recite a poem, depict some animal using pantomime, etc. If your child is actively interested in mathematics, the assignments can be mathematical. If you are learning to read right now, these could be games with letters, syllables and words to read. It would be good if all the tasks were somehow related to the plot of the game. Now we mark some circles on the playing field with a colored felt-tip pen. When a chip lands on any of them, the player takes a card out of the pack and completes the task. Or maybe you can come up with a collage game based on family photos about your family's adventures? Or a game about the baby himself, about his daily routine? Believe me, this kind of fun will be your favorite, much better than any, even the most wonderful and colorful store-bought one. Here are some more simple ideas for walking games. For the treasures! This unusual and exciting game is very easy to make. It will not only entertain you on a rainy day, but will also help your child master basic counting. Paint a white sheet of paper (preferably a larger one) in two colors: one third yellow (this is the sandy shore) and two thirds blue (this is the sea). Along the sea, parallel to the shore, draw 10-12 blue wave lines. Mark the “port” on the side of the sea far from the shore. This will be the starting line. For the game you will need small shells, pebbles, and coins. Scatter them on the “shore” (these are treasures). Now you need to glue a paper cube with points from one to three (opposite faces contain the same number of points.) The pieces in the game will be boats (the inside of matchboxes). You can paint them and make paper sails on masts using toothpicks that can be stuck into a piece of plasticine. So, let's start the game. The players' ships line up at the right time. We roll the dice one by one and move the required number of waves. Having reached the shore, we load one of the “treasures” into the boat and return to the port in the same way. And then we set sail again. At the end of the game, we count our trophies and determine the winner. This fun competition game is especially fun to play with a group of kids or the whole family.
Fun colors. If your baby is learning about color right now, make alternating circles of six colors on the playing field. The cube, accordingly, must have colored edges. Whichever color appears on the die, move the chip to that circle. First, the baby will learn to match identical colors, and then remember their names. Next to the colored circles, you can draw objects of the corresponding colors: yellow chicken, red tomato, green cucumber, etc.
Boring English. The walking game will also be a good helper in learning English words. Just stick all kinds of pictures on the playing field one after another (you can use the same stickers or magazine clippings), throw the dice and move the chip along them. Whichever picture they stopped at, they named the word in English. You can learn Russian (Ukrainian, English) letters in the same way. Draw circles with letters on the playing field. We stopped at a letter and remembered its name.
“Moo-moo,” “woof-woof.” There may also be pictures with animals on the playing field. The chip stops on the dog - the baby says: “woof-woof.” They hit the bear and growled menacingly. For an older child, ask them to name the animal or tell something about it: wild or domestic, where it lives, what it eats, what kind of fur it has, tail, ears, etc. In this way, you can get acquainted not only with animals, but also with plants, transport, dinosaurs, dog breeds, in a word, with everything that arouses the child’s interest.
Shoe shine
Shoe shine is a classic Montessori material. You will need:
- oilcloth;
- a pair of children's shoes;
- brush;
- sponge;
- shoe polish or regular baby cream.
Place dirty shoes on the oilcloth and offer to clean them. Use a brush to sweep away dirt, if any. Then apply a little cream to the sponge and rub in circular motions. The shoe will become clean and shiny - children really like this. When your child masters the activity, encourage him to clean his shoes every time he comes in from outside.
Oversleeping and transfusion
Although playing with cereals and water is also relevant at an earlier age, at 3 years old such work becomes more organized and requires greater concentration.
Place 2 glass jugs on a tray with cereal or water in one of them. Show how to pick up a jug with your right hand and, holding it with your left, tilt it and pour or empty the contents.
You can also offer 2 bowls with cereal in one of them and show how to carefully pour the cereal from one container to another with a spoon.
Toddler quiz
The main thing in this educational game is the spinning arrow. Cut it out of thick cardboard. Then make a hole in the center of the cardboard sheet and insert a screw into it. Screw the nut onto the screw, put the arrow on top and tighten with another nut. Do not tighten the top nut too tightly so that the pointer can rotate freely. The playing field is ready. Place cards in a circle with objects depicted on them (animals, flowers, fruits, furniture, clothes, etc.). Now rotate the arrow and see which picture it points to. Let the baby say what is drawn in the picture. In addition, you can tell something interesting about this subject.
You can teach letters or spellings in the same way. If the arrow points to a familiar letter, the baby names it. If the letter is not familiar, you name it. You can turn the arrow one by one and name the letters one by one. The cards can depict numbers, colors, geometric shapes, dog breeds and anything else you want to introduce your baby to. For older children, complicate the task a little by asking them to name the material from which the object in the picture is made (this is a glass, it is made of glass) or, say, the benefit that pets bring (this is a cow, it gives milk).
In order to activate the baby’s speech, place photographs in a circle showing the baby doing different activities. Let the child explain what he is doing in this or that photograph: “This is Lisa stroking her pussy. This is Lisa at the zoo. This is Lisa and grandma..."
Frames with clasps
Since independence is especially important for a three-year-old, teach your child how to button his clothes. It is difficult to fasten the item you are wearing, so let your baby practice using special material. In the Montessori group, these are traditional frames with fasteners: Velcro, zipper, large and small buttons, hooks or lacing. Make a similar tutorial at home by putting your clothes on an embroidery hoop: it will stretch and the clasp will become easier to handle.
Smart flannel
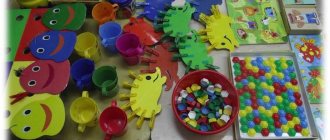
A wonderful device called a “flannelograph” has been used in many kindergartens for a long time. It is very easy to make, and the possibilities for games and learning are almost unlimited. You will need a large sheet of plywood or fiberboard, which needs to be covered with a plain flannel. We place our flannel base vertically against the wall. Now, if we glue a piece of the same flannel or velvet paper to a paper or cardboard picture, it can hang on our playing field. What can you do with all this? Many things. For example, get acquainted with vegetables, fruits, animals. Suitable pictures are cut out from magazines, old books, and printed on a computer. You can use cards from games or buy special didactic sets of pictures dedicated to different topics. Now let's spend a little more time and glue pieces of flannel to the back of the pictures. The first game is ready. First, you can make an “exhibition”, for example, of vegetables and get to know them well. Then sort the vegetables and fruits into two groups (for clarity, you can cut out two baskets from cardboard and place them on a flannelgraph).
The flannelgraph will help your baby get comfortable with geometric shapes. Multi-colored circles, squares, triangles can be sorted by color, shape, laid out in a row from smallest to largest and vice versa. And an older child will be able to create patterns of geometric figures on a flannelgraph.
If you cut out cardboard numbers and, say, apples, then you can do mathematics: compare the number with the number of objects, count apples, get acquainted with the concepts of “many” and “few,” compare, etc.
You can also perform real performances on the flannelgraph. For these purposes, buy several thin, cheapest books with fairy tales, cut out the characters from there, glue “catches” to them, and the theater is ready. Collect a collection of not only paper dolls, but also decorations: houses, trees, bushes, flowers, sun, clouds, berries, mushrooms, etc. Then you and your child can first set up a “scene” and then act out the performance by moving the figures along the flannel. The fairy tale can be classic. Or you can mix the heroes of different fairy tales and come up with your own exciting story with them...
Rough letters
Although the active development of writing and reading begins at the age of 4, it is recommended to learn letters from the age of 3. For training, use a set of rough letters; they are not difficult, although they are labor-intensive to make yourself. Glue capital letters cut out of velvet onto identical signs. When learning, sounds are called, not letters. The names of sounds are introduced using a three-step lesson.
Colored signs
Usually, by the age of 3, children distinguish colors well, but do not yet know all the names. If you haven't already offered sorting, be sure to start with them before moving on to learning about colors.
Names are entered using colored plates. Paired signs are made from cardboard, with a square of colored paper glued onto it so that there is a rim without color that you can hold on to. The names are introduced in a three-step lesson.
Children enjoy the game of matching objects from the environment to signs. Select one of the signs and ask them to select an item that matches the given color.
Size difference
Other essential sensory materials at this age include a pink tower, a brown ladder, and red rods and cylinders. It is difficult to make them at home, but it is important to provide such manuals on which the differences in size can be seen. To do this, use store-bought towers, nesting cups, nesting dolls, puzzles, or make a set of identical geometric shapes of different sizes yourself. The red rods are replaced with strips of cardboard of different lengths. During the lesson, a row is built from large to small (from long to short, from high to short).