DIY educational games
It would seem that now you can buy almost any toys.
Why reinvent the wheel and engage in amateur activities? But games made by mother’s hands always enjoy special love from the baby, and even if they turn out not quite perfect, they are certainly original and with a considerable share of mother’s warmth and love. Plus, in the current uncertain economic climate, homemade toys can help you save some money to buy something more worthwhile, like children's books.
I admit that I do not belong to the category of handicraft mothers, rather the opposite. But with the birth of my daughter, the situation suddenly changed: I wanted to create something (or at least try to do it), tinker, invent. As it turned out, this requires a minimum of time and material costs, and the child’s enthusiastic reaction is the most pleasant reward.
Tactile bags
To make them you will need some colorful scraps and various fillings: cereals, beans, pebbles, rustling polyethylene, cotton wool, salt, small coins, etc. It is advisable to choose fabric of bright colors and different textures. You can also sew two-color bags.
Just cut out squares from the fabric, for example, 8x8 cm + 0.5 cm for allowances on each side. Sew the bags, leaving a small hole, turn them inside out, fill them with stuffing and sew up the hole. The baby will be interested in exploring rustling, ringing, crispy bright toys.
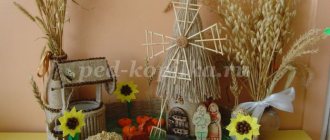
House
A tree house is every child's dream. A children's playground with an unusual house full of secrets will become every child's favorite place. Building a house is not so easy.
To do this, you need to buy the required amount of materials and make drawings. You won’t be able to build the structure alone, so find an assistant. You can connect the house with a ladder and a slide. Below you can place a swing and a sandbox.
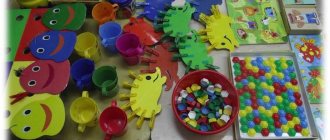
DIY educational games and aids
I would like to show our games for the development of auditory perception, promoting the development of speech and hearing, training in the development of color perception, intelligence and memory.
I'll start, perhaps, with such a thing as auditory perception. I wrote in detail here. Montessori noise cylinders.
The age stated by Mrs. Montessori for playing with noise cylinders is 3 years and above. We started at 2 years old, adapting it to suit our age. I made only 4 cylinders under the red markings and the same 4 cylinders under the green markings.
That's enough for us for now. As practice has shown, you can start with 2-3 things to begin with. If you start carefully, your child will be unstoppable. I don’t know why, this game reminds me of our children’s “Broken Phone”.
We play like this: I show Arina how I take out and listen to the cylinder: I bring it to one ear and shake it, then I do the same at the second ear. I suggest she do the same. She listens to all 4 cylinders in turn. I ask questions: “Which one is louder and which one is quieter? What does the noise sound like? Then we try to look for the same noise among the cylinders with green markings (they contain exactly the same fillers).
I ask questions as she holds two different cylinders in her hands: “Do they make the same noise?” If the cylinder makes a different noise, put it back in the box and take another one. And so we take it out until we pick a pair.
Nikitin squares. Official site .
Nikitin squares are a wonderful tool for developing intelligence. I am also interested in the fact that the gradual solution of problems of the first level smoothly leads to the next, more complex ones. I made the diagrams in the Coral program. Download.
Of course, at 2 years old, we solve first-level problems. But, day after day, there are results. And they make you happy. First I made these squares on magnetic paper.
Nothing worked right away (even for me).
In practice, I realized that they must be voluminous and not cardboard. Therefore, I made it from foamiran 3-4 mm thick. These are very comfortable.
Foam kitchen napkins are also suitable. This is how we put it together. So far, 2-3 squares at a time.
The Nikitins have developed a whole system of classes with these things. He suggests starting by sorting by color. To do this you need to have squares of different colors. We have been sorting by color for a long time, we are no longer interested.
Cuisenaire sticks. I think no one will be indifferent to these little bars. We are no exception. At first we arranged them by color.
Then we found diagrams on the internet. Download. Upon closer examination of the diagrams, it turned out that they were complex for a 2-year-old. I began to draw diagrams “by hand” on checkered pieces of paper, having first measured the sticks themselves.
Then I drew beautiful ones in the Coral program. Download.
The game itself is a good tool for learning mathematics, quantities, and segments. Develops imagination.
Play area fences
Of course, it is not necessary to fence the playground, but a small fence will only make it more beautiful. You can make a fence from available materials. Even ordinary plastic bottles can decorate a space. You can make beautiful animals out of them or paint them in different colors.
A wooden fence will look unusual. Paint each block or log a bright color. Make a beautiful door. Entrust your child with creating drawings that will decorate your entire area. How to make a playground with your own hands?
A difficult question to which you will definitely find an answer. Create a play corner for your baby and he will say “Thank you!”
Do-it-yourself educational games: Tatiana Aleksandrovna Barchan’s toy library
In April, I added to my collection of ideas for educational games made by myself. I was lucky enough to attend an amazing event organized by the “Native Path” website: a game meeting with Tatyana Aleksandrovna Barchan.
She has an unusual story: a biochemist by profession, she worked at a research institute and did not think that she would come up with and create educational games for children with her own hands. But everything turned out differently: Tatyana was asked to work with gifted children 6-7 years old, and this is where her career as a teacher and inventor of educational games began.
Now Tatyana runs the Rebus Center for Education and Creative Development, and is the author of many games that have been recognized by experts as one of the best (quality mark “Child Psychologists Recommend”).
Tatyana Aleksandrovna captivated me with her creativity and elegance of solutions for children’s development in play. I listened to her and realized that 90% of all the ideas I had read on the Internet in recent years were different variations of her games, invented back in the 90s. I wrote several sheets of paper, sketched diagrams and ideas. Now I have found the time and am ready to share some sketches with you.
DIY educational games
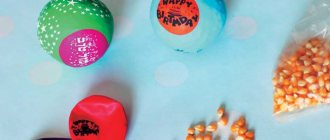
1) Box with tracks for a magnet . The point is that for the game you need two magnets: one larger, it is hidden under the boxes (on the other side), the second is smaller, it will walk across the playing field. We move the small magnet with the help of a large one, which is not visible. Wonderful miracle for kids.
We take a small candy box as a “playing field” (so that it is comfortable for the child to hold in his hands), add a path, obstacles, and other elements. As a variant of the game situation: the car is driving on business, you need to stop at a gas station (which element), then across the bridge to a car wash (next element), etc.
2) A bone for the dog. You need several boxes, different in size, covered with different colored paper. There is a dog who is looking for a bone (we can easily change it to a character that you have at home).
We hide the bone in one of the boxes and give a hint: “the bone is in the box between blue and red” or “in the box above the yellow one.” For older children, it can be more difficult: “not in red, but above blue.”
Aerobatics - let the child hide the bone and ask such a puzzle for you.
3) A simple thermometer model . Everything ingenious is simple! A rectangle cut out of cardboard, numbers signed, a regular elastic band inserted, part of the elastic band painted over. If you pull the rubber band on the other side, the temperature on the thermometer rises; if you pull it in the other direction, it drops.
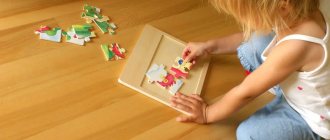
4) Another look at puzzles for kids: cut not a rectangular picture, but a circle into sectors. It is more difficult to assemble such a mosaic on one side, but easier on the other. In any case, a useful variety for training attention and thinking.
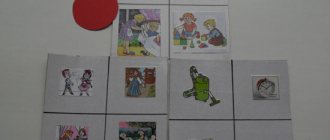
5) Children's library . We take 12 identical boxes, make them the same color, stick a number on the spine and a picture on the cover. By the way, the old calendar can be used as a source of numbers for this and other benefits. All books are stored in a large box for 12 books. There are a lot of options for games with such a library. You can develop speech by guessing from the picture on the cover what this book is about, what the plot is, what the story is. You can train the number series: collect books in order, find which book is missing, put it in reverse order, ask for the “next to the fifth” book, etc. As soon as I find suitable boxes, I will definitely make such a “library” for us.
6) Lotto for the difference between flat and three-dimensional figures. To do this, you will need sheets for filling and the actual volumetric figures. Tatyana made them herself from a special modeling mass.
The players’ task is to determine what shape the object pulled out of the bag resembles (a button is a circle, a ball is a ball, etc.).
It is very useful to pass all geometric concepts through your hands, to feel them in the literal sense of the word.
7) Comparison problems. Tatyana suggests interpreting the “more” and “less” signs as an arrow, which always points to the little one, to the baby, and recommends starting with pairs: mother and baby.
I really like this positive “arrow” because it is usually supposed to represent a crocodile that eats those who are smaller. First we play with a full-fledged arrow: from mother-baby we move on to the number of objects, then to numbers.
Then the arrow “loses” the stick and the “more”/”less” sign remains in its familiar form. Then we continue to play with cards with the usual sign.
 Game "Capricious buyer" . We officially allow kids to be naughty???? To play you need many different figures of different colors. These are goods in a store where a capricious buyer comes.
On his card it is indicated what he wants to buy, but something like this: not red, not round, but square. It is necessary to remove those cards that the buyer does not like and leave only those that meet the criteria.
In this way, kids learn the basics of set theory without noticing it themselves.
I showed you only a small part of the games that we discussed at the game library (only those where I have photos). It is clear with what care and love for children all the benefits are made.
In addition to ideas for developmental aids, Tatyana generously shared her gaming experience, tips on organizing games, making durable toys (her own creations passed through the hands of many children over several years), features of mastering mathematics, reading, and pedagogical tricks.
Tatyana is an amazingly enthusiastic person; after the game library, all the participants came out with sparkling eyes and full shopping bags, because In addition to homemade games, there are already many “ready-to-play” games. I am absolutely delighted with some of the acquisitions, Pasha too ????
Placing elements on the site
The area of land required for construction depends on your wishes, age and number of children. Usually this is a square corner with an area of 8-10 square meters. In such a site, the arrangement of elements can be very diverse.
Most often, a slide in combination with swings and other equipment is located in the center, a sports corner and some creative elements like a drawing board should be located in the corner near the fence.
The rectangular area is a little more complicated; there the elements will most likely have to be installed in a row, one after another. You also need to remember about safety, especially if you have more than one child. Due to the circumstances of a large family, you cannot place a swing next to the sandbox.
Do-it-yourself mathematical didactic game for the younger group
Children's development largely occurs through play. Children 2-3 years old, who are just joining the ranks of preschoolers, begin to spend a lot of time in a group of peers, gaining new knowledge. Do-it-yourself didactic games are especially valuable in preschool educational institutions. This is the warmth and care of a master who puts his soul into each child, as well as the opportunity to give children sensory development and first skills in mathematics and logic. We present to your attention a master class on creating a bright didactic game with a mathematical bias for the younger group of preschool educational institutions, which older preschoolers will also enjoy playing. The process is accompanied by pictures, so it will be easier for you to create.
Do-it-yourself didactic games - mathematics can be interesting
To make a didactic game with your own hands, you first need to prepare and, which is very important, calculate the material.
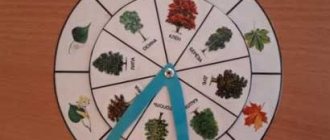
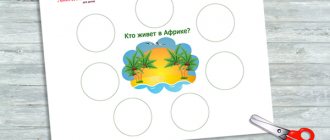
Let's call it "Harvest" - the guys will be able to put three types of fruit on three different trees, and then collect them in plates, leaving the leaves.
When the kids grow up, they will be able to play this didactic game with a different interest: count which fruits they have collected more or less, and distribute equally to all children.
For preschoolers in kindergarten, it is important not only to play, but also to learn new knowledge. In the didactic game “Let's Harvest,” preschoolers come to the idea of what kind of fruits grow on trees, what exactly these are fruits. They can tell what fruits taste like in each individual case, share their opinions about them, and this is the development of speech. Let's get started!
Creative materials
Anything you have can be useful. In total, you need to make three trees, several fruits of three types (for us these will be plums, pears and apples), three plates for them, and also, if desired, leaves. In order for children to develop their sensory skills as best as possible, it is worth making parts from different materials. It could be:
- Felt. Do-it-yourself didactic games made from this material are considered one of the best, since it is wear-resistant, has many beautiful colors and is easy to create.
- Rubber (or rubberized colored paper).
- Cardboard (thin and thick).
- Self-adhesive paper.
- A box or casket in which you can put parts of a didactic game.
- Of course, for the DIY process you will need scissors, a needle, colored threads (preferably floss), and a ruler. We also used green gouache to paint the back of the trees.
Source: https://mojdetskijsad.ru/pedagogam-na-zametku/matematicheskaya-didakticheskaya-igra-dlya-mladshej-gruppy-svoimi-rukami.html
Crafts from car tires
Tires or old bald rubber are an opportunity to build a system of playground objects with your own hands.
The easiest way is, as a rule, to build a small sandbox for one child from unnecessary rubber from a “heavy truck”. It is better to place it in the shade, since there is nowhere to place the “mushroom” or canopy. You can shade the descent with a fabric awning or an old beach umbrella, changing the location depending on the shade.
Step-by-step instructions for creating a sandbox:
- prepare a site for a sandbox (it is better to build on a prepared base - paving slabs or lawn grass);
- mark a circle almost the size of the tire and remove the turf layer;
- you need to secure the tire to the ground with stakes or slate nails;
- Cover the bottom of the resulting reservoir with a tarpaulin and fill the level with sifted sand;
- paint the outer surface of the sandbox in a bright color with harmless, quick-drying paint;
- To monitor the sandbox, arrange a lid to cover the sand from rain or the ingress of cat and bird excrement (you can get by with oilcloth with weights at the ends). They are very reliable.
Art objects made from tires are an original decoration for a children's playground. In combination with plywood boards, this is the most affordable material for placing recognizable figures in the form of:
- animals and birds;
- fairy-tale characters;
- favorite toys;
- cartoon characters.
The most popular tumbler walls are made from two tires of different sizes, which are completely mounted one above the other. For health reasons, voids are filled with plywood. Using paints, they paint the sundress and the face of the toy.
Like a tumbler, there is a way to make, repair and decorate a matryoshka doll or a teddy bear, and place a barrel with the inscription “Honey” next to it. There can be several objects of different sizes. For example, three different bear figures, as in the fairy tale “The Three Bears”. “Masha and the Bear” is a good plot for crafts made from tires, but other ideas are also suitable, it helps develop imagination.
No less popular themes are white swans, which can be cut out of turned-out tires and covered with white paint.
On the edges in the center you need to make wings (or leave them without cuts), and on the wrapped end they draw a bird’s face, as in the photo on the site.
- You can make a turtle out of tires by covering it with green and brown paint. One tire is needed for the base of the sculpture, the other is cut into 4 parts to make the legs. It is better to cut the head out of plywood and secure it near the base. This way nothing will happen to her.
- Bald rubber is an excellent material for fencing a playground or constructing all kinds of labyrinths and galleries, cars, tents. If you cover a covered gallery made of tires with a camouflage net, you will get a good training ground for little scouts who love such games.
Design ideas
The design of a playground depends on creative ideas, the volume of plans, style, materials used and the time that the owner is willing to spend on this event. It is better to coordinate all steps with the children; they should highlight the details that they like and what can be improved, because the main thing is that they have fun and comfort.
Since children are often bored at the dacha, the main idea of creating such a children's corner is to provide children with a fun and interesting activity, which means that everything should be decorated in an interesting and colorful way.
Absolutely everything can be combined on the site, and ideally all the main elements of entertainment should be built. If there is not much space, then you can install only the most interesting and important things for the child, for example, a swing and a sandbox, a slide and a sports corner, and so on.
The interests of the child should be taken into account not only in the placement of buildings, but also in the painting of these very elements.
For example, for a boy you can paint everything in protective colors, for a girl you can paint flowers on the elements. It is also important to decorate the site with additional elements and figures made from tires, pallets and other improvised means.
Sculptures made from trash
Sculptures will help you create a unique design. The master chooses fairy-tale creatures or fantastic animals, aliens or cartoon characters as prototypes. The frame of the sculpture itself is made of wire, which is coated with clay, plaster or cement.
Since it was decided to make a playground and its top (roof) with your own hands from scrap materials, bright small details are stuck on top of the figures: take caps from yogurt or mineral water bottles, parts of broken toys, checkers and buttons.
Scattered parts from the Lego constructor will also be used.
Even fragments of dishes can be put to use: they will become material for decorating a sculpture. However, you should be careful here: they need to be immersed deep enough in clay or cement so that the sharp edges cannot injure.
- Old basins are easily transformed with paint into strange turtles. And the bowls, mounted on tree stumps, imitate giant mushrooms.
- Metal dishes laid out in the grass or along paths, painted red and covered with black circles, will become fantastic ladybugs.
- And plastic bottles make cute piglets and hedgehogs, funny and amusing.