Features of organizing modeling classes in the middle group of preschool educational institutions
Current types of modeling
Children 4–5 years old find it easier to work with plasticine; their stronger muscles make it easy to tear off and knead the material. Although there remain difficulties with sculpting small parts and connecting parts of an object to each other (without flattening), the crafts are already quite similar to real objects and have certain proportions. With each lesson, preschoolers' skills improve.
Creating a fish refers to object modeling. Preschoolers generally love to sculpt animals and people - objects that they can later play with (and not just admire). Although, it should be noted, the depiction of plant-shaped objects is easier for them.
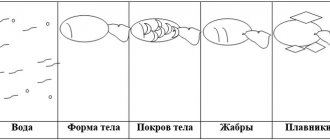
Since pupils in the middle group do not yet have a clear idea of the structure of the body of a living creature, the teacher’s task is to teach children to display the key features of an object and its striking features, for example, in a fish this is an elongated body, a pointed head, a curly tail and fins.
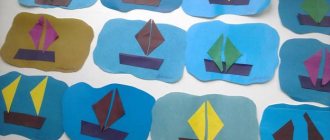
In addition to traditional modeling with its three-dimensional forms, in the middle group you can already introduce children to bas-relief - modeling on a plane. This is especially true if the teacher organizes group work “Aquarium” (the role of an aquarium can be played by a cardboard box lid). In this case, the relief figures of fish will be attached to the surface, protruding half or more (remember that the bas-relief has varieties - the actual bas-relief and the high relief).
In addition, children 4–5 years old can already be introduced to counter-relief modeling, when a drawing is cut into plasticine, occasionally including its elements in a traditional lesson.
Modeling methods
When sculpting such an object of living nature as a fish, preschoolers of the middle group can use various sculpting methods. Of course, the easiest way for kids is to use the constructive method, when an object is formed from separate parts (head, torso, tail, fins, eyes, mouth). The child mentally thinks through the image, determines what parts it consists of, and gets to work. As a rule, the process begins with the creation of the largest part (torso). It should be noted that with the constructive method of modeling, pupils in the middle group do not convey proportions very well and difficulties arise in connecting elements to each other. By the end of the year, these skills are improved: the number of details increases, their elaboration and connection becomes more thorough.
The sculptural method is more difficult for children of this age group (it is also called plastic). This is the modeling of an object from a single piece of plasticine. This requires more precise movements, a good eye and a clear idea of the desired shape. If the children have to sculpt a fish in this way, it would be good to draw it first - this will allow them to clarify the shape, proportions, and features of the transition from one part of the body to another.
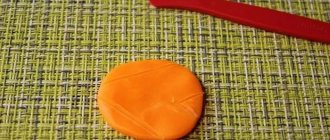
A piece of plasticine is initially given a certain shape. If it is a fish, then you need to make an oval. Having outlined the key shape of the animal, it is necessary to form its parts using the technique of pulling and flattening (head, tail, fins). Once the basic shapes have been sculpted, you can move on to working out finer details.
It is good to show preschoolers two fish, sculpted in a constructive and plastic way, and show their differences. The teacher must demonstrate modeling techniques in front of the children, constantly commenting on their actions.
It should be noted that in classes in the middle group, one of these methods of sculpting in its pure form is rarely used. Much more often, one method is complemented by another - the so-called combined method. As a rule, the largest parts are created using the sculptural method, while the smaller ones are sculpted separately and attached to the main form. With normal development, children in the preparatory group themselves come to this method as the most accessible and universal.
Techniques
As you know, there are many sculpting techniques. However, in the middle group, when creating the image of a fish, the following will be relevant:
Rolling is a technique that creates spherical objects. At the same time, the child’s hands make a circular sequential movement clockwise, with the left hand at a slightly slower pace.
Then the shape of the ball is transformed into an oval: to do this, you need to slightly stretch on both sides.
Since the fish's body is slightly flattened, the oval is slightly flattened . This technique is carried out by slightly squeezing the oval with your hands on both sides. The effort should be minimal, otherwise we will end up with a flat cake.
To shape the fish's mouth, we use the pinching - a small part of the plasticine is squeezed with three fingers.
By pulling and flattening, the fish gets a beautiful tail. To make it look especially impressive, you need to cut it in half a little in a stack. We use the same technique to form the fins.
If children sculpt a fish in a constructive way, then when attaching the parts to each other, they use the technique of smearing , in which two pieces of plasticine move towards each other, pressing and aligning the fastening points.
Independence of children 4–5 years old when choosing the color of plasticine and using a stack
Pupils of the middle group can already show a certain independence in modeling classes. So, according to the lesson plan, they choose the color of the plasticine. If you plan to sculpt a “golden” fish, then it will, of course, be yellow, which can be decorated with elements of a different shade. If the children are collectively decorating an aquarium, the teacher advises the children to make multi-colored fish - and then they choose a variety of colors.
With preliminary training and guidance from a teacher, preschoolers 4–5 years old actively use the stack during productive activities during the modeling process. Applied to the Fish theme, this tool can be used to beautifully draw scales or design the tail and fins. Using a stack you can “draw” the mouth and eyes of a fish.
Notes on sculpting "Different fish" (middle group)
Elena Krasikova
Notes on sculpting "Different fish" (middle group)
Visual activity. Modeling . Topic: “ Different fish ”
.
Purpose: to give children an idea of the body structure of fish.
Objectives: learn to convey the distinctive features of different fish that have the same shape, but slightly different from each other in proportions. Reinforce previously learned modeling . Develop fine motor skills, vocabulary, perseverance, and creativity. Foster curiosity and interest in the natural environment.
Methods and techniques:
visual: showing a modeling , looking at an illustration of a fish ;
verbal: conversation, asking a riddle;
gaming: finger gymnastics, physical exercises;
musical: use of TSO;
Demonstration material: pictures of fish, seascapes, audio recording of the sound of the sea.
modeling boards , cardboard covered with plasticine.
Progress of the lesson: Let's hold hands together and smile at each other. On the right is a friend and on the left is a friend, Let's smile all around! Wonderful! Your smiles made the group brighter .
Guys, yesterday we read an excerpt from A. S. Pushkin’s fairy tale “The Tale of the Fisherman and the Goldfish ”
.
Let's make fish out of plasticine today and let them into the “blue ocean”
so that there will be a lot of beautiful fish there.
Educator: Guess my riddle.
Wherever we want, we sail there.
The river is our home, we live in it (Pisces)
Educator: Guys, where do the fish ?
Children: In the river, and in the seas, and in the oceans.
Educator: Guys, where else can fish ?
Children: In the aquarium.
Productive activity.
We look at images of fish. Look, the picture shows a fish . has a body , fins, a tail, and eyes. tail serves as a "steering wheel"
, and fins are needed in order to swim.
body is covered with plates called scales. It protects the fish's body from damage: from sharp stones, other predators, etc. Q
: Guys, let's see what parts the fish . What is this part of the fish's ?
D.: Torso.
V.: That's right. What geometric figure does the torso resemble?
D.: To the oval.
V.: That's right, well done. What does a fish have on its body ?
D: Eyes, mouth, fins, tail.
V.: Correct. The body of the fish has dorsal and ventral fins. What do you think is the reason why a fish can swim fast or slow?
D.: Due to the tail.
V.: That's right. Tell the fish to be larger or smaller than its body.
D: Less.
V.: That's right, this fish has a small tail .
- Guys, now we’ll take the most ordinary plasticine and start sculpting.
1. While working, you must constantly maintain order in your workplace.
2. Listen carefully to the teacher’s tasks.
3. Work only on the board, use stacks and wet wipes.
4. You must be careful when working with plasticine:
- do not wipe your hands on clothes;
- do not dirty the table at which you work.
Dynamic pause “And fish swim in the sea like this”
author N. N. Pokrovkova
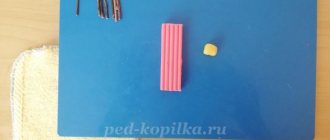
Take a piece of plasticine, using a stack, divide it into 2 unequal parts, so that one part is large and the other small. Roll a large piece into a ball, then roll out a slightly short sausage, pull out the tail, pinch the top and bottom to create a tail. We draw out the head, draw a mouth in a stack, pin one fin on the back, one on the abdomen on one side and one on the other side. Roll 2 small balls for the eyes. Let's scratch the scales with the stack. Look how wonderful the fish . From the second part (small part)
plasticine, make a small
fish . What elegant fish you have , funny and all so different , not one like the other.
And now that our “magic”
fish are ready .
Let's put them in our aquarium. Did you like the fish in our aquarium ?
Children: Yes.
Educator: Now you and I can be glad that in our group we have an aquarium made with our own hands. Thank you guys, you are all great!
Bottom line.
Educator: What did we do in our lesson today?
Children: Examined and sculpted a fish , played a game, guessed a riddle.
Educator: Well done, they said everything correctly. This concludes our lesson.
Variations on the theme: individual and collective compositions
Traditionally, fish sculpting in the middle group is carried out in the first half of the year (November), then the children draw an aquarium composition. In general, the task of this lesson (“Different fish”) is to teach preschoolers to sculpt fish of the same shape, but differing in proportions. During such activities, children reinforce the modeling techniques they have previously learned.
However, different interpretations of this lesson are possible. You can designate its theme as “Goldfish”, having previously told the children, for example, the famous fairy tale by A.S. Pushkin. This craft will be slightly different from traditional fish: firstly, with its unusual color scheme, and secondly, with fabulous magical details (a crown on the head, a magic wand, etc.).
Children of middle school age are already able to understand the relationship between objects and objects; it is quite possible to introduce plot modeling. For example, propose a collective composition “Aquarium”. Such an activity will, of course, require preliminary preparation. The teacher prepares the base in advance - it can be a real empty aquarium or some other glass or plastic container of the required size. You can offer 2-3 small aquariums, dividing children into subgroups.
A possible variant of a modeling lesson is “Fish House”, in which each child makes his own aquarium. In such a lesson, in addition to plasticine, children can be offered cardboard (cut by the teacher into squares or rectangles of the required size - the walls of an aquarium), which the children will fasten with plasticine. One side of such a house should be made transparent by offering preschoolers pieces of plastic. Subsequently, the children “populate” such an aquarium with plasticine fish.
Appropriateness of using additional materials
Modeling a fish opens up great opportunities for using additional, natural or waste material. To effectively designate scales, you can use cereals (rice, buckwheat, pearl barley) or seeds. If the guys create a fabulous fish, foil or finely chopped bright candy wrappers will be useful to decorate its body.
In addition, modeling in class can be successfully combined with appliqué: a plasticine fish can have a tail or fins made of colored cardboard.
Implementation of an individual approach within the theme
In the middle group, many children show increased interest in modeling. Of course, such students need to be encouraged by offering them complex individual tasks. For example, if a child quickly and efficiently completes a task, the teacher can offer him to sculpt another fish, but only of a different shape, color and size. Another option is to decorate your fish, for example, using a felt-tip pen cap to make a beautiful design of scales or make it more colorful using scrap material.
Options for a motivating start to a lesson
Like any productive activity, modeling should begin with a motivating moment. Most often, some fairy-tale character or just a toy fish comes to visit the children, talks to them and asks them to solve its problem. For example, it’s boring for a goldfish to swim in the sea, because it’s the only one so unusual, but it so wants to have friends and girlfriends. Some other sea creature may also appear in front of the guys - it could even be the Little Mermaid doll, popular among girls, who has no one to play with. There are many options here, it all depends on the teacher’s imagination.
A rubber fish that “comes to visit” preschoolers
You can play with a fairy-tale character in a fish sculpting class
To lead preschoolers to create a bright image, before class you can organize an exhibition of toy fish. It is ideal if in a group or in a living corner in a kindergarten there is a real aquarium with fish.
The best option is your own aquarium in a group room
An alternative to a real aquarium - a model created by a teacher
The group's developmental environment should include an album with illustrations of river and sea fish, which children can take out to look at at any time.
Modeling fish should be preceded by reading fairy tales, stories and poems on this topic. These may be fragments of the work of A.S. Pushkin "The Tale of the Fisherman and the Fish". The following poems can be recommended:
E. Chepovetsky
In a quiet river In a quiet river at the pier A fish met a fish: - Hello! - Hello! - How are you? - I was fishing, I fished for a fisherman, Uncle Petya - an eccentric. - Where is your fisherman? Gotcha? - No, he left, you cunning one! Lost it!
Yu. Mogutin
Ruffs Above the river In the silence The reeds rustle. And in the water there are six cocky ruffs among the reeds. Don't be irritable, you rashers. It's better to hide in the reeds. The pike is waiting for you little ruffs by the reeds.
V. Orlov
Goldfish Semolina is poured into a jar for the fish. The fish are burning with gold. They cook porridge for me from semolina early in the morning and they repeat that I too will be golden from that porridge.
E. Stewart
Pond At sunset the pond sleeps. Circles float on the water - These are small fish Playing out here and there. It’s nice to splash them with water, to flash their scales for a moment, - for fish to jump into the air It’s the same as for us to dive.
L. Rashkovsky
Fishes fish use their fins to muddy clean water. Have lunch - Thank you Never say. They live like this for centuries. And wherever you look, the fish only move their fins gratefully. Why such fish? Yes, they have water in their mouths! And they will never be able to say thank you.
https://deti.ledibashkirii.ru/stixi-pro-rybok
On the eve of modeling, you can show the children cartoons on a marine theme. These are “In a Blue Sea, in White Foam” (1984) or “Wow, a Talking Fish” (1983). They will certainly interest the kids, and they will want to create sea creatures with their own hands.
Outdoor games also need to be connected to a marine theme - these are “The Fisherman and the Fishes”, “The Sea is agitated once...”.
Summary of GCD for sculpting “Goldfish” in the middle group
Objectives: develop fine motor skills;
continue to teach children non-traditional techniques for working with plasticine;
consolidate previously learned modeling techniques: flattening, plucking from a whole piece.
Methods and techniques:
Practical: physical education, game
Visual: observation of the teacher’s actions. examination;
Verbal: riddle, conversation, reasoning, generalizations, conclusions.
Materials and equipment:
plasticine, boards, napkins;
preparation of fish.
I. Organizational moment
IV. Reading an excerpt from a fairy tale by A.S. Pushkin "The Tale of the Fisherman and the Fish"
“... Once the old man threw a net into the sea, - The net came with nothing but mud. Another time he cast a net, and a net came with sea grass. For the third time he cast the net, “The net came with one fish, With a difficult fish, a golden one...”
A fish appears above the easel.
Educator: Did you find out who she is?
(Children's answers)
This is a goldfish!
Fish:
Oh, my path was difficult, so I decided to turn to you. It has become bad for me to live in the sea: Suddenly the water has become dirty, There is nowhere else for me to frolic, They say that here you have an aquarium now. It is spacious and big With very clean water. Allow me, kids, to swim with all my heart. It's just boring, that's the problem. I don't have any girlfriends!
Educator: Guys! How can we help the goldfish?
Children's suggestions.
Educator: Guys, I suggest you make girlfriends for our guest. Each of you has an “aquarium with a goldfish” on the table.
V. Modeling of “Goldfish” to the soundtrack “Music and Nature”
Educator: Guys, today we will have an unusual sculpture. We will draw a “goldfish” with plasticine. Let's take plasticine with you. We fill the tail and head of the fish with it, spreading the plasticine in a thin layer: first we pinch off a small piece of plasticine, make a ball out of it, put it on the base (head, tail) and spread it. We do everything carefully, without going beyond the contours. Then we spread the plasticine onto the fins.
We take orange plasticine , we will use it to fill the tail and head of the fish , spreading the plasticine in a thin layer . First, we pinch off a small piece of plasticine , make a ball out of it, place it on the base (head, tail) and smear it. We do it carefully, without going beyond the contour. Then we smear the fins with yellow plasticine . In order to make fish scales, pinch off a small piece from orange plasticine , roll out a ball with a circular motion of your palms, flatten it and place it on the body of the fish . We place each scale next to each other. Then we do the same for the second row, etc.
Guys, why haven’t we made our fish ? (Children's answers). Correct eyes and mouth. To make an eye, take white plasticine , pinch off a little bit of it and roll out a small ball, flatten it and attach the eye to the fish’s . Next, take black plasticine (a small piece, roll out a ball, flatten it and make a pupil for the fish , placing it on top of the white plasticine . The mouth of the fish - roll out a small thin sausage, bend it in half and attach it.
The phonogram “Music and Nature” plays, the children complete the task
Educator: In order to make fish scales, we rolled balls in advance, now we take one ball at a time, flatten it and place it on the body of the fish. We place each scale next to each other. Then we do the same for the second row, etc.
Educator: Guys, what else haven’t we done for our fish? (Children's answers.) That's right, eyes and mouth. To make an eye, take white plasticine, pinch off a little bit of it and roll out a small ball, flatten it and attach the eye to the fish’s head. Next, take black plasticine (a small piece, roll it out into a ball, flatten it and make a pupil for the fish, place it on top of the white plasticine.) The mouth of the fish - roll out a small thin sausage from red plasticine, bend it in half and attach it. Here are the friends for our goldfish. How beautiful they all are.
Now let's glue our fish into our aquarium.
Come to me one by one.
V. Reflection
Fish: Guys, you are so great! What kind of girlfriends you have made for me. Thank you very much! For your efforts, for your help, I want to thank you.
(Children receive stars.)
An exhibition of works is being organized
Lesson summary of fish sculpting in the middle group
| Author's full name | Title of the abstract |
| Temereva L.M. | “Goldfish” Educational objectives : learn to sculpt a fish from plasticine, convey its characteristic features, improve the techniques of pulling and flattening, designate fish scales using a stack and a felt-tip pen cap, learn to maintain proportions between parts. Developmental tasks : clarify ideas about the appearance, lifestyle, habits of fish, develop imagination. Educational objectives : to cultivate perseverance, patience, and the desire to discuss the results of one’s work. Integration of educational areas : “Artistic creativity”, “Cognition”, “Communication”, “Socialization”, “Health”. Demonstration material: pictures of fish, seascapes, audio recording of the sound of the sea. Handouts: plasticine, stacks, modeling boards. Course of the lesson: Relaxation moment: at the beginning of the lesson, pleasant, calm music sounds. Children stand holding hands in a circle. The teacher wishes everyone good morning and offers to pass on a piece of his warmth to each other. The teacher invites preschoolers to go to the land of Fantasy, where they can learn a lot of new and unusual things. The sound of the sea surf sounds - the children “find themselves” on the seashore. The teacher reports that in the land of Fantasy there lives a kind sand prince who protects her from evil. He knows many fairy tales and games, but will only play with those who follow his rules. A surprise moment - the Sand Prince doll appears, who tells the children that in his country it is forbidden to fight, bite, or offend others. A character asks a riddle about a fish. I have wings, but I don't fly. I have eyes, but I don’t look at the sky. I have a mouth, but I don't speak. I shine in the clean river, with a silvery back. Who am I? (Children's answers) The teacher shows the children a toy fish (a fish is also offered to each child). They examine it, clarify its properties: color, size, body shape. The children and the teacher find out that it is a goldfish. In addition, they name other fish known to them (pike, perch, crucian carp, catfish, etc.). There is a conversation about why fish need a tail, fins, whether they have eyes, what the body is covered with, whether the fish can speak. Physical education |
| Show me how fish swim. The fish swam and dived in the blue sea water. They will come together, they will separate, and then they will bury themselves in the sand. | hands in front of the chest with folded palms, running in all directions, bending, approaching, diverging, squatting |
The Sand Prince informs the children that there are fish that are edible for humans, and there are dangerous ones that can inject or give an electric shock. The following is a short experiment to find out how fish see in water: you need to bring a jar of water close to your eyes and examine the objects that lie in it - their shape is distorted and their size increases. Next comes the direct motivation for productive activity: The Sand Prince asks the children whether it’s boring for one fish to swim in the sea. He offers to make friends and girlfriends for her, with whom the goldfish will not be lonely. In addition, they will fulfill the wishes of children. Demonstration by the teacher of modeling techniques ( sculptural method ). You need to roll the ball, then flatten it into an oval. You need to pull off the nose from one end, and the tail from the other. Using the stack, the tail and fins are drawn. You can use a felt-tip pen cap to stamp the scales, and mark the scales using cereals (barley, rice or buckwheat). Before productive activities, the teacher conducts finger gymnastics “Fish” with the children.
| The fish swims in the water, the fish has fun playing. | With their palms clasped together, children depict how a fish swims. |
| Fish, fish, mischief | they shake a finger |
| We want to catch you | slowly bring your palms together |
| The fish arched its back | again we depict how the fish swims |
| I took a bread crumb | make a grasping movement with both hands |
| The fish waved its tail. The fish quickly swam away. | sailing again |
Children can work independently while listening to calm music. The teacher guides the preschoolers and gives advice. At the end of the lesson, the crafts are analyzed, the teacher asks what the children would like to ask the goldfish for. Children talk about their desires, and the teacher writes them down.
Gorbenko N."Different fish" The lesson begins with a riddle about fish. The teacher tells the children about fish and specifically dwells on those that live in the aquarium (goldfish, angelfish, parrot fish, etc.). An aquarium is a whole world, there are pebbles, shells, and underwater plants. Next is a physical education session “There are clouds in the blue sky...”.| A river runs under the mountain | crouched down, arms extended forward |
| Early in the morning, fishermen are pulling nets from the river | imitate movements - as if sorting through a network |
| Caught a lot of fish | arms spread to the sides, |
| We cooked delicious fish soup | Circular movements with your hands, as if stirring your ear |
Preschoolers sit at tables, each has a picture of a fish, they look at them and discuss with the teacher the color, structure, purpose of body parts. The teacher demonstrates to the children the techniques of sculpting a fish ( using a constructive method) : the head, body, fins, eyes and mouth are formed separately. After independent productive activities, children are given physical education again.
Markova N.V."Fish and algae in the underwater world" (collective composition) One of the objectives of the lesson is to decorate fish figurines with moldings and cut-out designs (counter-relief). A special feature of the lesson is that the teacher prepares in advance the basis for the composition - an aquarium (as an alternative - 3-4 transparent jars or glasses). In addition, to create crafts you will need cocktail straws, toothpicks, caps from pens or felt-tip pens. At the beginning of the lesson, the teacher conducts a didactic game “What has changed”: he lays out several fish from geometric shapes on the board, then asks the children to close their eyes and changes some details. Preschoolers must guess what has changed. Another game “Make a fish”: an oval (the body of a fish) is placed on the board; tails and fins of different shapes can be attached to it. Then the teacher switches the children from a conventional schematic image to an artistic one and demonstrates 2-3 fish that he sculpted in advance. The teacher explains sculpting techniques and invites the children to sculpt beautiful fish to fill the aquarium with them together. Preschoolers sculpt fish in any way (constructive, plastic or a combination), and then decorate them to their liking: with spots of flattened plasticine balls of a different color, plasticine flagella, sparkles, seeds, cereals. The teacher also shows how to decorate the craft with a stack or a felt-tip pen cap. For the children who quickly completed the task, the teacher advises them to make algae and pebbles for the aquarium so that the fish can live comfortably. At the end of the lesson, the fish are placed in a common aquarium. Some of them are attached to the walls (slightly pressed), others are strung on cocktail tubes or toothpicks attached to the bottom).GCD modeling in the middle group theme "Fish"
GCD Artistic and aesthetic development. Modeling
Middle group
Theme: Fish
Conducted by a teacher
Sarycheva Lyudmila Viktorovna
Goal: to develop in preschoolers the ability to create the image of a fish using modeling.
Visual tasks: teach children to correctly convey the structure of a fish’s body, proportions of parts, shape, size; develop coordination in the eye-hand system, synchronize the work of both hands.
Technical tasks: learn to divide a block of plasticine into parts; continue to teach children to pinch and pull plasticine away from the main shape (ventral and pectoral fins), to work with stacks (notch, cut plasticine); improve techniques: rolling, unrolling, smoothing.
Educational objectives: to cultivate independence and accuracy in work in preschoolers.
Preliminary work: examination of pictures depicting sea and freshwater fish, game “Loto. Inhabitants of reservoirs”, integration of educational areas: cognitive development, speech development, artistic and aesthetic (drawing), reading the book “To Little Why About the Sea”, riddles, coloring pages “Magic Fishes”, p/i “The Sea Is Worried”, p/i “ Pike and fish”, laying out fish from geometric shapes, “Tangram”, “Fold a square” with the aim of laying out pictures “Underwater World”.
Demonstration material: a large toy fish, a flat fish “Sazan Ivanovich”, on whatman paper there is an image of a lake (“School for young fry”) with algae (desks for fry), technological maps depicting the sequence of actions for creating elements.
1 Organizational part.
Guys, guess the riddle.
Wherever we want, we sail there.
The river is our home, we live in it... (Pisces)
I'll tell you a fabulous story about a fish. In a clear blue lake, next to green algae, lived a good old and wise fish. And the fish's name was Sazan Ivanovich. He had seen a lot in his time, he knew a lot. And Sazan Ivanovich decided to open a school for small fish - fry, in order to teach them wisdom. I wrote an advertisement in the lake newspaper and put up a sign with the inscription “School for Young Fry.” He waited a long time for the young students. He swam to the shore, swam far into the middle, but still didn’t wait. I was upset. Sazan Ivanovich really wanted to tell the kids important and necessary secrets...
Guys, I'm very sorry for the fish teacher. Do you want to help a kind and smart fish? But how can we help Sazan Ivanovich? Right. We will sculpt little fish and students will appear in the “School of Young Fry”.
2. Main part.
Look at the fish toy. Tell me, what parts does the body of a fish consist of?
Sensory examination. The teacher asks leading questions, helping the child to independently identify and compare the main parts and some details.
Finger gymnastics.
| A small fish swims along the river | put your palms together and tilt them to the sides |
| The little fish beats its tail | Stretch your arms forward and alternately wave your hands up and down, imitating waves or a ponytail. |
Teacher: - To start sculpting a fish, you need to divide a block of plasticine into parts. Visually divide it in half and draw a line with a stack. Then we visually divide one half in half again and cut it off - this is the “secret”. We put the “secret” in the upper right corner of the board. From a large piece we will sculpt an ovoid - a body along with a head and tail.
The teacher clarifies how the children will sculpt the ovoid and asks them to accompany the story with hand movements. Then he shows the children how to cut the narrowed part of the ovoid in stacks and move the two resulting halves to the sides - this is the tail.
The teacher calls the child for a demonstration. - Alena, show how you cut the narrowed part of the ovoid and move the cut parts to the sides (show on the finished model).
The teacher reinforces all explanations and demonstrations with mnemonic diagrams.
Teacher: - To make the tail flat and beautiful, we flatten the cut parts and cut them from the inside. Now we make the ventral fins, pinching them on both sides of the body. Nastya, how will you make the dorsal fin (child’s explanation). Do any of you have another option? (child's explanation)
Teacher: - That's right, the dorsal fin can be made by pinching, or it can be done in a constructive way: a small ovoid, flattened and stuck to the top of our fish. To do this, we use the “secret”. We coat the joint and smooth out all the irregularities.
The teacher offers to sculpt small fish. Turns on the music. During modeling, the teacher approaches the children, providing assistance and reminding them of the need to use a wet wipe. Each time he clarifies how the child will do this or that part of the craft. Let's release your fry into the lake. Let's put them at algae desks.
3. Analysis.
The teacher asks the children to tell about the most beautiful fish. He asks why they like her? Notes expressive eyes, a flat beautiful ponytail and a voluminous body, etc. He asks what the names of the fish they sculpted are, and how the dorsal fin was made.
- Guys, hear the bell ringing. A lesson begins at the School of Young Fry. Let's not disturb them.
The P/I “Pike and fry” is being held.
Children tidy up their workspaces, put boards and plasticine back in place, and place napkins to dry.
Various options for crafts with comments and descriptions of execution methods
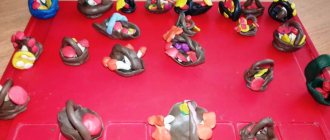
Most of the fish (photos 1–6) are made using a combined method: the head and body are sculpted from one large piece of plasticine, while the remaining elements (tail, fins, eyes) are attached separately.
The fish in photo 4 “Goldfish” looks very impressive - a beautiful long red tail, detailed scales and bulging beady eyes.
Photo 5 “Aquarium with fish” shows modeling using the bas-relief method - the fish are attached to the surface, protruding approximately halfway. The original composition is complemented by pebbles, shells and algae.
The “Magic Fish” craft is of interest (photo 7): the body is made of a twisted flagellum. The gradient color (transition from pink to lilac) will look interesting.
Photos 9 and 10 show volumetric aquariums. Sea creatures are attached to the walls of the cans or fixed in the center on special fasteners.
Photo gallery: finished works of children
Crafts from plasticine
Plasticine craft
Plasticine craft
Plasticine with bead decoration
Bas-relief modeling
Crafts from plasticine
Fish created using an unusual technique
Crafts from plasticine Crafts
Craft
Video: sculpting “Goldfish”
https://youtube.com/watch?v=SaqF0GjJJ-0
Video: plasticine fish
https://youtube.com/watch?v=oPxRnrAsDeo
Video: cartoon “Wow, the talking fish” (1983)
Video: cartoon “In the blue sea, in white foam” (1984)
https://youtube.com/watch?v=wCpIuwelvwk
Video: “The Tale of the Fisherman and the Fish” by A. S. Pushkin
Most preschoolers love to sculpt, because this is an opportunity to create a new toy for themselves. Object modeling, which includes creating a fish, will certainly captivate children in the middle group, especially if the teacher introduces them to various options for creating the image of sea creatures. And the use of additional materials will make the lesson bright and memorable.