How to draw an autumn landscape for children
What is landscape? In fact, the landscape is not just the nature outside the window. Have you seen how artists are looking for exactly that piece of nature that they will paint on canvas? They should like the view, the angle, and the lighting. Sometimes the character of nature is reflected in the most inconspicuous picture. And this suggests that the artist saw beauty and was able to convey it in all details, color and light.
How can children master this science? Very simple. You need to show your child a couple of pictures of a beautiful autumn landscape and tell him what makes this picture special. For example:
- In one picture there is a tree strewn with golden foliage. Although the artist painted the leaves as a “cloud,” he highlighted several individual leaves as an accent and drew every detail on them.
- On the other there is a river, which is visible from a high hill, already covered with yellow-brown-green foliage. And it is the shine of the river, and the way heavy autumn clouds are reflected in it, that makes the landscape special.
- And on the third everything is simple: trees, bushes, grass. And only how low the sun is and how it sparkles like sunbeams in the tree branches decorates the landscape.
Kids quickly grasp such details. A little training and they will succeed!
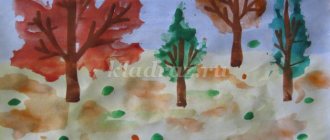
Master class on how to draw autumn trees and sky.
Author
I offer a simple option for children. You will need:
- Brushes
- Paints
- Wet wipes
- Plastic bag
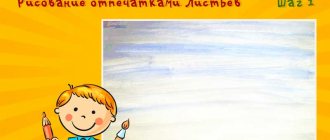
1. We make the background with watercolors. Using a large brush, apply transparent yellow, blue, a little red, apply randomly.
2. Take a damp cloth and smear the paint stains, while the cloth absorbs excess water.
3. On a separate sheet of paper, apply random spots of gouache paint. We make them with the touch of a large brush.
4. Apply clean water to the bottom of the sheet. We turn it over and apply our blank of paint stains to the wet part of the sheet, smoothing it with our hands. And we remove the leaf.
5. If you shoot by the top edge in the middle, you will get a static forest, and if you shoot by the uppermost corner, you will get the effect of wind in the forest.
6. It remains to draw the tree trunks. We do this in two shades of brown to make the picture more voluminous.
7. Let's draw rain. Take a wide brush and remove excess water from it. We put white gouache on the tip and apply strokes with diagonal light movements.
8. Using a thin brush and dark gouache we depict a key of birds that fly away to the south.
9. We put a simple plastic bag on our hand and apply gouache on the bag in spots. Let's crumple the bag a little in our hand.
Now we apply this package in different places of our trees with sharp jerky movements. This is how we get leaves. The forest becomes more alive.
Easy autumn drawings for kindergarten
Drawing is a favorite pastime of even the smallest toddlers. Yes, sometimes it is difficult for children to clearly draw something specific. They lack experience and confidence. That is why this section presents works that are understandable to children. These pictures are easy to repeat. They don't have a lot of small details that toddlers usually miss.
You can use various tools to make leaf prints: corks, paper tubes, toothbrushes, kitchen sponge, cotton swabs, palms, real leaves. Kids love making prints.
The main theme of these drawings is autumn. And to highlight the beauty of this time of year, kids are invited to get acquainted with the bright palette of autumn colors. Children will also appreciate the fact that autumn allows freedom of choice of colors:
- Green;
- Yellow;
- Brown;
- Red;
- Brown.
And also blue, lilac and black. That is, it will not be difficult for kids to draw a real autumn.
Autumn drawing master class for children 2-5 years old.
Author
You will need:
- White pencil
- Thick soft brush
- Gouache
1. Using a white pencil on a blue sheet, draw the silhouette of a tree and grass.
2. Mix yellow paint with a small amount of paint. We put a large amount of paint on the brush and “poke” it on the crown.
3. Add more yellow, and again poke the brush randomly across the crown.
4. Mix white with yellow and ocher (or light brown), and also add green. We draw grass with strokes.
5. Add a darker green to the mixture and paint dark strokes on top of the grass.
6. Mix white, a little brown and blue. We get light gray and draw a birch trunk.
7. Now we apply pure yellow spots to the crown.
8. If desired, draw clouds.
9. Use brown and blue to make stripes on the birch trunk.
Video on how to draw a drawing of “autumn colors” for sketching
For those who like to draw pictures, there is a special section in this selection of autumn pictures. In fact, it is not so easy to copy a landscape from a ready-made sample. Here you need to consider:
- every detail
- sizes of individual items,
- the scale of the whole picture,
- naturalness.
In addition, the choice of color is at your discretion. Therefore, pictures copied from the sample can be safely considered independent works. It is you who bring the landscape to life, showing how brightly the sun shines, how the wind “walks” and how the foliage rustles.
It is worth paying special attention to the selection of colors for the design of the work, the name of which speaks for itself: “autumn colors.” Autumn is diverse, you can’t count the colors and shades in which the sky, bushes, trees and withered grass are painted. The entire color palette can fit on one sheet of paper when it comes to fall colors.
Drawing on the theme of golden autumn with colors
When it comes to golden autumn, the first thing that comes to mind is yellow with its variety of shades, from sand and lemon to the color of ripe tangerine. But this is not entirely true. And just as gold glitters and shimmers with all the colors of the rainbow when a ray of sun hits it, so the golden season can be not only yellow, but also red, and orange, and bright blue, and deep green. All these colors should form the basis of the work about the foliage shimmering in the last warm rays of the sun.
What will help make the drawing even brighter? Paints! They are the ones who are able to color a picture so as to accurately convey the beauty of autumn days. The paints produce richer colors and are easy to mix and match.
I offer a simple and very beautiful work on the theme “Golden Autumn”.
Author
Materials and tools:
- Acrylic or gouache
- Paper – watercolor or any thick sheet
- Brushes
- Sponge
Stages of work:
1. Using a large brush, pick up thick white paint and draw a circle. We take a little blue with some water and apply it along the edges, mixing a little with white. We continue to draw a circle, expanding it.
2. We should get a circle with darker edges and a light circle in the center. To do this, take blue, without mixing with white, and apply further, moving away from the white center. The blue blends smoothly into the blue to create a beautiful gradient.
3. Draw a horizon line - about ¼ of the sheet. We paint over everything above in a circle.
4. Using horizontal strokes, apply dark blue to the bottom of the sheet.
5. Apply horizontal strokes of yellow color in the center. It mixes a little with blue, turning out greenish.
6. Apply white on top of the yellow with light horizontal touches, going down to the bottom of the sheet.
7. Using a thin brush and liquid black paint, draw a tree trunk from the horizon line. We draw with curved thin lines. Do not forget that the tree itself and each branch are always thicker at the base and thinner towards its tip.
At the base we draw roots going into the ground.
8. Tear off a piece of sponge, pick up rich red, mixing it a little with yellow. By applying a sponge and sharply tearing it off, we apply paint. We set the trajectory as if the leaves are twisting around the moon.
9. Apply foliage to all branches with a sponge. We also apply fallen leaves on the sides below.
Now take a lighter color with a sponge and apply it on top of the red along the edge. In some places we leave a dark red color.
10. Take an even lighter, almost white one and make prints on top.
11. Using a brush, turn the tip of the curled ponytail into a moon.
12. Chaotically apply thick paint and a brush to the falling leaves.
13. The final touch is the stars. Apply semi-liquid white to the brush and splash the paint from the brush onto the drawing with your finger.
14. On the water below we enhance the white strokes - the reflection of the moon.