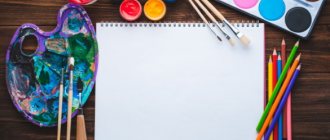
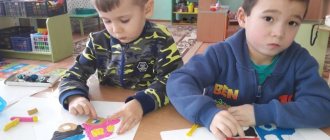
Skills acquired in childhood remain for life. Modeling classes are very useful for young children. They develop hand motor skills, calm fidgets, and teach the child the ability to occupy himself independently. Modeling develops imagination and fantasy.
Adults do not have to be able to sculpt well themselves in order to teach a child. We offer our own method for making plasticine figures using templates. With the help of pictures and descriptions under them, you will gradually mold the figures together with the children.
Plasticine goldfish step by step
In the middle group of kindergarten we suggest making a goldfish. The “Prestige” set for children's creativity includes not only yellow, but also gold plasticine. In this case, your fish will be truly golden. We show you step by step how to do this.
You will need: plasticine, plastic knives for it and a set of toothpick sticks.
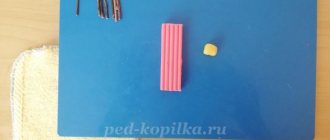
Roll a small ball out of plasticine.
Flatten it with your finger to make a circle.
Using a spatula, cut a circle on one side and turn the cut plasticine to the left and right sides, then use your hands to shape the turned pieces into triangles. The tail is ready.
Make another ball and attach a tail to it.
Make another ponytail and divide it in half. You now have a fin for the back. Attach it on top.
Make the circle smaller. Cut it in half, flatten it and mold each half into leaf-like figures.
It turned out to be two fins.
Attach them to the sides of the fish. Now take a toothpick and draw stripes on the tail and fins.
All that remains is to make the eyes. Form six small balls: two larger white ones, two smaller blue ones and two very small black ones.
Flatten the balls and stick large white circles on the goldfish’s head, then attach smaller circles to them and place black dots in the very center.
Do the same with the second eye.
The goldfish is ready. Stick it onto a piece of blue cardstock. Decorate the cardboard with pebbles and shells.
Lesson summary of fish sculpting in the middle group
| Author's full name | Title of the abstract |
| Temereva L.M. | “Goldfish” Educational objectives : learn to sculpt a fish from plasticine, convey its characteristic features, improve the techniques of pulling and flattening, designate fish scales using a stack and a felt-tip pen cap, learn to maintain proportions between parts. Developmental tasks : clarify ideas about the appearance, lifestyle, habits of fish, develop imagination. Educational objectives : to cultivate perseverance, patience, and the desire to discuss the results of one’s work. Integration of educational areas : “Artistic creativity”, “Cognition”, “Communication”, “Socialization”, “Health”. Demonstration material: pictures of fish, seascapes, audio recording of the sound of the sea. Handouts: plasticine, stacks, modeling boards. Course of the lesson: Relaxation moment: at the beginning of the lesson, pleasant, calm music sounds. Children stand holding hands in a circle. The teacher wishes everyone good morning and offers to pass on a piece of his warmth to each other. The teacher invites preschoolers to go to the land of Fantasy, where they can learn a lot of new and unusual things. The sound of the sea surf sounds - the children “find themselves” on the seashore. The teacher reports that in the land of Fantasy there lives a kind sand prince who protects her from evil. He knows many fairy tales and games, but will only play with those who follow his rules. A surprise moment - the Sand Prince doll appears, who tells the children that in his country it is forbidden to fight, bite, or offend others. A character asks a riddle about a fish. I have wings, but I don't fly. I have eyes, but I don’t look at the sky. I have a mouth, but I don't speak. I shine in the clean river, with a silvery back. Who am I? (Children's answers) The teacher shows the children a toy fish (a fish is also offered to each child). They examine it, clarify its properties: color, size, body shape. The children and the teacher find out that it is a goldfish. In addition, they name other fish known to them (pike, perch, crucian carp, catfish, etc.). There is a conversation about why fish need a tail, fins, whether they have eyes, what the body is covered with, whether the fish can speak. Physical education |
| Show me how fish swim. The fish swam and dived in the blue sea water. They will come together, they will separate, and then they will bury themselves in the sand. | hands in front of the chest with folded palms, running in all directions, bending, approaching, diverging, squatting |
The Sand Prince informs the children that there are fish that are edible for humans, and there are dangerous ones that can inject or give an electric shock. The following is a short experiment to find out how fish see in water: you need to bring a jar of water close to your eyes and examine the objects that lie in it - their shape is distorted and their size increases. Next comes the direct motivation for productive activity: The Sand Prince asks the children whether it’s boring for one fish to swim in the sea. He offers to make friends and girlfriends for her, with whom the goldfish will not be lonely. In addition, they will fulfill the wishes of children. Demonstration by the teacher of modeling techniques ( sculptural method ). You need to roll the ball, then flatten it into an oval. You need to pull off the nose from one end, and the tail from the other. Using the stack, the tail and fins are drawn. You can use a felt-tip pen cap to stamp the scales, and mark the scales using cereals (barley, rice or buckwheat). Before productive activities, the teacher conducts finger gymnastics “Fish” with the children.
| The fish swims in the water, the fish has fun playing. | With their palms clasped together, children depict how a fish swims. |
| Fish, fish, mischief | they shake a finger |
| We want to catch you | slowly bring your palms together |
| The fish arched its back | again we depict how the fish swims |
| I took a bread crumb | make a grasping movement with both hands |
| The fish waved its tail. The fish quickly swam away. | sailing again |
Children can work independently while listening to calm music. The teacher guides the preschoolers and gives advice. At the end of the lesson, the crafts are analyzed, the teacher asks what the children would like to ask the goldfish for. Children talk about their desires, and the teacher writes them down.
Gorbenko N."Different fish" The lesson begins with a riddle about fish. The teacher tells the children about fish and specifically dwells on those that live in the aquarium (goldfish, angelfish, parrot fish, etc.). An aquarium is a whole world, there are pebbles, shells, and underwater plants. Next is a physical education session “There are clouds in the blue sky...”.| A river runs under the mountain | crouched down, arms extended forward |
| Early in the morning, fishermen are pulling nets from the river | imitate movements - as if sorting through a network |
| Caught a lot of fish | arms spread to the sides, |
| We cooked delicious fish soup | Circular movements with your hands, as if stirring your ear |
Preschoolers sit at tables, each has a picture of a fish, they look at them and discuss with the teacher the color, structure, purpose of body parts. The teacher demonstrates to the children the techniques of sculpting a fish ( using a constructive method) : the head, body, fins, eyes and mouth are formed separately. After independent productive activities, children are given physical education again.
Markova N.V."Fish and algae in the underwater world" (collective composition) One of the objectives of the lesson is to decorate fish figurines with moldings and cut-out designs (counter-relief). A special feature of the lesson is that the teacher prepares in advance the basis for the composition - an aquarium (as an alternative - 3-4 transparent jars or glasses). In addition, to create crafts you will need cocktail straws, toothpicks, caps from pens or felt-tip pens. At the beginning of the lesson, the teacher conducts a didactic game “What has changed”: he lays out several fish from geometric shapes on the board, then asks the children to close their eyes and changes some details. Preschoolers must guess what has changed. Another game “Make a fish”: an oval (the body of a fish) is placed on the board; tails and fins of different shapes can be attached to it. Then the teacher switches the children from a conventional schematic image to an artistic one and demonstrates 2-3 fish that he sculpted in advance. The teacher explains sculpting techniques and invites the children to sculpt beautiful fish to fill the aquarium with them together. Preschoolers sculpt fish in any way (constructive, plastic or a combination), and then decorate them to their liking: with spots of flattened plasticine balls of a different color, plasticine flagella, sparkles, seeds, cereals. The teacher also shows how to decorate the craft with a stack or a felt-tip pen cap. For the children who quickly completed the task, the teacher advises them to make algae and pebbles for the aquarium so that the fish can live comfortably. At the end of the lesson, the fish are placed in a common aquarium. Some of them are attached to the walls (slightly pressed), others are strung on cocktail tubes or toothpicks attached to the bottom).Cockerel fish - step-by-step modeling
We show you step by step how to make another fish – the Cockerel.
You will need a piece of plasticine and a plastic knife.
Make a ball out of plasticine.
Roll a sausage out of a ball. Round the edges of the sausage, then flatten the figure a little. Step back a little from the edge and use a knife to make a vertical cut. You have outlined the head.
Make four small balls of different sizes. Mash them with the pad of your index finger so that you get circles and stick them on top of the fish’s body. The dorsal fin is ready. Roll a larger ball, knead it, cut off half and form the lower fin. Attach it from below to the body of the fish.
Now use the end of the knife to draw stripes on the upper and lower fin and tail.
Using a knife, make numerous indentations on the body of the fish that imitate scales.
All that remains is to mold the eyes and mouth into a tiny bow.
The fish is ready.
Step-by-step photo lesson:
Summary of the direct educational activity “Dymkovo toy” (middle group)
The fish can be made of plasticine of any color. One option is enough. You will also need rhinestones or beads to make shiny eyes. The main tool is the stack.
Cut the required amount of plasticine from the block and roll it into a ball.
Draw the ball out into a bullet, then lightly press the rounded piece onto a hard surface to make it flatter. Turn one side into a head, marking it with the same stack.
To create the fins, place small cakes on top and bottom in a row.
Use a stack to create membranes on the fins.
Attach the fish tail to the back, also finishing it with a stack.
Think about how you would like the scales on the fish's body to look. You can stick plasticine on top, placing small dots overlapping. And we suggest simply piercing the soft plasticine with the tip of the stack many times over the entire surface of the craft.
The final touch is the design of the fish’s face. Stick on shiny rhinestone eyes and attach a mouth.
A plasticine fish is ready to surf the waters. Take some water into a children's bucket and put the fish in it. Plasticine does not become limp from water, so such activities can be practiced.
Familiar plasticine fish
? Of course, this is the famous Dory - the sweet but forgetful heroine of the popular cartoon. Now you can make it yourself to create even more exciting adventures!
Conduct a simple modeling master class with your child to develop his fine motor skills, perseverance and accuracy. The result of your joint creativity is a neat figurine that exactly replicates the original from the big screen.
Hammerhead shark made from plasticine in stages
Hammerhead specimen
Take 2 pieces of plasticine - gray and white
From a gray piece, form a sausage, one end of which is wider, and the other is elongated and narrowed.
Roll a narrow short sausage, flatten it a little, shape it into a narrow elongated rectangle and attach it to the wide end of the body. The result is the head of a hammerhead shark.
Cover the bottom of the shark's body with white plasticine, this way you will outline its tummy.
Now you need to make a tail and seven fins - 4 small and 3 large. We form circles from the balls and divide them into two parts. From each half we make a small triangle-fin.
We attach two fins on top, two on the bottom and four on the sides and a tail.
We attach the eyes to the side of the hammer head.
Hammerhead fish in finished form.
Plasticine aquarium (craft)
When my eldest daughter was four years old, she and I made an aquarium with plasticine fish in a plastic cup.
A couple of days before, I needed something to keep my child occupied for a while. I cut a green plastic bottle into pieces and showed my daughter how to melt them over a candle flame (this can only be done under adult supervision, observing safety precautions). She held pieces of plastic to the candle with toy pliers. She enjoyed the activity and we ended up being the proud owners of a handful of clear green plastic “jewels.”
My daughter came up with the idea of using melted pieces of plastic as the tail and fins of a fish. It turned out unusual. She completely molded the rest of the fish and the octopus from plasticine, and I made eyes for them.
We glued together some pieces of melted green plastic with plasticine and attached them to the pebbles - we got algae for the aquarium. One of the algae bushes looks more like a Decembrist houseplant, but in the photographs with the aquarium it is almost invisible.
We poured several small stones and pieces of mother-of-pearl from river mussel shells into the bottom of a transparent plastic chocolate paste cup. Lastly, they placed the stones with algae attached to them.
Plasticine fish were glued to the inside walls of the glass. One of the fish was glued to a mother-of-pearl “underwater rock”, and another one was glued to a short thin strip of transparent plastic, the other end of which was attached with plasticine to the stone. The stone with this fish was placed at the bottom of the glass in the center. And then they poured water into the glass. To prevent the water from evaporating, the glass was closed with a transparent lid.
How to make an aquarium from plasticine in a jar
Such an aquarium can be made in a glass jar with a screw-on lid: a baby food jar, a coffee can, a half-liter or even a three-liter jar.
Glue fish and algae from plasticine to the inside of the jar, mold stones (or put real ones on the bottom), pour water, close the jar with a lid.
You can “place” several fish in the aquarium.
Or just one fish.
The jar can be placed with the lid up or, conversely, with the lid down.
Aquarium in a jar with plasticine goldfish
Older children can make a goldfish from plasticine.
To sculpt a goldfish you will need orange, yellow and black plasticine. Tools include a glass and a drinking straw to make scales. The manufacturing principle is the same as described in the third method - sculptural modeling.
In a jar of water, such a fish looks almost like it’s alive, especially when viewed from afar.
Aquariums made of plasticine on cardboard, lid, disk, etc.
It’s even easier to make fish for flat crafts with aquariums: just smear plasticine on the surface (as in the “Underwater World” craft).
But you can make fish separately using any of the methods described above, and then glue them to a cardboard aquarium.
Or make an aquarium from a transparent plastic lid from a dairy cup (before this, prepare the background by tearing off small pieces of blue or blue plasticine and smearing them on the lid).
In the same way, you can make aquariums from computer disks, disposable plates, polystyrene foam containers, etc.
An aquarium made from a disk can be placed on a stand made of a piece of plasticine or a cardboard ring (read how to make it in the article “Triangular Christmas tree made of cardboard”).
It is convenient to make flagella for algae with a syringe (article “Flagella from plasticine”).
I suggest you look at other articles:
- about crafts made from plasticine (salt dough),
- about crafts with fish,
- about books on plasticine modeling.
© Yulia Valerievna Sherstyuk, https://moreidey.ru
All the best! If the site materials were useful to you, please share a link to them on social networks - you will greatly help the development of the site. Posting site materials (images and text) on other resources without the written permission of the author is prohibited and punishable by law .
Check out other interesting articles:
- Bullfinch - a Christmas tree toy made of self-hardening plasticine
- Children's craft for the New Year from plasticine: Christmas tree
- DIY food for dolls: pizza. Master Class
- Braided fish made from strips of paper or ribbons
- DIY miniature dishes for dolls
- Plasticine monkeys
- Pigs are magnets (2 options)
- Crafts from Kinder surprises: pig
- DIY Christmas magnets and Christmas tree decorations
- Plasticine butterfly
- Plasticine horse - children's craft
- Pine cone - DIY kinder Christmas tree toy
Plasticine fish on cardboard - plasticineography for children
For children in the older group of the kindergarten, we invite them to do more complex work - plasticineography or plasticine appliqué on paper. Such figures can be sculpted flat or three-dimensional, leaving thickness. On this topic, we suggest making a plasticine fish on paper.
Roll into a ball. Place it on the cardboard and use the pad of your index finger to flatten it to form a circle.
Now use a knife to cut the circle into 4 parts, as shown in the picture. The result was fins and a tail.
Attach them to the fish's body.
Using a comb, apply stripes to the fins and tail of the fish.
Using a cup, make a notch on the body of the fish as shown in the picture. The result is a head.
Blind your mouth and eyes. Using the back of a pen or pencil, make small indentations imitating scales. Plasticineography is ready.
Clown fish - step-by-step master class
Among the beautiful aquarium fish there is a clown fish. It is characterized by bright stripes on its body. This job is more difficult than the previous ones. We suggest making such a craft with children in the senior group of kindergarten or first grade students.
Take 3 pieces of plasticine - white, yellow and red and a plastic knife.
Form a wide sausage from red plasticine, one end of which is slightly wider than the other.
Roll into small balls. Leave one, and make leaves of different sizes from the rest. Connect two larger ones into a ponytail, make a dorsal fin from four small ones, and a lower fin from the largest last one.
Attach all the parts to the body of the fish.
Using a knife, draw stripes on the tail and fins.
Decorate the fish with yellow stripes of different lengths and widths, as shown in the picture.
Use the end of a knife to make indentations-scales.
Add an eye, cut out a mouth. Your clown fish is ready.
Or this simple master class on sculpting a clown fish.
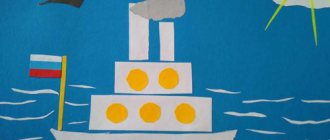
Various options for crafts with comments and descriptions of execution methods
Most of the fish (photos 1–6) are made using a combined method: the head and body are sculpted from one large piece of plasticine, while the remaining elements (tail, fins, eyes) are attached separately.
The fish in photo 4 “Goldfish” looks very impressive - a beautiful long red tail, detailed scales and bulging beady eyes.
Photo 5 “Aquarium with fish” shows modeling using the bas-relief method - the fish are attached to the surface, protruding approximately halfway. The original composition is complemented by pebbles, shells and algae.
The “Magic Fish” craft is of interest (photo 7): the body is made of a twisted flagellum. The gradient color (transition from pink to lilac) will look interesting.
Photos 9 and 10 show volumetric aquariums. Sea creatures are attached to the walls of the cans or fixed in the center on special fasteners.
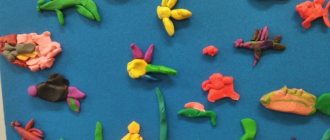
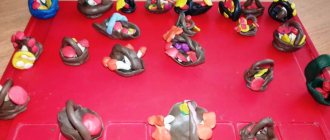
Photo gallery: finished works of children
Crafts from plasticine
Plasticine craft
Crafts from plasticine Plasticine with bead decoration Bas-relief modeling
Crafts from plasticine Fish created using an unusual technique Craft from plasticine Craft Craft
Video: sculpting “Goldfish”
https://youtube.com/watch?v=SaqF0GjJJ-0
Video: plasticine fish
https://youtube.com/watch?v=oPxRnrAsDeo
Video: cartoon “Wow, the talking fish” (1983)
Video: cartoon “In the blue sea, in white foam” (1984)
https://youtube.com/watch?v=wCpIuwelvwk
Video: “The Tale of the Fisherman and the Fish” by A. S. Pushkin
Most preschoolers love to sculpt, because this is an opportunity to create a new toy for themselves. Object modeling, which includes creating a fish, will certainly captivate children in the middle group, especially if the teacher introduces them to various options for creating the image of sea creatures. And the use of additional materials will make the lesson bright and memorable.
Cartoon fish with big eyes for kids
Sample of a finished fish with big eyes.
Roll a ball out of plasticine.
Flatten the ball a little and form a figure in the form of a truncated circle. Warm it in your hands and knead a piece of yellow plasticine well, tear it into 4 different pieces of irregular shape. Shape the pieces into different leaf shapes.
Attach the tail and top fin. Apply stripes on the fins and tail. We form thin sausages from pieces of green plasticine and attach them to cardboard on both sides of the fish, then flatten them a little. The result was seaweed.
Sculpt eyes from 2 flat pieces of plasticine - blue and white.
Finish the eye - add a black pupil, a white highlight and long black eyelashes. Add two small circles for the mouth.
Sample of the finished figurine.
Whale
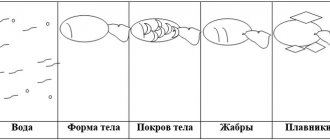
In 1st grade modeling classes, we offer to model a more complex fish using a template. To make the fish more believable, first tell us a little about it.
Sample figurine of a fish-whale.
Take a piece of blue plasticine and a plastic spatula.
Roll one large ball and four smaller ones.
From a large ball, mold the body of a fish in the shape of a thick leaf, one end of which is rounded and the other elongated and pointed. Form leaf-shaped figures from four small balls.
Attach the tail and fins to the body of the fish.
Turn the craft on its side, cut the plasticine in front, as shown in the picture. The whale has a mouth. Sculpt your eyes.
Using a spatula, draw stripes on the back and fins of the whale.
We make three thin sausages and connect them together on the whale’s head. The result is a fountain of water that the whale releases when breathing.
Finished blue whale specimen.