Summary of visual activities in the middle group. Topic: dishes drawing cups and saucers.
Yulia Ismailova
Notes on visual activities in the middle group. Topic: dishes drawing cups and saucers.
Form a correct idea of tableware , its purpose, learn to differentiate objects within the same type ( teaware , tableware, kitchenware; when examining an object, learn to identify parts as an identifying feature;
Develop the ability to hold a brush correctly;
to form in children a holistic artistic understanding of the role of dishes in human life and the desire to make the surrounding objective world beautiful;
Cultivate perseverance and accuracy when working with paints.
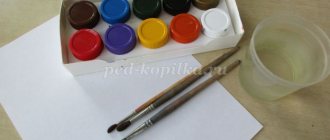
Album sheet with a picture of a cup and saucer , brushes, paints, napkin, jar of water.
Conversation about dishes , looking at illustrations, looking at samples of dishes made from different materials.
Preparatory stage
A distinctive feature of children 3–4 years old is increased restlessness and activity. Therefore, when preparing a lesson, the teacher must carefully consider the organizational aspects of the work so that every minute is in activity, but there is no monotony. In general, there are no trifles in preparation.
What colors and base should I choose?
Many kindergarten teachers working in senior and preparatory groups note that many children are reluctant to take up drawing. And this is due to the fact that at a younger age, when the little ones were just beginning to get acquainted with visual arts, the wrong materials were used. Namely pencils or watercolors. The fact is that even experienced artists consider watercolor to be a very difficult material, and it is not at all suitable for first artistic experiments.
Nevertheless, reasonable price and availability make watercolor the most popular material for drawing in kindergartens.
Gouache is considered the most convenient material for children's creativity.
As for pencils, in classes in the middle group (and in the junior group too) you can use only soft leads. If we talk about the recommended types of visual materials, then these are gouache and wax crayons - with their help, kids don’t have to put in a lot of effort to get a picture, they “draw on their own.” Separately, it is worth mentioning the use of felt-tip pens. They are used only for outlining and drawing accents of the pattern (for example, when creating a plate design). But they are not used for coloring.
This is interesting. Many methodologists prohibit the use of felt-tip pens in kindergartens, citing the fact that with their help it is impossible to explain to little artists the possibilities of full color rendition of shades, as well as to create elementary shadows.
As a base, it is better to use regular printer paper or thin cardboard in A4 or ½ A4 format (if the composition is a group one, placed on a common backing).
What techniques and techniques can be used?
At 3–4 years old, children can trace with a pencil ready-made stencils of simple shapes (that is, without small details), as well as make simple sketches of geometric shapes from life.
Unlike non-traditional techniques, traditional ones give a more complete idea of the shading capabilities of the palette
From this we can conclude that both traditional and non-traditional drawing techniques can be used for classes. However, it is the traditional ones that provide the opportunity to comprehensively develop fine motor skills, as well as cultivate a sense of color. Classic techniques suitable for the average group are
- coloring template pictures;
- adding details to the finished image (for example, children add a pattern to the finished drawing of a plate);
- tracing and coloring the stencil;
- drawing simple shapes from life.
This is interesting. Experienced methodologists believe that drawing from life can only begin when children have already mastered tracing and painting stencils well.
If we talk about techniques, then in the middle group they rely on the fact that the limiters of the image are the points of the depicted object, and not the edges of the sheet. Thus, the following techniques can be used:
- painting small and large parts of the image;
- drawing thick lines with an inclined position of the brush, resting on the entire pile;
- drawing thin lines with the brush in a vertical position, touching the paper with only the tip of the bristles;
- working with shades, in particular, obtaining the desired color through classic combinations (for example, white and red for pink);
- painting an image with the pencil in an inclined position relative to the sheet.
Photo gallery of drawings on the theme “Dishes” using non-traditional techniques
You can use regular cotton pads for the stamp base.
To paint using the poke technique, you can use cotton swabs or brushes.
The finger painting technique allows you to paint dishes with contents so that they seem voluminous
Pokes in one picture can be of different colors
Additional types of visual activities
The task of the aesthetic development of children in kindergarten is to give an idea of different types of visual activities. But since children show varying degrees of interest in drawing, appliqué, modeling, etc., the implementation of the task is facilitated by a combination of creative methods. Drawing can be called a universal type of work, as it combines perfectly with other types of fine art. Thus, brushes and pencils can be “made friends” with
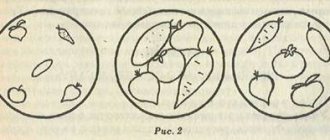
- natural material (for example, in the form of fruits and vegetables on a plate);
- pieces of fabric (for finishing cups and saucers);
- plasticine (both as decoration for dishes and to imitate the contents);
- colored paper.
This is interesting. It is important for a teacher who involves additional types of visual activities to remember that they are “additional”, that is, they should not be assigned a role greater than that required by the task of decorating dishes.
How to personalize a task?
At all stages of educational activity, the teacher must find ways to implement an individual approach. Finding them in kindergarten, on the one hand, is not easy, since all toddlers are at approximately the same level of development. But on the other hand, children have not mastered many skills, so their range of interests is not very wide. In a drawing lesson on the topic “Dishes”, you can individualize the task, leaving it to the little artists
- choosing a color scheme for the picture;
- background of the substrate (especially if colored sheets of paper or cardboard are used as the basis);
- additional ways to decorate the drawing (with pieces of plasticine or colored paper confetti).
After a detailed explanation of the task, the teacher gives the children maximum creative freedom
Individualization makes children feel like adults and independent. So a simple task to prepare the necessary materials for work, laying everything out near your work places can play along with this.
The place of the topic in calendar and thematic planning
The topic “Utensils” in the middle group is studied in different interpretations. So, when studying the fairy tale about Pinocchio, children draw Malvina’s favorite cup, and after discussing household items that are in every home, they sketch plates and tea pairs. The teaching staff of an individual kindergarten determines the topics of classes depending on the place given to drawing in the context of other classes. If we talk about a generalized version, then the wording may sound like this
- “Little Bear’s Cup” (when studying the fairy tale “The Three Bears”);
- “Treats for the doll” (children draw the fruits or vegetables they have studied on a plate);
- “My mom’s favorite cup” (for example, as a card for mom for Mother’s Day or for March 8);
- “What does the pattern on the plate tell you?” (after getting acquainted with the country's folk crafts);
- “Cup and saucer for a doll” (a universal topic, since it can be used after repeating simple geometric shapes, and in the context of talking about household items that we cannot do without);
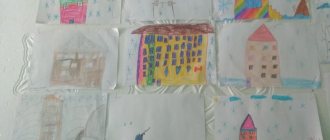
- “Tea party with friends” (an option for group work, when children draw cups, and then the finished drawings are hung on a common background - the dining table);
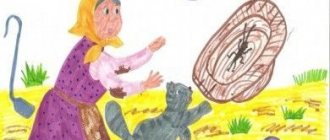
- “Runaway Dishes” (when studying Korney Chukovsky’s fairy tale “Fedorino’s Grief”), etc.
On the topic: methodological developments, presentations and notes
Goal: creating conditions for the formation of a holistic idea of tableware, its diversity in purpose, use. Objectives: Expand children's ideas about tableware, its purpose, history of origin.
Summary of direct educational activities in the preparatory group on the topic of speech development with elements of theatrical performances.
Summary of a lesson on speech development “Journey to the Land of Dishes” Middle group.
Goal: to develop in children the habit of behaving correctly on the roads, to educate them as competent pedestrians who use reflective elements (flickers) when moving in traffic.
Source
Side view
Now you can figure out step by step how to draw a plate from the side with a pencil:
- The first step is to use lines to determine the boundaries of the future main oval;
- Draw an oval;
- Moving slightly upward, mark the boundaries of the bottom inside the oval;
- Then remove the bottom and bottom of the dish;
- Shade the darkest areas, leaving highlights;
- Lightly shade the edges, trying to smoothly transition from dark to light shades;
- Make the overall picture more saturated with color;
- Make the bottom of the plate more rounded;
- Highlight the near edge with a dark thick stripe;
- Refine the highlights to make them look more natural;
- Paint over the untouched areas with very light strokes, leaving only some places unpainted;
- Draw the shape on the bottom using light strokes.
All! The plate shown on the side is ready!
Preview:
MBDOU "Burevestnikovsky kindergarten"
Summary of OOD in the middle group
"Journey to the Land of Dishes"
Summary of visual activities in the middle group. Topic: dishes drawing cups and saucers.
Form a correct idea of utensils and their purpose.
Develop the ability to hold a brush correctly;
to form in children a holistic artistic understanding of the role of dishes in human life and the desire to make the surrounding objective world beautiful;
Cultivate perseverance and accuracy when working with paints.
Templates for cups and saucers, brushes, paints, napkin, jar of water.
Stages of working on a drawing
“A pair of tea - a plate and a cup - for mom”
For this drawing you will need paints and markers. The basis of the picture is cut out templates. The task can be either individual or collective, for example, creating a set for mothers.
When doing this drawing, children learn to paint the background evenly
Instructions
- The teacher gives the children cut out cup and saucer templates.
- “Make a background with paints on the pair.”
- While the background dries, children perform finger exercises or physical education.
- “Now use felt-tip pens to draw the outline of the dishes and complete the pattern.”
- “Please note that the pattern must be the same and positioned symmetrically.”
This is interesting. As a way to individualize the task, children with confident visual skills can draw decor in the form of berries, fruits (for example, cherries, apples), and those who are not too strong in drawing can draw zigzag lines, dots, etc.
"My favorite cup"
To complete this drawing, children use the technique of dipping, which they will learn in more detail in the older group. At this stage, they just make bold dots with the tip of the brush. The drawing is made on a cut out template.
To complicate the task, you can invite the kids to make a background on the cup
Instructions:
- The teacher distributes cut out templates. If children know how to use scissors, they can cut out pictures on their own.
- “Dip the brush into a lighter color of paint and make a few dots, touching the sheet only with the tip of the brush.”
- “We wash the brush and dip it in paint of a darker shade, making dots again.”
- “We make sure the dots don’t merge.”
- “Let the drawing dry.”
"Service for Malvina"
To complete this composition, children use rulers with cut out stencils of a square, triangle and crescent. The ruler should also have a raised side to create a wavy line.
“Service for Malvina” helps children develop their ability to draw using a stencil
This is interesting. An option for individualizing the task could be to use a broken appliqué to decorate the dishes, as on the blue service.
Instructions:
- Children receive cut-out cup and saucer templates on a napkin.
- “Using a ruler, we draw crescent-shaped patterns on the tablecloth.”
- “We make a pattern using a stencil ruler.”
- “We paint the spout, handle, lid of the teapot, as well as the handle, bottom and inside of the cup with the same color.”
- “We paint the service, adding the necessary details of the pattern.”
Video. How to draw a cup and a teapot
On the topic: methodological developments, presentations and notes
Summary of a lesson on visual arts in the middle group Topic: “Near Lukomorye there is a green oak tree” (thread painting, drawing with a glue brush, foam rubber). Program content: teach children to draw.
Summary of a lesson on visual arts in the middle group Topic: “Let's help the bunny hide” (with elements of unconventional drawing).
Summary of joint visual activities of middle group preschoolers using non-traditional techniques of drawing “wet on wet” and “colored blots”. I know.
The abstract contains information about the images, subjects, types of composition and originality of the Gorodets ornament characteristic of this painting, the stages of painting, as well as the peculiarities of introducing doshk.
Outline plan for visual activities in the middle group. Topic: “Kokoshnik for the Snow Maiden.”
Plan-Summary for visual activities in the middle group Topic: “Spring is red” (non-traditional visual technique) Prepared by: Educator Pavlova T.Yu. Purpose: Formation in children of.
Source
With painting
In order to depict a plate with Gzhel painting, you need to know at least a little about this technique.
Gzhel is a folk art that is used in the manufacture of dishes, figurines and many ceramic products. The technique uses only blue-blue shades.
If you practice a little, you can learn how to paint a plate with Gzhel even for children. In the version below, the center of the decorative plate will be decorated with a large flower.
It will be complemented by small elements that give the composition a finished, beautiful look.