How to mold a girl from plasticine.
Children are of great interest in sculpting all kinds of figures. This is useful in itself, as it develops motor skills. During sculpting, the child’s imagination develops. It is easy to sculpt all sorts of different people. The girl's facial features are difficult to draw for a person who does not have the skills of an artist. Easier to make from plasticine. To do this, you need to correctly place the elements of the face: nose, mouth, ears, eyes and add hair to the dress and bows. The result will be a beautiful little Cinderella.
We offer you a step-by-step process of sculpting a figurine of a girl from plasticine.
To perform sculpting you need to prepare:
- modeling board;
- plasticine set;
- stack;
- a drawing of the girl you will make;
- thin sticks or matches.
Place a sheet of paper with a drawing in front of your child. Ask him to provide red plasticine for making the body - a dress.
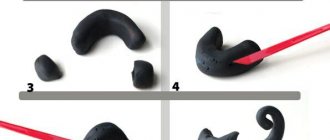
To sculpt the body, which will immediately be dressed in a dress, knead a piece of this plasticine and roll out a ball of the required size from it.
Form a cone from the resulting kolobok. Make a wavy edge on the bottom with your fingers, as shown in the picture.
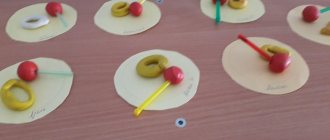
Roll out 14 yellow koloboks with your child. Pressing with two fingers, flatten them and attach evenly along the entire contour of the dress. The result was a polka dot dress.
Cut a piece of yellow plasticine and form a round collar. Using a stack, make indentations around the collar. Use a match to attach it to the body. Leave the top edge of the match free.
Cut two strips of red plasticine and roll into thin cylinders. Form handles from them and attach them to the body.
Roll a ball of flesh-colored plasticine. In the future, it will become a head.
Attach the plasticine mouth, nose, eyes, eyebrows, cheeks in the right places as shown in the figure.
Ask your child to roll red plasticine balls. Form bows from these balls. Cut brown strips and roll them into thin cylinders of varying lengths and thicknesses. Connect all the cylinders into three bundles. The result was braids.
We attach the elements of the banner and braids to the head.
We connect the head and body with a match.
Roll out two yellow sausages. Attach the top edge of the sausages to the body. Place shoes on the bottom edge. To make them, roll two balls and flatten them to form shoes.
This is such a cute girl made from plasticine. Ask your child to give her a name and you can safely start playing.
If you find an error, please select a piece of text and press Ctrl+Enter.
Olesya Selikhova
About the author: Psychologist, specialist in the field of family relationships and raising children. I love drawing, modeling, needlework and any interesting creativity. Mother of two children and a wonderful wife!
human figures
Share with friends:
We also recommend watching!
Modeling Homer Simpson from plasticine
How to make a city from plasticine.
Summary of a lesson on modeling in the middle group using natural materials
Publications on the topic:
Summary of a lesson on plasticineography using natural material “Fur coats for hedgehogs” Club lesson in the 2nd junior group on visual arts using non-traditional techniques: - plasticineography - testoplasty.
Summary of a lesson on modeling using waste material “Hedgehog in a clearing” Learn to convey the image of a hedgehog in collaboration with a teacher, using plasticine and waste material. Let's imagine that we are going for a walk.
Photo report from a lesson on sculpting from natural materials “Forest Dwellers” This week the children and I held a lesson on sculpting using natural materials. To begin with, we discussed who and what can be made from.
Summary of an integrated lesson in the middle group “Autumn” using applique from natural material (video report) synopsis of an integrated lesson in the middle group on the topic: “Autumn” using application from natural material. Objectives: 1. Educational:.
Notes on modeling using natural materials in the middle group "Hedgehog" Notes on modeling lessons in the middle group Topic: "Hedgehog" Goal: Continue to teach children to create the image of a hedgehog and use natural materials.
Summary of educational activities in the middle group on modeling using natural materials Topic: “Autumn Forest” Integration of educational areas: Cognitive. Social and communicative. Artistic and aesthetic. Speech.
Summary of a lesson on designing from natural materials in the middle group “Butterfly” Summary of a lesson on designing from natural materials in the middle group “Butterfly” Objectives: • To cultivate interest in constructive activities.
Summary of a lesson on designing from natural materials in the middle group “Owl” Goals: • continue to teach how to improve work on paper; • develop creativity and imagination; • develop fine motor skills.
Summary of a lesson on modeling using natural materials “Journey to the Forest” (senior group) od. Artistic creativity. "Journey to the Forest" in the senior group. Integration of educational areas. Cognition, Communication, Socialization,.
Abstract of the GCD for sculpting from natural material “Dragonfly” - Introduce children to the features of the appearance and lifestyle of the dragonfly. -To consolidate children’s knowledge about the structure of an insect: three pairs of legs.