Learn to draw animals with a pencil step by step
Drawing animals step by step for children of any age is a fun game. They love to watch how a familiar animal is formed from simple elements that appear according to an algorithm, as if by magic. And when adults allow you to repeat the demonstrated miracle, the child receives great pleasure from both the process itself and the result, because it is just like a real artist!
Teaching children drawing tricks
Unconventional technique of drawing animals
NON-TRADITIONAL TECHNIQUES FOR DRAWING ANIMALS
PREPARED BY:
TEACHER OF SUROOK KINDERGARTEN “SOLNYSHKO”
GRIGORYEVA T. A.
2019
The use of visual activities of the animal world in the process of teaching children confirms the need to instill a love for animals from childhood, to draw the child’s attention to the beauty of the animal, to its benefits, to maternal care for the cubs, to the feeling of affection with which it responds to any kind attitude. Introducing preschool children to the animal genre allows them to solve both cognitive (the appearance, habits and behavior of animals, their character) and educational tasks (love and an attentive, sensitive attitude to the animal world, the desire to protect and preserve nature).
Drawing animals is a very interesting and at the same time complex process. Using only traditional techniques when depicting animals does not allow children to develop their creative abilities more widely. They do not contribute to the development of imagination and fantasy. Drawing with unusual materials and original techniques allows children to experience unforgettable positive emotions. The result is usually very effective and almost does not depend on skill and ability. Non-traditional methods of depiction are quite simple in technology and resemble a game. What child wouldn’t be interested in finger painting, making a drawing with his own palm, putting blots on paper and getting a funny picture? .
FINGER PAINTING
Material:
Tinted or white paper, gouache paints, brushes (for additional elements), rags
(
for wiping hands
)
.
Progress:
The kid dips his finger into the gouache and puts dots and spots on the paper.
PALM DRAWING
Material:
Tinted or white paper, gouache paints, brushes (for additional elements), rags
(
for wiping hands
)
.
Progress:
We dip the child's palm in paint and make an imprint on the paper. You can “paint” your palm in different colors with a brush. To develop imagination in older preschool age, you can invite children to print a palm, then carefully examine the drawing and think about what it looks like, how the drawing can be transformed, changed by adding the missing details. And create a new image.
PALM DRAWING
DRAWING WITH THE “POKE” METHOD
Material:
A lead pencil with an eraser at the end, a white bristle brush, a felt-tip pen tube with inserted foam, white paper, a plate, gouache.
Progress:
Gouache is poured into plates. Then, using the manufactured “poke”, paint is applied to the image, first along the contour, then the internal image. Using a bristle dry brush, you can use a poke to paint animal fur. The variety of images depends on the chosen material for the poke.
POINTILLISM
Pointillism
- a very interesting and unusual direction of painting in the form of a manner of painting pictures with separate strokes of a regular, dotted or rectangular shape.
Material:
cotton swabs, felt-tip pens, gouache, stencils.
Progress:
We take felt-tip pens of the required colors and begin to fill the entire drawing with “bubbles” (circles).
We take a cotton swab, first dip it in water, then in gouache and use the “poke” method to fill the entire drawing with the corresponding colors.
PAMPING
Material:
foam rubber, liquid gouache paints, plate.
Progress:
The ink pad serves as a palette. To change the color, you need to take a different foam. Using this technique, it’s good to draw something fluffy, light, airy, and transparent.
DRAWING WITH A CANDLE
Material:
Candle, paper, brush, paints.
Progress:
Place the drawn outline drawing under a thin landscape sheet. Trace the outline with a candle on top, then apply paint.
DRAWING WITH WAX CRAYONS
Material:
wax crayons, paints, paper
Progress:
First you need to draw a “wax” picture, and then paint over it with watercolor paint. The watercolor rolls off the thick brushstroke of the pastel and remains only on a blank sheet of paper. The emerging pattern is very bright, all the strokes and lines are visible.
SPRAY
Material:
old toothbrushes, gouache, paper, silhouettes.
Progress:
A little paint is collected on the tip of the brush. Tilt the brush over a sheet of paper and run the cardboard or comb over the pile. The splashes will scatter across the clean sheet. You can also cut out any silhouette and place it on a piece of paper and spray paint. Then remove the silhouette and you will be left with a trace; you can supplement it by painting on the missing lines with a brush.
SPRAY
DRAWING ON CRUMPSED PAPER
Material:
paper, gouache, brushes, a jar of water, pencil.
Progress.
Crumple a clean sheet of paper with your hands and smooth it out. Draw the intended drawing. This technique is interesting because in the places where the paper is folded, the paint becomes more intense and darker when painted (mosaic effect).
DRAWING WITH CRUMPLED PAPER
Material:
paper, a piece of paper, gouache, a plate, a jar of water.
Progress:
crumple a piece of paper, dip it into a plate with gouache, then apply the drawing using the dip, complete the missing details of the drawing.
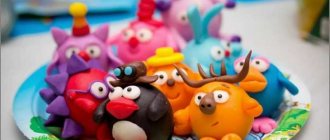
DRAWING WITH PLASTICINE
Material:
thick paper or cardboard, plasticine, modeling board, pencil.
Progress.
Draw an outline on a thick sheet of paper or cardboard with a pencil. We roll out a long rope of plasticine of a certain color, twist it in a circle, transfer it to cardboard, and press it lightly.
DRAWING WITH PLASTICINE
DRAWING ON SALT PAPER
Material:
paper with a pattern, salt, PVA glue, brushes, gouache paints, water, napkin.
Progress:
Stage 1: drawing the base with PVA glue and adding salt, leaving it to dry completely until the next lesson.
Stage 2: painting salted paper with gouache paints, choosing colors as you wish
DRAWING ON SEMOLANA
Material:
paper with a pattern, semolina, PVA glue, brushes, gouache paints, water, napkin.
Progress:
Stage 1: glue semolina onto the base with glue and leave to dry completely until the next lesson.
Stage 2: paint the base filled with semolina with gouache paints, choosing colors as you wish.
The use of unconventional techniques when teaching children to draw animals contributes to the development of fine motor skills and tactile perception; spatial orientation on a sheet of paper, eye and visual perception; attention and perseverance; visual skills and abilities, observation, aesthetic perception, emotional responsiveness. In addition, in the process of this activity, the preschooler develops control and self-control skills.
THANK YOU
FOR YOUR ATTENTION!
Where to start learning
It is advisable to teach children to draw animals by mastering a simple pencil. It will create an outline of the image, which you can later happily color. In addition, children quickly get upset if something doesn’t work out for them. In the case of a simple pencil, it’s not difficult to fix everything: erase the missing element with an eraser and continue creating.
Which animal to choose for drawing
The first lesson is the most important, because you can teach a child to draw animals in a few minutes, provided that the object to be depicted is chosen correctly. You shouldn’t immediately suggest drawing a horse or a giraffe. The best option is a duckling, kitten or puppy. The images of these pets consist of a small number of elements, which minimizes the risk of failure in the lesson.
Interesting! Parents who decide to try to learn drawing techniques using step-by-step templates themselves rejoice like children, amazed at the result.
What you need for drawing
Any activity, be it drawing or morning exercises, should be started when the child himself wants it. It makes no sense to force someone to draw, because creativity is closely related to the state of the soul. For the first lessons you will need a minimum of tools:
- paper;
- a simple hard-soft pencil (marked TM or HB);
- eraser.
Note! It is preferable to take A4 paper or a classic sketchbook, but a notebook sheet will not work, the lines and cells in it will interfere with the baby, and the sheet will seem initially unclean to him.
Innovative technologies in education according to the Federal State Educational Standard
It is recommended to give preference to a hard-soft pencil, because it is easiest to work with. Drawing with a hard stylus is inconvenient because it requires stronger pressure and the mark left behind is not bright. It will not be possible to erase it efficiently - a groove from the rod will remain on the paper. On the contrary, a soft lead does not require pressure at all, its mark is bright and clear, but when you try to erase the line, the eraser will smear the soft mark, leaving dark stains.
Motivating start to class
Drawing an animal figure in a characteristic pose or movement is a complex visual activity for preschool children. Creating a preliminary contour drawing from geometric shapes can be boring, practicing brush drawing techniques can be monotonous. To prevent children from losing interest in drawing, the teacher needs to use motivating material during the lesson.
Examples of using motivational material
| Type of motivating material | Examples of a motivating start to a lesson |
| Visual material: pictures and posters with images of animals, toys and figurines, slides, illustrations in books. | "Two greedy little bears." Pictures with illustrations of the fairy tale are attached to the magnetic board or the pictures are projected onto the screen. The children are invited to study the illustrations and arrange them in the order in which these scenes in the fairy tale are described. A conversation must be held based on the visual material: What animals are shown in the pictures? What features of the image of bear cubs and foxes did the guys notice? What colors and drawing techniques did the illustrator use? Which episode is shown most successfully and vividly, according to the students? |
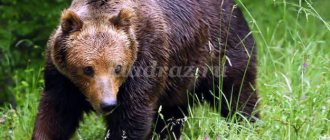
| Reading poems, excerpts from fairy tales, nursery rhymes, riddles, proverbs. | "White bears". At the beginning of the lesson, the teacher asks the children an animal: Among the snow and ice it does not go hungry, it dives into cold water for fish, its thick white fur saves it, it warms it from frost. (Polar bear) The children are asked to remember what structural features of the polar bear’s body are, and then the teacher reads passages describing this animal from the Yukaghir fairy tales “Why does the polar bear have a black nose?”, “Who lives in the cold sea?” |
| Creating surprise moments and game situations. | "Sheep in the meadow." At the beginning of the lesson, a knock is heard, Kurochka (a junior teacher dressed in a suit) enters the group and tells the children that a Sheep lives in their village - a kind and beautiful animal. Hen describes the fur of a sheep: white, light, soft, in the form of rings and curls. But autumn came and the farmer cut the sheep’s wool so that the housewife could make yarn out of it and knit warm clothes for the winter. The Chicken reports that the Sheep does not feel sorry for the wool for the farm kids, but she is still sad for her beautiful fur coat. The chicken asks the guys for help, they decide that they can draw a sheep in a new fur coat. |
| Conducting a conversation on the topic of the lesson (with reference to the experience and ideas of the students). | "Journey to the Farm" The teacher hangs pictures of domestic animals on the board: cows, horses, rabbits, pigs, goats, sheep. The guys are asked the question: “Where can you see all these animals?” - in a village, village, on a farm. Before the children begin to study and discuss the poster “At the (Horse) Farm,” the teacher invites people to share stories and memories of those who have been on a farm, and also gives the opportunity to speak to those who have seen farms in films or read stories about them. . |
| Conducting physical education lessons, outdoor and didactic games on the topic of the lesson. | "Mustachioed - Striped". Outdoor games “Cat and Kittens”, “Vaska the Cat”. Physical education lessons with performing movements to the poems “Our Murka has kittens”, “All the kittens washed their paws”, etc. Didactic games: “Help the kitten untangle the ball”, “Find the differences in the pictures”, “Which cat does this shadow belong to”. |
Drawing up notes for an art lesson on the topic “Wild and Domestic Animals”
The duration of a drawing lesson for children 5–6 years old is no more than 25 minutes and consists of the following steps:
- Organizational moment 1 minute.
- Motivating start of the lesson 5-6 minutes.
- Discussion of the drawing algorithm 2–3 minutes.
- Practical work 10–11 minutes.
- Demonstration and discussion of drawings 2–3 minutes.
- Summing up 1 minute.
Outline of a drawing lesson (senior group) on the topic “Hedgehog” Author: Natalya Aleksandrovna Ashenkova
| Tasks | Learn to draw conclusions from the discussion during the conversation. Improve your ability to paint with a brush. Develop an interest in drawing. Form aesthetic taste. |
| Material | Illustrations depicting a hedgehog, photographs. Cut out silhouettes of hedgehogs, brushes, paper and paints for painting. Audio recording with forest music. |
| Preliminary work | Reading stories about forest animals, looking at illustrations in books. Learning poems about wild animals. Listening to audio recordings with sounds and voices of nature. Visit to the local history museum to get acquainted with wild animals. |
| Progress of the lesson | The children will learn the topic of the lesson after learning the answer to the riddle about the hedgehog. Listening to N. Charushin’s fairy tale “The Hedgehog”, discussing the content of the text: what features of the appearance of the hedgehog were described by the author. The teacher invites the children to draw a fairy tale hero. Studying the algorithm for drawing a hedgehog. Creating a pencil sketch. Performing a warm-up exercise with a brush. Practical work with paints. Break for the outdoor game “Hedgehog with Hedgehogs.” Children complete the drawings with small details. Demonstration and analysis of finished works. Summing up the lesson. |
Step-by-step schemes for kids
There are many simple patterns that make beautiful drawings; for children, animals are of more interest than household items or landscapes, so you should start with them.
A simple example of drawing a bird. Children love to feed the ducks on the ponds, any child would love to draw their own duck.
- The creative process begins with two ovals: the head and the torso, connected to each other by a short neck.
- Paws are drawn from the body down.
- On the duck's body, just below the middle, draw an arc representing a folded wing.
- Sharpen the edge of the oval from the tail side using an eraser. The tail is depicted by several almost parallel lines of short length
- A beak and an eye are drawn to the duck's head.
- The final touch is adding details in the form of drawing feathers throughout the body and wing of the bird.
- Now you can color it.
How to draw a duck
Contents of lessons on drawing wild animals
Click on the desired option and you will go to it.
| 1 option | Option 2 - Video | Option 3 |
| Option 4 | Option 5 - Video | Option 6 |
| Option 7 | Option 8 - Video | Option 9 |
| Option 10 | Option 11 - Video | Option 12 |
| Option 13 | Option 14 - Video | Option 15 |
| Option 16 | Option 17 - Video | Option 18 |
| Option 19 | Option 20 - Video | 21 options |
| Option 22 | Option 23 - Video | Option 24 |
Schemes and templates for children 4-5 years old
Children at five years old already have basic drawing skills, especially if they attend a preschool where they are taught by teachers. But in the hot summer, many kindergartens are closed, and not all parents know how to draw themselves. In order to help your child with creativity, you can use children's instructions from the Internet.
How to draw a bee by creating your own coloring book.
Step-by-step instruction:
- Draw a round head.
- The body is drawn towards the head, like a flower petal or a propeller blade.
- Slightly curved lines divide the body into segments, depicting striped coloring.
- Children's imagination perceives animals as endowed with emotions, just like people. Therefore, the bee needs to finish drawing her eyes and smile.
- Now it's time to add antennae and wings.
- The final touch is a sting in the form of a narrow inverted cone.
More complex drawing techniques
Interesting! Insects are the best representatives of the fauna on which you can train your artistic skills. It’s easy to draw them using the simplest geometric shapes: a circle and an oval, which make beautiful caterpillars, bumblebees and bees.
Didactic game on the topic of ecology in preparatory groups of preschool educational institutions
Summary of GCD for drawing “Bear” in the middle group
Advanced training course for 340 rubles!
Emotional burnout of teachers. Prevention and ways to overcome
Municipal state preschool educational institution "Kindergarten No. 25"
educational activities in the middle group.
Theme of the week
: “Who is preparing for winter?”
Developed and conducted by teacher Mezentseva O.I.
Goals:
Continue to learn to master drawing examples (round and oval shapes), paint over them in a circular motion, carefully, without going beyond the contour.
Be able to convey the characteristic features of an animal (bear), observing proportions.
Fix the shape, color, size.
Foster independence and accuracy in work.
Blue cardboard (according to the number of children), paints, brushes, cups of water; templates; example of a teacher; video letter from a bear.
Preliminary work: a surprise moment at the beginning of the week a toy / gnome
/. The gnome is rearranged throughout the group during the week, unnoticed by the children, and the teacher draws the attention of the children to this.
Preliminary work:
viewing the album “Winter in the Forest”, conversation “How animals prepare for winter”, reading the poem “Why does a bear sleep in winter?” V. Orlova.
Classes for senior and preparatory groups
Schemes for drawing various animals for preschoolers are also used in master classes at preschool educational institutions. A popular technique is drawing with geometric shapes, from which not only insects are obtained, but also flowers, large animals and people. There is also a secret to using the number 8, which is demonstrated to children in open lessons in the form of presentations with templates. When teaching an algorithm for drawing a fly or a wasp, a figure eight is used, the horizontal arrangement of which helps to proportionally depict the head and abdomen of the insect.
More complex drawing algorithms
In the senior group of kindergarten, children already have a fairly broadly developed horizon, they think and fantasize more broadly, so at this age they can already learn more complex compositions.
More complex drawing techniques
These lessons pay more attention to detail, using shading, curved lines and irregular geometric shapes.
Using available templates and diagrams for drawing, you can teach your child to depict all representatives of the animal world, not only in our country. Many adults, trying to teach a child to create their own drawings, are so carried away by the diagrams that, to their surprise, they discover the hidden talent of an artist in themselves.
The order of drawings of animals
Pupils in the senior group develop the ability to work according to a given algorithm, follow techno maps, and talk with the teacher about the procedure for drawing an animal figure. You can look at examples of finished works on a given topic and invite the children to determine what techniques were used to create these drawings, what methods can be used to achieve a better result (create a colored background, think through the composition more carefully, draw details). The teacher uses direct demonstration of actions during introductory classes on drawing with new materials - sanguine, pastel, charcoal or sauce.
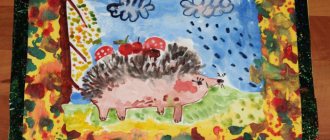
"Hedgehog"
Drawing an oval-shaped body Drawing hedgehog spines using the technique of dipping a brush
Drawing the background with strokes
Using a brush tip to paint image details
MCompleted drawing
"The Bear and the Bees"
Drawing the geometric shapes underlying the bear's body
Painting contours Drawing spots - bee bodies
Drawing an additional object according to the plan - a pot. Grass is drawn in the lower part of the sheet with strokes
Elaboration of details in the image of a bear - muzzle, claws
Drawing the proboscis and stripes of bees Drawing using the dipping technique - insect wings Drawing honey in a pot Drawing is ready
"Fox"
Drawing the outlines of the head, torso and tail
Painting outlines Drawing paws and ears
Drawing details with the tip of the brush - eyes, nose, claws The drawing is decorated with strokes - grass
"Squirrel"
Creating a Sketch
Painting the contours of the sketch Drawing details with the tip of the brush - tassels on the ears, muzzle
Drawing an additional object according to the plan - a pine cone Drawing a background - a spruce branch on which a squirrel sits
Completed drawing
"Fluffy cat"
Designation of the contours of the animal figure
Drawing with strokes and pokes of animal fur Combination of elements of different colors - stripes and spots in the color of the animal Drawing claws with the tip of the brush Working out the animal's face
The drawing is complemented by an additional object according to the plan - a ball
"Giraffe"
Creating a Sketch
Filling the background (on top of the sketch) Painting the outlines of the sketch
Adding horns and tail with the tip of the brush
Drawing bumps on the horns, spots, tail brush with the tip of the brush
Giraffe drawing completed
Following the knowledge of the proportions of objects, we draw a palm tree next to the giraffe. We draw the hot African sun. We draw cacti in the foreground.
"Hare and Wolf"
Creating a sketch of animal figures Working out the contours of the sketch Drawing details - faces
Hatching with light pressure - hare fur Working out the contours of the sketch
Drawing details - eyes, nose, teeth, claws
Hatching a wolf with strong pressure - wool
Strokes with strong pressure - imitation of shaggy
Drawing a stump on which a hare sits Drawing grass with shading
Drawing the background - bushes
"Snake Gorynych" ("Fairytale Animal")
Creating a sketch with a simple pencil Filling the background with watercolors - the sky and grass Hatching inside the contours with wax crayons Tracing the contours with chalk Drawing details - tongues, eyes, nostrils, ridges
Drawing foreground and background elements
Completed drawing