Drawing classes within the theme “Domestic and wild animals”
The topic “Animals” is quite complex and voluminous, so it is advisable to divide the process of studying it into several lessons, which will be evenly distributed throughout the academic year.
Thematic blocks
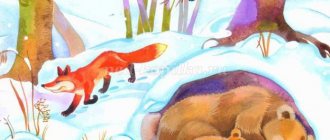
- “Forest Dwellers” - one of the most popular is the thematic series of drawings “How Animals Winter.” Each animal tells how it prepares for winter: changes the color of its coat, makes preparations (mushrooms, nuts, cones), prepares its home (hollow, den, hole), etc.
- “Pets” will help to form a kind attitude towards pets, reinforce ideas about the peculiarities of their appearance, and teach how to correctly convey in a drawing the body shape, size and pose of the animal’s figure.
- “Animals of Southern Countries” will enrich your horizons with new knowledge about exotic animals, awaken interest in animals and the desire to depict them using various materials and techniques.
- “Animal World of the North” will expand children’s understanding of the animals of the north, the characteristics of their habitat and way of life.
Photo gallery: children's work on different thematic blocks (animals of hot countries, northern animals, our forests)
“Hedgehog in the autumn rain” - combined technique (felt pens and paints)
“Hedgehog Harvesting” - combined technique (wax crayons and paints)
“Donkey” – colored pencils
"Giraffe" - felt-tip pens
“Burenka” - colored pencils
“Carrot for a bunny” - combined technique (colored pencils and watercolors)
“Polar bear” – gouache
“Prickly hedgehog” – wax crayons
“Mustache-striped” – gouache
“Bunny in winter” – felt-tip pen
“Kitten with a ball” - colored pencils
“Shaggy Dog” – gouache
“King of Beasts” – watercolor
“Sister Fox” – watercolor
“Goat” - colored pencils
“Horses” – gouache
“Yard Cat” - combined technique (gouache and wax crayons)
“Hedgehog with hedgehogs” - combined technique (watercolor, wax crayons, felt-tip pens)
"Elephant" - wax crayons
“Giraffes” – watercolor, crayons and markers
“Hippopotamus” – watercolor and colored pencils
Complex large compositions, which are based on a detailed plot and include many different elements, are usually created collectively. The preparatory stage, during which the background is painted over, individual details or figures are drawn, is carried out in small subgroups of 3-4 people, and then the children together compose a plot picture on whatman paper, gluing the silhouettes they have prepared, simultaneously developing spatial thinking abilities, as well as coordinated skills actions. When creating a collective drawing, children are guided by a given condition or design, and the process of collective work itself develops skills of mutual understanding and camaraderie.
Creating a collective composition in a subgroup fosters mutual assistance and camaraderie among children
It is important to pay close attention to the problem of teaching children to understand and follow the correct sequence of work to create a plot composition or collage. The teacher should explain that first you need to prepare a background drawing, painting the entire space of whatman paper, then draw background objects (trees, sun, clouds, houses, flowers, mushrooms, etc.) and only then draw or place previously prepared and cut out silhouettes animal based.
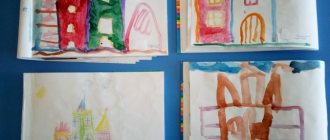
Photo gallery: collective work of preschoolers
“Wintering of forest inhabitants” “Inhabitants of hot countries”
"Beasts in the Autumn Forest"
"Summer Forest"
"Fauna of the North"
Motivating techniques for working with children
During the lesson, it is necessary to include playful moments that stimulate curiosity, cause a positive emotional reaction and activity.
Motivating techniques can be the appearance of a toy character, reliance on a well-known fairy-tale plot, demonstration of pictures, a musical break, a surprise moment, introduction to new knowledge, or the personal artistry of the teacher. It is important to develop the ability to concentrate attention and see an object, to perform its sensory (touch and vision) analysis. The lesson will be interesting if the teacher thinks through the game line of the scenario, taking one of the popular fairy tale plots as a basis.
Table: examples of questions, games, dynamic gymnastics for a lesson on the topic “Wild and Domestic Animals”
| Author and theme of GCD | Contents of the summary fragment |
| Vaganova O. G. “Forest Dwellers” | Game moment
Children, together with the teacher, walk along an imaginary path with the words:
Educator: Guys, here we are in the forest. There are many trees and bushes in this forest, but no animals are visible at all. Guys, look, what is this? There is an envelope under the tree (children's answers). And there is a riddle in the envelope, listen:
The teacher takes it out of the envelope and shows an illustration with a fox. Educator: Really beautiful! Guys, what kind of fox is it? (children's answers). Of course, she has a long fluffy tail, a muzzle that looks like a teardrop, and a sharp nose. We continue our journey (the children and the teacher continue their walk) and approach a birch tree. The teacher finds an envelope under a birch tree, opens it and reads the riddle:
The teacher takes out an illustration with a hare from the envelope. Educator: Guys, what kind of hare? (children’s answers). Indeed, the fur is fluffy, the tail is short, and the ears are long. We continue our journey (the children and their teacher continue their walk). Guys, look, there is an envelope hidden for us here (the teacher opens it and reads the riddle):
Educator: Guys, what kind of bear? (children's answers). Of course, the bear has strong paws, large, but small round ears. The body is large and powerful. We have disenchanted all the animals and now we will show how they move. Physical education minute.
|
| Levochkina T. P. “Drawing polar bears” | Conversation between teacher and children:
|
| Chesnokova O. A. “Travel to distant lands” | Didactic game “Add a word” The teacher names the definition, the children guess what kind of animal it is.
|
Scheme and outline of the lesson
In the preparatory group, standard long-term planning provides for one drawing lesson per week. The total duration of continuous activity should not exceed 25–30 minutes; methodological manuals recommend performing physical exercises (finger, breathing, motor exercises) for 5 minutes for relaxation and prevention of mental and physical fatigue in children.
Lesson outline:
- Organizational part (5 minutes). The information and familiarization stage involves awakening children's interest in the depicted object, studying its shape, color and components.
- Practical part - the teacher explains the sequence of drawing parts of an object, based on a step-by-step scheme for creating an image (5 minutes). Six-year-old children are given more freedom in the drawing process; the pattern is used, as a rule, only in decorative drawing. Demonstration of a picture or sample prepared by the teacher should not be used for copying, but only for the formation of a correct understanding of the task or its clarification. The work is done from life or on the basis of life experience and observation; the basic techniques have already been mastered, and therefore do not require additional demonstration, with the exception of the initial use of new material, for example, sanguine.
- Independent work of children (20–25 minutes).
- The final part - children's images are compared with the object, the degree of similarity between the original and the artistic copy is assessed (3 minutes).
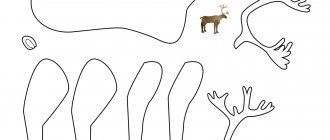
Photo gallery: drawing diagrams of animals (horse, cat, dog, sheep, fox and others)
Rabbit
Goat
Hedgehog
Pig
Squirrel
Horse
running horse
Dog
Monkey
Kitten plays with a ball
Elephant
Cow Giraffe
Fox
Lamb
Cat Camel Leopard
Table: synopsis of GCD on the topic “Domestic animal cow” (author Maltseva I. A.)
| GCD stage | Contents of the stage |
| Goal and tasks | To consolidate and expand children's ideas about pets and the features of their appearance. Learn to draw a cow, continue to develop the ability to think through the compositional construction of an image, continue to learn how to mix paints, develop imagination and memory. Encourage children's initiative and independence when making thematic additions to the work |
| Organizational part | Teacher. People have faithful friends and helpers - pets. Close your eyes. Listen. What did you hear? The audio recording “Voices of Pets” is played or the teacher imitates the voices of animals. 1st child. I heard a dog barking. 2nd child. I heard the cat meow. 3rd child. Like a cow mooing. 4th child. And I heard the horse neigh. 5th child. How a pig grunts, etc. Teacher. Right. Why are these animals called pets? Children. They live next to a person who takes care of them. Teacher: Tell me what a baby cow is called? Children: A baby cow is called a calf. Teacher: What benefits do you think cows bring to people? That's right, they give us milk and meat. People have learned to prepare many healthy, tasty and nutritious foods from milk. |
| Practical part | Teacher: today we will depict a cow walking in a meadow. Let's start drawing with the torso. It looks like an oval. Then we draw a round head. The head has an oval muzzle. On the face there is a nose and mouth. There are also ears and horns on the head. For our cow to see grass, she needs eyes. Now our cow needs to draw legs - at the ends of which there are hooves. Now we need a tail so that our cow can drive away flies. In order for a cow to produce milk, she needs an udder. What a beautiful cow we have! A cow grazes on a wide, green meadow. The warm sun is shining on her from above. Somewhere in the distance, in a village, a kind mistress is waiting for her. |
| Independent work of children | Children draw animals to calm music. The teacher, if necessary, conducts individual work. |
| Final part | Teacher: Now our cows will all gather into a herd. Children hang their work on the board. The teacher asks the child to give a name to his cow and tell what her character is. |
Nice cat
We talked about pictures of cats, now we combine knowledge and test the ability to imagine outlines. Let's pretend to be a good cat.
To depict the beast, we take a black gel pen; for beginners it is better to take a regular pencil, but when the image is ready, you will need to draw an outline.
- In the middle of the sheet we draw an arcuate segment. The arc should be directed downwards. At the end of the arc we draw cat ears on the two edges. From the edge of the colored ears we continue to show the circumference of the head.
- In the middle of the resulting figure, we will draw two circles apart, they will become the eyes of the cat. In the middle of the eye shape we show off the large pupils and add highlights. We go a little lower and depict a triangular nose with rounded corners. Let's add lips under the nose.
- Now let's outline the cat's fluffy chest. Under the chest we draw the front paws and divide their lower parts into fingers. Starting from the upper left side of the head, draw the torso and draw 2 hind limbs.
- Add a fluffy tail to the outline. We detail the ears and color the image. If you used a regular pencil to draw, outline the entire area with black.
- Use a black pen to fill in the eyes, leaving a shine. Use a pink pencil to color the inner edge of the ears. We show parts of the shadows in the image in black or gray. Paint the remaining perimeter of the eyes blue or green.
The cute cat is ready and now you can imagine how to make an animal drawing like a cat. The work is mostly simple. If you are a budding artist at a very young age, don't worry, if you meet our conditions, you will get a real creation.
Schemes and templates for children 4-5 years old
Children at five years old already have basic drawing skills, especially if they attend a preschool where they are taught by teachers. But in the hot summer, many kindergartens are closed, and not all parents know how to draw themselves. In order to help your child with creativity, you can use children's instructions from the Internet.
How to draw a bee by creating your own coloring book.
Step-by-step instruction:
- Draw a round head.
- The body is drawn towards the head, like a flower petal or a propeller blade.
- Slightly curved lines divide the body into segments, depicting striped coloring.
- Children's imagination perceives animals as endowed with emotions, just like people. Therefore, the bee needs to finish drawing her eyes and smile.
- Now it's time to add antennae and wings.
- The final touch is a sting in the form of a narrow inverted cone.
More complex drawing techniques
Interesting! Insects are the best representatives of the fauna on which you can train your artistic skills. It’s easy to draw them using the simplest geometric shapes: a circle and an oval, which make beautiful caterpillars, bumblebees and bees.
Consultation for parents on raising children's attention and perseverance
Elephant in squares
The elephant has large volumes, as far as practically every person knows what it looks like. We have already studied the image of an elephant, but now we need to consolidate the material we have learned. We will depict it on a sheet of paper in a cage, since this is how it is easier to reinforce the lesson.
How to draw by cells:
- Having prepared the album and equipped it with a pen, preferably a light pencil for beginners, we present a horizontal segment in the shape of an arc. At the top of the sketch we introduce small volume contours and draw a border identical to the first line, but downwards. As we get closer to the edge of the line, we move the segment in the opposite direction to get the bottom outline of the elephant's head.
- Starting from the top, we show large ears on the head in the shape of an uneven semi-oval. We then mark from the beginning of the ear to the front of the torso. Let's draw a horizontal line and complete the back of the elephant.
- We use a winding line at the back to show the tail of this animal. We finish drawing the forelimbs. Let's detail the ear.
- Now, use the arches on the head to place the eyes. We complete the mouth and detail it with teeth and tongue. We painted the main part of the mouth and the area above the trunk. We expanded the silhouette from above with drops of water that the elephant releases from its trunk.
- We paint the small lake on the right side with a blue pen. We paint the drops one color, but there should be white spots on them. Also, draw the edge of the pond.
- Then use a simple pencil to outline the outline of the body and other areas. Cover the brush on the tail. We shade the entire body with a light tone. Draw green grass under the elephant. We paint over it and paint the lake with a blue pencil. Tongue red or pink.
The elephant is drawn. Schoolchildren will even be able to figure it out on their own with simple work.