Objectives: expand children’s understanding of measures of length: conventional measure, unit of measurement; introduce measuring instruments: ruler, measuring tape; to develop the cognitive activity of children through familiarization with measures of length in ancient times (elbow, foot, pass, palm, finger, yard).
Materials: measuring tapes, rulers, pencils, paper, a piece of fabric 2-3 m long, braid or cord 1 m long, worksheet.
Description. “Measuring Chair Height” worksheets are laid out on the table.
Educator. What task did Grandfather Know leave us? (Measure the chair.) What does he suggest measuring with?
(Slipper, pencil, handkerchief.)
Start measuring, but don't forget to write down the results.
Children take measurements.
Educator. What is the height of the chair? The results of measuring with a pencil are the same for everyone, but with a slipper and a handkerchief they are different. Why? Everyone has different leg lengths, different headscarves. Look, grandpa Knowing has a picture “Measurement in Ancient Egypt” hanging up. How did the ancient Egyptians measure? (Finger, palm, elbows.) Measure the chair in the ancient Egyptian way.
Children measure and write down.
Educator. Why were there different results? Everyone has different arm lengths, palm and finger sizes. And in Ancient Rome (referring to the picture) there was its own measurement system.
How did the Romans measure? (Feet, ounces, passes, yards.)
How can we measure fabric in the ancient Roman way? (In yards.)
Children measure the fabric and write down the result.
Educator. How many yards are in a piece of fabric? Why do everyone have different results? What if the results are different?
Imagine that you decide to make a suit, measure yourself, and determine that you need to buy three yards of fabric. And so you came to the store, the seller measured out three yards for you. But suddenly, while sewing, you see that there is not enough fabric. You are upset.
What to do to avoid such troubles? What will grandfather Znay advise us?
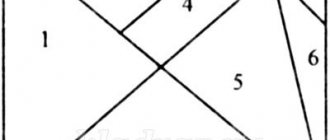
Grandfather Know. People have long understood that the same measures are needed for everyone. The world's first unit of measurement was called the meter. This is one meter long. (Showing a cord 1 meter long.) The meter was created two hundred years ago in France. Today, many countries use the metro. Trade between countries has become much easier and more convenient. The meter is divided into centimeters. There are one hundred centimeters in one meter (a measuring tape is shown). What instruments for measuring length do you know? (Ruler, measuring tape.) Look at the drawing. Are these the same lines?
The children's answers are listened to.
Grandfather 3 nay. You can't always trust your eyes. Check now with a ruler. Same lines? (Yes.) Now measure a chair or a piece of fabric using a ruler, a measuring tape.
Children take measurements.
Grandfather Know. Why are everyone getting the same results now? What did you measure with? Measure whatever you want. Why are measuring instruments needed?
Today we have seen that measuring instruments help us accurately take measurements.
Summary of the mathematics lesson “Meter. Table of length measures", 2nd grade. School of Russia
Math lesson “Meter.
Table of length measures" (2nd grade of Federal State Educational Standard). UMK: “School of Russia” Teacher: Margarita Valerievna Usova, MOU Novoberezovskaya secondary school named after Markidonov Basic textbook: UMK “School of Russia” Mathematics 2nd grade M.I.Moro. Lesson type: Lesson on introducing new material. Objectives: to introduce students to the unit of measurement of length - the meter; form a visual representation of the meter; develop the ability to convert one unit of measurement into another; improve computational and problem-solving skills. Planned results: Subject:
- get acquainted with the unit of measurement of length - the meter;
- compare named numbers, solve problems of the studied types; - develop numeracy skills. Meta-subject:
- understand and accept the learning task set by the teacher at different stages of learning;
— search for the necessary information, perform a comparison operation, draw conclusions and clearly present them; - highlight known knowledge and skills from the topic of the lesson. Personal:
- show motivation for educational and cognitive activity and the personal meaning of learning, which are based on the need to constantly expand knowledge to solve new educational problems and on interest in mathematics.
Equipment: Measuring tools: rulers, meter ruler, centimeter, decimeter, meter models
Lesson progress
I. Organizational point. The bell rang and fell silent, our lesson has begun. Take your pens in your hands and write the number beautifully. You write carefully, so that everyone would be pleased to look at your notebook. II. Consolidating knowledge of numbering numbers within 100. Each student receives a sheet with the task:
• Color the fish as follows: red – a fish with a number between 70 and 90; blue - a fish with a number preceding the number 51; yellow – a fish with a number following the number 69; green – a fish with a number that is between the numbers 25 and 50. • Circle the fish with the highest number in brown, and the one with the lowest number in green. Mathematical dictation. • Find the difference between the numbers 45 and 20 (25). • The first term is 35, the second is 15. Find the value of the sum (50). • How much is 43 greater than 30? (By 13) • The minuend is 30, the subtrahend is 16. Find the difference (14). • Find the sum of the numbers 28 and 12 (40). (Answers appear on the slide: 25, 50,13, 14, 40 Well done! Arrange these numbers in ascending order Slide (13,14,25,40,50) III. Calligraphic minute. Grandfather Ignat said to his neighbor: “I’m already a hundred years old.” for dinner!" "You added 30 years!" the neighbor objected to him. Please, guys, count how many years Ignat lived. (70) - Let's write these numbers beautifully and neatly in a notebook: 7 .... 7 .... 7 .... 7 .... 7 0 .... 0 .... 0 .... 0 ....0 – Write down all two-digit numbers using the numbers 4, 7, 0. (40, 44, 47, 70, 74, 77.) IV. Updating knowledge 1 cm .... 1 kg ... 1 dm ... 1 mm ... 1 l (Cards on the board) - How to call in one word everything that is written on the board? (Units of measurement) - What two units do you think are extra here? (1 kg and 1 l) - Why? (A kilogram is a unit of mass and a liter is a unit of volume) - What quantity are the remaining quantities used to measure? (Lengths) - Place the cards with the quantities in ascending order (millimeter, centimeter, decimeter) - Let's fill out the chart: 1 cm=…..mm 1 dm=…cm=….mm. Images on the board: caterpillar, crocodile, beetle
-Guys, what quantities are more convenient to use to measure their length? (caterpillar - millimeters, centimeters, crocodile - decimeters, beetle - millimeters). -What do you think is the most convenient measurement to measure the height of a house? (children's answers) - A new unit was introduced to measure larger objects. And you will find out its name by solving the mathematical encryption: -What word did you get? (Meter) -Who can formulate the topic of the lesson? V. Learning new material. -How can we find out the length of a pencil, book, etc. (Measure.) -What will help us do this work? (Ruler.) - What unit of length will you use? – Now we need to measure the length of the class. – Will it be convenient to use a millimeter? Centimeter? A decimeter? - Why? To measure the length of large objects, there is a unit of measurement - the meter. 1 meter is 10 dm, or 100 cm Write on the board: 1 m = 10 dm = 100 cm Then the teacher shows the students the meter and asks them to use the meter to measure the length and width of the classroom, the width of the door, the length of the board, etc. d. After this, the teacher asks the students to compare 1 meter with 1 decimeter and 1 centimeter and determine how much 1 meter is greater than 1 decimeter (centimeter). Students, reasoning, compare 1 m with 1 dm and 1 m with 1 cm (in case of difficulty, students can use sticks or bundles of sticks). 1 m is 100 cm. (100 is 10 tens.) 1 dm is 10 cm. (10 is 1 ten.) 10 des. – 1 dec. = 9 dec. (9 dec. = 90.) This means that 1 m is more than 1 dm by 90 cm. 1 m is 100 cm. The number 100 on the number line is preceded by the number 99. 100 – 1 = 99, which means that 1 m is more than 1 cm by 99 see VI. Physics minute We counted and got tired Everyone stood up together and quietly We clapped our hands 1,2,3 We stomped with our feet 1,2,3 And we stomped some more And we stomped together in unison We sat down, stood up, stood up, sat down And didn’t touch each other We’ll rest a little And start counting again. VII. Consolidation of the studied material Work from the textbook Open the textbook on page 13 No. 2 (p. 13) - Read the conditions of the problem. Put a question to the problem. (How many pages do two fairy tales take?). (Those who know how to solve the problem solve it on their own, the rest work with the teacher). — What is known about the problem? - What do you need to know? (One student on the board makes a short note about the problem)
- Solve the problem yourself (One student writes down the solution and answer on the board. Check. Self-assessment. Work in a printed notebook. No. 25 (p. 12) - What is said about the blue segment? How to find its length? (1 in. - 3 cm = 10 cm-3 cm = 7 cm) - What is said about the red segment? How to find its length? (1 dm-2 cm = 10 cm-2 cm = 8 s.) - Draw the segments. From what point will you start drawing? (from points 0) No. 27 (p. 12) - Read the problems. Make up one problem. - Read what you got. How many actions will be in the task? - Solve the problem yourself. (Check in pairs. Mutual check) VIII. Reflection. - Which did you learn a new unit of length? - What can you tell us about it? - What can be measured in meters? - Evaluate your work in the lesson. If it was easy for you to work in the lesson, raise the green flag. If you had some difficulties, the flag should be yellow If you need help from your friends and teacher, show the red flag. IX. Homework Textbook p.13 No. 3, No. 5
We recommend watching:
Math lesson notes for 2nd grade. Reinforcing addition and subtraction within 100 Notes of a mathematics lesson for children with disabilities in a correctional school, 2nd grade Notes of a mathematics lesson in 2nd grade on the topic “Journey to the winter forest” Mental arithmetic in mathematics lessons in 2nd and 4th grades
Similar articles:
Summary of a 2nd grade math lesson on the topic: Line. Parallel lines
Summary of a 2nd grade math lesson on the topic: Addition and subtraction of two-digit numbers
Summary of a 2nd grade mathematics lesson on the topic: Reciprocal operations
Summary of a mathematics lesson for grade 2 according to the program of L. V. Zankov
Summary of an open lesson in mathematics in grade 2
MAGAZINE Preschooler.RF
Topic “Measuring length” Program “From birth to school” Age Preparatory group Main educational area “Cognitive development” Integration with other areas “Physical development”, “Social and communicative development”, “Speech development” Form of implementation Joint activities of children and adults Goal Development of cognitive and mathematical abilities Educational tasks To cultivate discipline, the ability to listen to the teacher, to continue to develop the ability to quickly complete tasks. Developmental tasks Develop attention, intelligence, logical thinking, imagination.Educational objectives - To consolidate the understanding of measuring length using a measure and the ability to practically measure the length of a segment with a given measure; - introduce cm and m as generally accepted units of measurement of length, develop the ability to use a ruler to measure the lengths of segments; — consolidate ideas about comparing groups of objects using pairing, addition and subtraction, the relationship between the whole and parts, the composition of the number 6. Planned result Learn to use a ruler to measure the lengths of segments. Methods and techniques Verbal: explanation, clarification; Visual: display; Practical: exercises, completing assignments. Visual teaching aids Demonstration: white strip of paper - 40 cm, measuring strips: red - 10 cm, blue - 8 cm; meter (tailor's, folding, tape measure, etc.); model cm; ruler. Handout: white strip of paper - 20 cm; measuring strips: red - 5 cm, blue - 4 cm; ruler; sheets with three segments 5 cm, 2 cm, 4 cm; stars. Organization of children
Individual work Remind Nikita how to use a ruler correctly. Vocabulary work Centimeter, meter, span, fathom, elbow, segment, longer, shorter, “whole” and “sum”, wider, narrower. Preliminary work Conversation about units of measurement, ways to measure length. Structure 1. Start of GCD: 1 min. 2. Experiment: 5 min. 3. Work with handouts: 6 min. 4. Physical exercise: 1 min. 5. Measuring lengths: 6 min. 6. Physical exercise: 2 min. 7. Repeat: 6 min. 8. Lesson summary: 3 min.
GCD move
I. Start of GCD -1 min. II. Experiment -5 min. III.Work with handouts. IV. Physical exercise V. Measuring lengths with a ruler VI. Fizminutka VII. Repetition VIII. Lesson summary
-Hello guys! Today I will teach the class, Dinara Lyaufirovna. Now I ask you to sit correctly and listen to me carefully. Agreed? For each correct answer, I will give these stars (I show it). Additional stars will be awarded for good behavior. Whoever has the most stars will receive the main prize. It's here (showing the gift-wrapped box. Then I put the box in the closet so the kids won't be distracted). Guys, today we will learn how to measure length using a ruler, we will find out what cm and m are.
A) Now I want to invite the tallest boy and the shortest girl (names). Guys, look at the two stripes on the floor. Look carefully and tell me, which stripe do you think is longer? (I ask several children individually). That's right, they are the same length. Now let's conduct an experiment. Maxim will walk along this lane, Ksyusha will walk along this one (I show). This row will count how many steps Maxim has taken. This row will count how far Ksyusha has walked. How many steps did Maxim take? How many steps does Ksyusha have? Does Maxim have more steps or does Ksyusha? Now think, the strips are the same length, but the number of steps is different, why did this happen? What do you think, Nikita? What do you think, Dilyara? Thus, we can draw a conclusion: the wider the steps, the fewer the number of steps. Maxim had wider steps, but he had fewer steps. And Ksyusha’s steps are narrower, so she has more steps. Well done boys! I give stars to Ksyusha and Maxim for their good work. Thank you! You can take your seats. (Then I give stars to the children who answered). B) The next task is this. On your tables there are white (20 cm), blue (4 cm), red (5 cm) stripes. Please compare the blue and red stripes. Which stripe is longer: red or blue? How did you measure, overlay or app? Very good. Now measure the white strip using the red stripe. How many red stripes fit into the white one? Vera, how many strips do you have? Fine. Did this happen to everyone? Amazing! Remember this number. Now measure the white one using the blue strip. How many strips are there? Does everyone have the same quantity? Which stripes fit more: red or blue? Polina, how did it work out for you? Let us conclude: we have found that the larger the size of the measure, the smaller the measurement result, i.e. There were fewer red stripes, because it's longer. Well done boys! (During the task, I complete it on the board. I approach each child and help. I give stars for correct answers).
In the last lesson, you were introduced to some measurements for measuring length. Let's remember what other standards can be used to measure the lengths of segments? (stars for correct answer). Do you think the same result will be obtained when measured in all people? That's right, guys. To avoid disputes, people agreed to use measurements that are not related to the size of the human body - they are always the same. Today we will get acquainted with two such measures - the meter and the centimeter. (I demonstrate a model of a meter and a centimeter). Now mark 1 cm on your rulers with a green pencil (or a simple pencil) (I show it on the board on a demonstration ruler. I explain how to use the ruler correctly). Which measure do you think is more convenient for measuring distance in a room? The first row measures the length of the table, the second the length of the board, the third the length of the carpet (I help each row. I ask each row how many they got. I give stars for correct answers). Now look at task number 1. What yardstick is used to measure the length of the board by the boy in the picture? That's right, by meter. What is the most convenient yardstick to measure the length of the path along which a snail has crawled? Centimeter. How many small 1 cm segments are included in this path? Let's check. Yasmina, please count. Fine. Dima, how did it work out for you? Did everyone get 4 pieces of 1 cm each? Well done boys. Segments of 1 cm are laid out on the ruler. Numbers 1,2,3, etc. show how many cm are deposited. For example, there are six segments on my segment, which means there are 6 cm (I show it on the board on the demonstration ruler). Let's find out how many cm the snail crawled? Denis, how should you apply the ruler correctly? Nikita, you need to hold the ruler like this (individual approach to children). So, guys, how many cm did the snail crawl? Well done, that's right, the snail crawled 5 cm.
Guys, we have been studying for a very long time and we need to rest a little. We all go out onto the mat and get on all fours. Let us imagine that we are very slow snails. You know that a snail takes a very long time to crawl. Who crawls so slowly and carries his own house? It will crawl a little more, stick out and hide its horns. A snail crawls flexibly along a leaf, along a branch. Very slowly. Well done! Now we sit down at our seats and continue the lesson.
Your rulers are waiting for you on yours. Now we need them. Look at task #2. What is shown here? Right. These are segments. Our small task is to measure their length. I need helpers. There are segments on the board. They are exactly the same length as in your notebook (I call one of the children to the board). (d.) will measure, and you will measure from your notebooks. Then we’ll check (individual approach). Let's check. How many cm did you get, Karina? What about you, Kirill? Fine. Now let's find out how many cm (child at the board) got? This means that we have correctly measured all three segments (asterisks). Now we will conduct a small experiment. What geometric shapes are drawn on the board? Right. You have exactly the same figures in your notebooks. Let's remember where the sides of these figures are? (we consider each figure). Do you think the sides of these figures are equal? For example, does a triangle have equal sides? What about the square? At the rectangle? Now we will find out. (I break down the figures that are on the board into parts. Each one separately. I attach the parts to each other). Look guys, each piece has a different length. What does this mean? This means that, for example, a triangle has different sides. What can you say about the square? Rectangle? Measure the sides of the geometric figures in your notebooks and write the results in the box. (I give time, I help). Did everyone complete this task? Fine. Guys, look at task No. 4. What do you think we need to do? What it is? That's right, these are equalities and they need to be composed correctly. First we need to measure the length of each segment. Measure the length of the largest segment and write the result in the upper “window”. What equations can be drawn up? (I ask several children individually. For the correct answer - an asterisk. The answers are written down. I show it on the board).
We did a very good job. I think we deserve a break. We put on the record and go out to warm up. Get ready to exercise, get ready to exercise, get ready to exercise! We start running on the spot, the finish line is in two hundred meters! One-two, one-two, One-two, one-two! Enough, enough! They came running! Stretch and breathe! Let's work out a little more, and you'll rest longer.
Now look at task No. 5. Look how beautiful the pictures are. What do you think needs to be done here? There are > < = signs here. That's right, we need to compare. Artem, please tell us what is shown in the first picture? Right. Where are there more balls, where are there fewer? So, what sign will we put up? (showing signs on the board) Correct. Egor will tell us about the next picture. Please tell me what is shown and what sign should be placed? Why? Be careful. Right. All agree? Fine. And the last picture. Rostislav, please tell me what sign should be put up? Everything is correct. Guys, you completed this task. You will complete task No. 6 with Olga Sergeevna after sleep. And then I will check how you completed it. (In case I don’t meet the deadline).
Guys, today we got acquainted with new measurements. Let's remember what these measurements are? That's right, meter and centimeter. Why do we need such a measure as a meter? What is a centimeter for? Nikita, please remind us how to use a ruler correctly? Well done! So that you do not forget about these measurements, measure the length of the table, bed, and the length of your books that you have at home. I am very glad that you listened to me so carefully, behaved well, and were so active. As promised, the most active and obedient will receive the main prize. (we determine the most active, smart and obedient. The rest receive incentive prizes). You are all very smart, active, obedient, but, as you can see, (child’s name) was quicker and faster than everyone else. I have also prepared incentive prizes for you. Thank you all and see you again!
| Next > |