Plasticine Rainbow Dash
The cartoon about ponies is very popular among little girls. There are many characters in it, but the one we will sculpt below occupies a special place. Instructions on how to make such a horse from plasticine will be especially interesting for girls.
In our work we will use all the materials we are familiar with, with one exception. You will need a set of plasticine that contains all possible colors.
Instructions on how to make a plasticine pony craft for children:
- Let's start with making the head. For this we need blue. Roll a large and a small ball. We connect them to each other. We transform a small part into a tubercle. Using a stack on this tubercle, highlight the nostrils.
- We do not remove the stack and make holes on the face for the big and cute eyes of this horse. For the eyes you will need cakes of different sizes. We will list the colors in descending order of size. The largest color is black, followed by white, purple, black again, and the smallest white dots complete the eyes. We collect the cakes indicated by color in descending order. Decorate the finished eyes with eyelashes. This plasticine eye sculpting for children may seem difficult due to the miniature parts, so it can be done by an adult.
- Attach triangular ears to the made head. The head work is finished for now.
- Let's start making the body. Take a long block. On one side, make it narrow, then bend the part at an angle to create a neck.
- Take matches. They will be needed for fastening. We sculpt legs from medium blue balls. We pull them out to get cones. We insert a match into the base of each leg for fastening. We attach the legs to the body and the head.
- The horse must be decorated with a fluffy rainbow tail. Each individual hair of the ponytail must be composed according to the shades of the rainbow. We fasten all the parts and attach them to the horse figurine. We make the horse's mane and bangs.
- Those who have already seen the cartoon know that our horse stands out not only with its rainbow tail, but also with its wings. For them you need to make several blue cakes and apply notches on them with a tool. Attach the wings to the horse.
- Almost done. All that remains is to attach its distinctive sign to the horse - a lightning bolt.
You learned how to make Dash the horse from plasticine. The finished figurine looks very attractive. Girls will surely love such a graceful horse. If it’s difficult to make a craft, but you want to make a cute creature, try making a cat out of plasticine.
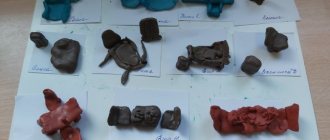
Notes on sculpting in the preparatory school group “Oh, you horses, my horses...”
Svetlana Tyurina
Notes on sculpting in the preparatory school group “Oh, you horses, my horses...”
Topic: “Oh, you horses, my horses...” (Sculpting a horse figure in motion).
Goals: To form children’s creative attitude towards the objective and living world around them.
Integration of educational areas: artistic creativity, communication, cognition.
Program content: Introduce children to the sculptural method of modeling. Learn to pull from the entire piece of plasticine the amount of material that is needed to model the neck and head of a horse; Freely use familiar sculpting techniques (pulling, folding, pinching, smoothing with fingers) to create an expressive image. Learn to sculpt a figure in motion on a sculpture; consolidate the ability to convey the image of a moving animal, the shape of body parts, proportions; consolidate the ability to firmly install a figure on a stand. Achieve accuracy in conveying the basic form and details. Develop aesthetic perception, imagination, spatial thinking, sense of shape and proportions. Cultivate a desire to experience beauty.
Preliminary work: a set of conversations to familiarize children with sculpture, with the work of the animal sculptor P. K. Klodt. visiting art museums and city monuments with parents.
Material and equipment: small sculpture depicting horses (several options) for examination. Pieces of plasticine of corresponding colors; stacks; planks or oilcloths; napkins; stands for finished works.
Progress of the lesson: The teacher reads to the children the story by K. D. Ushinsky “The Horse”:
The horse snores, curls its ears, moves its eyes, gnaws at the bit, bends its neck like a swan, and digs the ground with its hoof. The mane is in a wave around the neck, the tail is a pipe at the back, there are bangs between the ears, and a brush on the legs; the wool shines silver. There’s a bit in the mouth, a saddle on the back, golden stirrups, steel harnesses.
Sit down and let's go! To distant lands, to the thirtieth kingdom! The horse runs, the ground trembles, foam comes out of the mouth, steam comes out of the nostrils.
Educator:
— You and I have already become acquainted with such a wonderful art form as sculpture, we have learned who sculptors are. Who remembers which sculptor loved to depict horses? (that's right, Pyotr Karlovich Klodt, a wonderful Russian sculptor).
“Now you and I will sculpt horses so that they are just as beautiful: “the neck is like a bent of swans, the tail is a pipe, the mane is a wave along the neck, bangs between the ears.” and they were “as if alive,” just like P.K. Klodt’s.
The teacher invites the children to once again look at a small sculpture - horse figurines; and determine the best way to mold it. He clarifies the children's answers and advises them to try to sculpt a horse the way real sculptors do.
Educator:
- First you need to create the initial shape - a cylinder (roll out with straight movements of your palms). We cut one end of the roller (cylinder) about a third of the length with a stack, pull off the resulting parts and make a neck with a head from one part, and legs from the other. We lift the neck up and bend it a little to form a head. We make the legs from another part: we cut the stack into two equal parts, each of which is pulled back and rounded. We stretch the other end of the roller (cylinder) slightly so that the hind legs are the same length as the front ones.
The teacher invites the children to complete the figurine so that they get a beautiful horse:
-Children, let’s decorate the sculpted figurine so that it becomes a beautiful horse. We look at it from all sides and smooth it out. The mane and tail can be made more complex by sculpting the parts separately: roll up flagella or rollers and weave a tail and mane from them.
The teacher shows the basic methods of modeling and encourages children to create independently. As the lesson progresses, he helps children with advice, individual demonstrations, and leading questions to convey the horse’s movements and dynamics. Encourages children to convey the individual mood of their horse (galloping, swift; calmly grazing; prancing, etc.)
Educator:
- Don’t forget, children, that you are creating a “living” animal. Even if it just stands or lies motionless, it cannot be frozen and lifeless. The turn of the head, the bend of the back are moments of life.
All fashioned crafts are combined into a composition.
At the end of the lesson, each child can talk about their work.
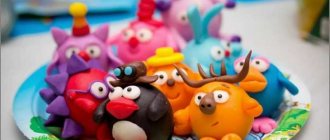
Multi-colored horse
Modeling from plasticine for children should be exciting, and in order to make it so, we recommend using bright colors and creating only interesting crafts. For example, you can make a colorful, playful horse from orange and black.
To carry out the work, we will not need new materials, the same board, plasticine of a brand convenient for work and a stack.
We proceed step by step:
- We take the main color and divide it into 2 large parts, five medium ones and four small ones. From two large ones we roll out the torso and head. From the middle ones we make the neck and legs, and from the four small ones we make hooves.
- We sculpt the body to the head. We coat the joints for the cast figure. We attach the hooves to the legs and sculpt everything to the body. When attaching the legs and when sealing the joints, be careful; the finished horse should not wobble.
- We make a lot of thin sausages for the bangs, mane and tail. Attach to the head and torso. Using a stack, we cut through and slightly open the horse’s mouth. In order for the horse to get an interesting color, make several small cakes and smear them on the back.
- All that remains is to make the eyes. We construct them from white cakes. We put black balls on them and place them on the head.
The modeling is finished, the horse is ready. Admire the result.
You can also draw a horse
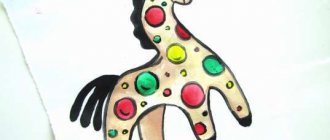
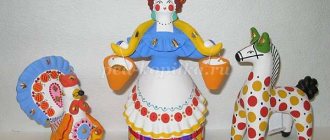
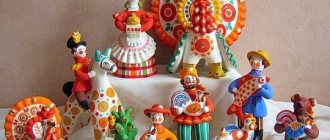
Dymkovo plasticine horse
Dymkovo horses are made from clay, and the finished products are decorated with a variety of patterns. But since we are considering plasticine modeling for children, we will make a plasticine Dymkovo horse.
Manufacturing process:
- Take your base color and divide it into two parts. One should be larger, the other smaller. We will need the first for making the head and neck, the second for the legs and torso.
- The difference between the Dymkovo horse and the others is that it has cone-shaped legs and a short and thick neck. The parts are easy to make, which is why such plasticine crafts for children are popular. For the legs and torso, roll out a thick roller.
- Using a stack, the previously obtained roller must be cut on each side in the center. This way you can get legs. The figure needs to be arched. We bend it until the legs are firmly on the surface of the desktop.
- Take the second part of the material and roll it up. From the resulting figure, mold an oval and a cone. The first part will be used as the head, the second will be needed for the neck.
- We connect the neck to the head. We iron the joints. We fasten the head and torso.
The instructions on how to make a Dymkovo horse from plasticine are coming to an end. It remains to design a few small parts.
What should be done:
- mold two cones from plasticine, these are ears, attach them to the head;
- the tail and mane for the horse can be made from thin sausages.
If you look closely at the photo, you will notice that the clay is painted. We won’t paint the plasticine, but you can add a few multi-colored cakes to the horse’s body. Smooth them over the material so that the finished figurine is beautiful.
The instructions on how to make a Dymkovo horse from plasticine are over. Of course, if you really want to make a product as close as possible to the original, you can apply patterns to plasticine using water-based paint, but this substance should only be used under adult supervision.
In another article, read the instructions for sculpting bunnies