Where to start?
So, regardless of which group you are conducting the lesson with, it is initially necessary to introduce children to the varieties of trees and shrubs.
After all, only a few of them will be able to name you more than 2 types of trees, not to mention shrubs. How can you do something you don’t know? Therefore, the teacher’s task is not only to tell, but also to show what this or that tree looks like. Perhaps you have teaching material on this topic: hand-drawn or printed from the Internet. But I recommend that you purchase demonstration pictures “Trees and Shrubs”, which can later be used in other classes. They cost just a penny, and the thick cardboard and large size of the cards will make you very happy.
The thematic picture dictionary “Flowers, Trees” will also serve well in classes where you need to get acquainted with the diversity of the plant world, depict it in the form of an applique or draw it. These two manuals will provide invaluable assistance to the teacher both in the initial stages of preparation for creative work, and in the case of a more in-depth study of the topic.
And of course, you will need templates to work. For the little ones, you will need to cut them out yourself, leaving only small elements for cutting - you need to practice using scissors from an early age. Students will only have to glue the necessary elements. For older children, “patterns” will be useful for tracing them on colored paper and then cutting them out yourself.
Application “Autumn tree” made of colored paper
To prepare such a fun applique, you need the following materials:
- colored paper
- cardboard
- glue
- disposable cardboard plate
First you need to take colored paper and tear it into small pieces. If you perform a cutting appliqué on an autumn tree, this significantly improves fine motor skills. Next, a disposable cardboard plate is greased with glue. Colored paper should be glued randomly onto it. This will be the crown of the tree.
Now you need to cut a rectangular piece of colored paper. This will create a tree trunk.
To make the work more beautiful, you can draw dark stripes on the tree trunk with a marker. After this, the finished parts are glued onto cardboard. This kind of work turns out to be voluminous and quite interesting.
Sources
- https://metodbv.ru/applikatsiya-derevo-iz-tsvetnoj-bumagi/
- https://gidrukodeliya.ru/applikaciya-osenniy-les
- https://academy-of-curiosity.ru/tvorchestvo/podelka-zimnij-les/
- https://podelunchik.ru/applikacziya-osennij-les
- https://masterimrukami.ru/applikatsii-osennee-derevo/
[collapse]
Stages of work
- At the first stage of work, we will prepare the silhouette of the tree. We give the kids cut-out blanks from brown paper; for the older ones, we give them stencils from cardboard or plastic, if available, to trace and cut out. Don't forget to offer children the safety scissors I mentioned above. When the tree is ready, put it aside for a while and work on the background.
- As you remember, we have blue cardboard as the background. You can cut out a semicircle from green construction paper and glue it in the middle of the bottom of the sheet. This will be the greenery on which we will place the tree. We also glue it on top. But there’s never enough greenery, right? Bright rich colors can decorate any application, so next you need to cut a thin green strip of paper and fold it across the entire width like an accordion. It will be weed. We glue it along the entire lower width of the sheet on top of the trunk.
- Next, perhaps, comes the most painstaking stage of work. We will make leaves. You can alternate the stages as you wish. You can first prepare all the elements of the image, and then all that remains is to glue them, or do everything in stages. I recommend that teachers make blanks for the leaves, since this will take a lot of time for children. For leaves you need multi-colored squares 3cmx3cm according to the color of the leaves: red, green, yellow, orange, light green, etc.
- Now we form the leaves directly, fold the squares like an accordion starting from any corner. When the accordion is ready, bend it in half and glue the middles together - these will be the original leaves. You need quite a lot of them to make the tree beautiful, so allocate more time for this work. One tree will require at least 30 leaves. Glue them onto the branches.
- The final stage of the applique will be clouds, which are formed from torn, crumpled blue paper and glued to the top of the background.
If you do the work at home with children, you can buy this interesting set of “Peppa Pig” applique, which can be planted under a tree.
Making the application “Autumn Kaleidoscope”
So, we will be interested in a multi-colored applique that would best symbolize a beautiful autumn tree. Pupils from the middle group can be offered a voluminous applique - with your help they will cope with this task perfectly. Such work will contribute to the development of fine motor skills, strengthening skills in working with scissors, and cultivating beauty and neatness.
To make the application we will need:
- sheets of blue cardboard;
- tree templates (ready-made colored or white for tracing);
- colored paper;
- pencil, glue, scissors, ruler.
Application “Autumn tree” made of autumn leaves
To work you will need:
- autumn leaves,
- cardboard with a silhouette of a tree,
- glue.
It is advisable to use bright colors of cardboard, so the tree will be more noticeable.
For work, you need to choose beautiful and undamaged dry leaves. They are cut into strips. To continue the task of appliquing autumn leaves, you need to prepare glue and a brush. The branches of the tree are coated with a brush. Dry leaves are placed on these branches. All that remains is to let the work dry.
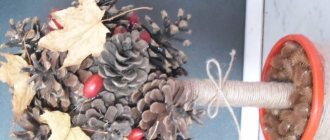
Application “Autumn tree” made from pumpkin seeds
In order to create this work, you will need:
- sheet of cardboard
- paints
- glue
- pumpkin seeds
- tree stencil
The first step is to create the autumn leaves. This application involves the use of pumpkin seeds, which are previously painted in different colors. It is advisable to use yellow, orange and red colors.
Coloring can be done with both paints and felt-tip pens. On a sheet of paper you need to draw a barrel with paint or use a stencil. Then the work will be more accurate. Now all that remains is to glue the leaves to the tree.
The work is ready.
Family tree making technology
If you want to try something new in your work, then I suggest you do some applique work in the form of a family tree. In this case, it is advisable to make the crown of the tree whole; voluminous leaves are not suitable here. In this photo they look very sloppy.
What will happen on the crown depends on your imagination. You can stick apples on which children will write members of their family (suitable for a preparatory group) or flowers. You can also ask parents in advance to bring photographs of family members in the form of small circles. Such a craft can even take pride of place in the living room and become a family heirloom. There are a lot of options, choose depending on the age of your students.
Cotton wool applications
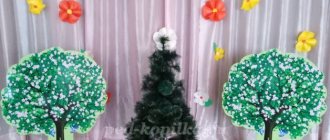
One of the most popular and simplest ways to imitate snow for crafts is cotton wool. The work done in this way turns out to be voluminous and truly winter-like.
Snow covered trees
What you will need:
- blue or light blue cardboard;
- pencil;
- glue;
- cotton wool
Let's get started:
- Take cardboard and draw a tree trunk on it.
- We coat the branches with glue and put cotton wool on them.
- In the background we draw snowdrifts and a few more trees, make clouds and bushes.
- We glue the cotton wool to the snowy hills and along the contours of the plants. The picture is ready.
We use cotton balls
For the next craft we will prepare: cardboard, colored paper and several cotton balls.
- We cut out snowdrifts from a strip of white paper and glue them at the bottom.
- We make several trunks for future trees from brown paper and place them on cardboard. We put a snow cap made of cotton wool on each of the branches.
- We cut out patterned snowflakes or make small circles using a hole punch and paste them over the trees.
Forest of cotton pads
As an alternative to regular cotton wool, you can use cotton pads. Additionally you will need: colored cardboard, glue and scissors.
Let's start designing the application:
- To imitate snow-covered hills, take a cotton pad, cut it in half and glue it onto cardboard.
- Then we cut out several strips - these will be tree trunks. Glue them onto the snowdrifts.
- We make the crown of the tree from a whole disk.
- To add liveliness to our picture, we draw snowflakes. They can be cut out of paper, drawn with cotton swabs, or small circles of cotton pads made with a hole punch can be glued on.
Another craft option:
- We draw Christmas trees on several cotton pads: we got four, then we cut them out.
- From another disk we make a month and snowflakes.
- We take cardboard and glue a cotton swab in the middle at the bottom - this is the trunk of one of the trees.
- Cut several cotton pads in half. In our case - three. We glue them at the bottom with different sides - we get snowdrifts and snowy hills.
- Place a cotton pad on top of a cotton swab - this is the crown of the tree.
- We place the cut out Christmas trees on the snowdrifts. Glue the month and snowflakes.
House in the forest made of cotton swabs
Don't forget about cotton swabs. With their help, you get cute snow-covered trees and houses.
Let's take: cardboard, colored paper, scissors.
- Whole sticks are suitable for tree trunks, but to create branches you will need to cut them.
- To make it at home, place cotton swabs next to each other horizontally or vertically. Cut out a triangular roof from white paper and glue it on top. We make windows and doors from colored paper. You can do the opposite: cut out houses from paper, and lay out the roof from sticks.
- We also cut out clouds, snowflakes and snowdrifts from white paper.