Progress of the lesson:
I. Surprise moment. On the teacher’s desk there is a table theater “Turnip”
covered with a napkin
(All characters except the mouse)
.
(I open)
a fairy tale has come to visit us . Did you recognize which fairy tale these characters ? (Turnip)
I’m reading an excerpt from V. Shipunova’s poem “Turnip”
Grandfather once sowed a turnip in the garden
Grandma and grandpa turnip
Grandfather for the turnip, grandmother for the grandfather,
Granddaughter for grandmother, Bug for granddaughter,
- Look carefully, which of the heroes is missing? (Mice)
- Do you think they can pull out a turnip without a mouse? (No)
-Where did the mouse go? Let's play the game "The Mouse Came Out"
and find out where she is.
II. Physical education break.
One day a mouse came out (children march in place)
See what time it is. (hands raised to forehead, looking into the distance)
One-two-three-four (clench fingers into a fist, unclench)
The mouse pulled the weights. (pulling with both hands)
Suddenly there was a terrible ringing sound (clapping)
The mouse ran away. (running in place)
“That’s where the mouse disappeared, it got scared and ran away.”
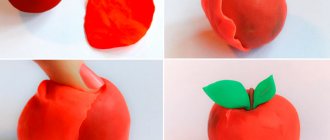
- How can we help grandfather, grandmother, granddaughter, Bug and cat? Let us make a little mouse (I’m showing a sample )
.
- Look how we will sculpt it (I show the method of sculpting and explain my actions)
.
- I take a lump of plasticine and roll it out in my palms in a circular motion, look, it turns out to be a ball. Show how you will roll (children show in the air)
. But the ball doesn't look like a mouse at all.
- You need to roll it out a little with your palms “back and forth”
, the ball turned into a cucumber
(children show in the air)
.
— I stretch out the sharp muzzle with my fingers. Now it looks a bit like a mouse.
- What a beautiful and cheerful mouse she turned out to be!
I invite children to choose any color of plasticine for the mouse.
Independent activity of children (children sculpt to calm music, individual work with children who have difficulty.
III.- Well done guys, they all turned out beautiful funny mice. Let's take one and help the heroes pull out the turnip.
(dramatization of an episode of the fairy tale “Turnip”
using a sculpted mouse).
I call one child, he begins:
“Grandfather for the turnip, grandmother for the grandfather, granddaughter for the grandmother, Bug for the granddaughter, cat for the Bug (put the mouse, mouse for the cat. Pull and pull - they pulled out the turnip!"
- Well done, everyone did their best and helped the heroes pull out the turnip. After class we will play with your mice some more.
I’m reading G. Lagzdyn’s poem “The Fairy
Tale is Dancing ” (excerpt)
A turnip is dancing in the garden
Grandma is dancing, grandfather is dancing
The granddaughter is dancing, the Bug is dancing
The cat is dancing, the mouse is dancing.
-Everyone is happy and dancing. Are you glad that you helped the heroes pull out the turnip?
Come on, come out in a circle, we will dance too. (dance “Like this”
)
We'll clap our hands
We will clap a little (children clap their hands)
Like this, like this
Our people are having fun (hands on the belt, bringing the foot to the heel)
This is how our feet dance
Our feet dance too (stomp their feet)
Like this, like this
Our people are having fun (hands on the belt, bringing the foot to the heel)
Spun around, circled around (spun around)
And they bowed to each other (they bowed)
Like this, like this
Our people are having fun (hands on the belt, bringing the foot to the heel)
-Well done boys! Now let's put the mice on the shelf and show them to our parents in the evening.
The lesson is over, help me clear the tables: boards, napkins.
Summary of a lesson on speech development in the second junior group “A fairy tale has come to visit us” Summary of a lesson on speech development in the 2nd junior group “A fairy tale has come to visit us” (Based on the fairy tales: “Teremok”, “Ryaba Hen”, “Kolobok” ".
Summary of direct educational activities in the first junior group “Spring has come” Summary of direct educational activities in the 1st junior group Perm region, Usolye city, MBDOU Kindergarten.
Synopsis of integrated direct educational activities in the second junior group “Spring has come to us” Synopsis of integrated direct educational activities in the 2nd junior group on the topic: “Spring has come to us.” Purpose: to generalize.
Summary of educational activities in the early age group “The doll came to visit us.” Summary of educational activities in an early age group in the form of joint partnership activities between adults and children “A visiting doll.
Summary of educational activities in the early age group “Matryoshka came to visit us” Summary of educational activities in the early age group. Educator: MKDOU kindergarten in the village of Zhmurova Poryagina A. A. Topic: “Visit us.
Summary of OD in the second junior group “Autumn has come to visit us” Synopsis of OD in the second junior group “Autumn has come to visit us” Program content: Expand children’s knowledge about the main signs of autumn.
Summary of a lesson on speech development and applications in the second junior group “The beautiful Christmas tree has come to visit us!” Summary of an integrated lesson on speech development and application in the second junior group together with parents Topic: “The Christmas tree is a beauty.
GCD “A fairy tale has come to visit us” in the junior group GCD junior group “A fairy tale has come to visit us” • The purpose of GCD: the development of the speech of a young preschooler in the process of theatrical and musical work.
Project “Designing a winter area in the second junior group “A fairy tale has come to visit us” The goal of the project: to create conditions for children for role-playing games on a walking area for role-playing games in winter. Relevance of the project:.
Source
Yanushko E.A. Modeling with young children
Plastic materials (plasticine, dough, clay, colored wax, etc.) provide great opportunities for the development and learning of children. During sculpting, fine motor skills of the fingers and imagination develop, manual skills are formed, children learn to coordinate hand movements, and acquire sensory experience - a sense of plasticity, shape, weight. In addition, they learn to plan their work and bring it to completion.
However, it is traditionally believed that it is too early for a one-year-old child to start modeling. Indeed, the crafts that a child is usually asked to do are quite difficult. They require, on the one hand, complex manipulations with plastic material, and on the other, delicate actions with small details. In addition, creating crafts requires patience and time.
Due to their age, young children are not able to concentrate on one type of activity for a long time. The level of development of fine motor skills in children of this age makes it difficult to work with large pieces of plastic material, and also does not allow making and attaching small parts. In addition, children may be tempted to taste the plasticine and smear it on the table and other surfaces that are not at all intended for this purpose. But, despite all the difficulties described above, you should not refuse to work with plastic materials.
In the process of working with young children, the author developed a special technique that allows you to create crafts from dough and plasticine in literally a matter of minutes. During the classes, children get acquainted with plastic materials and their properties, learn to make plasticine pictures using pressing and smearing methods, create simple three-dimensional crafts, and master the technique of indentation. Young children learn the skills of working with plastic materials quickly and without much difficulty. You just need to interest the kids and show them how to act.
The most suitable materials for working with young children are dough and plasticine. For classes, you should use soft, warm dough and good quality soft plasticine. Modern technologies have made it possible to improve plasticine. It became softer and more elastic, acquired pure and varied colors, and stopped sticking to the hands. These qualities make working with him a pleasant and interesting experience. Other materials can be offered to children as they grow older. Children are more willing to experiment with new materials in a familiar situation, when basic work skills have already been formed.
Modeling classes with young children can be carried out either individually or in small groups (2-4 people). The duration of classes with children of the second year of life is 7–10 minutes, of the third year of life – 10–15 minutes. In order to consolidate the kids’ skills, it is recommended to use the same plot several times.
In addition to teaching basic skills in working with plasticine, developing interest and a positive attitude towards modeling, classes provide many opportunities for the learning and development of children.
Speech development and familiarization with the outside world
Modeling classes are also activities for developing a child’s speech. During the work, there is a continuous conversation with the children, which, of course, has a positive effect on their speech development. The playful organization of activities stimulates children's speech activity and causes speech imitation.
In addition, in an exciting game, being at the peak of emotions, the child is able to learn many new words and expressions. Therefore, modeling classes help expand children’s active and passive vocabulary.
For classes, you should select stories that are close to the life experiences of children. They allow you to clarify already acquired knowledge, expand it, apply the first versions of generalization, and give kids ideas about color, size, shape, number of objects, and their spatial arrangement.
Development of imagination and creativity
Modeling classes involve joint creativity between an adult and a child. In order to interest children, it is necessary to play out the situation, show them how to operate with plastic materials. Once children have developed basic skills in working with plastic materials, they will have more opportunities to work independently. This will allow kids to have some freedom of choice when making crafts. Let the child choose what color the plasticine flower will be or where the plasticine snowflake will be located. This approach allows you to develop children’s imagination and their creativity (creative beginning of the individual).
And, of course, it is very important to emotionally charge children and turn the activity into an exciting game. The finished work must be carefully examined, approved, and the little author praised for his efforts. As one wise man said: “A child is not a vessel that needs to be filled, but a fire that needs to be lit.” Since the foundation of personality is laid at an early age, it is important to try to ignite the spark of creativity in children.
Personal development
You should be attentive and conscious about the future fate of children's work. It is very important that children feel respect for their creations. We must not forget that children of this age need the constant attention of a significant adult, his praise and approval. The expectation of such attention is one of the most powerful psychological motives that encourage children to act and achieve results. Therefore, it is useful to organize exhibitions of children's work and update them regularly.
You need to praise kids more often, and not be afraid to overpraise them. After all, such an attitude today will allow them to feel competent and confident people in the future.
Aesthetic development
During modeling classes, children should be offered dough of different colors, different types of plasticine and bases for plasticine pictures.
In general lessons, you can invite kids to compare different options for making the same plasticine picture or craft. Let each child choose the option that he likes best and embody it in his creativity. It is in this way, by involving children in practical activities, awakening in them the desire to try different options for implementing crafts, that you can arouse in them an aesthetic sense and teach them to see beauty.
Below are examples of classes with young children (for a more detailed description of the methodology, see the book Yanushko E. A. Lepka with young children. - M.: Mozaika-Sintez, 2007).
Introduction to plastic materials
Before you start modeling, you need to introduce children to plastic materials, give them the opportunity to feel their texture and properties.
Activity “Hide the ball”
Target . Introduce children to the dough and its properties; teach how to knead the dough with the fingers and palms of both hands; generate interest in working with the test; develop fine motor skills.
Materials . Dough, small (but not small) plastic or glass balls (preferably with a smooth surface so that the plasticine does not stick to them), damp cloths.
Reception of sculpting . Kneading.
Progress of the lesson
Take a small ball (preferably the ball and the dough are of different colors) and show it to the children. Cover the ball with a handkerchief.
Educator. Guys, where is the ball? No ball! Where did he hide?
Take off the scarf with your children.
Educator. Here's a ball! Found!
Give the children a piece of dough and invite them to knead it and play with it. Then show the bright balls and ask them to first hide them in the dough and then find them. The action can be repeated several times.
Lesson “This is such plasticine!”
Target . Introduce children to plasticine and its properties; teach how to knead plasticine with the fingers and palms of both hands; develop an interest in working with plasticine; develop fine motor skills.
Material . Medium-sized pieces of soft plasticine in different colors.
Reception of sculpting . Kneading.
Progress of the lesson
Show the children a box of plasticine. Tell us about his qualities. Repeat the names of the colors.
Educator. Plasticine comes in different colors, it is soft, and you can use it to make various interesting and beautiful crafts.
Show the children how to cut the plasticine. Cut several plasticine bars of different colors into medium-sized pieces.
Invite the kids to choose pieces of plasticine. Show how you can knead plasticine with your fingers, squeeze it, changing its shape. Give children the opportunity to play with plasticine without limiting time. This is very useful for developing movements and fine motor skills of the fingers. It is recommended to start modeling classes with this exercise.
Then say that in the next lessons the children will make interesting crafts from plasticine, and put the plasticine out of their reach.
Mastering the techniques of smearing and pressing
In these classes, children learn to create plasticine pictures using pressing and smearing techniques. This technique of working with plasticine allows you to very quickly create bright plasticine pictures.
In order for children to learn these skills, adult help is needed.
Pressure . In the right place on the cardboard, the teacher places a small plasticine ball with a diameter of 5–10 mm. Then he takes the index finger of the child’s right hand, places it on the ball and with his index finger presses on top of the child’s finger. As a result, a round cake is obtained from the ball.
Smudging . In the right place on the cardboard, the teacher places a small plasticine ball with a diameter of 5–10 mm, then takes the index finger of the child’s right hand, places it on the ball and with his index finger first presses from above, and then, without reducing the pressure, pulls the baby’s finger in the desired direction. The main directions of smearing are from top to bottom and from left to right (for the right hand), from right to left (for the left hand).
As children master the skills of creating plasticine pictures, they begin to independently roll balls (1-3 balls), place them on the picture, and use pressing and smearing techniques.
During work, it is necessary to ensure that the child’s finger does not bend, but remains straight and tense, so that he acts with the pad of his finger and does not scratch the plasticine with his nail.
Lesson "Fly agaric"
Target . Teach children to pinch small pieces of plasticine from a piece and roll them into balls with a diameter of 5–7 mm, press the plasticine ball with their index finger, attaching it to the base, place the balls at an equal distance from each other; develop an interest in working with plasticine; develop fine motor skills.
Materials . White A5 sheets of cardboard (with a pre-prepared drawing or appliqué) (according to the number of children); white plasticine; a toy or drawing depicting a fly agaric.
Modeling techniques . Pinching, rolling, pressing.
Progress of the lesson
Before starting the lesson, prepare the basis for creating a plasticine picture - an image of a fly agaric. To do this, cut out a hat from red paper and stick it on a sheet, and draw a leg.
Start the lesson with a riddle.
Educator. Listen to the riddle. Try to guess what it is about. Near the forest on the edge, Decorating the dark forest, It grew motley, like Parsley, Poisonous...
Educator. That's right, it's a fly agaric!
Show the children a toy fly agaric or a picture of one.
Educator. Let's take a closer look at the fly agaric. Here's his leg. And this is a hat. What's on the fly agaric's hat? White specks.
Give the children blanks with images of fly agarics and white plasticine.
Educator. Look, your pictures also show a fly agaric. There's just something missing from him. Who guessed? That's right, white specks on the cap. Let's make white specks so that everyone will recognize the fly agaric and will not pick and eat the poisonous mushroom.
Show the children how to make specks: pinch off small pieces of plasticine and roll them into balls with the thumb and index finger of your right hand. In order for the skill to be established correctly, you should approach each child and help him complete the task.
Ask the children to make 2-3 balls themselves, prepare the rest in advance. Then offer to stick the white balls to the fly agaric cap yourself using pressure. There should be 5–10 specks in total on the cap.
Lesson "Sun"
Target . Continue teaching children to smear plasticine on cardboard; develop an interest in working with plasticine; develop fine motor skills.
Materials . Sheets of blue or light blue cardboard, A5 format (according to the number of children); yellow plasticine.
Reception of sculpting . Smudging.
Progress of the lesson
Before starting the lesson, prepare the basis - “the sun in the sky.” To do this, roll a ball out of yellow plasticine, then flatten it and press it onto the cardboard in the center of the sheet.
Give the blanks to the children.
Educator. You have blue skies in your pictures. And the sun is shining in the sky. It only shines weakly and does not warm at all. Why do you think? Because the sun has no rays. Let's help him and make rays - like this.
Invite the children to press their finger on the edge of the plasticine sun, press harder and pull their finger down or to the side - you will get a sunbeam.
Educator. This is how the beam turned out! Let's make the sun shine a lot! Now it shines brightly!
Encourage kids to act independently. In order to make the sun's rays longer, you need to press harder on the plasticine. For ease of work, you can rotate the workpiece (it is easiest to perform actions in the direction from top to bottom or from left to right with your right hand).
Mastering the pressing technique
To create pictures using the indentation technique, a base is used, onto which an even layer of dough or plasticine is applied.
For pressing, you can use various small objects: shells, pebbles, bottle caps, buttons, beads, sticks, etc., as well as various materials: cereals (peas, beans, buckwheat), polystyrene foam, etc.
At the beginning of work using the described technique, it is recommended to choose such plots that will allow you to arrange the pressed parts in any sequence. In the future, plots are proposed that require the arrangement of details in a certain order or in a certain sequence, which requires special work on the development of spatial concepts in children - the concepts of top, bottom, in the center, next to, in the corner, etc.
Lesson "Caterpillar"
Target . Teach children to press parts into the dough base in a certain order; develop an interest in working with plasticine; develop fine motor skills.
Materials . Dough base of any color; buttons of bright colors of different sizes (it is better to take buttons with stems).
Reception of sculpting. Indentation.
Progress of the lesson
Before starting the lesson, prepare the basics for creating pictures. It is recommended to do this work on individual bases (A5 format and smaller), but you can also create a collective work (A4 format and larger). In this case, children can make several caterpillars by attaching buttons one at a time.
Show the children the base and place a button caterpillar on it. Draw children's attention to the fact that caterpillars can be straight and curved, long and short, large and small (use buttons of different sizes), and different colors.
Then give the children buttons and ask them to make their own caterpillars. First, use the same buttons, then invite the kids to choose the buttons they like. However, you should not immediately offer all the variety of buttons. You can make multi-colored caterpillars in one lesson, large and small caterpillars in another, etc. You can pull the buttons out of the plasticine - “the caterpillars crawled away” and press them in again - “the caterpillars crawled away.”
Modeling three-dimensional figures from dough and plasticine
In these classes, children learn sculpting techniques such as rolling and rolling; learn to create crafts using mastered techniques.
With young children, you should sculpt objects that are simple in shape and familiar to children (based on balls and sausages). It is necessary that during work the object (or dummy) is in front of the children’s eyes and they can remember its appearance. Before starting work, you need to help children determine the shape and color of the object, and highlight important details.
Lesson "Drying"
Target . Teach children to roll out sausages from plasticine and connect their ends; develop an interest in working with plasticine; develop fine motor skills.
Materials . Plasticine of light brown or other suitable color, divided into medium-sized pieces; natural drying; doll or other toy.
Modeling techniques. Rolling out, connecting parts.
Progress of the lesson
Start your lesson with a game. Show the children the toy and natural drying.
Educator. Look what the doll Masha brought with her. This is drying. The drying is delicious and crispy. Masha ate the dry food. He says: “I want more!” Let's make dryers for Masha.
Invite the kids to carefully examine the dryer, pay attention to its thickness and shape. Then show how to make it: roll out the sausage (length about 10 cm, diameter 1 cm) and connect the ends to make a ring.
After this, invite the children to make their own dryers. If there is any difficulty, please help.
When the crafts are ready, continue the game: put the dryers on a plate, treat the doll and other toys.
Note : The same dryers can be made from dough.