Abstract of an art lesson on the topic: “Decorative drawing”, 1st grade
MBOU Secondary School No. 29, Ekaterinburg
Primary school teacher Syomina Serafima Andreevna
Art lesson in 1st grade
Art lesson on the topic:
"Decorative drawing"
The purpose of the lesson:
create a composition “Bouquet of Flowers” using the “nitcography” technique.
Tasks:
- teach children to work using the “nitcography” technique;
- teach children to coat the thread with paint to the desired consistency;
- teach children to place the thread on paper to create a pattern;
- teach children to press paper with thread to create a pattern;
- teach children to complement the pattern with various elements to create a recognizable image (leaves, stamens, small details);
- teach children to place objects on a sheet of paper;
- teach children to mix paints.
I. _ Organizing time.
II . Explanation of new material.
A)
Introduction.
Guys, have you ever given a bouquet of flowers as a gift? Did they give it to you? What is a bouquet? Bouquet
- These are cut or picked flowers, matched to each other.
Yesterday, while preparing for your lesson, I learned from this book that in every nationality, bouquets are composed differently and differ significantly from each other. I was very interested in Japanese bouquets. Japan is a small country located on islands. The Japanese take great care of their greens, because... it purifies the air and that is why their bouquets are famous for having few flowers in them. Japanese bouquets are built according to this principle. Their bouquets use dry branches, leaves, and maybe just one flower or several. Each of their bouquets has deep meaning and has its own name. The Japanese are famous for their ikebana, which is the Japanese word for flower arrangement. According to the rules, in relation to ikebana, flowers are arranged in a vase in a “natural form”. The stems of each flower should stand independently and nothing should obscure them.
When someone from the family comes from the forest or garden, they probably bring winter or summer bouquets? Are every flower visible in these bouquets or are they obscured by each other? Russia is a big country and we arrange bouquets in an oval. Our bouquets most often turn into a broom. If you are arranging a bouquet, you need to make sure that every leaf and blade of grass is visible. Russian bouquets follow two main directions: 1) natural, i.e. in a vase, flowers stand the same as in nature; 2) decorative, where attention is paid to shapes and contours. The shape of the bouquets can be round and freely assembled, one-sided when the bouquet is placed against the wall, vertical, massive, etc.
Today you will be artists and your task is to create a beautiful bouquet using an unusual technique - thread printing. Your brush today will be a thread with which you will draw various patterns. But you will definitely need a brush and gouache to apply color to the thread.
In front of you you see half a sheet - this is a palette on which you will smear the thread with paint and also mix the paints to obtain the desired color. Also in front of you is the sheet that I distributed to you. It is a training one, you will practice creating a pattern on it. And each of you has two threads, one for the training pattern, the other for depicting our bouquet on a blank sheet.
b)
Explanation of new material.
Let's look at the illustrations I drew. We see that the bouquets are all different both in shape, number of flowers, and color scheme. You need to remember that the higher the pattern, the lighter it is, the lower it is, the darker it is. For the top patterns it is better to take yellow or orange paint, for the patterns below - red, burgundy and for the bottom patterns - blue.
Take the training sheet, place it in front of you, fold it in half crosswise and open it. Take a thread, fold it in half, wet its two ends in water so that they do not “diverge” while working. Fold the thread in half, but so that the end of the thread with the loop is slightly higher than the wetted end of the thread. Fold the thread in half again, aligning the ends (the loop should be located opposite the loop). And once again fold the thread in half and again the loop is opposite the loop. Please note that the end of the thread soaked in water does not participate in folding; we need it in order to hold on to it while drawing.
Place the folded thread on the palette, leaving the wetted end outside it. Take a brush, soak it in water and put on it the paint that you like best, and with the brush you begin to completely paint the folded thread, except for the wetted end. After the thread is dyed, turn it over and coat the other side with the same paint.
Then you take the dyed thread and carefully unroll it, because... she might get confused. After the thread has been unrolled, you need to remove excess paint from it. Holding the wetted end of the thread with your right hand, run two fingers of your left hand - thumb and index - along the thread, removing excess paint. Your hands will be dirty, but that's the technique.
Take a training sheet, already folded in half, attach a thread to the fold line so that its soaked end extends beyond the sheet. We will pull the thread for it. With the other end of the thread you begin to draw loops, one loop is larger, the other - smaller in it - and bring the same end to the fold line so that it also extends beyond the sheet.
Place the clean side of the sheet on the side of the sheet with the thread, press firmly and, holding both ends of the thread, pull it out, you can pull it at one end. Then open the sheet and see what happens. And the result was beautiful patterns, similar to flower petals.
The second time you also fold the thread, put another paint on the brush and remember, the higher the pattern, the lighter it is, the lower it is, the darker it is. Take less paint, because... The thread is cotton, it absorbs well, remove the excess paint again, also apply the thread from below, just below the already obtained pattern, press the paper tightly, pull out the threads and see what happens.
Whoever has space left at the bottom of the sheet can make a third pattern in the same way.
In the bouquet we must add leaves. You need to mix paints on the palette. What colors are the leaves? (Green, yellow).
We will mix these paints, adding white so that the flowers do not get lost against the background of the leaves.
The leaves will “extend” from the fold line. Having loaded the brush with paint, I smear and stretch, press the brush and stretch.
Decorate the middle of the leaves with stamens. In a flower, this is the place where the pollen is found. We will depict them with thin lines coming out from one point.
V)
Use of technological maps.
Let's look at a diagram that shows the patterns you can make with thread. You can also come up with your own patterns.
Don’t forget, the higher the flower is, the lighter it is, the lower it is, the darker it is. For the top colors it is better to use yellow or orange paint. For lower flowers - red, burgundy, and for the lowest ones - blue. We will use green paint for the leaves.
III . Independent activity of children.
A)
drawing a pattern on a practice sheet;
b)
choosing a color for drawing a bouquet;
V)
location of the pattern on the sheet.
IV . Individual work with children.
A)
help position the thread on the practice sheet;
b)
help choose colors for the bouquet;
V)
help place the pattern on the sheet.
V. _ Analysis of children's work.
5
LESSON SUMMARY ON DECORATIVE DRAWING “THE MIRACLE OF GZHEL”
Transcript
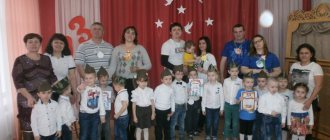
1 Mikhailova Marina Borisovna State budgetary special (correctional) educational institution for students with disabilities special (correctional) secondary school 657 Primorsky district of St. Petersburg LESSON SUMMARY ON DECORATIVE DRAWING “THE MIRACLE OF GZHEL” Goal: to expand children’s knowledge about Gzhel painting Objectives : teach children to independently decorate the silhouettes of dishes (cups, saucers) with characteristic elements of Gzhel painting; — consolidate drawing skills with the whole brush and its end; — consolidate the ability to evenly alternate flowers, leaves and berries in a circle; - exercise children in identifying cold and warm colors of the spectrum; develop memory, attention, speech; — replenish students’ active and passive vocabulary. to cultivate interest in folk art, respect for the work of folk craftsmen, patriotic pride in Russia, rich in folk talents. Equipment: Gzhel dishes, tables with painted elements, sample cup and saucer. Silhouette images of a cup and saucer. Cut pictures. Chamomile petals with warm and cold tones, wreath with ribbons. Progress of the lesson:
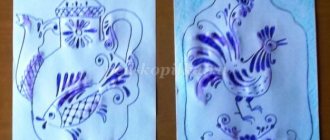
2 Organizational moment: An exhibition of Gzhel ceramics was organized in the classroom. The teacher is dressed in folk costume. Children enter the classroom to the tune of a Russian melody. The teacher calls everyone together: “Hey, honest gentlemen! Come join us here! How do we have containers, bars, all sorts of different goods. Come, come, Look, look!” Children come up and look at the Gzhel ceramics: “Look what a wonderful painting on this dish.” Sit down. Now I will tell you about Gzhel folk craft. — “In a certain kingdom, a Russian state, not far from Moscow, among forests and fields, stands the town of Gzhel. A long time ago, there lived cheerful and beautiful, brave and skillful craftsmen. They got together one day and began to think about how it would be better for them to show their skills, please all the people, and glorify their land. We thought, thought and came up with something. They found wonderful, white clay in their native land. And they decided to sculpt various dishes from it, and such as the world had never seen. They painted their dishes with blue paint of different shades. Painted on dishes
3 different patterns of mesh, stripes and flowers. The dishes turned out to be very intricate and elegant. People fell in love with her and the world began to call her “a gentle blue miracle.” The masters glorified their beloved land throughout the world and told everyone what skilled craftsmen live in Rus'. Children read poems: “Blue birds across a white sky, A sea of blue flowers. Jugs and mugs true or false? Golden handicrafts." “The blue fairy tale is a feast for the eyes, Like drops in the spring. Affection, care, warmth and patience Russian ringing Gzhel
4 — What products did the craftsmen sculpt? — How did they decorate their dishes? — What colors did you use in your work? — What is the name of this painting? (Children answer questions) 1. Now you and I will play. The first game is “Collect the broken dishes.” From individual parts, children assemble a complete product: a saucer and a cup. 2. The second game “Who can collect the daisy faster.” The daisies must be the same color: either cold shades or warm ones. You completed the tasks well. But there is time for business, and time for fun. So we'll work now. (Children sit at the tables) - Gzhel masters worked hard and well, it’s not for nothing that the people composed many proverbs and sayings about work. Let's remember some of them. - You can't pull a fish out of a pond without difficulty. - Like the master, so is the work. - What goes around comes around. - Labor feeds a person, but laziness spoils him. - Persistence and work will grind everything down. — Now we will paint the silhouette of a cup and saucer. CUP. — where is the pattern on the cup? (in the center, in the middle) - what colors are used? (blue, cyan) - What needs to be done to get a dark blue color? (you need to press the brush harder) - What needs to be done to make the shade lighter? (press the brush less).
5 — Where do we paint it completely with blue paint? (along the edge of the cup, bottom and handle) - Where do we start painting the pattern? (from large parts, petals, core, stem, leaves). — What do they paint next? (edge of cup, bottom, then handle) SAUCER. — We are looking at a sample saucer. -Where is the big flower located? (in the middle) - What do we highlight with a straight line? (bottom of the saucer) - How is the pattern located? (in a circle) - What does the pattern consist of? (alternating flowers, leaves and berries) - What wild berries are used in the pattern? (blueberry, blueberry) - To draw blueberries, what do you need to do? (you need to press the brush hard) - And to draw blueberries? (press weaker) - We will decorate the edge of the saucer with a border. This will give the saucer a finished look. The border should be painted holding the brush flat. — What is the procedure for painting? (from the middle to the edge). The teacher removes the samples and leaves only tables with elements of Gzhel painting. Children begin to work independently. The teacher conducts individual work with children. 6.Analysis of work: Mark the children who: have a correctly drawn pattern, correctly chosen colors, a cup and saucer that look like real Gzhel ones. - Finished the job, go for a walk! We worked hard, and now we can play.
6 Game "Carousel". For the game, a wreath with long ribbons according to the number of students is used. The game is played to a Russian melody with the words: “Barely, barely, barely, the carousel began to spin. And then, then, then, still running, running, running. Hush hush, don't run. Stop the carousel. One, two. One, two, the game is over.” Summary of the lesson. It's time to part ways. You worked hard, your painting turned out well, almost like the real masters of Gzhel. Well done! The lesson is over.
The importance of decorative drawing in working with preschool children
author: Fokina Inna Olegovna
Teacher of MBDOU No. 137 of the city of Penza
The importance of decorative drawing in working with preschool children
The importance of decorative drawing in working with preschool children.
In kindergarten, drawing takes a leading place in teaching children the fine arts and includes three types: drawing of individual objects, plot and decorative. Each of them has specific tasks that determine the program material and the content of the work. The main task of teaching drawing is to help children understand the surrounding reality, develop their powers of observation, cultivate a sense of beauty, and teach drawing techniques.
There are two directions in folk art : urban artistic craft
and
folk arts and crafts
.
As a method of traditional artistic crafts, one can name: painting on wood
(Khokhloma, Souvenirs, Gordets, Northern Dvina) and
on porcelain
(Gzhel),
clay toys
(Dymka, Kargopol, Filimonovo).
Folk art items are diverse. These can be toys made of wood, clay, carpets, lace, lacquer miniatures, etc. Each product carries goodness, joy, and imagination, captivating children and adults.
Decorative drawing tasks.
Decorative drawing, like all types of fine arts, develops a child’s sense of beauty. Works of folk decorative art are close to children due to their colorfulness and simplicity of composition. By introducing children to works of decorative art from various regions and nationalities of our country, the teacher must instill in children a sense of love for the Motherland and respect for the work of the people who create these works of art.
Decorative drawing solves the following problems:
- develop a sense of composition in connection with the construction of patterns on various forms;
- develop a sense of color;
- develop the ability to distinguish between styles in the decorative arts and the use of their individual elements in one’s creativity;
— improving technical skills in drawing with a brush and pencils.
The child must feel and understand how the ornament decorating it changes depending on the purpose and shape of the object. From here he learns the meaning, the appropriateness of design, the connection between form and content.
An important task of learning is to develop the ability to make patterns, take into account rhythm, symmetry, and color.
Children, getting acquainted with decorative drawing, must learn to clearly imagine what rhythm and symmetry are, without which decorative art cannot exist.
Developing a sense of color stands out as a major task. The color in a painted ornament is closely related to the composition; in a pattern they are inseparable from each other.
The task of using color in decorative painting becomes more complex in each group, starting with the brightest, most contrasting combinations and ending with shades of warm and cool colors in different combinations. The implementation of these tasks can begin when children master drawing the simplest pictorial forms. Children acquire initial visual skills in the first and second junior groups
, and some tasks in the second junior group are decorative in nature (for example, decorate the edges of a scarf with stripes).
But the main goal of such an activity is not to create a pattern, but to consolidate the ability to draw straight lines in different directions. Direct instruction in decorative drawing begins with children of four years old.
Objectives of teaching decorative drawing in the middle group:
develop skills in the rhythmic arrangement of shapes in a pattern on a strip, square, circle; develop a sense of color - the ability to beautifully combine contrasting colors; develop skills in drawing various large and small shapes - simple elements of a pattern; develop technical skills in using a brush (touch the paper easily, making dots; act with the entire surface of the brush, drawing stripes, strokes).
At first, children learn to draw straight lines with a brush and apply rhythmically repeating strokes or dots between them, alternating strokes by color, changing their position when the pattern becomes more complex. Smear
- the easiest decorative element to perform, since it does not require particularly precise movements and is obtained by simply applying the brush to the paper. Therefore, strokes are included in the pattern first, and then dots.
Dot
requires mastering a new technique of working with a brush (the brush is held vertically) and sufficiently developed coordination of movements to just touch the paper with the end of the brush.
Alternation
is a more complex compositional technique, as it is based on a combination of several forms. Children in the middle group can alternate between two elements in shape or color. In addition to dots and strokes, children learn to use circles and rings in patterns, the drawing techniques of which they learned in the younger group. In decorative drawing, the image of these forms changes somewhat: they are smaller in size, when drawing they must all correspond to each other in size and, in addition, they are not associated with the image of the object, which also makes their image more difficult for the child.
Children of the fifth year of life
you can set more complex tasks for decorative drawing: symmetrically arrange the pattern depending on the shape of a sheet of paper or a three-dimensional object; use a variety of straight, rounded lines and shapes, plant elements in the pattern; find beautiful combinations of colors depending on the background; skillfully use a brush (paint with the end , with the whole brush, move it freely in different directions).
First, the skills acquired in the middle group are consolidated in drawing up patterns consisting of straight lines, strokes, and dots on different forms. Children are given a larger number of colors to choose from; elements combined in patterns can be of different sizes. of alternating
is more often used as a compositional technique , which makes the pattern more decorative. Alternation can include 2-3 elements, different in shape or color. As pattern elements, children learn to use a variety of linear shapes (thick and thin lines, strokes, dots, circles) and more complex shapes - plant shapes (leaves, berries, flowers).
In decorative painting, the colored background can be more varied than in thematic painting. In the older group, children are taught to make patterns on three-dimensional shapes. The difficulty of applying such a pattern is that it is difficult to maintain the composition of the pattern, since you only see it partially; the elements of the pattern sometimes change their shape somewhat due to the convex surface. Therefore, three-dimensional objects offered to children for sketching should have simple shapes. These can be toys modeled on the Dymkovo toys made of clay - birds, horses. The pattern of the Dymkovo toy is simple and rhythmic - a combination of straight and wavy lines of different thicknesses and dots, circles, rings. In terms of color, these ornaments provide the simplest contrasting combinations of a white background with several bright primary colors.
seventh year children
life of decorative drawing are as follows: develop a sense of composition: learn to make patterns on flat and three-dimensional forms depending on their characteristics and the purpose of the object; develop a sense of color: learn to use a variety of colors with their shades in various combinations; learn to see the features of different types of folk decorative painting, use individual elements of folk ornaments in drawings; improve technical skills in drawing with paints and pencils.
Children who come to the preparatory group are familiar with the basic principles of constructing patterns on round and rectangular shapes. They are offered new shapes - rectangle and polygon and various planar shapes of objects - vases, jugs, cups, mittens, hats, etc. These objects do not have the correct geometric shape, and the pattern on them requires the use of different principles (for example, on a jug according to on the edge of the neck there is a linear ornament, on the rounded part there is a pattern from the center). The concept of symmetry is also becoming more complex .
In addition to arranging identical shapes to the right and left, children are introduced to mirror reflection, where parts of the pattern change their position accordingly.
Then children learn another technique of filling the entire form with a uniform pattern based on the principle of a mesh pattern - repeating and alternating elements in a checkerboard pattern
.
In decorative drawing in all groups only gouache is used, which allows you to apply color on color, and this is often required in decorative drawings and is impossible when working with watercolors.
Methods of teaching drawing in kindergarten age groups
The main principle of teaching children of any age to draw is clarity: the child must know, see, feel the object or phenomenon that he is going to depict. Children should have clear, precise ideas about objects and phenomena. There are many visual aids used in drawing classes. All of them are accompanied by verbal explanations.
Let's look at techniques for teaching drawing in different age groups in kindergarten. First junior group
. First of all, the teacher’s activity itself is a visual basis. The child follows the teacher’s drawing and begins to imitate it. A child who watches how a drawing is created also develops the ability to see the features of shape and color in their planar image. But imitation alone is not enough, so the methods of teaching children become more complicated. The teacher can use demonstrations of drawing techniques and verbal explanations, and the children will complete the task themselves without a reference drawing. It is important here that the process of constructing a drawing by the teacher’s hand is well coordinated with the course of verbal presentation. The learning of children of primary preschool age is positively influenced by the use of various game moments. The inclusion of game situations makes the subject of the image more intimate, lively, and interesting.
Teaching methods in the second junior group
are associated with the development of the ability to depict various forms, the development of technical skills in the use of pencil and paint, and the ability to depict various objects. Conducting drawing classes with three-year-old children requires specification of all the material. Perception of surrounding life is the basis of teaching methods. Therefore, all images with which lines, circles, and dots are associated must be previously perceived, and not only visually, but in active activity: “They ran along the paths,” “They wound balls of thread and rolled them,” etc. Active cognition of an object creates a prerequisite for active actions when drawing.
The teacher reminds the children about the subject of the image, shows new movements that the children need to master. First, he makes movements with his hand in the air, then he repeats this movement with the children.
If one of the children fails to move, the teacher helps the child’s hand take the desired position and make the appropriate movement. In the same way, it is necessary to first show all drawing techniques. The teacher shows how to hold a pencil or brush correctly, how to put paint on the brush and move it across the paper. In the second younger group, the artistic word is used as a special technique. The teacher can start the lesson with a riddle or reading a short poetic passage.
Children who have weaker drawing skills should be given more attention during the lesson, encouraging their desire to draw whenever they want. An individual approach at this age is especially necessary, since this is where children’s inclinations and abilities begin to form. Before the middle group
The task is to teach children to correctly depict an object, conveying its main features, structure, color.
As in the younger group, when examining an object, the teacher uses an outlining gesture and verbal explanation. Program requirements are based on the development of the ability to more consciously perceive, the ability to distinguish and compare objects with each other in the process of their detailed examination before the lesson. That is why in the middle group the use of nature begins to occupy a greater place.
When examining an object, the teacher draws the children’s attention to the shape and arrangement of parts, their sizes, colors, and various details in order to make it easier for children to correctly convey the structure. When drawing, the teacher should pay the children’s attention only to the visible parts of the object.
Taking into account the characteristics of four-year-old children, playful aspects should be included in various teaching methods. For example, a tumbler doll asks to draw her portrait; when analyzing the work, she looks at and evaluates the drawings. Play always brings excitement and joy to children’s work, which increases their activity. In decorative drawing, a sample drawing made by a teacher can be used, on the basis of which he first introduces children to the principle of constructing a pattern, the elements that are included in it, and shows how to work. In the older group
Much attention is paid to the development of children's independent creativity. The creative work of the imagination can be based primarily on the richness of experience. For older children, play is still one of the methods of learning to draw.
More complex and varied objects can be used here as nature than in the middle group. At first, the nature is simple - fruits, vegetables, but if in the middle group, when drawing an apple, attention was paid to its main features - round shape and color, then in the older group children are taught to see and convey the characteristic features of exactly the apple that lies in front of them - shape round, elongated or flattened, etc. In order to highlight these features, two apples of different shapes can be offered as nature. Drawing from life in the senior group does not require additional demonstration of drawing techniques, with the exception of mastering new techniques. After examining the nature, the teacher explains to the children the sequence of depicting the parts. To find out whether the children understood the explanation, the teacher asks one of them where they will start drawing, and at the beginning of the lesson, he first of all approaches those who began to work incorrectly. The sample made by the teacher is used in the older group mainly in decorative drawing. Depending on the purposes of drawing, the method of using the sample may be different. But more often in the older group the sample is used only to explain the task. Children complete the pattern independently, using all its elements, color, etc. as they wish, without violating the task. Among the methods of teaching children in the preparatory group for school
A large place is given to drawing from life - the leading method of teaching in school. In the preparatory group it is combined with other methods. In the preparatory group, children are able to visually examine nature, highlighting its main features. The experience of children aged 6-7 years is increasing so much that they can already give an analysis of the general form, parts, and their position based only on visual perception without the additional participation of other senses. In this case, it is assumed that the proposed object or similar ones were previously familiar to the children; unknown objects perceived for the first time cannot be drawn in this way. In fine art, every drawing begins with a light sketch - the position of the entire object, its parts, their proportions. The use of the sample in the preparatory group is even more limited than in the older group. In decorative drawing, objects of folk decorative art are used, on which children become familiar with composition, the use of color, and various elements of painting. A sample is given in cases where it is necessary to highlight any element of the pattern from the overall composition to show the features of its execution.
When teaching new techniques, demonstration is necessary in all groups. In the preparatory group, the teacher teaches children how to work with paints and pencils, for example, blurring paints on a large surface, applying strokes or strokes to the shape of an object, etc.; use new materials - sanguine, pastel. When analyzing the drawings, children in the preparatory group are already able to evaluate the quality of the work performed. First, the teacher helps by asking whether the drawing was completed correctly or not. In the future, children independently justify positive and negative assessments. The teacher should encourage invention, fantasy, and the ability to think independently in the children’s work, i.e., that without which a conscious, creative attitude to any work is impossible.
Knowledge
,
skills and abilities required in decorative activities.
The compositions of the pattern and its color structure are subject to aesthetic laws, which gradually become accessible to children. First, at 3.5–4
years old
, they master the simplest skills of decorative activities: rhythmic repetition of elements (decorate napkins, mittens, a doll’s dress), then learn to alternate simple elements (petals - luring the entire bristles of the brush to the paper, dots, stripes).
In middle and senior groups
tasks become more difficult. By strengthening the skills of repeating the elements of a pattern, children learn to symmetrically place it on paper in the shape of a square (napkins, handkerchiefs), circles (plates). To complete the pattern, the child must use the entire sheet of paper, find the corners, edges, and middle. In the process of creating a pattern, the child is taught to match identical parts. The pattern includes arcs, flowers, leaves, the pattern is performed not only with the entire brush, but also with the tip of the pile. In the older group, the patterns should be symmetrical.
In the preparatory group
Children are taught to make symmetrical patterns. The elements of the pattern become significantly more complex: spirals, curls, wavy lines are introduced, and the color scheme is enriched. Another task is also set - to teach how to make a pattern in a certain color scheme, characteristic of one or another type of folk decorative art - Dymkovo, Khokhloma, Gorodets painting, in warm or cold colors. When making patterns, children are given the opportunity to use not only primary colors, but also shades. From rhythmic patterns with repeating elements they gradually move to symmetrical and then asymmetrical; compositions.
The cycle of classes for teaching preschoolers decorative drawing consists of three stages:
— acquaintance with the history of folk crafts and highlighting the simplest elements of a pattern;
- deepening knowledge about the craft, highlighting more complex elements of the pattern and becoming familiar with the features of the decorative composition;
— creative use of acquired knowledge, skills and abilities.
It is advisable to start learning the rules of creating a pattern by constructing the simplest compositions on a strip. Limited space allows one to learn one of the main ways of creating expressiveness in ornamental activity - rhythm and alternation.
Then, the following sequence is possible: drawing up a pattern in a circle, square, rectangle and triangle, decorating various shapes that convey images of clothes, shoes, dishes, toys, and, finally, if possible, decorating three-dimensional forms.
The basis of learning decorative drawing, as noted above, is familiarity with folk crafts.
As an analysis of ethnographic, art and historical literature shows, everything that we perceive simply as decor has long been filled with the deepest meaning.
Elements of patterns and ornaments had the meaning of signs and symbols, and their combination was always given a strictly defined meaning. This expressed the utilitarian function of the ornament. The aesthetic function appeared later. For example, when an item no longer fulfills its original purpose. This is illustrated very well by a folk clay toy, which originally served as an attribute of religious rites. On Dymkovo, Kargopol, Kalinin and many other toys, the sign of the sun is often found - an object of special worship of our ancestors.
In Dymkovo toys, wavy lines between solar circles, going from top to bottom, indicate heavenly moisture, i.e. rain; black dots are seeds in the ground. The meaning of the ornament is clear - warmed by the sun, filled with heavenly moisture, the grain will sprout - a new life will begin...
Deciphering and reading decorative patterns in the products of folk craftsmen is a fascinating and educational process. Presented to children in a fabulously entertaining form, a story about the meaning inherent in each pattern. Will help:
— to awaken interest (as a special form of cognitive need) in folk art;
- create a bright emotional background for decorative and ornamental activities;
— fill the overall composition with narrative meaning;
— to form the concept of conventionality and stylization of decorative elements.
The importance of decorative drawing in working with preschool children