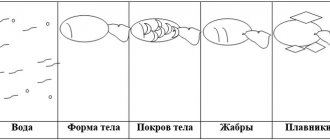
Goal: development of independence, active skills of joint activities of children in the classroom. Training sessions: Strengthen the ability to draw strokes with pokes in a certain order, learn to paste ready-made shapes (circle) in a certain order, focusing on a sample. Developmental objectives: to develop children's sensory abilities - to recognize and distinguish between red, blue and yellow colors. Speech tasks: encourage the use in active speech of words denoting objects (sea, fish) and signs of objects (red, blue). Educational tasks: to develop independence and activity when choosing the color of the created image of a fish, type of activity; cultivate accuracy when choosing visual materials. Materials: “Sea” manual, a blue or light blue piece of fabric measuring 1x1 m “with seaweed” in red and yellow. Yellow and red paper fish attached to the front of the fabric. White fish “swimming” among the “algae”. Red and yellow paint (gouache), glue, red and yellow ready-made shapes for applique (circles), glue brushes, napkins, pokes, fish holders. Preliminary work. Exercise children in drawing with a brush and paints in the classroom; development of the ability to recognize and name red, blue and yellow colors; round dance game with the manual “Sea”.
Progress of the lesson:
1. Introductory part. Educator: Guys, look what we have. This is a blue, blue sea. In one distant country there is an amazing blue, blue sea. And two fish live in it - red and yellow. Do you see them? What color are they? When was the sea rough? (Swings the fabric faster) - that’s how it was worried - the fish were splashing around in the blue water. Like this. Sometimes our fish swam to the very bottom of the sea. Quickly and quickly raise your arms up and immediately lower them smoothly (3-4 times). Let's see what's there at the bottom of the sea. Who saw what? Educator: That's right, the fish there are white. What color are our fish? Red and yellow, and soon they became sad. Look how sad they have become. Sad fish? Do you know why? Because they had no friends - other red and yellow fish. Do you want to help them? Then sit down on your chairs, and I will tell you how you can do it. Finger game:
The fish swam, the fish swam, waved its tail, waved its tail, feed it quickly - it will be more fun to swim!
Educator: To help our fish, we need to make the white fish colored - red and yellow. You can color the fish with paints or with colored paper. Who wants to do what?
2. Main part:
(With the help of the teacher, children are seated at two tables)
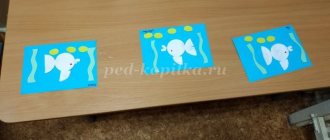
Educator: Guys, please choose what color fish you will make - red or yellow? Look how I decorated my fish. I glued yellow circles between these stripes. Show with your finger where you will glue.
(The kids get to work, the teacher watches how the children hold the brush, spread glue on the finished forms, and glue them onto the finished bases)
Educator: Guys, look how I will decorate my fish. I want to decorate a yellow fish, so I take which fish? (Yellow). Now please choose paint colors for your fish.
(While the children are working, the teacher carries out individual work: he completes the drawing of the eye, shows how you can play with her - how she swims, how she opens her mouth, wags her tail)
3. Final part:
The teacher, with the help of the children, attaches the fish to the blanket with clothespins: red fish are near the red fish (these are her friends), yellow fish are near the yellow one. At the same time, children are asked questions.
Conversation on issues. — What color is your fish? - Which fish did she make friends with - red or yellow? — How did you paint the fish? - Did you like what you did? Educator: now our fish have many friends, they are happy. They play again, have fun and laugh. Let's see how they do it?
We are small guys, small, remote, we stood together around the sea, we raised the sea with the fish, and walked in a circle. We go, we go, we go in circles, and we squat down!
Author: Gabibullaeva Firoza Pashaevna, teacher of MBDOU DSKV No. 10 “Squirrel”
The article is published in the author's edition
Hand drawing in the senior group
Children 5–6 years old are already using cotton pads, toothbrushes, colored paper and other auxiliary materials to make beautiful drawings. With a brush you can depict snow and colorful splashes, with cotton swabs - tree foliage, pebbles, shells.
Tiger
The technique of depicting a tiger is suitable for drawing any four-legged animals: both pets and wild animals.
The child smears orange and black paint on his palm in alternating stripes parallel to his fingers. You can apply only orange, and after the print has dried, make black stripes on the sheet with your finger. The thumbprint can be enlarged, it will be the head of a tiger. It is necessary to depict ears, eyes, nose. The remaining four fingers are the paws of the animal. The long tiger tail needs to be painted on with your finger.
Trees
Before starting to work with palms, the preschooler himself or with the help of a teacher draws the trunk and branches of a tree with a brush. Then he distributes green, light green, and yellow paint over the palm in small spots. You can also use orange and red if the tree is autumn. Directing the palm with the fingers spread upward parallel to the trunk, the child presses it to its upper part. The result is a lush crown.
Cockerel
Before the start of the lesson, the teacher asks the student to remember what color the rooster’s tail, comb, paws, and beak are. The child paints the thumb and the middle of the hand in one color: this is the body and head of the bird. And each of the four remaining fingers is covered with a different paint, imitating a multi-colored rooster’s tail. Then, pointing the palm horizontally, applies it to the paper. Finally, the preschooler depicts the beak, high crest, eyes and paws of a bird.
Necessary materials
Everything you need for non-traditional drawing techniques can be purchased in any stationery department of the store. There is no need to buy expensive professional supplies. But it’s worth paying attention to the component composition: it must be absolutely harmless, since a small child may want to lick the paint off his fingers.
Here are the materials needed:
- album paper;
- paints, preferably finger paints;
- cotton pads and sticks;
- napkins;
- oilcloth.
Instead of white landscape paper, if desired, you can use cardboard or a set of colored sheets. The main thing is that the paper is sufficiently thick, otherwise the sheet will become deformed from moisture.
You can use not only finger paint, gouache or watercolor will do. If desired, you can add glitter to the composition to make the design brighter and more interesting. Girls will like this option.
Finger paint is ready for use. And watercolor and gouache will have to be diluted with water to a paste-like consistency so that it is convenient to apply to the palms.
Cotton pads and swabs are auxiliary materials. They can complement a drawing made by hand. And napkins are needed to remove paint residues from the skin.
The desktop must be free. It is advisable to cover the tabletop with oilcloth, because a child will certainly get it dirty. The little artist should be dressed in clothes that he doesn’t mind throwing away if they don’t wash.
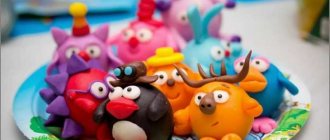
Unconventional drawing “Palms”
This non-traditional method of visual creativity forms in the preschooler an idea of freedom of artistic expression and the characteristics of the materials used for drawing. Tactile contact with paint and paper arouses delight and curiosity in the child. The preschooler begins to realize that using his own palm prints he can create original images. Through non-traditional drawing, the child also masters other techniques of visual creativity, which in this case he uses as auxiliary ones.
The purpose of the palm painting technique is to improve creative thinking and visual skills in preschool age.
Tasks:
- acquaintance with one of the unconventional drawing techniques;
- developing an idea of the capabilities of one’s own hands and fingers;
- development of fine motor skills, which positively affects speech skills and memory;
- instilling interest in fine arts;
- broadening your horizons, developing your imagination;
- improving the emotional state, acquiring the skill of expressing feelings through images.
Palm drawing in the preparatory group
Preschoolers aged 6–7 years already have an idea of proportions and sizes, are able to identify objects based on typical features, and have a good sense of plane orientation. Therefore, drawing can already be more detailed, elaborate, with patterns, and multiple additional elements.
Autumn
A preschooler draws the trunk and branches of a tree with a brush. The crown can be depicted as simply oval, or you can make it using a palm painted yellow. Next, the teacher asks the student to depict autumn leaves on the crown, using colors suitable for this time of year. The child dips his index finger into the paint and puts green, red and orange dots on the paper. Moreover, it is important not to go beyond the contours of the crown. You can also put dots at the base of the trunk, supposedly these are fallen leaves.
Hedgehog
The hedgehog's body is brown. Therefore, you need to smear this paint on your palm, then place your hand on the paper with your fingers up. In this way, you need to put 3-4 prints on top of each other, each time moving your fingers a little to the side so that you get several closely spaced needles. On the left side of the image you need to draw a semi-oval with your finger or a brush: this is the face of a hedgehog. When the drawing dries, draw an eye, nose, ear. You can also paint a mushroom or an apple on the hedgehog’s back, and grass around it.
Palm drawing in the middle group
In the middle group, in addition to their palms, children must use cotton swabs and other auxiliary devices. It is also recommended to combine palm painting with appliqué creation.
Birds
A child's handprint can be turned into a funny bird, for example, a bullfinch, dove, chicken, swan, flamingo, peacock, eagle owl. The thumb will be the bird's neck, and the other four fingers will be the tail. The middle of the hand is the body of the bird.
What type of bird the bird will be is determined by the chosen paint and the position of the fingers relative to each other. For example, to depict a peacock, you need to spread out four fingers widely and make them multi-colored to create a bright and fluffy tail with color transitions. When drawing a flamingo and a swan, you need to use your finger to draw a long neck and a round head at its end. The bullfinch should be painted with red paint, the flamingo with pink paint, and the swan with white paint. To understand how far to spread your fingers, you need to remember what the plumage of real birds looks like, whether it is smooth or lush.
When the print is dry, all that remains is to draw on the eyes, beaks and paws with felt-tip pens or paints.
Caterpillar
A child coats his palm with green paint. He makes the first print on a horizontally oriented sheet, then three more on a sheet turned upside down. Next, you need to turn the paper back over, after the image has dried, draw eyes and a mouth on the first print, and shoes on the paws on the next ones.
Crab
The teacher helps the student apply red paint to both palms. Then the child joins his wrists and turns his outstretched fingers in different directions as far as anatomically possible. In this position, he presses his hands to a sheet of paper. All that remains is to draw the black eyes inside the thumbprints and the green algae around the crab.
Application "Chicken"
Before you start drawing, you need to cut out an image of a chicken in profile from colored paper and glue all its parts onto a cardboard base. Then, on a separate sheet, make an imprint of an outstretched palm, the color corresponding to the color of the bird. This will be the wing. When the drawing dries, the child must cut it out and glue it to the applique.
You can make an applique of any other bird in a similar way.
Palm painting technique
Non-traditional visual techniques have been developed in accordance with pediatric, speech therapy and psychological standards for children of different preschool groups. A child can start the activity from the age of one, but at first he should be helped by his parents.
The duration of the first lessons should be no more than 5 minutes, as the child will get tired out of habit and lose concentration. After adaptation, the time should be gradually extended to 20 minutes.
You cannot force a preschooler to study or set too difficult tasks. A child will be willing to draw only if he is in the mood and inspired.
It is advisable to practice the game form. For example, ask a riddle, and the child must depict the answer. Or read a fairy tale, then ask your preschooler to draw the character they like.
You can’t expect a child to immediately start drawing something that can even be hung on the wall in a frame. At first it will be scribbles, spots, chaotic lines. But with regular practice and gaining experience, you will get more and more beautiful and original drawings.
The drawing technique does not cause difficulties:
- Using a brush, the child applies paint to an open palm. It can be one specific color or several.
- Immediately, before the paint has dried, press the painted palm onto a sheet of paper.
- Then he takes his hand away from the sheet. Remove paint residue from the skin with a napkin.
- After completing the lesson, wash your hands thoroughly under the tap.
You can’t paint the whole hand, but only individual parts. To obtain non-standard images on paper, the fingers can be bent, combined or spread apart.