Text of the book “Applique with children 3-4 years old. Class notes"
Daria Nikolaevna Koldina Application for children 3–4 years old
From the author
By the end of the third year of life, the child acquires basic ideas about color, size, shape; listens to fairy tales; learns to compare real objects with their images in paintings; looks at the landscapes.
It is easier for a small child to express his impressions with the help of visual activities (three-dimensional image - in modeling, silhouette - in appliqué, graphic - in drawing). He conveys images of objects using plasticine, colored paper, and paints. The child should always have these materials at hand. But this is not enough. It is necessary to develop the child’s creative abilities, show modeling techniques, teach how to cut out colored paper, and introduce various drawing techniques. To improve visual skills, one should develop the perception of form, color, rhythm, and aesthetic concepts.
A 3-4 year old child can do a lot: wash his hands, brush his teeth, feed himself, dress and undress, use the toilet. The baby develops simple verbal reasoning. He answers questions from adults with pleasure and is eager to communicate with other children; His gaming skills and voluntary behavior develop.
To develop children's creativity and mastery of visual arts, it is necessary to take into account the interests of children, use a variety of lesson topics and forms of organization (individual and collective work). It is very important to create a friendly environment in class.
At first, the child is interested in the process of making the craft, but gradually he begins to be interested in its quality. He strives to stick the object as neatly as possible, and after class admire his work, tell him what color he chose, what this object can do, and what kind of applique he turned out to have.
In this manual, we provide notes on exciting activities for children 3–4 years old on appliqué made from colored paper and natural materials.
These activities contribute to the implementation of the following tasks: introducing the child to the surrounding beauty; development of imagination, independence, perseverance, the ability to complete work, accuracy and hard work, skills in processing various materials, which in the future the child will be able to independently use to make similar crafts.
The classes are organized according to the thematic principle: one topic unites all classes (on the surrounding world, on speech development, on modeling, on appliqué, on drawing) during the week.
It is advisable to conduct an appliqué lesson after the children have sculpted the item.
An appliqué lesson for children aged 3–4 years is held once a week and lasts 15 minutes. The manual includes 36 notes of complex plot-game activities designed for the academic year (from September to May).
Read the lesson notes carefully in advance and, if something doesn’t suit you, make changes; prepare the necessary material and equipment. Preliminary work is also important (reading a work of art, becoming familiar with surrounding phenomena, looking at drawings and paintings).
By observing each child in class or playing with other children, you can learn more about them and deal with challenging behavior.
If a child quits his activity
, as soon as something doesn’t work out for him, it means he doesn’t know how to overcome obstacles. This can be taught by offering the child other ways to achieve what he wants. Then he will understand that there must be a way out of any situation. For example, if a child wants to draw a snowman, but he can’t do it, invite him and you to make an applique of a snowman from white paper on a dark background.
If your child quickly loses interest in an activity
, perhaps it is too simple or, on the contrary, complex for him. Understand the reason and make the task harder or easier. For example, a child needs to applique a turnip with tops. If this is too easy for him, have him stick a basket and place different vegetables in it using colored paper. If the task is too difficult for the child, you can invite him to stick a turnip without tops.
If your child gets tired quickly
, cannot sit for even five minutes, try to develop his endurance using massage, hardening, and sports exercises. In art classes, alternate between active and calm actions more often.
To ensure that the child understands the task and completes it
, it is necessary to develop his attention and ability to concentrate. Play the game “What Has Changed?” with your child. (place 3-4 toys in front of the child, and then quietly hide one of them or swap the toys).
Try to find as many ways as possible to involve the child in bringing the task to its logical conclusion (for example): “Let’s stick balls on the elephant, otherwise he has nothing to play with” or “Let’s make a big house for the bunny and the rooster, otherwise they have nowhere to live.”
We recommend conducting appliqué classes with children 3–4 years old in accordance with the following sample lesson plan.
1. Creating a gaming situation to attract children’s attention and develop emotional responsiveness (riddles, songs, nursery rhymes; a fairy-tale character in need of help; dramatization games; exercises to develop memory, attention and thinking; outdoor games).
1. Acquaintance with the subject that children will subsequently depict in the appliqué; determining the sequence of laying out pre-prepared parts, applying glue to them; attaching forms to paper and gluing.
2. Bringing the application to the desired image with the help of additional decoration with felt-tip pens or decorating the work with small pieces of colored paper (in this case, it is necessary to draw the children’s attention to expressive means: correctly selected colors and interesting details).
3. Review of finished works (they are given only a positive assessment). Children should be happy with the result and learn to evaluate their crafts.
There are three types of application:
Subject
– individual objects are depicted that do not participate in any events (fruit in a vase);
Plot
– a composition is compiled based on events (actions) in fairy tales, stories, poems, nursery rhymes; by personal recommendation;
Decorative
– a pattern is made of geometric shapes on a strip, square, circle.
We list the application methods that are used in working with children 3–4 years old.
Application from prepared parts of an object
– the child must assemble an object (pyramid, bear) from the proposed parts and stick it on paper.
Application from prepared silhouettes of objects
– the child makes a composition from one or more cut-out objects, and then pastes it onto a sheet of paper (cucumber, tomato).
Breaking-mosaic
- small circles, triangles, squares or torn pieces of colored paper are glued inside the outline (autumn leaves on a tree).
Cutting along the contour
– colored paper is torn along the intended contour to convey the texture of the object (the curly body of a lamb, a fluffy cloud).
Rolling paper
– the paper tears into small pieces, each piece crumples and rolls into a lump (rowan berries, fluffy chicken).
Overlay applique
– parts that are identical in shape but different in size are glued onto each other, starting from the largest to the smallest (snail, turtle, flower).
Application of dried leaves
– the leaves are laid out and arranged into the intended object, then glued onto a sheet of paper (fish, swan).
For applique classes you will need: colored paper, magazine paper, colored napkins, dried leaves, album sheets, colored cardboard, felt-tip pens, PVA glue, oilcloth lining and a rag.
Expected skills and abilities of a child by age 4:
• has an interest in the art of applique from pre-prepared figures;
• knows how to select colors that match the color of objects;
• knows the order of gluing (first you need to lay out all the prepared parts of the application on a sheet of paper and make an image of the object, and then gradually stick them on);
• knows how to carefully glue (first you need to put the part with the colored side on the oilcloth, carefully pick up glue on a brush and apply it in a thin layer from the middle to the center, apply the side with the glue applied to a sheet of paper, gently pressing it with a cloth or napkin);
• knows how to stick simple objects (fruits, tree leaves) onto a sheet of paper;
• knows how to compose a subject application from 2–4 parts (house, traffic light);
• knows how to create a simple composition (a plate of fruit, flying airplanes);
• knows how to make patterns on a strip, square, rectangle, circle from prepared geometric elements, alternating them by color, shape and size (decorate a scarf);
• knows how to decorate a product using felt-tip pens (draw the eyes and nose of a hare);
• knows how to create an object not only from colored paper, but also from magazine paper, dried leaves and napkins.
If your child can't do any of the above, don't worry. You will still have time to catch up.
We wish you success!
Annual thematic planning of application classes
Class notes
Theme of the week: “Toys”
Lesson 1. Cube on cube (Colored paper. Applique from prepared parts of the object)
Program content.
Teach children to lay out cubes and squares in a certain sequence (by size). Introduce the method of applying glue with a brush to the back side of the figure from the middle to the edges; teach to apply the glue-smeared side to a sheet of paper and press it tightly with a cloth. Introduce the color blue, learn to correlate the color with its name. Cultivate compassion and kindness.
Demonstration material.
Cubes of three colors.
Handout.
Half of an album sheet; 3 blue squares (large, medium and small), cut out of paper; PVA glue, glue brush, cloth, oilcloth lining.
Progress of the lesson
Read the story “Cube upon Cube” by Ya. Taits to the children:
“Masha puts cube on cube, cube on cube, cube on cube. She built a high tower.
Misha came running:
- Give me the tower!
- I'm not giving it!
- Give me at least one cube!
- Take one cube. Misha reached out his hand and grabbed the lowest cube! And instantly - bang-bang-bang! “The whole Machine Tower has collapsed!” Ask the children: “Which cube should be given to Misha so that
did the tower collapse? (Upper.)
Let's help Masha build a new tower."
Place a landscape sheet and 3 blue squares (large, medium and small) cut out of paper in front of each child. The child must find the largest square and place it at the bottom of the sheet, then find the middle square and place it above the large one, and place the small square on top.
Tell the children that they now need to glue the cubes onto a piece of paper. Show them how to put glue on a brush, apply it in a thin layer from the middle to the edges, not on the colored side, but on the back of a small square, press it firmly to a sheet of paper with the greased side and blot off excess glue with a rag. The large and medium squares are glued in the same way.
Look at the resulting towers with your children and ask: “What color are the cubes from which your towers are built?” (Blue.)
Theme of the week: “Vegetables”
Lesson 2. Turnip (Colored paper. Applique from prepared parts of the object)
Program content.
Teach children to make a whole from two parts. Strengthen the ability to apply glue to parts and stick them onto a sheet, pressing with a cloth. Continue to introduce the color yellow, learn to correlate the color with its name. Develop memory. Learn to retell fairy tales based on illustrations.
Demonstration material.
Six cards, each of which depicts a hero from the fairy tale “Turnip” (grandfather, grandmother, granddaughter, Bug, cat, mouse) or a sheet of paper with schematic images of the heroes.
Handout.
Half a landscape sheet, blanks for turnips, cut out of colored paper (root crop and tops); glue, glue brush, rag, oilcloth lining.
Progress of the lesson
Read the Russian folk tale “Turnip” to the kids in advance.
During the lesson, remind the children of this fairy tale, show cards on which the heroes of the fairy tale “Turnip” are drawn and offer to arrange the heroes of the fairy tale in the right order: grandfather, grandmother, granddaughter, Bug, cat, mouse. (If you don’t have cards, you can sketch the characters on a piece of paper, leaving space in front of them for a turnip.)
Help each child make a turnip from two parts (root and tops). Show the kids how to apply glue evenly with a brush on the back side of the root crop from the center to the edges and stick it on the sheet, pressing with a cloth, and then stick the tops in the same way.
Ask the guys: “What color is the turnip? What color are the tops?” Ask the children to retell the story based on their work.
Theme of the week: “Fruits”
Lesson 3. Fruits in a vase (Colored paper. Application from prepared silhouettes of objects)
Program content.
Teach children to apply glue to the part and stick it to the sheet. Continue to introduce the color green, learn to correlate the color with its name. Cultivate a friendly attitude towards others.
Demonstration material.
Doll.
Handout.
Colored cardboard on which the vase is glued in advance; apples and pears cut out of colored paper in yellow and green colors; glue, glue brush, rag, oilcloth lining.
Progress of the lesson
Show the children the doll and say: “Guys, the doll Masha came to you for help. She got sick. The doctor said that she needs to eat more green apples and pears because they contain a lot of vitamins. But the doll doesn’t know which apples and pears are green.”
Invite the children to help the doll - put only green apples and pears in the vase. Place in front of each child colored cardboard, on which a vase and blanks cut out of colored paper have been glued in advance - apples and pears in yellow and green colors.
Children select green apples and pears and place them on a sheet of cardboard.
“Thank you,” says the doll and “takes” from one of the children a cardboard with fruit preparations (apples and pears fall). “Oh, how can I carry apples and pears home?”
If the guys don’t guess that apples and pears need to be labeled, tell them. Remind how to put glue on a brush, apply it in a thin layer to the workpiece and press it tightly to the sheet with a cloth.
At the end of the lesson, say: “Well done, guys! Now the doll won’t lose the fruit.”
Theme of the week: “Berries”
Lesson 4. Strawberries (Colored paper. Applique from prepared silhouettes of objects)
Program content.
Continue teaching children to stick parts on the sheet in the right place. Continue to introduce the color red, learn to correlate the color with its name. Cultivate compassion and kindness.
Demonstration material.
Doll, object picture, which depicts a strawberry bush with berries.
Handout.
Half of an album sheet on which strawberry bushes without berries are drawn and red strawberries cut out of colored paper; glue, glue brush, rag, oilcloth lining.
Progress of the lesson
Show the children the doll and say: “This is the girl Zhenya. She wanted to pick strawberries in the garden, but did not find a single berry. Zhenya is very upset.”
Invite the kids to plant berries on the strawberry bushes and treat Zhenya.
Place in front of each child half of a landscape sheet on which strawberry bushes without berries are drawn and red strawberries cut out of colored paper. Examine strawberry bushes with your kids, determine the shape and color of the berries.
Remind the children to apply glue to each berry and stick it to the tip of the branch.
At the end of the lesson, invite the children to give Zhenya a treat: give her strawberry bushes and berries.
Theme of the week: “Mushrooms”
Lesson 5. Mushroom (Colored paper. Application from prepared parts of the object)
Program content.
Improve children's ability to make appliques and apply glue to parts. Learn to accompany the words of the poem with movements corresponding to the text. Develop precision and coordination of movements.
Handout.
Landscape or tinted sheet of paper; blanks cut out of colored paper: grass, mushroom details; glue, glue brush, rag, oilcloth lining.
Progress of the lesson
Talk to the guys about mushrooms, tell them where mushrooms grow, what time of year they appear. Tell the children: “Today I invite you to go for a walk in the forest. I will read a poem, and you repeat the appropriate movements after me:
In the morning the children went to the forest (Steps with high knees.)
And they found mushrooms in the forest.
(Measured squats.)
We bent over, collected,
(Bent forward.)
We got lost along the way.”
(Rhythmic spreading of arms to the sides.)
Invite the children to depict a mushroom in the applique.
First, they must place the blanks - the details of the mushroom and the grass on the sheet, then apply glue to the stem of the mushroom and stick it on, then apply glue and stick on the cap. The grass is glued last.
Tell the kids a riddle about a mushroom:
Antoshka stands on one leg.
Ask the guys: “Can we say that the mushroom has one leg? (Can.)
What else does a mushroom have?”
(Hat.)
Theme of the week: “Autumn trees and bushes”
Lesson 6. Maple (Colored paper. Collective applique from prepared silhouettes of objects)
Program content.
Strengthen children's knowledge about the rules of sticking. Introduce the color orange, learn to correlate the color with its name. Consolidate knowledge about yellow, green, red colors. Continue to learn to understand and analyze the content of the poem.
Demonstration material.
Half a piece of Whatman paper with a maple tree without leaves on it.
Handout.
Maple leaves cut out of colored paper (yellow, red, green, orange), glue, glue brush, rag, oilcloth lining.
Progress of the lesson
Read the poem “Maple” by D. Rozalieva to the children:
The maple moves its branches, shedding its leaves. A cloud runs across the sky, dropping droplets.
Give the children one maple leaf cut out of paper. Draw the children's attention to the shape of the leaves - it resembles a star. Tell the children: “Run up to me, everyone who has yellow leaves!”
Children, holding yellow maple leaves in their hands, run up to the adult and then return to their seats. Then the guys with red (green, orange) leaves run up.
Show the children a piece of whatman paper with a maple without leaves on it and suggest: “Guys, let’s give the maple its leaves back.” Each child must apply glue to their own leaf and stick it to a tree branch.
At the end of the lesson, say: “Well done, guys! You’ve got a real autumn maple!”
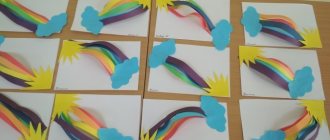
Theme of the week: “Autumn”
Lesson 7. Sun in the clouds (Colored napkins. Cutting along the contour and appliqué from large lumps of paper)
Program content.
Teach children to create a plot composition from a broken circle along the contour and crumpled lumps of napkins. Learn to glue rolled up large lumps of paper onto cardboard. Strengthen the ability to understand and analyze the content of a poem.
Handout.
Napkins of yellow and white colors, a sheet of blue cardboard, glue, a glue brush, a rag, an oilcloth lining.
Progress of the lesson
Read the Armenian song to the children:
– Where does the sun spend the night? - In grandma's bed. - Who is his grandmother? - Blue sky. - What will it cover with? - A woolly cloud. -Who will cover him? - Grandfather is the wind.
Ask the children: “Where does the sun sleep? (In the sky.)
What color is the sky?
(Blue, blue.)
What covers the sun?
(A cloud.)
What color are the clouds?
(White, gray.)
Now you and I will also put the sun to bed.”
Show the children a blue piece of cardboard and ask: “What does it look like?” (To the sky.)
Then show them the yellow napkin and ask: “What do you think can be done with this napkin?”
(Sun.)
Give each child a yellow napkin and help them tear it in a circle to make a “sun.”
Show the children a white napkin and ask: “What can you do with this napkin?” (Clouds, clouds.)
Place a white napkin in front of each child and offer to tear the white napkin along a line into four parts, crumple each part - you get four clouds. Now we need to place the sun and clouds in the sky. The child sticks on the sun first, and then the clouds.
Theme of the week: “In the forest”
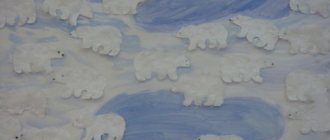
Lesson 8. Leaves from the forest (Applique from dried leaves)
Program content.
Show children that the applique can be made from dried leaves. Learn to relate an object to its shape. Continue to teach how to accompany the words of the poem with movements corresponding to the text. Cultivate compassion and kindness.
Handout.
A landscape sheet on which colored outlines of two leaves of different shape and color are drawn; dried leaves of appropriate shapes and colors; leaves cut out of colored paper; glue, glue brush, rag, oilcloth lining.
Progress of the lesson
Give the kids leaves cut out of colored paper and invite them to play with these leaves while listening to the poem:
The leaf flew up, (Flash the leaf).
The leaf is spinning, The leaf is spinning,
(Twist the leaf.)
It falls under your feet.
(Lower the leaf to your feet.)
The leaf is torn, torn, torn.
(Tear the leaf.)
The leaf wrinkles, wrinkles, wrinkles.
(Crumple up the leaves.)
Play out the situation that two Leafs came to visit the children from the forest: everyone in the forest tramples them, the Leafs want to find their home.
Place in front of each child a landscape sheet with colored outlines of two leaves of different shapes and colors drawn on it, and ask them to find a house for each leaf.
Tell the children: “In order to prevent the leaves from losing their houses again, they need to be glued: apply glue to the back of the leaf with a brush and press it to the paper with a cloth. So we hid the leaves in the houses.”
Summary of an open lesson on technology on the topic: “Application”
Lesson summary
on technology in grade 5 "b"
Lesson topic
: "Applique"
Lesson date:
03/13/2018
Subject: "
Application".
The purpose of the lesson:
creating conditions for students to become familiar with the history, types of appliqués, and systematize knowledge about techniques for making appliqués.
Planned result:
product - apron pocket using the "fabric applique" technique.
Tasks:
Educational
- give an idea about the application, its types, technology of execution and application,
Educational:
— developing the skills of independent work, accuracy, and responsibility for the results of one’s work.
Educational:
- development of aesthetic taste, independence and the ability to work at the right pace, promote the development of mental operations (analysis and synthesis), promote the development of students in accordance with their abilities.
Lesson type:
lesson with elements of the design and research method (executing an order for a garment factory).
Lesson Feature
: integration of technology, fine arts.
Methods:
visual, verbal, practical.
Forms of work:
frontal, individual, group work.
Equipment:
paper, scraps of fabric, ruler, pencil, scissors, ICT, presentation “Appliques”, technological maps, posters, supporting notes, appliqué samples, electric iron, ironing board, needles, pins, scissors, sewing machines.
Personal UUD:
— Development of hard work and responsibility for the quality of one’s activities.
Cognitive UUD:
— systematization and expansion of children’s ideas about new techniques of manual and machine work;
— compliance with safe labor practices, fire safety rules,
— compliance with labor and technological discipline,
- development of constructive thinking,
— awareness of responsibility for the quality of work results,
— development of compositional thinking.
Regulatory UUD:
— search and selection of necessary information;
- the ability to consciously construct a speech statement orally and in writing.
Communication UUD:
- allow for the existence of different points of view;
- adequately use speech means to solve various communicative tasks.
Lesson steps | Purpose of the stage | Teacher activities | Student activity | Techniques, UUD |
| Stage 1 Organizing time. | Positive attitude to class. 3 min. | - Hello girls! In what mood did we come to class today? Let’s draw emoticons in our notebooks and smile at each other. Our class attendant | The teachers greet, draw emoticons, monitor readiness for the lesson, and rapport with the duty officer. | Personal : - self-organization. Regulatory : the ability to regulate one’s actions, predict activities in the lesson. |
| Stage 2 Updating knowledge. | Systematize students' existing knowledge. 4 minutes | So, you have sewn your first product - an apron. In the future, you will make more complex garments: a nightgown, a robe, a skirt, a dress. Now let’s check what you learned from previous lessons. You and I will split into two teams. I will distribute cards with tasks to each team, we sign our last and first names and answer questions (5 minutes to work on the cards). Now the teams will exchange cards and check them; if you agree with the answer, put a +, if not, put a bet! Now let's check your answers and give marks (slide No. 2, 3) Let's remember what types of household clothing exist? (Casual, work, evening, children's). What type of clothing is an apron? (For work clothes). What should an apron be like, in your opinion? What requirements must it meet? (Beautiful, comfortable, practical). Yes indeed. Household items and clothing should not only be comfortable and practical, but also beautiful. And this is fully facilitated by arts and crafts. | They work with cards. Reviewing the products. Answer questions and formulate a conclusion about their capabilities. | Personal: awareness of your capabilities. Cognitive: Formation of skills to establish the relationship of knowledge in different academic subjects to solve applied educational problems. Regulatory: ability to draw up a plan and sequence of actions, monitor the results. |
| Stage 3 Setting the goals and objectives of the lesson. Motivation for students' learning activities. | Arouse an emotional mood, setting goals and objectives for the lesson. 4 minutes | A crossword puzzle will help you determine the topic of our lesson today, the keyword of which will help form the topic of the lesson (slide No. 8) Question for students: What types of decorative and applied arts can we use to decorate household items and clothes? So we come to the topic of our today's lesson: “Applique”. The teacher writes the topic “Applique” on the board, and students do the same in their notebooks. Girls, we received an order from a clothing factory - we need to develop sketches to decorate an apron. And since we are getting acquainted with this type of decorative and applied art such as appliqué, we will also make sketches using this technique. What is this type of creativity - appliqué? (Students' answers in free form). — Have you worked in appliqué technique? When and where? (In technology lessons in elementary school). — How would you formulate the definition of appliqué? (Students' answers in free form). — And now we’ll try to figure it out and formulate an exact definition of an application. On the table, each team has a sheet with the definition of the application. Let's read them out loud. (Call one student to read the definitions and attach the definition sheets to the board). Application : 1. This is the creation of artistic images by gluing pieces of some material onto a certain surface (base). 2. This is one of the types of visual techniques based on cutting out various shapes and fixing them on another material taken as a background. | They think, give answers, formulate the topic of the lesson, set goals and objectives: 1. Study decorative and applied arts using textile appliqué techniques, 2. Develop skills in composing a decorative composition. 3. Create a technological sequence execution of this application. | Personal: showing interest and activity in choosing a solution; establishing the personal meaning of knowledge. Cognitive: The ability to analyze, the ability to consciously construct a speech statement. |
| Stage 4 Search and research. | To contribute to the formation of an idea of the types and history of application. 7 minutes | Now let's take a closer look at these definitions. How are they similar and how are they different? Both the first and second definitions contain the words “pictorial”, “image”. What does this mean? (The application must depict something, contain some content). Application content is divided as follows:
To make an applique, you need a base or background on which the details will be placed. What material can the applique be made from? (fabric, paper, buttons, leather, straw) (On the board there is a poster - a daisy. In the middle - the word “applique”, the petals are the names of the materials for the application). Today you will develop a sketch of an apron decoration using the “fabric applique” technique. Let's return to the application definitions: — In the first definition, appliqué parts are called “pieces of some material,” and in the second they are called “various shapes.” (The application must have some form. The second definition is more competent). Let's look again at the definitions of an application: - how are the methods of attaching details to the background explained? (one definition simply refers to gluing the parts onto the base, while the other refers to first cutting out the parts and then attaching them to the background. As it turned out, the second definition is more accurate and understandable, so we write it down in the notebook. And for the next lesson you need to learn it (Slide No. 11). There are various ways to attach parts to the background (fabric): Adhesive appliqué, sewing parts by hand with a buttonhole stitch, machine appliqué with a zigzag stitch. I gave some of you an advanced task, so we will listen to the speakers who will tell us and show us how to work using the “fabric appliqué” technique. (15 minutes). Each of you has a supporting summary with the text of the speakers, from which you need to write down the most important information in a notebook (work with notebooks 5 minutes) Phys. minute (3 minutes) Think about which parts of the apron can the decoration in the form of an appliqué be placed on? (On the pocket, on the bib, on the bottom of the apron). Today we will decorate an apron pocket. How will we attach the applique details? (hand-stitched or machine-stitched zigzag) Why do you think it’s impossible to use adhesive applique in this case, because it’s easier to do? (The apron is washed very often, so the applique may come off). Let's start fulfilling the order for the factory. We have the pocket pattern ready, all that remains is to make a template for the applique and choose a harmonious color combination. | Listening to speakers, viewing slides, recording important information in notebooks. | Personal: -showing interest and activity in choosing a solution; establishing the personal meaning of knowledge. Regulatory: - ability to draw up a plan and sequence of actions, monitor the results. Cognitive: -ability to rationally use technological information; evaluate the technological properties of materials, navigate the means and technologies for processing materials; ability to select tools, materials and equipment. |
| Stage 5 Practical work. | Ability to analyze received information and apply it in practice. Ability to collaborate in class with the teacher, classmates, in a group and team. 20 minutes | So, one team will appliqué with a hand buttonhole stitch, and the other team will use a machine zigzag stitch. But before we start, let’s remember the tools and rules for using them. And for this we will play the “chain” game. (For the first team in the chain, it is necessary to name the tools for manual work and the rules for using them. And for the second team, the tools for performing machine work and the rules for using them). While working, students use technological maps proposed by the teacher. (On everyone's table). During the students’ work, the teacher organizes the work of groups, monitors the correct implementation of the stages, controls and corrects the actions of students, and conducts frontal and individual instructions. | Preparation of an appliqué sketch on a sheet of paper, selection of colors, necessary materials, tools, devices. Carrying out a practical task using technological maps. | Personal: the ability to master the norms and rules of the scientific organization of work. Development of hard work and responsibility for the quality of one’s own and collective activities. Regulatory: the ability to draw up a plan and sequence of actions, exercise self-control. Cognitive: ability to highlight the necessary information; ability to navigate the means and technologies of materials processing; ability to plan your work activities. Communication : formation and argumentation of one’s opinion and communication position, management of the partner’s behavior. |
| Stage 6 Reflective-evaluative. | Understanding the process and result of activity, correction. 5 minutes | So, today you got acquainted with a new type of arts and crafts: fabric applique. Everyone did a great job, we give the floor to each creative group to defend their work. (Organize students to evaluate their own activities in the lesson). Marks for completing the appliqué: Look how many sketches you came up with to decorate the apron. All we have to do is process everything and send it to the factory. And maybe, someday, you will learn your work from your friends and acquaintances. In conclusion, I suggest you complete the sentence - Today in class I met... - Today in class I learned...... | Protection of a mini-project. Students' work is assessed. | Cognitive : reflection on methods and conditions of action, control and evaluation of the process and result of activity. Personal: self-assessment based on the criterion of success, adequate understanding of the reasons for success and failure in educational activities. Communication : planning educational cooperation. |
| Stage 7 Information about homework. | 2 minutes | Discussion and recording of homework. Cleaning workplaces. | Write down homework. |
Review
about an open lesson on technology, developed and conducted in grade 5 “b” by the technology teacher of the MCOU “But-Kazmalyarskaya Secondary School” Saidova Lyudmila Mukhtarovna.
Subject: "
Application".
The “Applique” lesson was planned and taught during the passage of the “Creating a product from textile materials” section.
Cognitive activities are varied; group, individual and frontal methods of organizing students to complete assigned tasks are used.
The stages of the lesson are sequential and correctly distributed over time.
Stage 1
Organizing time. - 3 min.;
Stage 2
Updating knowledge. - 4 minutes;
Stage 3
Setting the goals and objectives of the lesson. Motivation for students' learning activities. - 4 minutes;
Stage 4
Search and research. — 7 minutes;
Stage 5
Practical work. - 20 minutes;
Stage 6
Reflective-evaluative-5 minutes;
Stage 7
Information about homework. -2 minutes
Regular changes in activities and changes in methods of organizing students contributed to compliance with the protective regime
At the 6th stage, the results of the lesson were summed up and reflection was carried out.
The educational material corresponds to age and program requirements, the scientific, educational and developmental orientation of the lesson is traced.
Practical work was preceded by a search and research stage (history of the application, then work in groups to make a sketch)
There is a connection between the repeated and the new material. The level of knowledge, skills and abilities of students is rated above average and good.
. Teaching methods and techniques are chosen correctly and contribute to the mastery of the topic.
Methods and techniques are adequate to the objectives of the lesson and the level of development of children’s cognitive abilities.
During the lesson, teaching methods alternate. Verbal (story, explanation, conversation), visual (illustration, demonstration), practical (heuristic) are used. Students did not receive ready-made knowledge, but actively participated in finding solutions.
Equipment: ICT, presentation “Appliques”, technological maps, posters, supporting notes, samples of applications, electric iron, ironing board, needles, pins, scissors, sewing machines. The equipment is used in accordance with its intended purpose.
During the survey, students actively responded and gave examples.
The time allocated for all stages of the lesson was distributed rationally, the pace of the lesson was maintained throughout the entire activity. All stages of the lesson were interconnected and worked towards the main goal.
All didactic material was prepared based on the objectives of the lesson and the age characteristics of the students. Work with didactic material and TSO was aimed at achieving the goals.
The teacher's style of communication with students is friendly, positive, and demanding.
At the end of the lesson, reflection was carried out. Students rated the knowledge and skills acquired as good and excellent. On the negative side, they asked for more time to conduct the practical part of the lesson.
Lesson objectives achieved. There is no gap between the goals set and the actual end result.
Deputy Director for SD D. Jalilov
Review
about an open lesson on technology, developed and conducted in grade 5 “b” by the technology teacher of the MCOU “But-Kazmalyarskaya Secondary School” Saidova Lyudmila Mukhtarovna.
The teacher structured her lesson in accordance with the Federal State Educational Standard, using information and communication technologies.
During the lesson, the age and psychological characteristics of the students were taken into account. The content of the lesson included elements of teaching schoolchildren universal educational actions: the topic and purpose of the lesson were determined (tried to be determined) by the students themselves. Any process of cognition begins with an impulse that encourages action. Motivation is needed to encourage the student to begin the activity. With this in mind, the teacher tried to think through each stage of the lesson, composed assignments, and selected questions, including those related to our region. At all stages of the lesson, students were involved in active thinking and then practical activity; the children had to use their existing knowledge. The lesson stages are traditional for a practical technology lesson. A situation of success was created for each student, which also helped to increase motivation and maintain cognitive interest in learning. When asking questions and determining tasks in the lesson, Lyudmila Mukhtarovna took into account the individual characteristics of the students, gave only positive characteristics to the results of their activities, which stimulated the children and increased their activity in the lesson.
The educational information was attractive to the children. Due to the attractiveness of the content of the practical task, the students’ abilities to achieve their goals in the lesson increased. Study time in the lesson was used effectively, the planned volume of the lesson was completed. The intensity of the lesson was optimal, taking into account the physical and psychological characteristics of the children.
The activity was 100%, i.e. at a good level. This activity, in my opinion, is due to the fact that the structure of the lesson, its content, teaching methods and techniques corresponded to this type of lesson and the age category of the children. Everything that was planned was learned by the children, therefore, I believe that the lesson achieved its goal.
Teacher of the Municipal Educational Institution “But-Kazmalyarskaya Secondary School” M. Akhmedov