The joint creativity of a child with his parents contributes to the formation of trusting relationships, familiarizing the child with the world around him, traditions, rituals and holidays.
On the eve of festive events, an adult can invite the child to make children's crafts for the city day “My Favorite City”.
The variety of materials used will help develop the child's fine motor skills and tactile perception. A craft on the theme “My City” can be created from plasticine, colored paper, or corrugated cardboard.
DIY “Cardboard City” craft
To create a themed gift for loved ones, you can make “City” paper and cardboard crafts. To create such a city, the following tools are needed:
- glue;
- scissors;
- thick cardboard;
- thick marker;
- a simple pencil;
- acrylic paints;
- brush;
- glass of water.
- You need to take thick cardboard and cut out the silhouette of a building from it. Thus, it is necessary to create several houses.
- Draw the resulting template in the middle with a simple pencil.
- Draw a small line with a pencil next to the main one to the middle of the house. Cut out the resulting strip of cardboard.
- On some houses it is necessary to cut out the middle from the top or bottom of the house, since in the future the two parts will be connected to each other.
- We connect the two halves of the house.
- We draw out the location of windows and doors on the house with a simple pencil.
- We paint both parts of the house with acrylic paints.
- Let's connect them together.
- In a similar way, we produce several houses of varying thickness, height, and width.
- We take a sheet of Whatman paper and draw the markings of the lawn and paths with a simple pencil.
- We paint whatman paper with acrylic paints.
- We place the resulting houses on a sheet of Whatman paper.
You and your child can make paper crafts and create a city in the same way: first we draw and paint the houses with paints, then we cut out and glue the bottom part of the houses to a sheet of white paper.
Thus, in the process of creative activity, the child will develop the importance and significance of such a festive event as City Day.
Source: https://womanadvice.ru/podelki-na-temu-moy-gorod
Tasks. Teach children to cut out houses from paper folded like an accordion or twice in half. Improve the technique of cutting with scissors: by eye in a straight line (walls of houses), along an oblique (roofs) and along folds (windows). To develop compositional skills - when creating a panorama of the city, rhythmically arrange houses in rows, starting from the top and partially overlapping the images.
Preliminary work. In independent artistic activity, a small group of children prepares the basis for a future composition - they tint a large sheet of paper or a strip of wallpaper, dividing the space into two parts (2/3 - green or yellow-brown ground; at the very bottom two stripes of a gray road, separated by white markings; 1/3 - blue or dark blue sky - see figure). A city tour or looking at illustrations and postcards with city panoramas.
Materials, tools, equipment. Strips of colored paper of different widths for cutting out buildings, rectangles and strips of colored paper for cutting out windows, simple pencils, scissors, glue, glue brushes, oilcloths, napkins, paper and cloth, a large sheet of paper or a strip of wallpaper to create an overall composition.
Contents of the lesson.
The teacher shows the children the basis for the future composition, explains that now there is space - the earth (the bottom of the sheet) to the horizon (holds his hand, showing the horizon line) and the sky. But soon, soon houses here will rise to the very sky, people will live in the houses, cars will run along the roads... And you and I will do this. Let's create our own city. The city is big, there are also a lot of houses in it. Now I will show you how you can create a big beautiful house.
— I want to build a brick house, so I’ll take an orange sheet. My house will have 2 floors, so I will fold the paper in half. I'll turn it around, you see - this is the first floor, and this is the second. How many entrances will there be in my house? Let's see. I'll fold the paper in the other direction - first in half, and then in half again. I'll unfold it. Help me count the entrances: one, two, three, four - four entrances in total. I'll fold the porches again and cut out the roofs - like this - I cut off a corner on one side, and then on the other. Let me turn it around and it turns out to be a house with a figured roof. Now we need to make the windows. I take a narrow strip of yellow paper. I fold it in half and in half again, smoothing out the fold. I unfold and cut exactly along the folds so that the windows turn out the same. I put up windows on the house. You see, there are not enough windows. I take another strip of paper, a different color (for example, blue, pink) and make exactly the same windows. I lay out the windows, alternating them by color or just as if the light is on in some windows and not in others (or the curtains are pink, blue, green) and glue them. This needs to continue until there is one window in every room of my house - on every floor, in every entrance. I will continue cutting out windows when you start making your houses.
The teacher invites one child to show the children how to make a house, clarifies and comments on his actions so that the children reinforce the idea and repeat the sequence again.
Children independently choose the color of paper for their house and windows. They start cutting. The teacher helps with advice and completes his work, and also cuts out round dances of men (ribbon applique) in order to interest the children in another new way, which they will master in the second half of the school year. Children transfer the houses to the general panorama. The teacher helps place them and explains that first we need to glue the houses on the horizon line, and then lower the next rows lower and lower. Partially overlaying the house on the house, we have a road below, cars will rush along it, which we will cut out on the next lesson.
After class. The composition “Our City” is hung for general review and discussion.
Applique city
The “City” applique made of colored paper will be a worthy decoration for any classroom and any room in the apartment. Even the smallest child can cope with its production,
if you help him overcome some difficulties.
Applique city
It is better to take cardboard in a light blue shade as the basis for the application. Against this background, the “City” application will look most organic. At the first stage of work, we glue a fairly wide black stripe to the bottom of this sheet (folded lengthwise).
In the center of this strip we glue a narrow (distributive) strip of white color. It turns out to be a road.
Road
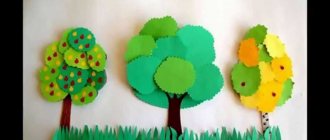
Above it we glue an uneven strip of light green color. This will be the lawn. Cut out four rectangles from beige, light orange or brown paper. We make four square slits in each of them. The result is multi-storey houses, which we glue to the main background - on the “lawn”.
Lawn with houses
We cut out silhouettes of Christmas trees from green corrugated paper, and stems from brown paper. We glue Christmas trees between the houses.
Christmas trees
We cut out trapezoidal roofs for houses from pale yellow corrugated cardboard. Glue them. We cut out a traffic light from black paper and glue it next to the road. Opposite it, we lay out a pedestrian crossing with pieces of a white stripe.
Traffic light and pedestrian crossing
Cut out two cars from paper of different colors. We send them along the road in different directions.
Cars
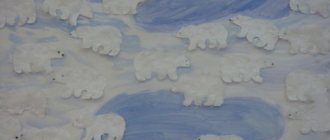
All that remains is to decorate our urban landscape: cut out flowers from colored paper and plant them on the lawn. We make small clouds from white paper, napkins or cotton pads and stick them on the sky.
Flowers and clouds
Between the clouds we place in the sky a bright, radiant sun cut out from a sheet of yellow paper.
Application favorite city
Our application on the theme “City” is ready! In front of us on the table lies a simple, but clearly recognizable landscape. If desired, you can make various variations of this picture - for example, evening and night views. To do this, you will only need to change the main background and the design of the sky.
Source: https://montessoriself.ru/applikatsiya-gorod/
Abstract of the educational activity “My city is St. Petersburg”.
Author: Grekhova Olga Vyacheslavovna
Educational institution: GBDOU Kindergarten No. 38, Pushkinsky district
Locality: St. Petersburg
Topic: Abstract of the educational activity “My city is St. Petersburg” in the middle group.
Library Section: Lesson Developments
Goals:
Expand children's knowledge about the city in which they live. Introduce the main attractions of the city of St. Petersburg. Develop social and communication skills, speech, artistic and aesthetic perception, physical activity, imagination, attention. Cultivate love for your hometown.
Materials and equipment:
Presentation of illustrations on the computer (Peter I, Peter and Paul Fortress, Nevsky Prospekt, Neva River, drawbridges, Palace Square, Winter Palace, Chizhik-Pyzhik monument). Envelope with tickets. Conductor's bag. Walnut shells, wooden sticks, colored paper for creating boats.
Modern educational technologies:
Research technology (travel on a map, travel along the “river of time”). Information and communication technologies. TRIZ technology.
Progress of the lesson:
Organizing time. Educator: Guys! Look what I found. What is this? That's right, an envelope. There is something written on it: “For children from the Zvezdochki group.” Shall we open the envelope and see what's inside? Here's the letter. This is what it says: “Dear children! My name is Chizhik-Pyzhik. I invite you to a tour of our city of St. Petersburg by bus. I have prepared a ticket for everyone. I am waiting!" Guys, this is great! And we will find out who Chizhik-Pyzhik is a little later.
Do you know what an excursion is? This is when people gather to visit famous places in the city. And I will be your tour guide, or guide, as I will tell you about the interesting places of our wonderful city.
I suggest that Alice give out tickets for the guys, but to do this, they must first be put in their purse. Who will Alice be for us? That's right, a conductor.
Physical education Poem "Bus".
Forward, forward the bus,
Spin your wheels!
Hurry, hurry, driver,
Start your engine!
Getting to know the city. Educator: Here we are. Our city, St. Petersburg, is one of the largest and most beautiful cities. Many years ago, among swamps and forests, Tsar Peter I (portrait of Peter I) began to build a new city on Hare Island. He named it St. Petersburg. The construction of the city began with the Peter and Paul Fortress (illustration).
Guys, do you know what a fortress is?
Peter I built several buildings on Hare Island and to protect them from enemies, cold wind, and water, he built a high and strong wall around it. And it turned out to be a fortress.
Let's move on, guys. And so our bus turned onto the main street of our city - Nevsky Prospekt (illustrations). What do we see? Beautiful old houses and a wide road. There are always a lot of people on Nevsky Prospect, including from other countries.
And so we drive further, and what do we see? The Neva River (illustrations). What kind of river is it? Deep, most likely cold. In winter, it becomes covered with a crust of ice and looks completely different than in summer. Our city is also called “City on the Neva”.
Do you see this unusual bridge that opened into two parts? There are several such bridges in our city. They are deployed at night so that large ships can sail along the river, which simply would not sail under an unopened bridge.
Let's spread our elbows to the sides, connect our middle fingers to each other and imagine that this is a bridge. And then night comes. A big, big ship is approaching, and we need to let it pass. We raise our palms up, bending them at the hand. This is the principle by which bridges are moved apart.
Artistic work. Educator: Guys, Chizhik-Pyzhik asked us to make boats to sail them along our Neva River. Let's sit down at the tables and fulfill our friend's request. (Children sit at the table and make boats from walnuts, wooden sticks and colored paper as sails).
Continue exploring the sights of the city. Educator: Having driven along Nevsky Prospekt, we find ourselves on the main square of our city (illustrations depicting Palace Square). In the middle of the square stands the Alexandrian Pillar (illustration). At its top there is an angel who protects our city.
Palace Square was named so because the large and beautiful Winter Palace is located nearby (illustration). Previously, kings and their courtiers lived there, but now there is a museum called the Hermitage. What's in the museum? Paintings, sculptures, furniture and clothes of the kings who lived in this palace a long time ago.
Let's tell a poem together about this wonderful building:
Winter Palace near the Neva, look! Our kings once lived in it. Well, now it is a huge museum. Here is the Hermitage, the pride of the entire Motherland.
Physical education Guys, are you probably tired? Let `s have some rest. Let's sing a funny song.
Here we are sitting on the bus, and we sit, and we sit. And we look out of the window, We look at everything! We look back, we look forward, Like this, like this. Well, the bus is not lucky, is it not lucky? The wheels started spinning Just like that, just like that, Forward we rolled Just like that! And the brushes rustle on the glass, whack-whack-whack, whack-wheez-whack, they want to sweep away all the droplets whack-whack-whack!
Meet Chizhik-Pyzhik.
Educator: Guys, now let's go further and meet Chizhik-Pyzhik, who invited us on this excursion, and also give him our boats so that he can launch them along the Neva River.
So we came to our friend (illustration). And who is Chizhik-Pyzhik? That's right, sparrow! Do you think he's real? No, this is a monument, and it is made of bronze. This is the smallest monument in St. Petersburg. It sits on the embankment of the Fontanka River, which flows into the Neva. People throw coins at his paws and make wishes. But instead of coins, we will give him boats.
8. Results, consolidation.
Educator: Our excursion is over here, and it’s time for us to go back to kindergarten. While we're driving, let's remember where we were today? (The teacher again shows illustrations of the sights, and the children say their names).
Did you enjoy our excursion?
Do you want to walk around the city again?
So we returned to kindergarten.
Educational portal
Joint activities with children of primary preschool age
Collective application on the theme “My Home”
Educational areas “Artistic creativity”, “Communication”, “Cognition”
Zhurba A.D., teacher of GBDOU No. 99
- Saint Petersburg
- Program content:
Teach children to compose an image from several parts, following a certain sequence; position it correctly on the panel. Refine your knowledge of geometric shapes (square, triangle, rectangle). Fix the names of colors, develop color perception, aesthetic taste. Cultivate accuracy when working with glue.
Equipment: a picture with a view of the city, a construction set, cut-out blanks (squares, rectangles, triangles), brushes, glue, napkins, a sheet of whatman paper.
MAGAZINE Preschooler.RF
Plan - summary of the actual educational lesson in the middle group. Application. Topic: “City Streets”Educational field Artistic creativity Educator: Ryabtseva S. A. Kindergarten No. 145 “Ogonyok” Bryansk, 2015
Program content:
- Cut a rectangle, folded along the boards, for the windows of the house, place the windows on the same level.
- Strengthen the ability to cut corners.
- Strengthen the ability to correctly compose images from details (geometric shapes).
- Practice gluing parts carefully.
- Strengthen the ability to work in a team.
- Foster children's interest in their surroundings and applications.
- Develop imagination and sense of composition.
Integration: Communication, Cognition, Artistic Creativity
Handouts: tinted Whatman paper, colored paper rectangles, blue rectangles, black rectangles, colored paper squares, ready-made machines, glue, glue brush, oilcloth, brush stand, napkins, scissors.
Demonstration material: illustrations depicting streets and houses of the city of Bryansk.
Progress of the lesson:
Q: Guys, today we have guests, let’s say hello to them and smile at them, and now let’s smile at each other.
There is a knock on the door. The teacher comes to the door, “Who’s there?” Look, the postman brought us a letter from Lesovichok.
Q: Let us read it and find out what Lesovichok writes to us.
Letter from Lesovich.
Hello guys!
I want to see your city, but I can’t come to you. I live far in the forest and am very busy with forest affairs. Please show me your city.
Goodbye.
Q: Guys, where do you live?
D: in the city of Bryansk.
Q: Yes, you and I live in the city of Bryansk. Our city is big and beautiful. It has many streets and wide avenues. It has many beautiful buildings. What beautiful buildings do you know?
The teacher invites the children to look at reproductions depicting various city streets.
Q: Guys, let's send Lesovich a picture about our city.
- Look, on a large sheet of paper I drew a road, a sky, planted trees, but this picture is missing something to make it a real city street. What do you think is missing? (Children's answers).
- That's right, we need to build houses, glue cars.
- Today we will do it at home; do not draw, do not sculpt, but with the help of appliqué.
And whoever completes his task will help me stick the cars on the road.
The teacher explains how to do the work:
To make a house:
- Take a large rectangle and place it in front of you on the table.
- Take one blue rectangle. We fold the blue rectangle corner by corner, and then smooth it along the fold line, unfold it, cut it - this will be 2 windows, do the same with the rest of the blue rectangles. Place them on a large rectangle.
- Take a black rectangle and cut off its corners on one side - this will be the roof. Place the scraps back into the plate. Lay out the roof on a large rectangle.
- We smear each part with glue on oilcloth and glue it into place where we took it.
Whoever has the house comes up to me to glue his house to our street.
Finger gymnastics
Q: You are already tired. Let's do gymnastics for the fingers.
We are building a house, knock and knock all day long - a ringing knock is heard. Hands clenched into fists, thumb raised, tapping index fingers.
The hammers are knocking, knocking fist on fist. We are building a house for the children (hares, squirrels). Connect your fingers and show the roof.
This is such a nice house, clench and unclench your fingers. How gloriously we will live. Rotate your hands.
Repeating the stages of gluing the house.
You can start working.
During the lesson, the teacher reminds how to work with scissors and glue. Monitors the children’s work, compliance with the required color scheme, and gives advice on creating the details of the drawing.
Safety precautions when working with scissors
- Store the scissors in the specified location and position.
- When working, carefully monitor the cutting direction.
- Do not hold scissors with the blade facing up.
- Do not leave scissors with open blades.
- Don't cut with scissors as you go.
- Do not approach your friend while working.
- Pass the closed scissors rings forward.
- As you work, hold the material with your left hand so that your fingers are away from the blade.
Safety precautions when working with glue
- Handle the glue with care. Glue is poisonous!
- Apply glue to the surface of the product only with a brush.
- Do not let glue get on your fingers, face, especially eyes.
- If glue gets into your eyes, rinse them immediately with plenty of water.
- After finishing work, be sure to wash your hands and hands.
- When working with glue, use a napkin.
At the end of the lesson, the teacher asks the children to look at the finished picture and pay attention to whether all the houses turned out smooth, neat, and also look carefully to check everything else. Children examine their work, find their favorite details, and explain their choice. The teacher praises those children whose houses or trees turned out to be the most neat, beautiful and straight.
I think that Lesovich will like our city street and he will see how beautiful our city is. Well done boys.
And now the workers on duty will remove their workplaces.
| Next > |
Application
The best works of participants and winners of the competition “My Home, My Garden, My City”
Happy birthday, Saratov region!
Authors: students of the senior group “Smile”, teacher Andreeva Yulia Sergeevna. MBDOU “Kindergarten No. 11 “Nest”, Yoshkar-Ola.
Our kindergarten is designed for two groups. The entire building is divided into two wings. You can go upstairs using the purple or blue elevator, which makes three stops. The first stop is a walking balcony-greenhouse. The second stop is corners of solitude, where calm music is always playing, there are shelves with books, soft sofas, a lot of soft toys... The third and last stop is the green and orange playrooms, connected by a green corridor. Three rooms upstairs are a dining room, a study area and a common area bedroom... You can travel from one wing to another by mini-train. He makes three stops: near two children's play stations, blue and purple, and in front of the educational complex located on the right. On the ground floor of the complex there is an orange music room, on the second there is a sports hall, on the third there is an art studio, and even higher there is a mini-zoo.. The last floor is a swimming pool. Above and to the left of the play station there is a center for experimentation and children's research (pink), and even higher – mini planetarium (yellow). It can be accessed via a ladder. On the roof of the planetarium is a launching pad for young balloonists. In good weather, excursions are organized
on the air balloon.
Authors: pupils of MBDOU “Kindergarten No. 6 “Fairy Tale”, city of Tsivilsk.
Kudryashova Arina, Zemtsova Sofia, 6 years old
Authors: Batura Timofey, 5 years old, Derakch Vladimir, 4 years old, teacher Korotkova Tatyana Aleksandrovna. MBDOU "Golden Fish", Noyabrsk.
We built a kindergarten out of geometric shapes. In the central building with a large gate, teachers meet children in the morning. When it's time for breakfast, lunch or dinner, children go to the mushroom-shaped building. The next building, with diamond-shaped windows, is for relaxation: there are comfortable beds on which children sleep. The unusual building on the right side is a place for games and activities. There are many games and toys for children to play and do interesting things.
Project "My Petersburg"
Project type: informational and creative. By timing: short-term (from 19.05 to 30.05). Project participants: middle school children. The project also provides for the active participation of parents of students.
Problem: children’s ignorance about the sights, diversity and features of architectural buildings; lack of culture of behavior in your hometown. Project goal: Implementation of an integrated approach to raising children in the spirit of patriotism, introducing preschoolers to the history and culture of their native city of St. Petersburg, its attractions; nurturing love and affection for one’s hometown. Project objectives: 1. Create conditions for the perception of information about the historical past and cultural appearance of the native city. 2. To familiarize preschoolers with historical, cultural, geographical, natural and environmental uniqueness. 3. Cultivate a sense of pride in St. Petersburg, an emotional and value-based attitude towards your city.
Forms and methods of work:
Thematic classes, presentations, conversations , targeted walks, watching cartoons, situations, memorizing poems, board games, observations, reading works of art, role-playing, didactic games, looking at illustrations.
Reason for development:
The project ensures the achievement of specific results in a short period of time.
The implementation of the project ensures the active participation of children, parents and teachers.
The project can be implemented as part of a joint activity. Preparatory stage: - select illustrations, paintings, slides, recordings on the topics of the lessons; — select children’s literature on the subject of the project; - select samples of Russian folk crafts; — develop a script for a literary and musical festival for City Day “My City - St. Petersburg”; - prepare material for visual arts. Project content: - conduct cognitive cycle classes to familiarize yourself with the environment; — organize creative activities for children: games, drawing, appliqué, etc.;
- together with the children, make a collective work: “Finland Station” - involve children and parents in collecting material for the design of albums: the photo exhibition “Sights of our city”; — to hold a literary and musical festival “My City is St. Petersburg.”
Expected Result:
Clarification and addition about the sights of the city and the culture of behavior in the city.
Have an idea of events aimed at developing and improving the city.
To consolidate knowledge about the types of bridges and buildings; know their names; be able to distinguish and find similarities in varieties of architectural structures.
Have discipline skills and a culture of behavior in public places of the city.
Develop a humane attitude and patriotic feeling towards your city.
Project implementation:
1. Cognitive cycle classes to familiarize yourself with the environment:
Topic 1. “Bridges of St. Petersburg” - a lesson in the form of a presentation, introducing children to the types of bridges in the city: their features, differences, symbols.
Topic 2. “Sights of the city” - a lesson in the form of a presentation, viewing slides, getting acquainted with the features of the city, a brief history and a memorable symbol of the architectural structure.
Topic 3 . “Finland Station” - a lesson in the form of a presentation, a short story about its origin, characteristic features and distinctive features.
Topic 4. “Peter and Paul Fortress” - a brief history of its origin, highlighting its characteristic features, and the significance of the architectural structure.
Topic 5 . “Nevsky Prospekt” is the main street of the city, according to old ideas “a street for the rich,” famous buildings, features, comparison with modern Nevsky Prospekt.
Topic 6. “ Rivers of St. Petersburg” - a lesson in the form of a presentation, types of rivers and their names.
Topic 7. “ Ancient Petersburg” - introducing children to “old” Petersburg, slide - pictures depicting the sights of the city in the past; comparison with the “new” Petersburg, similarities and differences.
2. Visual activities for children:
Topic 1. “ City sights ” - coloring pictures, conveying exact colors, highlighting architectural features.
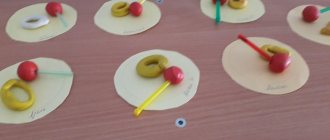
Topic 2 . “Finland Station” - applique made from waste material and plants; teamwork.
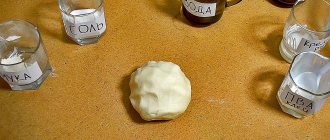
Topic 3. “Peter and Paul Fortress” - modeling from salt dough, highlighting characteristic features and memorable features.
3. Children's play activities
• Didactic games: — “Recognize our flag (coat of arms)”; - “Foreigner” - “Whose suit?”; - “I’ll name it, and you guess”;
- “Guess the picture.”
• Board games:
— "Labyrinth";
- “Puzzles”, “Dominoes”.
• Outdoor games: — “Lions of stone”; — “Burners”; - “From bump to bump.”
4. Reading fiction: • tales: - “The Tale of How Our City Was Born” - “Savior on Spilled Blood”; — “Peter and Paul Fortress” — “Winter Palace”; — “The Bronze Horseman” — “Decembrist Square”; — “The Secret of the Palace Bridge.”
• Stories, novellas: - “This city of Leningrad” Budogoskaya L., Vladimirov Y.; — A. Ishimova “History of Russia in stories for children” (separate chapters); - N. Nosov “Metro”.
• Poems about St. Petersburg - S. Skachenkov “At Night on Nevsky”; "Night Wind"; "Petrodvorets"; — V. Bryusov “To the Bronze Horseman”; — A. Fatyanov “Petersburg”, “White Nights”;
— V. Lelina “Lion's Bridge.”
5. Participation of parents in the implementation of the project: ; — collecting material for the design of albums: “Cities of Russia”;
— photo of the exhibition “Attractions of our city”;
— collection of coloring books on the theme: “My Petersburg.”
The result of the project: - album design, “Cities of Russia”; — photo exhibition “Attractions of our city”; — Literary and musical festival “My city is St. Petersburg.”
Abstract of the OD “Artistic Creativity” (application) on the topic “Big House” in the middle group.
Abstract OD "Artistic creativity (application)"
Topic: Big house.
Goal: teaching children to create an image of a large house in an applique.
Objectives: 1. To train children in the ability to cut corners on a strip of paper, to consolidate the ability to cut a strip of paper in a straight line, and to compose an image from parts. Reinforce techniques for careful gluing.
2. Develop a sense of proportions, fine motor skills, and attention.
3. Foster independence, interest in future work, and a desire to help the hero.
Activation of the dictionary: one-story house, multi-story house, trapezoid.
Materials: glue, brushes, napkins, scissors, oilcloth, sheet of paper, rectangle of colored paper and strips of colored paper for windows, roofs, bunny toy, laptop.
Preliminary work: looking at illustrations of houses.
1. Introductory part. Mental warm-up
All the children gathered in a circle, I am your friend, and you are my friend.
Let's hold hands tightly and smile at each other.
I wish that we have a good mood all day.
Guys, today I went to kindergarten and met a bunny, he was very sad. When I asked him what happened, the bunny replied that he had no home, he had nowhere to live, nowhere to hide from the wolf and fox, nowhere to invite guests. He really wants to have his own home. And I invited the little bunny to our kindergarten, told him how kind the guys were in my group and promised that you would definitely help him. How can we help the bunny? (children's answers: build a house). What kind of houses are there? (single-story and multi-story).
The bunny has many friends, what kind of house can you build him? (multi-story)
- Do you think we can build a big brick house now? (We can't).
What can we make multi-storey buildings from?
(From paper)
- Yes, and I think we can do it.
Then I invite you to come to our creative workshop. (we sit down at the tables) Posture.
The teacher displays a sample of the “Big House” application, completed in advance.
— What parts does the house consist of? (roof, windows, base)
— What shape does the base of the house have? (rectangular)
Window? (square)
Children, under the guidance of a teacher, draw up a work algorithm:
— Guys, let’s discuss together the sequence of our work... (Support diagrams are set up one by one)
You have a large rectangle on your table - this is the base of the house. In order to get windows for our house, you need to cut a strip of paper in half along the line (diagram on the board), you get two squares, two windows. You have two such strips, since our house is multi-story, so we get 4 windows, 2 windows are glued on top, 2 windows on the bottom. Then we prepare the roof. For this, you also have a strip of paper, a little larger than for the windows. How to make a roof from a rectangle? (diagram) Starting from the bottom corner, along an oblique, the scissors are slightly tilted to the side, move up, cut off the upper corner, then turn it over and in the same way from the bottom corner, along an upward slope, cut off the corner. We got a roof in the form of a figure unfamiliar to you - a trapezoid. After everything is ready for gluing, be sure to carefully lay out the base of the house, the roof, and arrange the windows on a sheet of paper. We have a lot of work, we need to rest.
— Physical training “Home”
One, two, three, four, five (step in place)
Let's build and play.
We build a big, tall house (on tiptoes, hands up)
We install windows and build a roof (show)
What a beautiful house and everyone lives in it together! (clap our hands).
Look at the board, remember the rules for working with scissors. (picture)
gluing rules.
The little bunny is really looking forward to his beautiful multi-storey house, let's get to work, I wish you good luck.
— Independent work of children, individual assistance from the teacher. (calm music sounds).
3. Final part.
Well done boys. Let's go out in a circle with our works. Look what wonderful houses we have made. Who's visiting today? Were we able to help the little bunny? Guys, what kind of houses did we get? (multi-story)
…., whose house did you like, why? What difficulties did you encounter while doing your job? What was easy? (praise from children) I think the bunny can’t wait to invite all his friends to visit, because now he has somewhere to invite them. Let's put our houses near the bunny and he will choose the best one for himself.