Photos of crafts made from plasticine and natural materials
On a sheet of cardboard (A4 format), draw a basic picture with a simple pencil. The child can handle it. Take colored plasticine. Smear the pieces on the cardboard to resemble the details of a painting. Gradually a blue sky and a grassy cover of the earth are formed. This is just a leaf divided in two. With simple finger movements, small pieces of plasticine will turn into ropes and balls.
The background of the picture is not necessarily grass and sky. Big water, sea, river, stream. Mountains in the distance. In the foreground is a ship or boat. Useful for tree trunk, leaves, sun.
Take a closer look, ant, butterfly. These are all flattened balls of plasticine. The result is a wonderful picture. If desired, add flowers made of rhinestones, beads or cereals.
We suggest gluing three-dimensional insects onto a similar picture. Elementary ball caterpillars, horned beetles, butterflies, ladybugs. Do you get a weighty picture? Secure it to a piece of thick cardboard. Or place it in a frame without glass.
Interesting options with natural materials. Small pebbles, caterpillar shells, chestnuts and much more. Take what you have on hand. Cones, dry bark, cut tree branches.
The combination of plasticine and natural materials gives magical pictures. The underwater world blooms in a cardboard box. Cut the fish bodies from the bark. Decorate with feathers and blades of grass. Turtles made of plasticine and walnut shells. Buy ready-made eyes, special for toys.
A family of plasticine snails - a craft for a competition. Made from natural materials - shells. Snail bodies made from plasticine. Doing it yourself is not difficult. Line up the characters on cardboard. And he, in turn, is covered with crushed plasticine. Don't have any shells? Substitute pine cones. Simple and sweet.
Is the installation intended to be horizontal? Place ships on it. Protozoa from nut shells. Attach a plasticine ball to the bottom. Install a matchstick mast. Put on a paper sail.
We present to you a three-dimensional craft made from pine cones and plasticine. The idea is not new, but it looks original. A 4-5 year old child can easily repeat the rooster with his family. The cone in the shape of a bird's body looks harmonious. Opened scales form feathers. Glue a plasticine tail to the back.
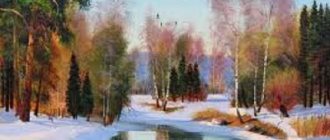
New crafts on the theme “Spring” from the website Country of Masters
The “Country of Masters” website constantly pleases readers with new photographs of crafts. These are ideas that you can bring to life. New crafts on the theme of spring will be interesting for children. Some cannot be done without adults. For example, crocuses made of polymer clay. Looks like it came from a flower shop counter.
What is actually rolled out are thin pieces of clay. Place on a glass cutting board. A relief is created. To give shape they are placed in spoons. The petals are connected to the stamens. Each flower is dried with its stem up. Better to hang it up.
Bouquets made in quilling style. First, many oval and round parts are prepared. Thin grass is cut from green paper. Connect on cardboard with glue and you're done!
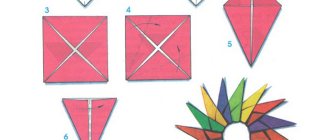
The cute chick comes to life in a few minutes. Parts are cut out. In the right places they are not cut through completely. They are inserted into each other, fastening without glue. The muzzle and paws are made of orange paper.
One of the craftswomen came up with the idea of decorating discarded plastic vitamin jars with salt dough. I made a composition. Created three-dimensional pictures. Dried and decorated.
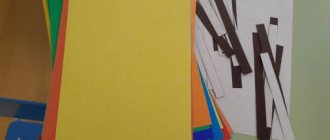
Ideas for spring crafts made of paper and cardboard with templates for elementary school children
We suggest creating light applications using a template. Ideal for 1st and 2nd grade students. The work consists of cutting out parts from a colored template. Next comes fantasy.
Invite the children to come up with a story for the picture on their own. Schoolchildren will discover the art of composition and collage. The bright colors of the templates will play out the imagination of children.
More complex pictures - without example. Children obviously do not know how to put the parts together correctly. This leads to interesting results. The flowers turn out unexpectedly beautiful and unusual.
Grades 3, 4 – application based on a black and white template. Each child is given one of the printed templates. Optionally, offer to cut the template into pieces. Next, repeat the details on colored paper and recreate the whole picture on thick cardboard. Or draw approximate parts of the collage by hand and gradually cover the picture with colored paper.
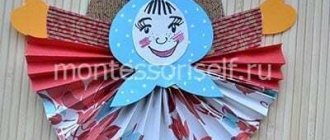
Spring bells made from napkins
For work you will need plain napkins, white and green paper, colored cardboard.
Cut out templates from white paper as outlines for future flowers. One job will require 5 elements of different sizes.
Also prepare the stem, leaves and bases for the bells in advance. After this, cut the napkins into 1.5 cm strips. Crumple each piece into a random lump. Apply glue to the white paper outline and begin gluing napkin balls to it.
The finished children's craft will look like in the photo.
Spring crafts for school
Children's imagination has no limits. Easy, but very interesting crafts are created by children from the first grade. A striking example is the tree of life. These are four drawings joined together. It turns out to be an installation of the seasons. Just imagine - hot summer, warm spring, orange autumn and snow-white winter. All in one picture. Suitable for crafts in both elementary and high school.
Prepare the base. Four square pieces of paper. Color each one. Take green, yellow, red, blue. Don't limit yourself to one tone. Let blue contain shades of blue and violet. In red - yellow, orange. In green - blue, turquoise.
Connect the squares with a picture. Draw the trunk and branches of the tree. Use pencil, then gouache or watercolor. For decoration you will need buttons. Small or medium size. A scattering of different colors will look original. For fastening PVA or glue gun.
The simplest flowers will grow on your desktop. How, you ask? Creativity will help. Look how simple these ideas are! They are easy to implement. Colored paper, sheets for scrapbooking. Plant stems are twisted leaves. For convenience, take a knitting needle and a strip of paper 2-3 cm thick. Wind the paper tightly onto the knitting needle. At the same time, drip glue onto the inner edge. Gradually, you will form a beautiful and even stem for the flower.
Spring flowers are a simple craft for school. For the flower itself, use a magazine clipping, drawing, appliqué, or combine several techniques. The stem is a strip of thin cardboard folded like an accordion.
Using the technology of gluing simple parts, a three-dimensional branch with flowers and leaves is made.
Identical flowers are obtained in the following way:
- Fold a white square of paper 5x5 or 7x7 cm in half. Then in half again. You will get a small square with equal sides.
- Use your finger to grab the corner of the folds. Use scissors to cut out a heart from a square.
- Expand. The result is a flower.
For the leaves, do something similar. But the sheet is folded once. A semicircle is cut out.
The parts are fastened with a glue gun. At the base is a birch branch. We suggest taking a branch with budding leaves.
For elementary grades, we suggest placing a paper bird on a plastic plate. The combination of drawing and applique creates a wonderful piece of work. Brown woolen threads will help to recreate a birds' nest.
3D application “Birch trees”
For the craft you will need:
- green cardboard;
- double-sided colored paper;
- glue and scissors;
- White list.
Draw lines on the sheet as in the picture.
Make dashes with a black pencil. They will imitate birch bark. Cut out each element and glue it into a tube. Preparing the branches. For them, draw black stripes on a white sheet of paper (like on a trunk). Cut strips 4mm wide. Lubricate the tip of each branch with glue and attach it to the trunk, going down almost to the very bottom of the tree. All that remains is to create a stand. To do this, make cross cuts at the base of the plant. Bend them over and glue the tree to the green cardstock. Using the same technique, make other “representatives” of the forest. To complete the composition, the applique is expanded with flowers. Cut them out of colorful paper and glue them to the green stems. You have received a bright three-dimensional craft.
Application “Blossoming Apple Tree”
For the craft you will need:
- blue or light blue cardboard;
- colored and white paper;
- scissors;
- glue.
- The work itself is a twig of an apple tree.
- Having cut out a branch from brown paper, we begin to create flowers and leaves. 5-6 pieces are enough for one application.
- The leaves should be elongated oval in shape. Using a green pencil or pen, create a drawing of the “skeleton” of a leaf.
- To complete the spring composition, cut out silhouettes of dark-colored birds.
- After collecting all the parts, indicate to the children the contours of the finished work. The main thing is to give them a clear step-by-step description of each step.
- Let your artwork dry.