In modern preschool education, speech development is considered as one of the foundations of raising and educating children. After all, future successful studies at school, general intellectual development, and the ability to communicate with people depend on this. Today, educators are increasingly giving preference to practical teaching methods, because when a child interacts with objects himself, he understands the world around him better. Therefore, the teacher should make an interactive guide - a lapbook on speech development.
- 2 Materials for filling out a lapbook on speech development
2.1 For younger preschoolers - 2.2 For older preschoolers and preparatory groups
- 2.3 Thematic lapbook
- 3.1 Photo gallery: ready-made lapbook spreads
For what age is a “speech” lapbook suitable?
You can offer children a lapbook on speech development at an early preschool age. Only in the junior and middle groups does the teacher himself draw the children’s attention to the manual and work with them using it.
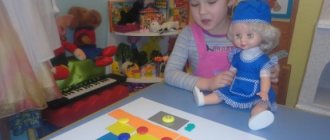
At a young age, the teacher himself captivates children with a laptop, arouses interest in it
Older preschoolers can work with the interactive folder on their own. It should always be within the reach of children and supplemented with interesting material.
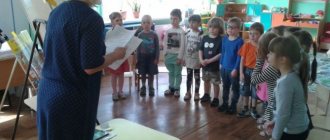
In the senior and preparatory groups, children can study independently with the manual
Choosing a theme
It all depends on what the child needs to learn about. Standard options include seasons, studying trees, numbers, letters, insects, wildlife, etc. A small book will contain a small educational part and a training part to consolidate knowledge. By making a lapbook yourself, you can make an individual guide that would be suitable for consolidating gaps in knowledge.
A full-fledged study is suitable for the 3-5 year old category, when children perceive interactivity positively and are at the age of “why”. On the Internet you can find a huge number of ready-made templates that are created by real professionals.
Even if nothing comes to mind, you can simply print and assemble a full-fledged book within a few hours.
How to use a lapbook when working with preschoolers
Of course, a lapbook is not just a beautiful craft for decorating a group. This is an invaluable teaching material for speech development. The following areas of its use can be distinguished:
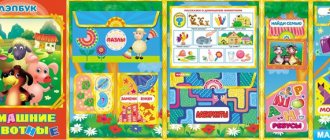
- Lapbook for children. This is a colorful interactive folder that holds secrets. Preschoolers want to look at it and study it again and again in their free time. Unbeknownst to the children themselves, the manual encourages them to develop speech and communicate with peers and adults.
- Lapbook for teachers. This manual allows you to organize a lesson on speech development and provides ready-made material for exercises.
- Lapbook for parents. This is an opportunity to show your creative abilities, spend fun and useful time with your child, organize active communication, and an opportunity to discover the baby’s potential.
Speech development in kindergarten is carried out in a variety of activities and in different forms. A modern approach to organizing this work, in particular the use of a laptop, will make it possible to interest children, systematize their knowledge, and turn learning into an exciting process. It is quite possible to study with such benefits at home.
Creating a Layout
A layout is needed for those who create a book from scratch. If you use templates, then everything will be in its place, and the parent will not get confused. In other cases, you can draw the placement of pockets and additional details by hand. For a draft, you can take a standard A4 sheet. What to do:
- The book should not be too big. Each part should be organically placed and comfortable.
- The more tactile details there are, the more interesting it will be. Pockets, accordions, a retractable questionnaire - all this needs to be included.
Based on the layout, it will be possible to make any laptop in the future. Only the theme and content changes.
Pockets
Made using standard envelope technique. A rectangle or square is cut out and only three sides are glued to the base. Cards with letters, vegetables, animals, etc. can be placed in the pocket.
They can be printed on plain paper using a color printer. How to make pockets for a laptop with your own hands can also be found in the public domain.
Making additional elements
And so, a lapbook is a hodgepodge consisting of a large number of additional details. Each of them carries useful information and structures knowledge. The topic is studied step by step, which has a positive effect on mastering the subject.
Note!
Ideas for LD (a girl’s personal diary): step-by-step instructions for making it yourself, photo reviews of the best options
Educational soft books made of felt: materials for making, detailed instructions + reviews of plots for books (100 photos)
Original do-it-yourself valentines - design options, necessary materials, master class for DIY work
How to make a lapbook out of cardboard with your own hands, using a minimum amount of material, will be discussed in sections.
Curly pockets
Ideal for themed compositions. For example, when it comes to studying edible mushrooms. Instead of the usual rectangular pocket, a basket is made.
The child is given cards with mushrooms, which he must independently select and place in the basket. The fastest way is to print it on a printer and cut it around the perimeter.
Note!
Do-it-yourself bead brooch: photos of the best options, step-by-step master class on how to create it yourself, weaving patterns
Do-it-yourself felt toys - TOP-120 photos of toy ideas, do-it-yourself instructions for making them for beginners
Amigurumi for beginners - photos of the best toys, a master class on knitting items with your own hands step by step
How to make it yourself from felt
The safest option for a laptop is one made from soft, pleasant fabric. Such a product will definitely not hurt even the smallest student. In addition, it turns out to be strong and reliable.
The first step is to decide on the theme of the product. It can be general or narrow. The second option is always easier to do. It is best to first take paper and pen and sketch out a rough plan for creating the craft.
Next he draws a mock-up of the product. Here it is immediately noted how it will look, what sequence of tasks is planned, the location of all the moving parts, games, and details.
First, all parts of the future lapbook are drawn on thick paper and cut out. Then they are applied to pieces of fabric and also carefully trimmed.
Next you need:
- Place the resulting felt pieces on the fabric, secure with pins and determine if they are the right size.
- Sew the blanks to the fabric base.
- Fix pockets for different games and insert cardboard into them.
- Decorate every page of the future “book”. For example, using buttons, beads, bows, flowers, stickers. You can paint directly on fabric with acrylic paints.
- If desired, laminated the names of games and tasks on different pages.
- Use an awl and a needle to sew together the sheets of the future laptop. You should immediately thread the ribbon into the needle so that you can eventually tie the product with a beautiful bow.
Instead of tape, you can use a loop and a button or even a zipper to secure the structure.
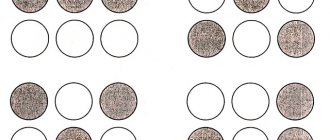
Spinning circles
Plain paper will not work; you must use hard cardboard. Ideal for learning time or interactive calendar. To do this, cut out the base (3-4 circles), then place a button in the middle, which is glued on the other side with a piece of clay or simply bent. You can also use a piece of a match or a toothpick, the main thing is that the sharp base is not accessible.
Cut notepad
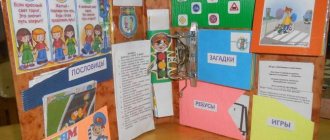
Good for learning proverbs or quick polls. One part is simply glued to the book, the top is cut into small parts. Example:
- Finish the proverb - the first part contains 50% of the phrase, the rest is closed at the bottom. At any time, the child can turn it over and see if the answer is correct.
- Clever riddle - themed riddles with short answers can be found online.
This notebook must be made using paper and cardboard. Where the harder part stands out as the base. There are a lot of ideas on how to make a lapbook for children with your own hands. Parents constantly post online options that they come up with on their own. For inspiration you should definitely study them.
Material
Before creating, you need to make sure that you have all the necessary items:
- Scotch.
- Colored paper and cardboard.
- Scissors.
- Having a printer is welcome.
- Markers.
- Glue.
- Stapler.
This is everything you can use to make a lapbook with your own hands in one day.