Galina Klokova
Notes on drawing lessons using non-traditional image techniques.
Art activities using non-traditional
image technician in a preparatory school group.
Prepared by G. A. Klokova, teacher of the 1st category of kindergarten No. 25 “Ryabinushka” in Michurinsk, Tambov region.
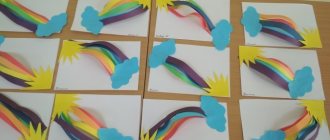
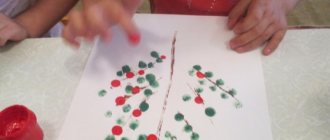
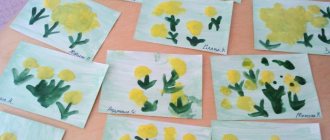
Theme: “Autumn bouquet.”
Goal: development of creative abilities through the use of non-traditional drawing techniques : “leaf print”.
Objectives: - continue to introduce the genres of fine art (still life)
;
— learn to mix paints directly on the leaves;
— improve drawing skills using leaf printing and plasticine printing techniques;
— develop compositional skills.
Equipment: sheets of paper, watercolor paints, brushes, leaves and plant seeds, plasticine.
Lesson summary “Landscape. Unconventional drawing techniques"
Summary of an open lesson in fine arts
6th grade
Subject:
"Scenery. Unconventional drawing techniques"
Goals :
familiarizing students with the history of the genre, its varieties, creating a favorable emotional environment for studying fine arts
Tasks :
- educational
– to form in students an idea of landscape as a genre of fine art, to study types of landscape, to teach how to depict natural objects based on simple geometric shapes; familiarize students with non-traditional methods of drawing (using wax in watercolor painting)
- developing
– develop students’ creative abilities: imagination, fantasy; promote the development of attention, memory, associative thinking; improve skills in working with graphic and painting materials (graphite pencil, watercolor); familiarize students with the features of working with wax (mixed painting techniques)
- educational
– education of accuracy, discipline, aesthetic attitude towards the surrounding reality and works of art
Lesson type:
thematic drawing
Methodical techniques:
conversation, teacher's story, frontal survey, practical work of students
Lesson equipment:
computer, tape recorder, board
Visual range:
new terms, landscape images (charcoal, pastel, watercolor, gouache) made by students, reproductions of paintings by painters
Musical series:
sounds of nature
Equipment (for students):
watercolor paper (A4 format), graphite pencil, eraser, watercolor, brushes (No. 1, 3, 5), palette, water jar, white paraffin candles
Lesson Plan
1. Organizational moment (2 min.)
2. Main part
(communication of the topic of the lesson, presentation of new material), (
13 min.)
3. Practical task (23 min.)
- Final part ( View work. Lesson summary ) (2 min.)
During the classes
1.Organizational moment
(checking the availability of tools and materials for drawing) –
2 minutes
.
2. Main part (13 minutes)
.
Today we will go into the wonderful world of fine art. In front of you on the board is the name of the topic of our lesson. Which of you is the most attentive? What is the lesson about? That's right, the landscape. What is “landscape”? Landscape is a genre of fine art whose central theme is nature and landscape. The name of the genre comes from the French word “pays” - country, locality. The landscape genre originated in China in the 4th century AD. e.. In European art, the genre became popular only in the 16th century. The views of nature amaze with their beauty, help you relax, and inspire.
We can admire the landscape, which was created by graphic artists using pencil, charcoal and ink, and the wonderful works of painters.
The history of the development of landscape as an independent genre
Landscape has been part of a wide variety of images since ancient times. Elements of landscape are found in ancient Russian painting: the so-called “slides” and “chambers”. In the fine arts of the ancient world, Egyptian and Greek masters worked on landscapes. However, all these images were simply the background against which the main action unfolds. The importance of landscape increased during the Renaissance, when discoveries in the field of perspective, chiaroscuro, made it possible to make it more realistic.
Art historians believe that the first “pure” landscape belongs to the brush of Albrecht Altdorfer (first half of the 16th century). The heyday of the landscape occurred in the 19th century, when plein air (from the French word “open air”) - painting in nature - appeared for the first time in art. Previously, only sketches were made in nature, and paintings were painted only in the studio. After the invention of paint in tubes, it became possible to work entirely in nature. Landscapes appear, permeated with light and air.
Types of landscape
By level of human participation:
- Village (rural);
- Natural (sea);
- Urban (industrial);
According to the plot, the landscape can be divided into the following types:
Seascape (“marina”)
is a type of landscape with a marine theme.
The direction was popularized during the active development of shipping, navigation, and the Great Geographical Discoveries. The most striking example of this type is the work of the 19th century Russian marine painter I. Aivazovsky. Futuristic landscape
is a variety whose adherents paint pictures with images of space flights and fantastic extraterrestrial worlds.
The cityscape
("vedata") appeared in Italy in the 17th century.
In essence, this is a detailed image of buildings in the city, down to the smallest detail. The main feature of the landscape is the accurate representation of all the nuances of the architecture of a house or an entire block. 3. Practical work of students
(independent work is carried out with musical accompaniment, “Sounds of Nature”) -
23 minutes
.
And now we will look into the impromptu art gallery. Look carefully at the landscapes. What technique was used to perform this work?
(watercolor and gouache painting techniques) What makes this drawing stand out?
At first glance, this work is practically no different from the others, but the young artist used an unusual material here - a paraffin candle, which acts as a fixative: white-trunked birches look great against a bright background precisely because of the wax, it prevents the paint from flowing onto the surface of the tree. We will also try to use this technique today, prepare pieces of paraffin, we will work with them at the first stage.
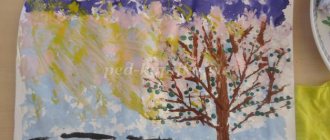
Sequence of drawing a winter landscape:
- Drawing the contours of trees (birch) and the plane of snow (paraffin candle). Smooth lines - trunks and branches of birch trees, abrupt, short strokes - reflection on the water, shading with the side surface - snow planes
- Filling the background (watercolor). The work uses a smooth transition from violet and blue to light yellow - in the background color scheme, and in the reverse order - in the filling of the river plane.
- Working on the details of the composition (watercolor). In the foreground there is a hillock with trees and yellowed grass, on the surface of the water, in the central part of the sheet there is an image of a dark brown fishing boat. The details of the composition in the foreground are bright, saturated, and 3-5 shades are used in the picturesque solution.
(students work on the composition in parallel with the teacher)
4.View works. Lesson summary (2 minutes)
You have done wonderful work. What do you think is the most successful job? Explain your decision (discussion of students’ creative works). And now we will check who was the most attentive of you during the lesson (a survey on terminology is being conducted)
- The birthplace of the landscape.
- In what century did the first “independent” landscape appear?
- How is the word “PLEIN AIR” translated?
- What is "VEDUTA"?
- What type of landscape is the image of space?
- What invention allowed artists to paint sketches in nature?
-Well done! You did a great job today: you got acquainted with a new drawing technique, learned interesting facts about the genre of landscape and its varieties. I hope that my next meeting with the world of fine art gave me vivid impressions. All the best!
Lesson summary “Unconventional drawing methods”
— Did everyone succeed? (Check for correct execution in children).
- Well done.
- What else is our bird missing? (- Tail, eyes and beak)
- Certainly. Let's do the ponytail. And here a brush will help us.
- First, I draw the tail, and you watch.
“I dip the brush again in black paint and draw a small line down the middle, a little below the branch, and then add two feathers at the tail on each side.
— Is the task clear? (- Yes)
— Draw the bird’s tail yourself.
— Put black paint on the brush and draw a middle line and two on the sides. Vika does it with me. (See the guys' work)
- Well done. Wash the brush and place it on a napkin, let it rest for a while.
- Well, our bullfinch is almost ready.
- Now we need to make eyes for our birds. Look how I do it.
— I’ll take a cotton swab, dip it in white paint and put two white dots. Now I need to add the pupils. I'll turn the cotton swab over and put some black paint on the clean side. I'll put small dots in the middle of the eyes, these will be the pupils.
- Now you add eyes to your birds. (Check the result, help Vika)
— Have we drawn everything to the bullfinches? (- No)
- What is missing? (- Beak)
- Well done. You are very attentive.
— We will paint the beak with yellow paint, using a thin brush. I'll do it first. Look how.
-I take a small brush, pick up yellow paint and paint a small beak. (Show)
- Now you draw a beak for your birds. (Help Vika)
- Look how beautiful your bullfinches turned out.
— Bullfinches come to us with the first snow. Let's draw snowflakes too. To do this, take a clean cotton swab, dip it in a jar of blue gouache and apply small dots on our drawing, as if it were snowing. When making snowflakes, we again meet with the impression, only this time we make the impression with a cotton swab.
— We remove the cotton swabs.
VII. Lesson summary
- Look at your work. What beautiful birds you have made. Did you like them? (-Yes)
— At the beginning of the lesson, we talked about the fact that bullfinches really like to feast on rowan berries. Let's treat our bullfinches with rowan berries.
— Take a clean cotton swab, dip it in red paint and draw berries on a branch:
draw some berries - if you liked our lesson today and you are very pleased with your work
1 berry - if the lesson was boring and you think that you could do your job better.
I really liked today’s lesson, because you all tried hard, completing a new and difficult task. Therefore, I will also draw berries for my bird, and I will draw four of them, because I had four diligent students in my lesson today.
Notes on non-traditional drawing techniques in the senior group “Painting with salt”
Summary of an open lesson on visual arts using non-traditional drawing methods (painting with salt (sprinkling technique))
in the senior group on the topic: “Birch in winter attire”
Goal: to create conditions for the activation of speech and creative abilities during visual activities.
Tasks:
1. Educational: continue to teach children to draw a tree: trunk, branches. To shape children’s need for self-expression through visual activities. Introduce a new technique of unconventional drawing - the pouring technique. Strengthen the ability to mix paints.
2. Developmental: develop children's speech and creative abilities in the process of drawing. Develop fine motor skills, perseverance, attention, imagination and sense of composition. Develop the ability to comment on your actions.
3. Educational: to cultivate in children a sense of beauty, love for their native land through fine art and poetry. To cultivate an aesthetic attitude towards nature and its depiction in drawing. To develop independence in drawing and accuracy when working with paints.
Preliminary work: observing winter trees on a walk, looking at reproduction paintings and talking about them, reading and memorizing poems, listening to music, free drawing.
Materials and equipment: gouache paints, tinted paper, brushes for glue and painting, PVA glue, salt, napkins, audio recording of P. Tchaikovsky “The Seasons”.
Progress of the lesson
Educator:
I'll tell you a riddle,
And you solve it...
Many hands, but one leg... (Tree)
- That's right, it's a tree. What parts does a tree have? (Trunk, branches, leaves). A tree looks like a person. The trunk is the body, the roots are the legs, the branches are the arms, the shoots extend from the branches - the fingers, the bark is the skin of the trees. The older the tree, the more wrinkles there are. The snow lying on the branches is the clothing that people wear when cold weather sets in.
The teacher shows a reproduction of Grabar’s painting “February Blue” and a photo of “Snow-Capped Birches.”
Educator: The birch is called a symbol of Russia. The original name was given to her on behalf of Beregini, an ancient Slavic goddess who was the mother of all good intentions and spirits. Birch is an excellent air purifier. In spring, a birch tree can produce a bucket of sap in a day. Birch brooms can heal, cleanse, filling the human body with vitamin C and essential oils. In the old days, a birch torch was considered the best for lighting peasant huts - it burns brightly and without soot. But the main value of birch for us, Russians, is in its beauty, grandeur, and soulfulness. It is not without reason that poets, composers and artists at all times dedicated their works to her.