Application “Autumn tree” made of colored paper
To work, prepare a set of colored paper and decorative cardboard, office glue, a ruler, scissors, and a simple pencil for marking. Do the job like this:
- Take brown paper. Draw the outline of a tree trunk. Or you can draw a trunk on a white landscape paper using paint or pencils in different shades of brown to create a beautiful woody texture.
- Cut out the resulting trunk. Its approximate height should be 18-20 cm, considering that the background will be in landscape format.
- To make leaves, cut out squares with a side of 3 cm; they should be of different autumn colors: red, red, burgundy, yellow, green. Also cut out the grass-covered ground from green paper into a long, narrow rectangle.
- Fold the grass like an accordion along the short side. Turn multi-colored squares into “accordions” too, but fold them from one corner to the opposite.
- Fold the folded squares in half and glue them in the middle to make cute ribbed leaves.
- Use a light blue cardboard sheet as a background. Glue a tree trunk on it.
- Glue the grass parallel to the bottom edge of the background, stretch the accordion so that it takes up the entire distance between the right and left edges of the cardboard.
- Glue leaves on the branches. The distribution of colors should be arbitrary so that the crown looks variegated. You can glue several leaves to the grass, as if they had fallen.
- Cut out clouds from white or pale blue paper and glue them above the tree.
Autumn forest made from rolled strips of paper
Prepare an autumn background for the application and determine the location of the trees on the sheet.
Three-dimensional trees can be made in three ways.
The first method: cut strips of 1x5 centimeters from colored paper in autumn shades. We glue each strip into a ring, the colored side out. Glue the resulting rings sideways onto the trunk in a chaotic manner. Try to glue so that the joint line is hidden at the bottom.
Second method: Cut a strip of paper 1.5x20 centimeters and wind it in a spiral around a pencil. Make 10 spirals in this way and glue them to the paper, placing them like rays from one point in the center of the trunk.
Glue smaller leaves on top of each spiral. Leaves can be cut out using a template or punched out with a hole punch.
Third method: willow or birch. Cut out many strips of 0.5 x 20 centimeters and screw them very tightly onto a toothpick so that you almost get a tube. Draw a willow or birch trunk with drooping branches. Glue the resulting spirals to the ends of the branches.
Autumn tree made of leaves
For this lesson you will need leaves collected in the fall and dried; they must be neat, without holes or signs of rotting. You also need decorative cardboard for the background and office glue.
Instructions for creating an application:
- Cut the leaves into thin strips and triangles.
- Draw a tree trunk on a background cardboard sheet.
- Carefully coat the branches of the tree shown with glue.
- Immediately, before the glue dries, sprinkle the chopped leaves on it.
- Leave the application to dry.
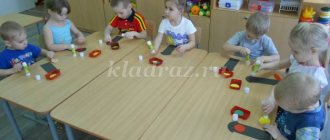
Autumn tree in the younger group
For the activity, prepare a cardboard background sheet, strong glue, clean pumpkin seeds, a tree trunk template, and gouache paints.
Do the job like this:
- Place the seeds on oilcloth or newspapers, paint them with gouache in autumn colors: red, burgundy, red, yellow.
- On a sky-colored background cardboard, draw a tree trunk according to the template.
- Carefully glue the dried seeds to the branches.
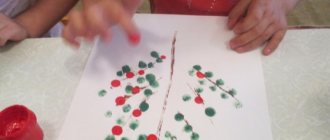
DIY “Autumn Tree” craft
The activity is suitable for younger preschoolers. The purpose of creating an autumn applique is to teach children 3-4 years old the skill of working with available materials, developing imagination and fine motor skills. For the lesson, take gouache in 3 autumn colors: red, yellow, orange. It is not advisable to use watercolor paint, otherwise the application will turn out faded. You also need cotton pads, 12-15 pieces.
Making the craft is as easy as shelling pears:
- Lay out the discs on oilcloth.
- Dilute gouache paint with water in 3 separate containers.
- Use a brush to pick up the diluted paint and drip it onto the discs. You can drip a certain color onto each disc, or you can mix colors to create beautiful stains.
- On the background sheet, draw a tree trunk with brown gouache.
- When the discs are dry, glue them onto the top of the trunk so that they partially overlap each other. Leave the craft to dry.
Application “trees in the snow in the second junior group
Construct of joint educational activities
according to PM.02 Organization of various types of activities and communication of preschool children
student 33 “A” group Stratonova Alexandra Sergeevna
Specialty 44.02.01 Preschool education
Date of:
13.12.19
preschool educational institution
: № 5
Educator:
Zelenina Irina Alexandrovna
Methodist:
Chemezova Natalya Yurievna
Head of practice
: Eyvazova Yulia Nikolaevna
Group:
second youngest (3-4 years).
Type of OD:
applique
Subject:
Trees in the snow
Educational area:
artistic and aesthetic development, social and communicative development, cognitive development.
Forms
: group, individual, collective
Target:
development in children of the ability to stick cotton wool, distributing it on a sheet of paper.
Planned result:
Children have fixed ideas about snow (white, soft), and are able to distinguish between seasons (autumn, winter). They have the idea that snow warms trees. Tactile sensations develop. Children have acquired the ability to follow the algorithm for performing the application, they know how to follow the rules of use and safety precautions when working with a brush and glue, follow the rules of behavior (apply carefully, remove excess glue from the walls of the jar, do not wave the brush, do not make noise, do not shout). Children demonstrate the skills of careful use of glue. Children pronounce the sequence of application. Children know how to pinch off small pieces of cotton wool and place the cotton wool on a sheet of paper (on tree branches). Children have established rules of behavior during class. Children demonstrate the ability to complete a job they have started, perseverance, and patience while working. Children have developed a culture of behavior during work (address each other politely, call each other by name). Children have the ability to stick cotton wool onto a surface smeared with glue. Children fine motor skills of the fingers are developed. Children show friendly relationships.
| TASKS educational program | Tasks taking into account the individual characteristics of group students |
| Educational : develop the ability to finish a job; cultivate perseverance and patience during work; cultivate mutual assistance, the desire to help each other. Developmental: to form a culture of behavior during work (address each other politely, call each other by name). Develop skills in safety rules (rules for using scissors). Develop creative imagination, thinking, attention. Strengthen children's ideas about snow (white, soft), teach children to distinguish between seasons (autumn, winter). Develop tactile sensations. Educational: teach children the rules of use and safety precautions when working with a brush and glue, follow the rules of behavior figurative: teach children to create an applique “Trees in the Snow” Technical: teach children to pinch off cotton wool, stick the cotton wool onto the surface of a leaf and distribute it on paper (on tree branches). Compositional : teach children to create an application in accordance with the teacher’s model Color: learn how to create an applique using white cotton wool. |
Application “Autumn tree” in the middle group
The applique is made using an interesting technique, when the elements of the composition are made from paper scraps. For work, prepare a set of colored paper, pencil glue, colored pencils, and a tree template.
To make an application:
- On the background sheet, color the tree according to the template using colored pencils in different shades of brown.
- Take colored paper in red, yellow, and light green colors. Tear it into small pieces of arbitrary shape.
- Glue paper pieces in random order onto the tree branches to form a crown, and onto the bottom of the background to create the ground covered with fallen leaves.
Forest applique of autumn leaves
Working with natural material is quite complicated; it requires preparation and careful handling of fragile leaves. Typically, an application of leaves on the theme “Autumn Forest” is done in 2nd grade.
The material for this craft must be prepared in advance by drying the leaves. To prevent the composition from looking sad, find leaves that retain a bright color after drying. For example, red wild grape leaves or yellow linden leaves.
The collected raw materials need to be laid out with newspapers and weighed down with something heavy, leaving in this form for three to four days. If the material is needed urgently, it can be quickly dried with an iron. To do this, the sheet is placed between two sheets of paper and ironed for ten minutes.
Cut out or draw a tree trunk from paper. Glue the leaves using PVA glue.
Older children can cut the leaves into small pieces and make a craft using the collage technique.
Application “Autumn Tree” in the senior group
To make a three-dimensional applique, take a set of colored paper, white or blue background cardboard, PVA glue, scissors, and a cut out template of a small maple leaf. The optimal template length is 3 cm.
To make an autumn applique:
- Cut out maple leaves according to the template: 10-12 pieces each in red, yellow, burgundy, light green, orange.
- From brown paper, cut out 6-8 strips 28-30 cm long and 1 cm wide.
- Having outlined with a pencil, cut out the tree trunk, only its lower part, without branches. It should be about 10 cm in height.
- Glue the trunk to the background cardboard sheet.
- Glue the strips to the top of the trunk, but not completely, but only one of their edges.
- Twist the strips into a spiral. Then glue their second free edge onto the background. You will get “curly” tree branches.
- Glue maple leaves on the branches in random order. Leave the application to dry.
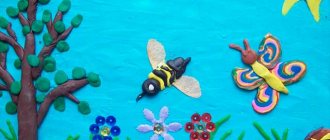
Options for paper applications
Autumn-themed crafts have always been popular and have not lost their relevance to this day. It is during this period of the year that the miraculous transformation of green trees into yellow, orange or red occurs.
All this gives applique lovers the opportunity to find the most beautiful leaves and use them in their crafts. In addition to them, during work you will need a minimum amount of simple and accessible materials for everyone. Their low cost means that even children from families with little financial resources can practice appliques.
Vegetation objects
Most children begin their education in creativity while in kindergarten. There, professional educators keep them busy with various activities that help the proper development of fine motor skills and mental activity. One of these activities is autumn-themed appliqué.
In the preparatory group, children study various plants, flowers and trees, which become their first objects for creating crafts.
Most often, educators use tree appliqué as a lesson. In order to get started, you need to prepare the following materials and tools:
- several sheets of colored paper;
- multi-colored cardboard;
- glue;
- brush;
- a simple pencil;
- scissors.
Instead of colored paper, you can use pre-collected natural materials, such as tree leaves. They will help revive the future picture and make it more attractive.
The process of making a children's applique is simple and consists of the following steps:
- First of all, take a sheet of thick cardboard and cut out a base of the required size from it. Its color can be chosen arbitrarily or based on the requirements of the future craft.
- A picture of a tree trunk is drawn on a piece of brown paper.
- Then, using sharp scissors, the workpiece is cut out and set aside.
- At the next stage, yellow, red and orange paper is taken. The required number of leaves is drawn on it. You can also use pre-prepared templates to apply contours. This will not only help speed up the process, but will also greatly simplify it. It is best to use oak, birch or maple leaves.
- Multi-colored leaves are cut out and folded separately from the tree trunk. You can immediately arrange the blanks by color so that you don’t waste time searching for them during the creative process.
- As soon as all the details of the application are prepared, the process of gluing them to the cardboard base begins. First of all, take the barrel and lubricate its back side with glue.
- After this, the largest part of the craft is attached to the center of the base.
- Next comes the turn of the cut leaves. They are glued to the cardboard one by one and form the crown of the tree. Its appearance depends only on the author’s imagination and personal preferences. To ensure that the attached elements do not lose their shape after the glue dries, it is necessary to apply it not to the entire surface, but only to the edges.
- The finished tree is set aside for a few minutes to dry completely.
- If there is enough space left on the base, then you can attach several more smaller trees in the same way.
- The craft is decorated with various additional elements. It could be grass, flowers, clouds, the sun or any other attribute of a children's applique.
Application “Autumn Tree” in the preparatory group
Completing this application is simple, but painstaking and will require perseverance and patience from the preschooler. The lesson develops imagination, introduces the possibilities of using scrap materials, and teaches how to sew buttons to fabric.
To make an applique, collect unnecessary buttons of different sizes, but be sure to be flat and painted in autumn colors: yellow, beige, ocher, red, red, brown, burgundy. Also for the background you need a piece of canvas, preferably a light shade.
Instructions for creating crafts:
- Cut out a tree from thick dark brown colored paper.
- Paste it onto the background. You can also draw the trunk and branches directly on the fabric with a brown felt-tip pen, but if you don’t have artistic skills, it’s better to do it using a template.
- Sew the buttons with matching threads to the top of the trunk, forming a lush crown.
The finished application turns out to be extremely beautiful and interesting, worthy of hanging on the wall in a prominent place in a frame.