What a beautiful time of year - winter! Fluffy snow, sledding, frosty cheeks. And how great it is to come home from a walk, drink tea and do what you love! Draw, make appliqués, sculpt from plasticine, create!
We offer you the most interesting winter crafts for school and kindergarten : we will make fairy-tale characters, invent clothes out of paper, sculpt Christmas trees and animals in winter clothes, and do winter plasticineography. Many crafts come with ready-made templates for printing. If you don't have much time or don't have colored paper, print them out. They are especially convenient if you want to make New Year cards for a large number of friends.
The ideas in this collection can be used as creative activities for your advent calendar. You will find a lot of inspiration and creative ideas for activities with children throughout the winter.
Beneficial effect
When a child works on a craft, he is not only busy, interested and determined to achieve results. There is an imperceptible influence on his subconscious in a positive way. The child develops the necessary skills.
Children's DIY paper crafts help fingers become stronger and hold objects more confidently. Feeling the density, texture, color of the paper, his subconscious sensations remember them.
Diversity
The more preschoolers can do, the better. After all, with cutting, gluing, and coloring, the movements become precise and the hands stop making mistakes. By modeling plasticine, three-dimensional thinking is developed. The child sees the volume of the craft he is creating.
Fantasizing, composing something that doesn’t exist, he immediately implements it. Creates. When sculpting with plasticine, not only the fingers develop. The frontal lobes of the brain become more developed. The child becomes smarter.
This happens due to the specifics of sculpting. This action combines several factors of intelligent activity. It is no coincidence that all sculptors are distinguished by great memory, curiosity and a sharp mind. It is useful to train children by modeling plasticine.
There are, of course, combined crafts. They include: paper fragments combined with plasticine crafts. If you approach such a craft with imagination and work it out carefully, you can even send it to an exhibition of children’s creativity.
What you need to prepare for work
For an exciting journey into the world of creativity, you will need quite ordinary items: multi-colored sheets of paper or cardboard, small scissors with rounded tips, a ruler, a pencil, glue (stationery). You need to be able to tune the baby in the right way.
You will need just a little patience and skill, and children's crafts made from colored paper will decorate the room with various cartoon characters, colorful plants, fairy-tale characters, birds, and animals. You never know what a little creator can dream up.
Gift for mom and dad
Crafts for moms and dads in the older group.
Stock. You will have to collect pine and fir cones, prepare acrylic paints with a brush, glue with a brush, thin twigs and rectangles of green paper.
- Pine cones are painted in different colors with acrylic paints.
- Branches of different lengths are painted green.
- Green rectangles are folded in half and the corners are rounded with scissors.
- The leaves are glued to the branches.
- Branches with leaves are attached to colored cones.
What to do in kindergarten?
Children in kindergarten are given special hours for creative self-realization. Educators, parents and the children themselves are unanimous in one thing - creating paper crafts with your own hands in kindergarten is a wonderful pastime.
Working with paper of all colors of the rainbow is never difficult. But how many joyful and cheerful moments it brings. Children's crafts made from colored paper are displayed in a prominent place so that everyone can admire them.
Various websites display all sorts of paper “creations.” The teacher can choose several and offer them to his students to choose from, so that they do them correctly and please moms, dads, grandparents.
DIY New Year decorations for the home
Sometimes the preparation for the holiday is much more interesting than the holiday itself! Does this happen to you? When we prepare for the New Year, we decorate the house, put up a Christmas tree and hang garlands. We will tell you what crafts you can make with your children from scrap materials.
New Year's wreath made of paper and pompoms
How beautiful New Year's wreaths look on the doors of the apartment. And we will make one from paper and pom-poms. To do this, we will cut out fir branches from paper, draw patterns on them and decorate them with multi-colored pom-poms. What kind of wreath will you make?
Craft “New Year's boot”
Or you can make a personalized boot from cardboard. Look how hard Varya tried and decorated her felt boots with stickers. This is a very simple and easy craft that children from 3 years old can handle.
Do you remember how they used to sew elastic bands to mittens? And we decided to make a pendant from cardboard and white paper mittens. It turned out great!
Pendant “Winter City”
Another pendant is a winter city, which we decorated with snow wool and sparkles. As a basis, we took a piece of cardboard, of which so much remains after the goods are delivered. Cardboard from boxes makes very strong crafts.
We not only decorated the house, but also came up with a winter crown! Download a ready-made template or make a sample with us. Sequins are suitable for decorations, you can take nail polish with sparkles or simply paint with felt-tip pens.
Interesting ideas
Light children's paper crafts are pleasing to the eye and can be a good gift for a loved one. There are several simple options that are most popular with both children and adults.
Crafts for March 8
Tulips are very delicate and graceful flowers. And such crafts for March 8, made in the preparatory group, will be an ideal gift for mothers.
These flowers can be put in a bouquet or given one at a time - in any case they will look very beautiful. Materials to prepare:
- Disposable plastic spoons,
- One flower will require four pieces,
- Scotch tape and colored corrugated paper,
- Shades should be green and red.
For one flower you need up to one meter of each type of paper. Wrap red paper around the spoons, and wrap the handle of the spoon in green paper and use tape to secure it. Attach leaves cut from green paper.
Beautiful flowers are ready, you can arrange them as a bouquet in a basket.
Fairytale "golden fish"
A child of four years old can make his own paper craft in the shape of a goldfish. What do you need? Round plastic plate - once. Thick cardboard - two.
Then everything is on the list: scissors, multi-colored paper sheets, stationery glue, pencils, decorated elements for the fish. Subsequence:
- turn the plastic plate over onto cardboard and trace it with a simple pencil;
- the resulting circle is cut out;
- draw a triangle inside another circle;
- cut it out. This is the tail of the fish;
- glue the cardboard circle and triangle together;
- stick yellow paper and decorations on top;
- cut out a blue circle and a smaller black one for the eye and stick it on.
Simple and fast. You can play with it or just admire it as a decoration.
Preparatory group. Senior preschool age. Children 6-7 years old
Application “Winter Night” for children 6–7 years old Application “Winter Night” Age of pupils: 6-7 years Types of activity: “Artistic and aesthetic”
“Cognitive development”
,
“Social and communicative development”
,
“Physical development”
. Goal: developing the ability to make winter-themed appliqué. Tasks: •…
SOD on drawing and applique within the framework of the lexical topic “Clothing” with elements of Gorodets painting (preparatory group)
Goal: consolidation of knowledge about the characteristic features of Gorodets painting. Educational objectives: continue to introduce decorative and applied arts. Developmental: develop creative abilities, using acquired knowledge and skills according to your own plan Educational...
"Little Heart"
Kids really like everything bright and unusual. Then any process of creating a craft is interesting and mysterious. For the proposed option, you will need bright multi-colored paper with a corrugated base plus thick cardboard. An even heart shape is drawn on a thick sheet of paper. You can use a 20x20 cm stencil.
It is necessary to cut it out and additionally cut small squares of 2x2 cm in size from corrugated paper. Small areas of the heart are coated with glue. A square is glued to these places. You will need a toothpick to lift the edges. This fills the entire surface.
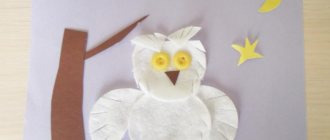
Craft "Forest"
To complete this craft, you need to try hard. But the result is worth it.
In progress:
- prepare 4 spruce or pine cones: 2 are painted brown, and 2 are painted green;
- make the base of the craft, for which a thin layer of cotton wool is glued onto a sheet of thick cardboard (this will be snow);
- 3 rectangles are cut out of thick brown cardboard and cylinders are made from them (tree trunks and stumps);
- secure the workpieces on the prepared base;
- The legs, muzzle and antlers of a deer are made from solid wire, wrapped in brown paper or thread of the same color and attached to the body;
- The head and wings of an owl are made from white paper and attached to the body;
- green cones are attached to the trunks - these will be Christmas trees.
You can simplify the process by installing Christmas trees without “trunks”. It will also turn out beautiful.
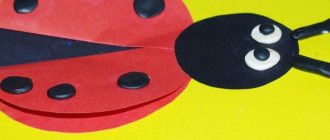
"Merry Caterpillar"
A cute craft that will please everyone. Be sure to choose bright, rich tones of paper. Multi-colored circles cut with scissors are glued onto the base cardboard. They should vary in size. The head is the largest circle. The tail is the smallest circle.
Note!
- DIY paper crafts: TOP-200 photos of exclusive ideas and craft options
- DIY paper origami craft step by step: ready-made diagrams for creating beautiful origami at home (90 photo ideas)
- Crafts from paper and glue for children: step-by-step instructions for creating interesting crafts with your own hands (90 photo ideas)
All elements are glued to cardboard using PVA. A black felt-tip pen is perfect for eyes and facial features, and black paper is perfect for hairs and small horns.
Winter plasticineography
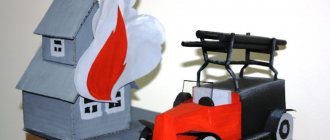
Santa Claus's house
Do you know where Santa Claus lives? We fantasized about this topic and decided that grandfather lives in a very nice red house with a huge snowdrift on the roof. And always with a round window from which he waves to all the kids! We made Santa Claus from plasticine using the reverse plasticine technique in a sour cream lid.
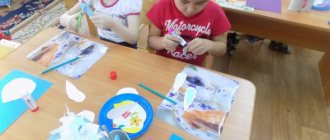
In this master class we combined plasticineography classes and watercolor painting. It will be interesting and will keep the child busy for a long time!
We really love it when the city is covered in snow. We invite you to depict a beautiful country house using plasticine. Let's learn how to sculpt patterns from plasticine and draw a monochrome background.
How to make plasticine cards
For the New Year we often make plasticine cards. To make them last longer, you can fix them on top with varnish. Look at the postcards we made with the children using the plasticine technique.
- Christmas tree made of flagella and circles;
- making a snowflake from flagella (a rather difficult and painstaking task);
- New Year's balls using the smearing technique (a simple and easy master class for children over 3 years old).
See plasticine New Year here
Winter plasticineography for children from 3 years old
Make an applique with a warmed dachshund.
We will learn how to make flagella and make a sweater out of them. A penguin with a warm heart, he really wants to please your loved ones. Great idea for a card. You will need black paper, a white pen (can be replaced with gouache) and plasticine. Remember that if you don’t have some material or tool, you can always replace it with an alternative (white pen for gouache, plastic eyes for plasticine eyes, black paper can be drawn with gouache on white).
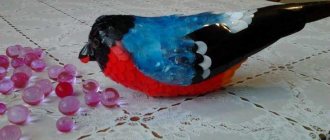
We sculpt from plasticine on a winter theme
If your child loves to sculpt with plasticine, see what we can offer for creative inspiration. With the help of detailed step-by-step visual diagrams, you can sculpt winter animals and learn how to sculpt different textures.
How to make a Christmas tree from plasticine: 7 detailed instructions
7 detailed diagrams for sculpting a Christmas tree from plasticine are waiting for you. Look how bright and beautiful they are! This is a very useful master class for developing fine motor skills and more. Plasticine has a calming and positive effect on children.
You can make funny hedgehogs from plasticine, which are insulated: put on hats, scarves and mittens. See detailed instructions for modeling in the diagrams. Recommended for children over 5 years old.
Or this New Year's pig. Children will practice making clothing items and learn how to make textures from plasticine using stacks.
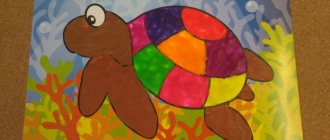
Volumetric shape of paper crafts
Making voluminous paper crafts for children is interesting, but a little more difficult. You will need to be patient. But the result will please all participants. For example, “voluminous cat”.
All you need is a sheet of A4 paper, scissors and glue. This is where you need a template that can be downloaded and cut out. The neck is bent like an accordion, and the tail must be twisted in a spiral. In the template part, four cuts are cut along solid lines. The paws along the fold line are glued to the cardboard.
Similarities between different methods
When working with preschoolers, the main thing is to prepare them for school. All methods are subject to this, although there are many of them. There are also many methods for teaching DIY crafts.
But they are all based on the same principle - first a simple action, then a complex one. If the child has learned to cut out shapes along the lines, the next step is to have him draw what needs to be cut out. And then he will cut it out.
I learned to cut out what was drawn, I need to move on. Let the child learn to draw. Measure the required centimeters, draw lines, cut. And so it is in everything. As you gain experience.
Photos of children's paper crafts
Smeshariki from CDs
To complete this craft, you will need an old disk, colored paper, markers and the artistic abilities of your parents.
In the process of work, you just need to draw and cut out the face, arms and legs of the cartoon character about Smeshariki, and then glue them in the appropriate places to the disk.
If you attach a loop of thread to such a craft, you can use it as a Christmas tree decoration.
This is just a small part of the ideas. There are a lot of options for DIY crafts for kindergarten - birds, animals, heroes of your favorite fairy tales and cartoons. You just need to choose the one that suits you and show a little imagination.