Variety of products
In the photo of folk crafts, first of all, what catches the eye is the variety of work performed, the abundance of colors and paints, and the expression of folk culture in the products. It can be:
- Figures and paintings made of straw, clay, salt dough, wood;
- Crafts and toys made from scraps, yarn, paper;
- Models of huts, churches, Russian stoves;
- Khokhloma painting;
- Dymkovo toys.
Wooden toys
Scenes from the surrounding life became the theme for creating wooden crafts. In villages, children played with dolls made with an axe. With the advent of the plane and other woodworking tools, toys began to transform and improve.
Tumblers, which are now made of plastic, first appeared in the 19th century. Back then they were made of wood. They were painted to look like merchants, clowns, and funny fat women. Using a knife, two halves were cut out of linden, and a weight was attached inside the round blank. Both parts were glued together, painted, dried and varnished. This traditional Russian toy was the first toy in life for many generations of children.
Ancient folk traditions are being revived again. Russian art, dormant in grandmothers' chests, is becoming more popular every year. It evokes admiration among foreigners and pride among descendants. Now there are many sites on the Internet where master classes show and tell in detail how to make a folk craft yourself.
DIY craft
Both professionals and beginners in needlework can create a beautiful product. You just need to put in a little effort, patience and perseverance.
Crafts on a Russian-folk theme are often created from scrap materials and simple tools. If you know how to sew or knit, you can make dolls, characters from Russian folk tales, and amulets.
The basis is made:
- Made from material stuffed with cotton wool,
- Straw,
- Mattings,
- Tree.
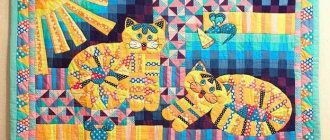
The top is decorated with sewn and knitted clothes, hair made from threads and yarn. From leftover yarn and fabric you can sew bright patchwork rugs, blankets, and sofa cushions.
It’s easy to make a matryoshka doll or a Dymkovo toy from clay or plasticine. It is better to use polymer clay for the product. It holds its shape well and does not crack when drying. With the children, paint the finished craft with bright ornaments and cover the top with a layer of varnish.
Make three-dimensional pictures from salt dough or plasticine: scenes from Russian fairy tales, nesting dolls, fairy-tale characters. Stick the details of the painting onto a board, dry it, and paint it.
Folk arts and crafts
Since ancient times, man has strived for self-expression and mastered various types of creativity.
Since the invention of the needle in the 11th century, embroidery has emerged. Clothes and household items were decorated with embroidery. This ancient art is still popular today. Craftswomen create paintings where all the color shades are created not with paints, as in painting, but with threads. Folk architecture was popular in Rus'. Wood carvings crowned the frames of huts and fences. Houses framed in this way resembled a fairy-tale tower. From soft and pliable linden, craftsmen carved nesting dolls, figurines of birds and fairy-tale characters, and made whistles, pipes and kitchen utensils.
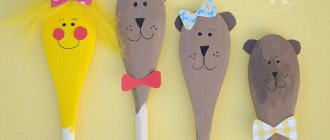
Wooden spoons were popular. Before the advent of aluminum cutlery, wood products were the most popular items in Russian cuisine.
Baskets and boxes were made from willow, and bast shoes were woven from bast. Nowadays such shoes are a souvenir item, but in the old days they were a necessary item in the “wardrobe” of every peasant. And what craftsmen haven’t created from birch bark!
All containers for bulk products were made from this natural material: cups, salt shakers, sugar bowls. Butter, cheeses, bread, even milk and drinks were stored in birch bark boxes.
Wooden crafts
Wooden folk-style crafts are very interesting. Complex wooden products require special manufacturing skills. For novice craftsmen, it is better to take on something simpler.
For example, simple matches make masterpieces of Russian architecture in miniature. Wooden matches are glued together with glue into different shapes. From these blanks you can make models of ancient Russian buildings, huts, and wells. This principle is used to glue and fold amazingly beautiful boxes.
Twigs, straw, and small driftwood will make charming goblins and brownies. You just need to arrange everything correctly and with love. Birch bark is suitable for making tueskas, boxes, and souvenir bast shoes.
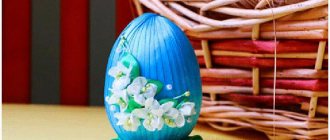
Birch
This tree can become not only a souvenir, but also a talisman that will protect you from misfortunes and bring good luck, health and wealth.
We make a circle out of wire. And we will make the tree itself from large and coarse thread. The thread can be multi-colored, and the branches can be made from beads of different colors.
We recommend reading:
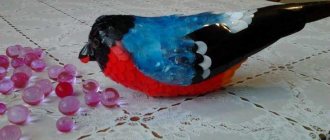
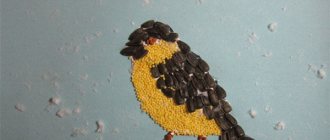
- Craft bullfinch: detailed description of how to make a bird with your own hands (115 photos)
- Crafts from vegetables: 100 photos of the best crafts for children and a review of recipes for adults
- Craft ship: 120 photos, templates, drawings and step-by-step instructions on how to make a boat
To make the threads hold tighter, you need to make a wire model, and then wrap them with thread of the desired color. The roots are brown, the trunk of our birch tree is white and black.
Crafts made from straw
A universal material for DIY folk crafts is straw. You can buy ready-made material or prepare it yourself. Select straw of the same length, without thickening knots, and bright yellow color. Pour boiling water for 15-20 minutes, drain the water. Cut each straw along the entire length with a stationery knife. Unfold and iron with a hot iron.
You will get a flexible, shiny material for weaving dishes, boxes, and figurines. These straws make amazing sunny paintings in the Russian style. Products created in this way are fragile and require careful handling.
A folk toy for children to make at home, made from polymer clay or salt dough. After drying, they become durable and can be used for playing.
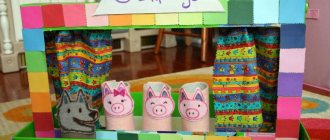
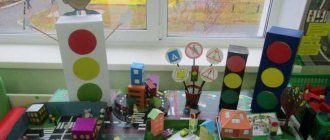
Crafts Russian hut
Making this craft is not so easy and children will not be able to cope with the task on their own.
To create a craft, you will need a small and shallow box, glue, a stationery knife, natural wood film, double-sided tape, plasticine, scraps of material, multi-colored threads, brown cardboard, watercolor paints, brushes, felt-tip pens or pencils.
The box must be cut so that only 2 walls remain. Use a utility knife to cut out the windows.
We cover the inside of our house with paper. If you don't have sticks on hand, you can make them from cardboard, but the logs shouldn't be too thick. We also cover it with film. We need them to decorate the walls from the outside.
Now you can start decorating the hut and creating interior items. The first thing we do is make a Russian stove. We have already discussed how to make it above.
We make pieces of furniture from cardboard: a table, chairs, a chest and something else. We need plasticine to create dishes. We hang curtains, make rugs and bring everything into the house.
To keep the hut from being empty, make dolls. Russian folk crafts will fit into any interior and will be an excellent gift.
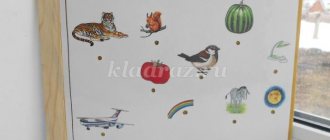
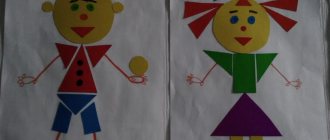
Application "Matryoshka"
But the most beloved and famous craft is the folk toy Matryoshka. She has long become a symbol of Russia. It can be made from any materials. The main thing is to maintain the Russian folk style in design.
Make a picture applique with your children. The beauty of such pictures is that each one will be unique. They can be made in any outfit; the faces of all the nesting dolls will also be different.
- Print two identical images of a nesting doll;
- Glue the pictures onto cardboard for strength;
- Cut the first one along the contour;
- Cut the second into parts: face, scarf, torso;
- Trace a whole matryoshka doll onto a piece of paper;
- Copy and cut out the details from multi-colored paper;
- Stick them on the outline;
- Decorate the dress with multi-colored buttons, beads, flowers;
- Draw the face;
- Glue the sheet with the applique onto thick paper;
- Decorate the frame with Russian folk patterns made of colored paper or thread.
You have a simple and charming craft in Russian folk style.
Straw masterpieces
Straw is the stems of cereals. The basis of the toy for peasant children was a bundle of straw, folded in half and tied with a rope. The fan-shaped straws resembled a sundress. These were the first straw creations.
Over time, this type of creativity improved, and ideas arose for creating not only human images, but also all kinds of little animals, golden-maned horses, and deer.
Skillful weaving and artistic taste, imagination and ingenuity of talented people led to the creation of wonderful plates, boxes, chests, hoops, bracelets and many other original souvenirs.
Crafts made from material saturated with the sun, nourished by mother earth and the warmth of human hands, create a certain style for a fashionable interior.
Crafts for children
All children love to draw, sculpt, and make things. Join them in creating folk crafts. This exciting activity will appeal to kids and older children.
Consult with your children what interests them most and get to work. Make small amulets from threads or yarn. They can be used as a toy, decoration or keychain.
Aspects of drawing on the topic “Doll in Russian folk costume” in the senior group of preschool educational institutions
Preschoolers try to depict anthropomorphic objects from an early age. At first these are primitive works according to the principle “Stick, stick, cucumber, here comes the little man!” However, for development to go further, systematic work by the teacher in this direction is necessary. Learning the art of drawing a portrait is inextricably linked with the development of perception and imagination. The teacher must find techniques that will awaken children's interest in the image of a person.
Of course, preschoolers are frightened by the task of drawing a person because they are afraid that they will not succeed. The teacher’s task is to overcome this fear and replace it with a pleasant creative process. It is ideal to start the image not with a human figure, but with something similar to it. So, in the middle level, the guys are happy to draw a matryoshka doll and a snowman. They know well what parts these objects are made of and learn to depict a face. Next, we suggest drawing the Snow Maiden in a wide fur coat and with her hands.
In the older group, a detailed acquaintance with the portrait takes place; children learn the proportions of the face, ways of conveying the character and mood of a person. They draw themselves, parents, friends, fairy-tale characters.
In the preparatory group, children improve their ability to depict anthropomorphic creatures from life and from memory. Children aged 6–7 years are already good at noticing the characteristic features of objects and objects and conveying them in artistic images. At this age, during a drawing lesson, preschoolers are offered such a complex but interesting topic as “A doll in a national costume.” As a rule, this is drawing from life or based on illustrations. Note that the guys are not portraying a person, but a doll. This makes the work a little easier, since the proportions of the body and face structure here will not be so strict: for example, the head can be large, as well as the eyes, mouth, and palms.
When conducting this lesson, the teacher should focus on examining the doll in appropriate clothing. The shape of the sundress (if it is a Russian national costume), shirt, headdress, and shoes is discussed in detail. The teacher also focuses on the location of the arms, legs, and head shape. The doll's head in the picture can be oval or round. To depict a face, children must visually (or with a simple pencil) divide it into three parts: forehead, eyes and nose, lips and chin. The teacher can remind the children how eyes are drawn (draw them on the board), remind them that the nose can only be indicated by its tip (nostrils or a short line).
Sometimes children are offered a schematic drawing of a doll: using a circle (head) and several lines (body parts). This diagram is then outlined with missing elements, including clothing. Another option is to draw with ovals or arcs.
Step-by-step image
In the preparatory group, it is especially important to give children the opportunity to show creative initiative, creative imagination, and encourage their independent choice of color schemes for drawings. So, for example, the guys independently choose the color and pattern of the Russian beauty’s sundress, as well as her kokoshnik. Note that at this age, preschoolers already know a lot of shades, such as lemon, sand, light green, etc.
An important aspect of the preparatory group lesson is the analysis of finished work. By looking at their drawings, children learn to see their strengths and weaknesses. Together with the teacher, the children discuss what can be done better than adding to the composition.
Materials used and base
In the preparatory group, the range of materials with which children can work in the process of visual arts is expanding. Their combination in one drawing helps to create an expressive image. Since the image of a doll in a national costume requires detailed drawing, it is advisable to additionally use felt-tip pens or gel pens when working primarily with paints (watercolor or gouache) or colored pencils. Using these tools, you can designate facial features or intricate patterns on a sundress and kokoshnik.
An image object such as a doll requires a preliminary sketch in pencil. This is especially true when working with paints. As for the eraser, which is sometimes offered to preschoolers in the preparatory group, it is better not to give it, since children often use it irrationally and spoil the drawing.
As a basis for drawing a doll in a national costume, the teacher offers the children sheets of standard size paper. When painting with paints, they are pre-tinted in pastel colors. By working with colored pencils, children can complete the composition with a suitable background.
Techniques and drawing techniques that should be used when drawing a doll in a national costume in the preparatory group
In the preparatory group, imaging techniques are further improved. Hand movements become more free and accurate, smooth and rhythmic.
A simple pencil sketch is made with fairly quick hand movements, using a light, unbroken line (to make it easy to correct inaccuracies). By the way, it will be useful if the child completes several test sketches on the draft.
When drawing with a pencil, children practice smoothly turning their hand - this is necessary to depict rounded lines. Preschoolers learn to draw long lines without breaking them and also to depict large shapes. Small details (facial features, patterns on a sundress) are drawn using short lines and strokes.
Similarly, different ways of working with a brush (all bristles and tip) are improved when painting with gouache or watercolor. Preschoolers develop technical skills - they learn to mix paints to create interesting shades.
Additional types of visual activities used when drawing a doll in a national costume in the preparatory group, the relevance of an individual approach
In the preparatory group, the developmental characteristics of children are already clearly visible; some preschoolers have clearly expressed abilities and interest in visual arts. Such children, without a doubt, need to be encouraged, to further stimulate their desire for artistic creativity. One way is to invite them to diversify the composition with additional applicative or plasticine elements.
For example, a sundress or kokoshnik of a Russian beauty can be decorated with plasticine elements (thin ornate flagella or small balls) or shiny sequins can be glued on.
Drawing can be combined with applique, especially if we are talking about a collective composition: the drawn figures of young ladies are painted, cut out, supplemented with applique details and pasted onto the general background.
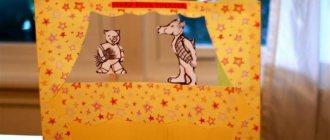
Drawing with applique elements
Doll girl
- Take white, beige or pink yarn.
- Cut the threads 20 cm long to make a bundle with a diameter of about 2 cm.
- Tie it in the middle with a thread of the same color and fold it in half.
- Leave 6 threads on the braids, tie the rest by 2cm. from the top is the head.
- Divide the remaining threads into 3 parts, the middle one being slightly thicker.
- Bandage the side parts at the base, shorten them by half, bandage them at the ends - these are the arms.
- Decorate the middle part with an apron or embroidery - this is a dress.
- Braid braids from the top remaining free threads and tie thin ribbons.
The doll is a guy, made in the same way as the first doll.
- Only the dress is tied in the middle, the threads are divided in half and tied at the bottom - these are pants.
- We decorate the shirt at the top with embroidery, and tie a patterned sash to the belt. We cut our hair shorter.
These folk crafts for children can be made in just a couple of hours. Give such a touching souvenir to your grandparents or friends. Children themselves will be happy to wear such amulets.
Clay figurines
Making these figures is not so easy. But for those who know how to make all kinds of souvenirs from clay, this activity will only bring pleasure.
Especially now, you can buy polymer clay in specialized stores, which is influenced much faster. And the finished product dries in just a couple of hours.
You can make animals and dolls from it, dressed in national clothes. You can color them at your own discretion.
Sometimes clay is replaced with salted dough. This material allows you to make different figures and you are not afraid that the child will get dirty.