Reverse applique
This is an application in reverse. It is performed on a smooth and transparent surface of plastic or glass, and its reverse side becomes the front side.
The most important thing is to make a good, clear drawing on paper, which is placed under the inverted lid.
To prevent it from moving, it must be attached to the lid with two peas of white plasticine.
The outline of the future design is laid out with black plasticine, and the open areas are sequentially filled with colored plasticine.
Turned over with the smooth side facing you, the product makes an amazing design for a painting or panel.
After finishing, the application is covered with a circle of colored cardboard.
The idea of this technique belongs to Tatyana Prosnyakova, the author of numerous books on artistic work and the creator of the Internet site “Country of Masters.”
This application can be done using several methods: laying out a contour of flagella, mosaic of plasticine balls
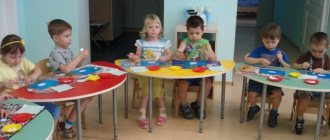
It is recommended to conduct such classes with children aged 3 years and older.
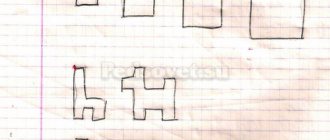
Using Templates
Templates for appliques made from fabric or other materials are available in large quantities. These can be cartoon characters, flowers, elements of plants or animals, entire compositions. Templates for fabric appliqués are good and convenient because they contain all the details and elements necessary to form a holistic image.
For example, the photo above shows a horse. All details of the animal are drawn in appropriate proportions, which allows you to print the blank on paper of any size - from a small sheet of paper to A3 or larger.
Mosaic
Another very exciting way to create creative works is to make a mosaic from cut out or torn pieces of paper, multi-colored eggshells.
It is done in two ways: from separately cut multi-colored small shapes (squares, triangles, trapezoidal parts, stripes) and by cutting several layers of the base in a patterned form, then changing the parts according to color in the background slots and fastening them with glue.
Think over the drawing, mark it with a pencil outline and, having previously smeared the surface with glue, fill the drawing with the color that you need to create your idea.
Article “Child development through non-traditional appliqué techniques”
Child development through non-traditional types of applications
In preschool age, the process of cognition in a child occurs in an emotional and practical way. Every preschooler is a little explorer, discovering the world around him with joy and surprise. The child strives for active activity and it is important not to let this desire fade away, but to promote its further development. The more complete and varied a child’s activity is, the more significant it is for the child and corresponds to his nature, the more successful his development is, the more potential opportunities and first creative manifestations are realized.
One of the closest and most natural activities for a preschool child is appliqué. Appliqué translated from Latin means “attachment”. This is one of the types of fine art. It is based on cutting out various details and applying them to the background in a certain order. The parts are fixed to the base using various adhesives and threads. Currently, a wide variety of elements can be used in applique: various types of paper, fabric, threads, straws, fur, shells, sand, birch bark, dried plants, leaves, seeds and other natural materials.
Applique is one of the most favorite activities of children. Kids like to cut something out of paper or fabric, glue it, paint it and end up with a handmade creation. You can engage in this type of creativity with children at a very early age. After one year, children can, with the help of adults, stick various elements onto a sheet of paper. The older the child is, the less help he needs from educators and parents.
This type of creativity is of great benefit to children. Firstly, it is an effective means of understanding reality. This activity helps the development and formation of visual perceptions, imagination, spatial concepts, memory, feelings and other mental processes. Secondly, useful qualities are formed, such as perseverance, independence, accuracy and patience. The need to cut out, lay out and paste small parts develops fine motor skills of the child’s hands, their muscles, and coordination of movements.
Application plays a major role in the development of a child on the development of the child’s creative and mental abilities. With the help of such creative work, the child becomes familiar with the concepts of shape, size and color, learns to find different and identical details, and becomes familiar with the concepts of big and small. In addition, the child at the same time learns a creative approach to creating his crafts, develops imagination, learns to highlight the main thing from all objects and see the whole, which consists of details.
At the same time, the child himself is a master, learns to create, and can then use his work for gifts or decorating an apartment (for example, postcards made in the form of appliqués).
By doing appliqué, children learn different materials (paper, cereal, clay, shells, etc.), become familiar with their properties, expressive capabilities, and acquire skills in working with them. Children also acquire experience working with certain tools of human activity (pencil, glue, brush, paint, scissors).
To create an applique, you need to apply effort, carry out labor actions, master the skills of sculpting, cutting, drawing an object of one shape or another structure, as well as master the skills of handling scissors, a pencil and a brush, glue and plasticine. Proper use of these materials and tools requires a certain amount of physical effort and labor skills. The assimilation of skills and abilities is associated with the development of such volitional personality traits as attention, perseverance, and endurance. Children are taught the ability to work hard and achieve the desired result.
The application can be:
- subject, consisting of individual images (leaf, branch, tree, bird, flower, animal, person, etc.);
— plot, reflecting certain events;
- decorative, including ornaments and patterns that can be used to decorate various objects.
The shape of the applique can be three-dimensional or flat.
By color - single-color and multi-color.
By creating beautiful applications with their own hands and seeing the result of their work, children experience positive emotions. Here are some unconventional appliqué techniques you can use with children.
Fluffy applique Applique made from rolled napkins is a simple and accessible form of creativity for any age that promotes the development of children’s fine motor skills. To work, you will need paper napkins of various colors, a contour drawing of the future application on colored cardboard, and PVA glue. The napkins are cut into equal squares, then each square is rolled into a ball using your fingers. The resulting balls are glued according to the pattern using PVA glue. Individual details of the composition can be made from colored paper - plain or velvet.
Applique of autumn leaves
Applications can be made from either freshly picked or dried leaves.
Before you start work, cover the table with oilcloth so as not to stain it with glue. Prepare the base - a sheet of cardboard, collected leaves, scissors, glue, tweezers.
First you need to come up with a future picture. Then arrange it on a separate sheet of paper. And only then start gluing the individual leaf parts to the base. It is best to apply the glue in droplets along the edges. If you apply glue to the entire surface of the sheet, it will warp when the application dries.
The finished picture should be placed under a press for one or two days. Don't forget to frame it!
Applications made of cotton wool and poplar fluff
Appliqués made of poplar fluff are monochromatic, they resemble grisaille (a decorative type of painting done in different shades of one color - usually gray). When choosing themes for appliqués made of poplar fluff, you must keep in mind that it is easier to work if there are few details and if they are not small. Using appliques made of cotton wool or poplar fluff, you can make fluffy, voluminous animals, snow, depict the fluff of plants, clouds - the scope for imagination is very wide. From small cotton balls you can make a poodle and a lamb, from thinned and torn pieces of cotton wool you can make clouds, from cotton pads you can make chickens and flowers, snowmen. Remember that cotton wool can be tinted with watercolors or gouache, and then the scope for creativity and imagination will increase several times.
Confetti applique Description of work:
1. Draw, for example, the outline of a fish. 2. Invite the child to apply glue over the entire surface of the drawing with a brush, or if he does not have the skill to work with it, then with a sponge. 3. Let the confetti sprinkle heavily over the entire piece of paper. 4. Shake off the excess from the sheet of paper (you can simply turn the sheet upside down). 5. Together, be surprised by the fish that appears in front of you. As you understand, you can work with this technique with children of any age.
Application from sand or salt Working with sand is a pleasure, and the finished paintings turn out simply gorgeous. Kits for appliqués made of colored sand are sold in any office supply store or in children's art departments. But you can try making colored sand with your own hands. Children of any age enjoy playing with sand: pouring it, choosing colors, leveling it, and most importantly, shaking it off. Why not, at least occasionally, meet them halfway? And, if, in addition, you allow the children to paint sand or salt with you, it will give them incredible pleasure! Sand or salt application can be started with children aged 2-2.5 years. To begin with, choose simple applications with a small number of details, gradually complicating the design and increasing the number of small details.
Cereal applique
For very young children it is useful to develop fine motor skills. Touching objects with your fingers and learning to make pinch movements is, of course, important. But for children over a year old, it is interesting to see the result of their work right away. Cereal application becomes the most attractive for them in this regard.
Any cereal will do. For the first time, it is better to make the simplest application, from one type of cereal. For example, millet chicken. In this case, completely cover the design with PVA glue and sprinkle with millet (we press the millet a little with our fingers to help it stick better). The cereal should lie in one layer. The eye can be made from buckwheat, the beak and paws can be simply drawn (or made from beans, as in the photo). To preserve the cereal layer, the applique can be additionally coated with glue on top. Then you can move on to applications from different cereals. The principle is simple: for each detail we use a material of a different color or texture. First we smear one part with glue, cover it with cereal, then another, etc. For example, clouds are made well from rice, the sun from millet, the sky from semolina, and the earth from oatmeal and beans. If necessary, cereals can be painted (with gouache or watercolor) Methods for painting cereals:
- Scatter the millet on a wide plate, take a brush, dip it in gouache and water and paint it. Then carefully pour the cereal onto cellophane in a thin layer and dry. Such grains get your hands dirty when working, but applique
It turns out bright and unique.
- Pour the rice into several cups, add water and gouache of different colors to each container to form a thick solution. Leave overnight. In the morning, pour out the water and scatter the cereal into plastic bags to dry thoroughly. It is most convenient to store in small jars of baby food, vitamins or baby plasticine. Painting rice this way does not stain the child’s hands, but the colors are less saturated.
- It is more practical to mix semolina with powdered colored chalk.
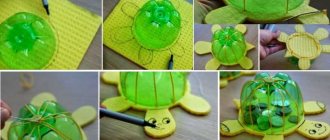
Reverse applique
This is an application in reverse. It is performed on a smooth and transparent surface of plastic or glass, and its reverse side becomes the front side. The most important thing is to make a good, clear drawing on paper, which is placed under the inverted lid. To prevent it from moving, it must be attached to the lid with two peas of white plasticine. The outline of the future design is laid out with black plasticine, and the open areas are sequentially filled with colored plasticine. Turned over with the smooth side facing you, the product makes an amazing design for a painting or panel. This application can be done using several methods: laying out a contour of flagella, or a mosaic of plasticine balls. After finishing, the application is covered with a circle of colored cardboard. It is recommended to conduct such classes with children aged 3 years and older.
Mosaic
Another very exciting way to create creative works is to make a mosaic from cut out or torn pieces of paper, multi-colored eggshells. It is done in two ways: from separately cut multi-colored small shapes (squares, triangles, trapezoidal parts, stripes) and by cutting several layers of the base in a patterned form, then changing the parts according to color in the background slots and fastening them with glue. Think over the drawing, mark it with a pencil outline and, having previously smeared the surface with glue, fill the drawing with the color that you need to create your idea.
Application made of foam rubber The foam rubber is painted. Then they tear it into small pieces. Foam rubber can be replaced with green paper or cotton balls. After that, draw on paper with a simple pencil what you or the children want to do. Lubricate with glue and glue foam rubber. You can not draw, for example, a tree with a pencil, but let the child use his imagination or put the tree together using glue from pieces all at once.
Iris folding - rainbow folding
Iris folding originated in Holland. This technique is also called "rainbow folding". Its principle is as follows:
1. The required fragment of the picture is cut out along the contour.
2. On the reverse side, strips of colored paper are glued onto the drawing strictly in a certain order, in accordance with a pre-prepared template or a diagram you have drawn up.
3. The wrong side is sealed with a clean sheet of paper.
4. The drawing, if necessary, is supplemented with details.
Before you start working, you need to learn how to build a template yourself or stock up on ready-made Iris templates.
Thus, non-traditional types of appliqué in a preschool institution are one of the most rarely practiced types of visual activity. At the same time, non-traditional appliqué techniques contain colossal educational reserves and enormous pedagogical opportunities, which influence the artistic, aesthetic and figurative-spatial perception of the world by preschool children, and the development of creativity in preschoolers.
Iris folding - rainbow folding
Iris folding originated in Holland. This technique is also called "rainbow folding". Its principle is as follows:
1. The required fragment of the picture is cut out along the contour.
2. On the reverse side, strips of colored paper are glued onto the drawing strictly in a certain order, in accordance with a pre-prepared template or a diagram drawn up by you.
3. The wrong side is sealed with a clean sheet of paper.
4. The drawing, if necessary, is supplemented with details.
Before you start working, you need to learn how to build a template yourself or stock up on ready-made Iris templates.
Cityscape
If you are wondering how to make winter applique with your own hands, use the following idea. For a winter cityscape you will need colored paper and cotton pads.
Identical rectangles are cut out of paper of different colors to depict multi-story buildings. On them you need to stick small squares of blue or yellow windows, as if there were lights in the windows, if we are depicting an evening landscape.
For doors, you can use paper in a contrasting color. Half a cotton pad will replace snow-covered roofs.
In order for the composition to look harmonious, the width of the “houses” should be equal to the width of the cotton pad. The picture can be simple, in one row, or with perspective.
Then the rows of houses - “streets” - begin to be glued from the middle part of the sheet, the bottom row of each street is covered with a row of “drifts” of whole cotton pads, moving down, the next row of houses is glued in a checkerboard pattern.
The bottom of the applique is also decorated with “drifts”. A snow-covered tree will add charm to the city landscape; the trunk is cut out of brown colored paper, and the crown is depicted with cotton pads.
Applications made of cotton wool and poplar fluff
The fluff of the poplar, which every spring covers lawns and city streets with “white snow”, flies into the open windows of houses, causing displeasure among residents, but it turns out that it can also delight them.
Appliqués made of poplar fluff are monochromatic, they resemble grisaille (a decorative type of painting done in different shades of one color - usually gray). Delicate, airy, graceful. When choosing themes for appliqués made of poplar fluff, you must keep in mind that it is easier to work if there are few details and if they are not small.
It is better to choose animals, birds, and plants with a fluffy texture. For example: bunnies, kittens, ducklings, chicks, plush toys, dandelion heads.
It is easier to make applications from black and white drawings and contrasting photographs.
In the plot application, winter landscapes, birch groves, fish in an aquarium are successful.
Using appliques made of cotton wool or poplar fluff, you can make fluffy, voluminous animals, snow, depict the fluff of plants, clouds - the scope for imagination is very wide.
From small cotton balls you can make a poodle and a lamb, from thinned and torn pieces of cotton wool you can make clouds, from cotton pads you can make chickens and flowers, snowmen.
Remember that cotton wool can be tinted with watercolors or gouache, and then the scope for creativity and imagination will increase several times.
Confetti applique
People use pieces of paper punched with a hole punch in different ways. Well, how they use it: they throw it away, or they give it to children to play with, and then they throw it away anyway. I suggest you create pictures from it yourself or together with your children. It all depends on your imagination and desire. Description of work:
1. Draw, for example, the outline of a butterfly. 2. Invite the child to apply glue over the entire surface of the drawing with a brush, or if he does not have the skill to work with it, then with a sponge. 3. Let the confetti sprinkle heavily over the entire piece of paper. 4. Let the baby shake off the excess from the sheet of paper (you can simply turn the sheet upside down). 5. Together, be surprised by the butterfly that appears in front of you.
As you understand, you can work with this technique with children of any age.
Foam applique
Foam rubber is the same democratic material as cotton wool, poplar fluff or confetti, which is why it attracted my attention.
Foam rubber is painted with paint. Then they tear it into small pieces. Foam rubber can be replaced with green paper or cotton balls.
After that, draw on paper with a simple pencil what you or the children want to do. Lubricate with glue and glue foam rubber.
You can not draw, for example, a tree with a pencil, but let the child use his imagination or put the tree together using glue from pieces all at once.
Application made from electrical tape
Invite the children to make an applique using duct tape. For example, a road for cars. Show how to use duct tape and safety scissors. And fantasize again!
An unusual way of drawing can be obtained if you paint an application made from electrical tape with paints, and after the paint has dried, carefully remove the electrical tape from the drawing. Using this unconventional painting technique, you can paint both abstract and ordinary paintings.
Applique from waste materials
My favorite applique is made from waste materials. Children love to collect everything they can get their hands on. From this, at least sometimes, it is simply necessary to make an applique.
Remember yourself as a child. After all, then everything that was in your pocket, matchbox or casket seemed to you a real treasure. So, try to make a real masterpiece out of the children’s “treasures”!
Sand or salt application
Working with sand is a pleasure, and the finished paintings turn out simply gorgeous.
Kits for appliqués made of colored sand are sold in any office supply store or in children's art departments. But you can try making colored sand with your own hands.
Children of any age enjoy playing with sand: pouring it, choosing colors, leveling it, and most importantly, shaking it off. Why not, at least occasionally, meet them halfway?
And, if, in addition, you allow the children to paint sand or salt with you, it will give them incredible pleasure!
Sand or salt application can be started with children aged 2-2.5 years. To begin with, choose simple applications with a small number of details, gradually complicating the design and increasing the number of small details.
Non-standard creativity
To develop your imagination, some types of applique can be improved. Conventional technologies combined with non-standard materials or approaches can give interesting results.
For example, a standard applique, in which flowers are the main motif, will sparkle with other colors if you use an unusual material.
To work you need:
- thirty pieces of cotton swabs;
- green paper;
- three pieces of yellow plasticine;
- blue or white paper for background.
First, you need to carefully trim the heads of the cotton swabs with scissors. This must be done carefully to avoid injury.
Then on green paper you need to draw the outline of dandelion leaves and stems. The cut out leaves are glued to the base.
From yellow plasticine you need to roll three approximately equal balls, which are then flattened with your thumb. Cotton swabs are carefully pressed along the edges of the plasticine with the plastic bases inward. Then the resulting blanks are carefully lifted and, using the same piece of plasticine, attached to the stems of the flowers. The resulting applique, the flowers in which are made in such an unusual way, looks very interesting. Using this technique, you can make a hedgehog by gluing sunflower seeds or buckwheat onto PVA instead of needles. Any natural material, as well as any scraps of fabric, leftovers from handicrafts, etc. can be used.
“Indentation” technique
1. We will need a blank: a color drawing or the simplest paper applique. In the photo, a paper applique is used as a blank - a silhouette of a tree glued to colored cardboard.
2. Then we apply plasticine circles, carefully leveling the edges.
3. We invite the child to decorate the circles with cereals (or coffee beans, nuts, seeds, etc.) - press them into plasticine.
4. We also make a tree trunk. Apply brown plasticine, forming the silhouette of a tree.
If the tree is winter, you can sprinkle the plasticine trunk with coarse salt, and then press the salt crystals into the plasticine.
That's all! It couldn't be simpler.
Fluffy applique
Application made from rolled napkins is a simple and accessible form of creativity for any age that promotes the development of children’s fine motor skills.
To work, you will need paper napkins of various colors, a contour drawing of the future application (for this it is convenient to print children’s coloring books on printer paper), PVA glue, and colored cardboard as the basis for the application.
The napkins are cut into equal squares, then each square is rolled into a ball using your fingers.
The resulting balls are glued according to the pattern using PVA glue.
First, the appliqué is done on printer paper on which the design is printed. The finished applique must dry well, after which the design is cut out and pasted onto the background - colored cardboard.
The final finishing of the panel depends on the imagination of the author: depending on the theme, the work can be decorated with natural materials, threads, shells, shavings, etc.
Individual details of the composition can be made from colored paper - plain or velvet.
The author of these works is Tatyana Cherednichenko.
Bullfinches made of threads
Thread applique is not just a children's craft. It provides the widest scope for creativity. Experienced craftswomen turn non-traditional types of appliqué into real masterpieces. Working with threads is very painstaking and requires great precision and perseverance. When starting to master this direction, it is worth practicing making small plots, mastering the creation of individual elements, experimenting with the shape of objects and the quality of the thread. Then you just need to start implementing the big plot.
To make bullfinches you will need:
- green melange threads for grass;
- white threads for the background;
- blue melange threads - sky and clouds;
- brown, black, red, gray - for berries and bird bodies;
- glue;
- thick cardboard;
- pencil.
First, a sketch of the plot is made on cardboard, which will be the basis. Bullfinches arrive in winter, most often we see them against a background of snow, sitting on the branches of trees - ordinary garden or spruce. This is exactly what needs to be drawn.
It is important for yourself to decide which block will be made in which color. This way, there will be no confusion in the location of the threads.
The background elements are done first. The base is carefully painted over with PVA glue, and then the threads are glued. The first strand can be laid in any order, but all subsequent strands will definitely follow the contour. It is more convenient to start from the bottom, first bypassing all the difficult places, and then completing a large field. After the sky and branches are ready, they begin to make the bodies of the birds. It is necessary to work carefully; the beak and paws require special precision in laying the threads. The last to be done are the berries. To make them look like real rowan, the red threads are twisted in a spiral. This makes the berry more textured and voluminous.
If desired, the base can be fabric. In this case, the threads are laid out on the base or glued as described above. Then, several stitches are made by hand or on a sewing machine, which additionally secure the threads. This applique can be beautifully decorated with a pillow or bedspread; it can also be used as an element of clothing decoration.
This thread painting will decorate any interior and will attract the admiring glances of guests.
Applications based on ready-made templates
A wonderful template for a winter applique in the form of a penguin or snowman can be downloaded on the Internet. An interesting effect is obtained if you use foam tape rather than glue to glue parts. This way the parts do not fit tightly together, and the image becomes more voluminous. The main thing is to think in advance about the sequence of gluing the parts.