September 2022 is just around the corner, and soon schools and kindergartens will begin autumn-themed craft competitions. To help parents and teachers, we have collected in one place photos of works sent by readers of our portal. We hope these photos inspire you to create your own masterpieces. Applications on the theme of autumn We have divided it into sections for your convenience.
You can see detailed information about the works at the following links: competition 2016, competition 2015, competition “Autumn Kaleidoscope”, “All the colors of autumn”. See also the works of the competition: “Our autumn is golden, fruitful”
We invite you to take part in the current autumn competitions with diplomas.
Positive aspects of creating applications
This type of crafts has a very beneficial effect on the development of the child. The main advantages of creating applications:
- Development of fine motor skills of the hands;
- Development of creative and logical thinking;
- Trains perseverance and accuracy;
- While working, the baby remembers what objects look like and what they are called.
Also, in this way, a child can create not just a simple standard craft, but also present the work as a gift or interior decor.
Pumpkin
Autumn is associated with the harvest and Halloween. You can make a bright applique on this topic for the middle group of kindergarten.
For work, prepare:
- template – outline image of a pumpkin with leaves;
- pumpkin seeds;
- gouache paints;
- office glue.
Instructions for creating the “Pumpkin” applique:
- Glue the pumpkin template onto the cardboard base.
- Place the seeds on the table, after covering it with film or newspapers.
- Color most of the seeds orange, the smaller part green. Leave to dry.
- Carefully glue the dried seeds to the template image: orange ones to the pumpkin itself, green ones to its leaves.
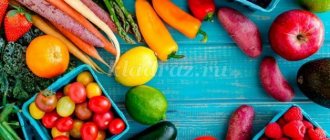
Applications fruits and vegetables
Applications in the form of fruits and vegetables are quite popular; they are created by both younger and older children. Using them you can glue real compositions, and from different materials.
The depiction of fruits and vegetables using the appliqué technique facilitates their quick learning and memorization, which is very important for a small child.
Materials for their manufacture
To make applications depicting fruits and berries, you can use not only the usual material - colored paper, but also others:
- corrugated paper;
- felt;
- some types of fabrics;
- dried tree leaves and berries;
- seeds;
- cereals and pasta;
- beads;
- eggshells;
- threads
An application on this topic with several types of materials turns out to be quite interesting and original.
Technicians
As a rule, fruits and vegetables are depicted in the form of standard applications, but they also look very interesting in 3D volume. If desired, you can make the applique using the origami technique or by twisting narrow strips of paper.
They also often do work using the mosaic technique, that is, they tear paper or break eggshells into small pieces, and then fill them with the required image.
Origami “Maple Leaf”
Preschoolers in the preparatory group will be interested in learning about the Japanese art of origami. Making an applique is not difficult, the main thing is accuracy. The work requires 3 paper squares of autumn colors and stationery glue. The preferred size of the squares is 8x8 cm.
Instructions:
- Take a square. Fold diagonally. Expand.
- Place the square so that the fold is directed vertically. From its top point, fold the “wings” towards the fold. The result will be a rhombus with a more elongated upper part.
- Turn the workpiece over with the extended end down.
- Fold the protruding upper triangle under the “wings”.
- Fold the top corners towards the center line. You will get a rhombus with two small triangles.
- Return the triangles to their original state. Then remove them along the folds inside the diamond.
- Fold the top corners of the diamond down. The result was a third of a maple leaf.
- Perform similar actions with 2 other squares. Then connect them with the side edges.
The carved maple leaf is ready. All that remains is to glue it to the decorative cardboard and paint on the petiole. You can decorate walls and windows in a kindergarten with ready-made origami maple leaves.
For the little ones
You can start making your first applications from about 2 years old, you just have to choose the easiest and simplest options. As a rule, appliques of vegetables and fruits in a preparatory group or nursery are done in the form of a single work, rather than a composition.
This way it is easier for children to glue them and also to remember them. To make it as easy as possible for your child, you can use already prepared templates of fruits and vegetables for appliqué.
Cherry
Cherry is an excellent applique option for the youngest children on this topic. To make it you will need:
- white sheet of cardboard;
- pencil;
- scissors;
- glue;
- colored markers;
- red colored paper.
Work plan:
- Draw 2 small circles on colored paper and cut them out.
- Glue the circles onto the cardboard so that they are on the same level and not far from each other.
- Using a brown felt-tip pen, draw 2 stripes, connecting the circles to create a design in the form of a pair of cherries.
- Draw a leaf with a green felt-tip pen.
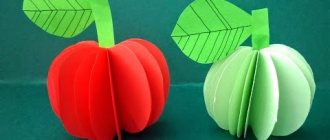
A pineapple
Almost every child likes this exotic fruit, and of course it makes them want to portray it. For a more beautiful and interesting look, you can make it voluminous from simple colored paper. All you need for this craft:
- yellow, green paper;
- sheet of cardboard;
- glue;
- scissors;
- pencil.
Step-by-step work plan:
- Draw a pineapple on a piece of cardboard.
- Cut the yellow paper into strips, approximately 5 cm long and 1.5-2 cm wide.
- Take one strip and fasten its ends to make a ring, glue the ends together.
- Press down a small part of the ring a little and glue it to the upper contour of the pineapple.
- Glue another ring next to it and fill the entire top row.
- Take a ring of paper and also glue it, but just below the top row of the pineapple, while the glued part should be under the free edge of the upper rings.
- Follow the previous step until the entire pineapple is filled.
- Cut out small long leaves from green paper and glue them to the top of the pineapple.
Autumn landscape
This leaf applique on the theme “Autumn” is intended for older preschoolers. The task greatly develops imagination; autumn leaves in the composition turn into bushes and trees: the leaf plate is the crown, the petiole is the trunk.
For work take:
- press-dried leaves of different types of trees;
- white cardboard for the base;
- PVA;
- watercolor.
Step-by-step work:
- Using watercolor paints, depict the main composition on cardboard, for example, the sky, a lake, and a strip of shore between them. Wait for the painting to dry.
- Select leaves in pairs. That is, the leaves in a pair should be as similar as possible.
- Create a forest on the shore. Glue the leaves one at a time from a pair. Glue at random, with one leaf partially overlapping another. The effect will be as if the trees are standing close to each other, the forest approaches the water itself.
- Don't forget about the reflection in the water. Glue the second pair of leaves upside down onto the image of the lake. Straight and inverted paired leaves should be joined by petioles.
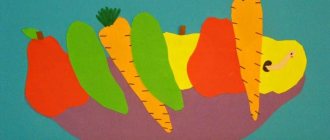
Fruit basket
Quite an interesting way to create a fruit applique from felt. This material is sold in a wide range of colors and is easy to work with. Also for this craft you will need: a sheet of cardboard, brown paper, scissors, a glue gun and sticks for it, a pencil, a newspaper.
Action plan.
- Draw a basket on a sheet of cardboard.
- Cut the sheets of paper into strips about 2 cm wide and roll them into thin tubes, seal the edges well.
- Lay out the outline of the basket from newspaper tubes, cutting them to the desired size.
- Tear the brown paper into small pieces and roll them into tight balls.
- Glue the balls over the entire area of the basket, so that there is no gap between them.
- Cut out the desired fruits from felt, attach them to the basket in a happy order and glue them.
In principle, for such a volumetric application of fruits and vegetables, you can use seeds and cereals, as well as eggshells.
Applications depicting fruits and berries allow you to create colorful works from a variety of materials and using different techniques. Even the smallest creative hands can begin their acquaintance with appliques with vegetables, berries, fruits, and older children can create entire compositions.
Autumn tree
Preschoolers of the younger group are interested in the use of various creative techniques. One of these involves the use of cotton pads.
Making a bright autumn tree is quite simple:
- Prepare your watercolors. Draw the trunk and branches of a tree on watercolor paper with brown paint.
- Provide children with cotton pads and pipettes. If necessary, teach how to use this medical device.
- Dilute the watercolor paint with water so that it becomes convenient for drawing into the pipette. Each color requires a separate glass. It is important that kids choose colors typical for autumn: red, yellow, orange, burgundy, light green.
- Show the students the image technique: they should dip a pipette into glasses with watercolor solutions, then pour it onto a cotton pad. One disc can be pigmented with different colors, resulting in beautiful color transitions.
- When the painted discs are dry, children glue them to the trunk and form the crown of the tree.
Rainbow in the clouds
You will need: colored cardboard, scissors, glue stick, cotton wool, stapler.
Master Class
- Cut 7 strips of paper of different colors so that each piece is shorter than the previous one. The red stripe should be the largest and the purple stripe the smallest.
- Arrange the stripes in the following order: red, orange, yellow, green, blue, indigo and violet.
- Fasten the strips of paper together using a stapler.
- Roll 6 cotton balls.
- Glue 3 cotton balls at the base of the rainbow as clouds.
Rainbow in the clouds is ready!