What you need for drawing
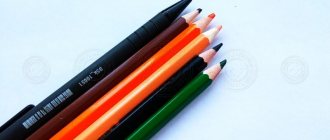
It is advisable to choose paints in natural shades. The table lists the main paint colors and additional tools that may be needed for painting, as well as their purpose.
| Simple pencil | It is needed to create a sketch. For a colorless drawing you will need 3 pencils of different hardness with marks: T2, TM, M2. |
| Eraser | Needed to remove excess pencil lines |
| Yellow paint | You need it to paint the body of a chicken. |
| Orange paint | For detailing and coloring the beak |
| Brown paint | Useful for creating shadows, drawing feathers and painting legs. |
| Black paint | It is needed for the design of the eyes and the final stroke. |
| Artistic brushes | Brushes should be of different thicknesses and hardness |
If the chicken will be painted in watercolors, then it is better to give preference to special sheets for watercolors. This paper is thicker than regular landscape paper. It does not deform from moisture. The surface of these sheets is rough, so they absorb excess paint well and do not allow it to spread.
Step-by-step instructions for drawing a chicken with a pencil
A chicken (a drawing for young children should not contain too many details) drawn with simple pencils can be more realistic than a picture made with paints. Using thin pencil lines you can show the direction of feather growth, apply shadows and work out small details of the drawing.
Outlines
First you need to make a sketch in pencil marked T2.
Chicken - drawing for children step by step
Algorithm of actions:
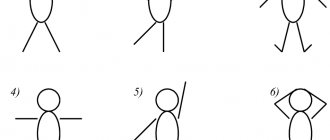
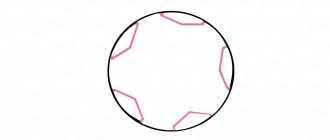
- Draw a small circle in the center of the sheet. This is the future head of the chick.
- At the bottom, draw an oval twice as large as the head. Position it at an angle. The top of the figure should be in contact with the outline of the circle below.
- Using thin lines, connect the circle and oval into 1 shape. The point where they meet is the chicken's neck, so the lines should be slightly curved inward.
- Draw a small tail for the chicken, slightly extending beyond the lines of the oval.
- Mark 1 small wing on the side. Its edges can be depicted with a wavy line, imitating the shape of feathers.
- Since the chicken in the picture will be turned half a turn, the other wing should not be drawn completely, it is enough to depict only a small part protruding from behind the breast.
- Draw the bird's legs from below. They should have the shape of an inverted and elongated cone.
- At the bottom, on the thinnest part of the legs, draw hooked toes.
- Draw a triangular beak.
- Add 1 small and round eye. Draw on 2 short eyelashes.
- There is no need to draw on the other side of the eyes. It is enough to indicate the protruding eyelashes, which will show that the chicken has 2 eyes, it’s just not visible.
Use an eraser to erase all additional lines. Remove the connections of the figures inside the neck, erase the lines inside the tail.
Detailing
Details should be drawn with a pencil marked TM.
Chicken - drawing for children step by step
Algorithm of actions:
- Draw the outline of the chick's head and body with a zigzag line, imitating protruding fluff and small feathers.
- Draw a small tuft on the top of the chicken's head.
- Draw the feathers on the wings and tail.
- You need to make several horizontal stripes on the bird’s legs.
- Draw nostrils on the beak.
Using an eraser, remove the contour lines of the head on the crest, and also erase the old contour of the body.
Shadows and highlights
The shadows need to be worked out with a pencil marked M2.
Algorithm of actions:
- Shade the lower part of the body.
- Mark the shadow under the wing.
- Paint the tips of the wings.
- Shade the area under the tail.
- Apply a few strokes to the front of the neck.
- Mark the shadow under the crest.
- Carefully blend all applied strokes with your fingers.
- Use an eraser to remove any graphite that has accidentally smeared behind the contours of the drawing.
- Paint in the chicken's eye and shade its beak.
When applying strokes, there is no need to put pressure on the pencil. Using an eraser with a sharp angle, erase some of the graphite inside the eye to create a highlight. Also remove a thin layer of graphite from the top of the beak.
Hand drawing using stamps for children 4-6 years old
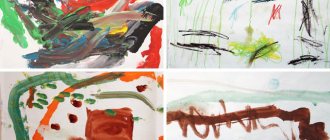
Drawing with palms using stamps.
Master class “The chicken went out for a walk.” Author: Natalia Albertovna Fomicheva, teacher, MDOU general developmental kindergarten No. 30 “Teremok”, city of Rybinsk, Yaroslavl region. Description: This master class will be useful to teachers of preschool and additional education, as well as creative parents. Designed for children of middle and older preschool age. Available for individual work for younger preschoolers. Goal: to develop children's skills in using non-traditional drawing techniques. Objectives: - introduce children to options for using non-traditional drawing techniques (handprints, fingerprints, stamps, cotton swabs); - develop imagination, creative initiative and fine motor skills; — to develop interest in arts activities; — to form elementary ecological ideas; - evoke an emotional response; - cultivate a love for nature; - cultivate independence and accuracy when performing work.
Materials and equipment: a sheet of colored paper for an A4 printer, gouache, cotton swabs, scissors, a cocktail tube, a plastic bottle, an art brush, a jar for water, a small container for diluting paint, a black felt-tip pen
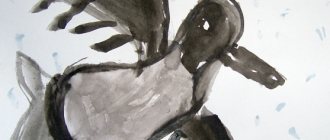
There are a variety of bird species found in nature. Some of them are large - like a tall and fleet-footed ostrich, others are very tiny, no bigger than a bee - caliber. Some of them, for example, ducks and swans, can not only fly, but also swim. Others cannot even fly and move either on land or by swimming. There are a great many birds. People have managed to tame some birds. Now they not only live next to a person, but also benefit him. These birds are called domestic birds. The most famous poultry is the chicken. The chicken went out for a walk, to pluck some fresh grass, and behind her were the children - Yellow chickens! Co-co-co, co-co-co, Don’t go far, Row your paws, Look for grains! They ate a fat beetle, an earthworm, and drank some water. A full trough! Chicks walk all day long. They are not too lazy to bend over. The worms are not visible - The kids are offended. (T. Volgina)
A mother hen walks on the grass, and fluffy yellow lumps scurry nearby.
Her kids. Funny, cute, stupid chickens. We will try to draw this whole friendly family. Work progress: On a sheet of paper placed horizontally, use yellow paint to make a palm print. Wrist down. It will be a chicken. The fingers should be slightly apart. The thumb is moved to the side.
Then we immediately collect all fingers, except the thumb, into a fist. With your thumb we make several chick impressions next to the palm print - the mother chicken.
To depict the beaks, we use a stamp specially made for this purpose. It is done as follows: an acute-angled protrusion is cut out of a cocktail tube using nail scissors, which is then bent outward.
Dipping this stamp in red paint, we draw beaks for the chickens and hens.
Using a cotton swab, we create the image of a scallop.
We also use a cotton swab to highlight the eyes.
To draw the grass we use an artistic brush and the dipping technique.
Using a black felt-tip pen, draw the legs of the hen and chicks.
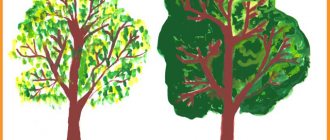
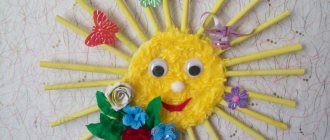
To draw the sun and clouds we need a small plastic bottle. One that has a flat border around the neck. In this case, a bottle of drinking yogurt was used.
First we mark the center of the sun.
We depict openwork rays in the form of a flower.
We compact the rays by placing the prints one on top of the other.
We perform the image of clouds in the same way. The only difference is that you don’t need to maintain symmetry, but you can arrange the prints randomly. We use paints of different shades. Lighter first.
And then a more saturated blue color.
Our work is ready!
We recommend watching:
Drawing with palms in the middle and senior groups Drawing with palms using stamps in kindergarten. Middle - senior group Drawing with palms and fingers in kindergarten for children of the middle - senior group Crafts, drawings for Cosmonautics Day in the middle group of kindergarten
Similar articles:
Drawing with palms and fingers for preschoolers
Step-by-step instructions for painting a chicken with paints
A chicken (a drawing for children can be done in a cartoon style), painted with paints, will turn out bright and beautiful. Paint colors should be selected taking into account their features.
For example, after drying, gouache will become paler by 1-2 tones, and watercolor will have to be applied in 2-3 layers to get bright shades, since this paint is translucent.
Sketch
The sketch should be done in pencil marked T2.
Chicken - drawing for children using paints using the “poke” method
Chicken - drawing for children using paints using the “poke” method
Algorithm of actions:
- Draw an oblique oval in the center of the sheet. Its upper part is the chicken's head, and the lower part is the tail.
- Use zigzag lines to indicate the shape of the plumage of the chick standing sideways. Lines may extend beyond the drawn outline. It is important to maintain proportions, so the head should be drawn smaller than the body.
- The breast should be round and protrude slightly forward.
- Draw the tail slightly raised, and draw a protruding corner at the end.
- Mark the bottom line of the wing.
- Draw thick, short legs with straight toes.
- Indicate the position of the round, small eye and triangular beak.
Use an eraser to remove excess lines, if any.
Coloring
Now you need to color the chicken's body, its eyes, beak and legs.
Step by step:
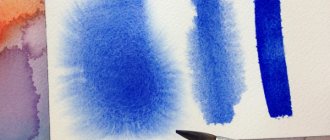
- Take a wide brush, dip it in water, press it against the edge of the jar, and lightly moisten the painted body of the chicken.
- Take some yellow paint and paint over the head and body completely.
- Dry 1 coat of paint, then apply 2 coats.
- Mix yellow and orange paint in a 1:1 ratio, apply this color with a wet brush to the chicken’s neck area, under the wing and on the tail.
- Paint the lower part of the body.
- Using a thin brush, pick up some brown color and paint the chicken's legs.
- Then paint the beak with orange paint.
Wait until the drawing is completely dry, and then paint the eye black. You can use a felt-tip pen instead of paint.
Detailing
The drawing needs to be detailed by drawing the chicken's feathers along the contour and creating highlights. For younger children, parental assistance may be required.
Algorithm of actions:
- Use a thin brush to apply orange paint and use a zigzag line to highlight the growth of feathers on the lower part of the bird's body.
- Add a few strokes under the tail, outline its tip and upper part.
- Also paint the back.
- Make a few strokes on the top of the chicken's head. There is no need to paint the neck and chest.
- Outline the wing with orange strokes.
- Add 1 small stroke above the eye and apply 3 strokes of different sizes on the breast.
- Wash the brush thoroughly in clean water and pick up white paint. Place 1 small dot inside the eye and on the beak, simulating glare.
All orange strokes should be applied in accordance with the direction of growth of the chick's feathers.
Summary of a lesson on drawing with a poke for children of senior preschool age “Chickens”
Gulia Bogdashkina
Summary of a lesson on drawing with a poke for children of senior preschool age “Chickens”
Goal: learn to draw chickens walking in the yard; improve your poke drawing . Form cognitive interest.
Material: landscape sheet, gouache box, small color check sheet,
all painting , paintings of chickens .
Examples of images for sketching, tips for beginners
Those who are just learning to draw need to know a few secrets that will make the drawing more accurate.
Tips for beginners:
- To avoid smearing the graphite of a simple pencil, you need to place a sheet of clean paper under your hand.
You can use round objects to draw circles
- When creating a sketch of circles and ovals, you can trace round objects or tablespoons by placing them on the paper.
- When coloring the body of the chicken, it is important not to go beyond the lines of the eyes, especially if they are supposed to be white. To prevent this from happening, paint should be applied around each eye and wait until it dries. After this you can start coloring.
- If the paints take a long time to dry, you can blow on the drawing with a hairdryer.
- When painting the long fingers of chickens with paints, the brush should be pressed at the base and raised closer to the end of the finger, then the line will smoothly change thickness.
- To show the direction of feather growth, you need a hard-bristled brush and very thick paint. Then you will get clear strokes.
- You need to outline a picture painted with paints only after it has completely dried.
The main rule of drawing is not to be upset if the drawing does not turn out beautiful the first time. You can always take a new sheet of paper and try to draw the picture again.
Drawing chickens will help children develop their thinking and prepare their hands for writing. Parents should conduct classes with their child, explaining during the drawing process who chickens are, where they come from and how they grow. You can choose a picture for sketching from the options presented in the article.
ECD for drawing with a poke for children 5–6 years old with mental retardation “Chicken”
Violetta Noskova
ECD for drawing with a poke for children 5–6 years old with mental retardation “Chicken”
Abstract of the educational activity on visual activity " Chicken "
compensatory group for children 5-6 years old
Goal: to learn to convey in a drawing the features of the appearance of a chicken
— introduce children to the technique of “poking with a dry brush”
;
- expand ideas about poultry (name, appearance features,
methods of movement, sounds made);
— enrich and activate the vocabulary on the topic;
- develop mathematical concepts: above, below;
— cultivate love and caring attitude towards poultry;
- learn to listen carefully to your interlocutor.
- develop visual attention and perception;
- develop speech hearing and phonemic perception;
- develop memory , fine and gross motor skills, coordination of speech with movement.
Materials and equipment: multimedia equipment, presentation “Poultry”
, sheets of white paper, hard brushes, thin soft brushes, gouache, toy
chicken .