In today’s article I would like to introduce children and their parents to a funny clown - an indispensable “merry man” in the circus, which we will make with our own hands together.
This little man in the arena is able to make any spectator, both old and young, laugh, play the accordion, sing a funny song, and show many original tricks. And that’s why today’s article is on the topic of clown applique.
After reading the detailed instructions and following each step step by step, it will not be difficult for even a novice master.
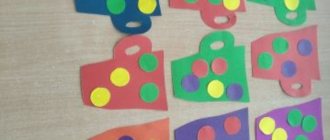
Simple clown applique made from geometric shapes
This master class will involve geometric shapes, which will allow the child to develop his knowledge by studying shape and color, and diagrams and photos will help to visually understand how to make a paper craft. Little children in the junior group of kindergarten will make appliqués using the prepared parts, and children in the middle group will be able to cut out the components according to the template.
To make a clown applique, prepare:
- templates of geometric shapes;
- thick cardboard - base;
- colored paper;
- scissors;
- a tube of paper glue (PVA is fine).
Attaching the templates to colored paper, cut out:
- The juggling balls and face will consist of six different colored circles;
- Triangles of the same size (5 pieces) - pants, sleeves and cap of our hero;
- One oval shape for the body;
- One star - on the collar;
- Another oval shape (cut into two equal parts) - shoes;
- Cut half of the oval blank into two more - for the hands.
- Next, connect all the components of our clown applique and glue it onto a cardboard sheet.
- When finishing your work, you need to use a felt-tip pen to draw in the eyes, a red nose, and let our “merry man” smile - draw the lips, raising their corners higher.
Pea jesters made of different materials
A simple template for making a product from geometric shapes. Transfer them to cardboard and help your child cut them out. Stick on any background. This way you can repeat the learned names of the figures with preschoolers.
To create, you will need paper tubes. Prepare different colors. Cut into small rectangles and roll them into tubes. Stick them in place of the hair. The bow should be made of tubes. And draw a face.
Just make a composition out of buttons. Select brightly colored objects and stick them together. For better fixation, use superglue and thick cardboard.
Pasta compositions are made in a similar way. Only after gluing the pasta are painted with gouache.
The technique of torn appliqué is also relevant. Often the pieces are cut into arbitrary rectangles, squares or torn by hand.
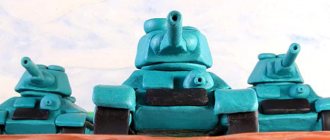
Children especially like to create with plasticine. Combine business with pleasure and create a funny jester. This is done using plasticine balls (like a mosaic) or two-dimensionally rolling out the plasticine into the desired shapes.
Freeze this product a little and store away from the sun and high temperatures.
Create an interesting creation from mini-modules. Take small squares of double-sided colored paper. Fold them into simple modules.
Fold one corner first.
Then the opposite one from above.
Prepare the stencil. And stick the blanks on it in any order. Even preschoolers can complete such modules.
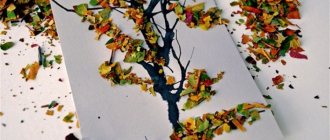
It is also made using mixed technique. Use natural herbarium and ordinary A4 sheets.
Clown made of paper palms. Offer the children colored A4 and cardboard. Help glue the elements together, and the craft is ready.
For your next masterpiece, prepare colorful fabric, balloons and glue. Roll the strips into tight spirals. Stick them on the desired parts of the picture. The collar may consist of rubber balls.
The eyelashes are made from cotton swabs, and the mouth is made from floss threads.
We will need scraps of old colorful clothes. Prepare 4 different cuts and other necessary things.
Cut out the stencils and transfer the outlines onto the canvas. Choose one that will not come apart during use. If it's satin, burn the edges.
Glue the parts onto cardboard. If the fabric is thick, use superglue. Help identify the front and back of the product. Close the joints with buttons. Lay the collar with an “accordion” made of loose fabric or a candy wrapper.
Fabric applique "Clown"
In this type of needlework there are many different techniques for performing crafts. In this MK we will consider the technology of making a clown applique from pieces of fabric. It will also not be difficult for children if adults help them understand the step-by-step description of the work. So, in the preparatory group, children were asked to work with an appliqué made of fabric, pieces of which will be glued to a sheet of cardboard. In addition, children's crafts will look bright and funny if the clown himself is painted. Interesting additions will be applique elements made of fabric, threads or other decorative elements. Another option for clown applique is to apply the contours of the design to a fabric base and secure the details using satin stitches. In this master class we offer several interesting ideas. Pictures can be printed on a printer and then cut out as a stencil.
- To complete the appliqué in these two ways, the preschooler first needs to copy the drawing onto a sheet of paper. Then all parts need to be numbered, starting from the bottom and in turn from bottom to top.
- Cut the pattern into its component parts and cut them out from the prepared piece of fabric.
- Determine the location of the drawing by laying out the blanks in front of you.
- Now glue the individual parts of the clown applique to a cardboard sheet or sew to fabric using a sewing machine. This will be the final stage of the craft.
Textile clowns
The collections of many craftswomen include rag dolls made from scraps of fabric. Using the same principle, you can make a merry fellow from the circus, for example, as a gift for a child or as an additional souvenir.
The head and arms for such a doll can be bought ready-made at a craft store or sculpted with your own hands from clay, plasticine, salt dough, sewn and filled with stuffing.
From pieces of fabric we cut circles with a diameter of 6 cm. The more there are, the better.
We make a “pillow” from each circle. We put a small piece of cotton wool or padding polyester on the scrap, put a running stitch along the edge and tighten the workpiece. We straighten the filler so that it “lays” in an even layer.
We assemble the body from four ovals of bright fabric and stuff it. In the shoulder area we sew “sleeves” of the same fabric - we sew the circles, leaving a window for turning them inside out, turn them inside out, and sew them to the base. We thread a wire through the hangers - we will string round blanks with filler onto it.
We make the tip of the wire sharp, string the pieces onto it one by one, then attach the palms. Using the same principle, we assemble the clown's legs.
All that remains is to sew the cap, the shoe legs and secure them.
We cut out all the details of the shoes from the same fabric as the body of the toy. For each shoe you will need 2 upper parts and 1 sole. We fill the shoes with padding, tighten the tops and sew them to the legs. For the cap, cut out 2 parts, sew them together and attach them to the figure’s head.
Felt Christmas tree toy
Children are happy to take part in creating toys to decorate the New Year tree. Girls can be invited to make a cheerful clown out of felt. You will need:
- felt and embroidery threads;
- needle, scissors, pencil;
- thin ribbon for a loop;
- two beads;
- pattern templates.
We cut out parts from felt of different colors. We make a small hole in the middle of the round element. Let's start designing the face.
We sew ears on the sides of the face. We place the largest part at the bottom and secure it with glue or thread.
The final touch is to sew on the cap and loop. The toy can be hung on the Christmas tree.
Color applique of a clown made from candy wrappers
Circus is joy, kindness, a lot of positive emotions and good mood. Who is the most fun and funny in the arena? You guessed it - a clown. Children fell in love with this character, and therefore not only in kindergarten you can get into a world where there are jokes and laughter; make a funny clown at home yourself.
Step-by-step photo instructions for the “Clown” applique
The MK presented below is done by children in the senior group of kindergarten as it is a little more complicated than the previous one.
- Prepare background material.
- Cut out a pair of boots using the template.
- Cut the corners and cut out the pants and sleeves.
- Make a face and attach a bow.
- Cut out the eyes. You can line the eyes with whole candies, the main thing is the round shape.
- Next, make a cap for the head according to the diagram.
- Glue the prepared figures onto colored background paper, draw eyelashes, smiling lips, and hair.
Our funny clown is ready.
Video: Candy Clown
In this lesson we will look at how to make a clown from scrap materials - from candy wrappers. To do this, you need to collect a lot of bright candy wrappers in advance, you will also need free time and desire.
Make a candy clown with care and please your loved ones with a new application, give moments of good mood to everyone who looks at it. So, let's start watching the video.
Working with plasticine
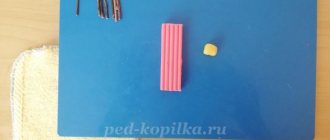
An equally original clown is made from plasticine, and even the smallest craftsmen can work with this material under the guidance or together with their parents.
We start work by designing the head.
We will make the body from two oblong elements of different colors, and immediately decorate it with buttons and an openwork collar. We insert a wooden stick into the upper part and place the head on it.
We fashion wide sleeves, attach them to the body, and complement them with yellow “fists”. All that remains is to make boots with plasticine pom-poms.