Modeling classes in the middle group
Detsky sad.Ru >> Electronic library >> Family and children >> Children's creativity >> Source: N. B. Khalezova, N. A. Kurochkina, G. V. Pantyukhina.
“Modeling in kindergarten” Moscow, “Enlightenment”, 1978 OCR Detskiysad.Ru A child of the fifth year of life is distinguished by greater endurance and mobility. Further complication of activities and enrichment of children's experience affects the development of all mental processes: thinking develops - children can identify more significant features of objects, group them by purpose, quality, material, they become able to understand the simplest connections and relationships; processes of intentional memorization and recall begin to develop; visual, auditory, tactile perceptions are improved, which become more stable and purposeful. A 4-year-old child can already plan in advance what he will sculpt, although this plan is still unstable at first. Children develop a certain interest in the result and process of mastering a skill, they begin to understand that the completion of the work depends on this, and if the child was unable to complete the task, this upsets him. Children's working capacity increases significantly, the opportunity to work in a team, and to subordinate their desires to the demands of adults. The main task of teaching modeling remains the task of cultivating a sustainable interest in plastic activity, its process, the quality of the image of the object and the result. Children are required to be able to express their impressions in a plastic image so that it can be easily recognized and expressive. The teacher always highlights and emphasizes elements of expressiveness. For example, when depicting a bird or chicken, you can show that different positions of the head, beak and tail create new interesting images. Much attention is paid to the formation of an independent plan - half of all classes are devoted to modeling according to the plan. By this time, the child’s creative idea becomes more stable. Children must sculpt on their own, not only using the theme on which they worked together with the teacher, but also invent their own, reflecting images of the world around them. The goal of this year of study is to develop in children the ability to independently find ways to depict objects, creatively applying the acquired knowledge and skills. Working on technical sculpting skills is of primary importance. Children consolidate and refine techniques learned in previous kindergarten groups and master new ones. Considerable attention is paid to working on the arbitrariness and quality of movement. To obtain different shapes of objects, various forces of pressing, pressing, rolling, flattening, and pulling are required. The topics of the tasks become more complex - children depict animals and humans, all kinds of dishes and other complex objects, the shape of which is an ovoid (an ovoid is an egg-shaped figure. This term is not given to preschool children), cones, cylinders, balls. Creating precise shapes and distinctive details requires work not only with the palms, but also with the fingers. Children master techniques such as pulling, smearing, pinching, smoothing; they are introduced to the solution of certain technical problems: vertical installation of the figure, fastening parts, weighting the lower part of the figure to give it greater stability, approximate measurement of proportions and parts, of which there are more and more (up to 5-6). In the middle group, as well as in the second youngest, repetition of the image of one form is provided for with different thematic content. This makes it possible to strengthen the skill of depicting various forms. The main content of the assignments is substantive in nature, but children are also taught plot modeling. They complete the first tasks together with the teacher (the children make ducklings, the teacher makes a duck, and at the end of the lesson they compose a composition - “The duck leads the ducklings to swim.” Or the children make bear cubs, and the teacher sits them in a circle and gives each of them a spoon - “The bears are having lunch.” ). Later, the children independently perform small episodes based on a fairy tale, poem, or story. In this case, the work can be of a collective nature: children are united in twos or threes, the teacher helps determine who will sculpt what. Each child portrays his own hero, and then all the characters can be collected on a common stand. The teacher helps children find expressive features of the image. For example, when sculpting bear cubs according to the fairy tale “Two Greedy Little Bears,” he says: “Look, Natasha, how well you did: your bear is crying (he brought both paws to his eyes), and Seryozha’s bear cub seemed to have hidden the cheese behind his back (paw behind back). That’s how greedy!” After reading K. Chukovsky’s work “Fedorino’s Grief,” the teacher suggests talking about it in modeling. Everyone decides together what plot to depict: how the dishes ran away from Fedora or how she came back. All the children make dishes (whoever wants what), and the teacher - Fyodor. At the end of the lesson, a composition is compiled. Such joint creativity, joint searches teach you to create an expressive image, help to evoke an emotional mood and interest in sculpting. In the middle group, work continues to develop children's aesthetic perception, the ability to see and feel the beauty of the shapes of surrounding objects, their proportions. Children learn to evaluate created works and express their elementary judgments. When depicting any object, you can be given the task of decorating this object with a pattern. Thus, molded dishes (cups, saucers) can be decorated using a stack, a set of signets, or making a pattern from small pieces of clay. Using the Dymkovo painting style, you can decorate birds, goats, etc. The first modeling classes in the middle group are aimed at consolidating and restoring in the children’s memory techniques that are partially forgotten during the summer months. In addition, new children usually come to the group from the beginning of the year; they should become familiar with the techniques of working with clay and plasticine that were taught last year. Therefore, in the first quarter they do not teach new modeling techniques, but reinforce old ones, complicating and clarifying them. Children repeat technical operations such as rolling, connecting, rolling, pinching when sculpting vegetables, fruits, berries and other items (sausages, buns, dryers, etc.), as well as toys. Autumn is a very favorable time for getting acquainted with the richness of the plant world, its beauty, its fruits, which with their shapes, colors and diversity evoke joyful aesthetic feelings in children and the desire to depict them. The first sculpting activity can be one the children have in mind. It gives the teacher the opportunity to find out the level of children’s skills and build further work in accordance with this. The program involves repeating the rolling technique, which children reinforce when depicting sausages, cloves, zucchini, cucumbers, etc. You can introduce a complication: roll out the clay with your hands in a vertical position (when making thin, elongated cylindrical bodies) or with your hands positioned at an angle when making carrots , zucchini, rockets, etc.; finish practicing the form with your fingers. As an exercise in rolling, rolling and joining, children make pretzels, puff pastries, chains, etc. In doing so, they learn various techniques for rolling elongated cylindrical shapes. At the beginning of the year, the technique of rolling is also consolidated, and a more complex topic than before is selected - modeling nuts, oranges, apples, cherries, etc. Children not only model all kinds of objects, but they are also asked to fashion several homogeneous objects of different sizes - large nuts and small ones, a large orange and a small one, etc. In some classes, children, when depicting more complex objects, practice all previously learned modeling techniques. For example, to sculpt a turnip, you need to roll up a lump of clay, flatten it slightly and pull off the tip, and insert leaves made from green paper on top. In the middle group they sculpt mushrooms, airplanes, a cat, a cockerel, a turtle, etc. As a final lesson, it’s good to sculpt according to the plan: “Let’s treat the dolls with berries,” “Delicious apples and oranges,” “Funny little animals,” “Chains and beads for Christmas tree,” etc. The winter months are associated with the joyful New Year holiday. Children receive many unforgettable impressions and emotional experiences associated with the Christmas tree, Santa Claus, Snow Maiden, and toys that suddenly came to life and spun with the children in a New Year's round dance. This is an excellent material for depicting in plastic images. But in order for children to be able to convey their impressions in modeling, it is necessary to introduce them to such geometric shapes as an ovoid (its difference from a ball), a cone, a disk, with new visual and technical skills, and ways of creating an image. It is good to introduce children to sculpting animals, birds, fish, the shape of the body of which is close to an ovoid. This is a hedgehog, a hare, a mouse, a bird, a fish, a whale, etc.
Approximate sequence of sculpting different objects
Hedgehog. A lump of clay is rolled into an ovoid, after which the narrow end is slightly rolled out and made pointed, raised slightly upward, and the face of a hedgehog is obtained.
Hare. They sculpt the same shape, but the sharp part is rounded and blunted with the fingers - this is the muzzle. The ears should be sculpted separately and attached.
Fish. The ovoid is rolled out, more elongated, its pointed part is also slightly lengthened (pulled with the fingers), then flattened and separated in the middle into corners - the tail of the fish. The fins on the back and belly are pinched (one, long, on the back, two on the belly: near the head and at the beginning of the tail). The mouth of the fish is lightly pinched and the head is outlined with a stack.
Whale. An ovoid shape is used, the tail is molded like a fish, and a wide mouth is cut in a stack on the thick part.
Piglet. He has an oval body; the patch is pulled out and finished with the fingers; stretch your legs slightly; The ears and tail are made from separate pieces of clay.
Teddy bear. A piece of clay is divided into three parts. Roll the larger ball into a ball, then roll it out slightly (palms at an angle) - you get an oblong shape - a torso. The wide end is placed on the base. The second largest ball, the head, is attached to the body. The remaining clay is divided into two unequal parts. Two pieces are pinched off from the smaller one, rolled up and flattened - these are two ears (the ears can also be pinched). The last piece of clay is rolled out into a sausage shape, divided in half - these are the paws, which are pressed on both sides of the body.
Birdie. A piece of clay is divided into three parts of decreasing size. From the largest part, a body is sculpted (an oval shape), the tail is pulled back and worked with the fingers. The head is rolled out of a small part, attached to the body, and the beak is pinched. The remaining part is used to make a stump, nest or stand.
In the middle group, children are taught to sculpt a person in the most basic image - a girl in a long fur coat, Father Frost, Snow Maiden, etc. This is a complex task that requires children to be observant, the ability to see proportions, correctly correlate parts, and also need to know the technique sculpting - weighting the lower part of the figure. The construction and sculpting of all these figures is the same. A piece of clay is divided into three parts. A cone is molded from a large one (its base is leveled on the board), a round head is rolled from another piece, which is attached to the cone. The remaining part needs to be divided in half, one should be rolled out into an elongated cylinder - these will be the arms, the other part the children will use for details - a hat, collar, buttons. To sculpt Santa Claus, you will need a larger piece of clay: the teacher shows how to sculpt a beard; It’s good to give a pre-cut Christmas tree to Santa Claus. The legs of all the figures are not molded. You can try to sculpt Parsley with your children: the body is in the shape of an ovoid, the head is a ball. The figurine is placed on a stand (a flattened ball), smeared on, after which a cut is made from the middle of the body downwards in a stack and the resulting parts are slightly separated. A cap (cone) is placed on the figurine's head. The hands can be sculpted separately. Parsley turns out to be standing, while the figurine stands firmly, since its lower part - the legs - are significantly weighted. In this group, you can introduce children to the image of a running animal, whose body is an elongated cylinder. It is the basis for the image of a hare, fox, squirrel, cat, dog. The main attention is paid to the image of the characteristic features of animals (shape of head, ears, tail). After sculpting a person or animals, it is good to carry out a collective plot sculpting, for example: “Father Frost and the Snow Maiden”, “Oh, what a good, kind Father Frost!”, “The Hare and the Hedgehog”, “Two Greedy Little Bears”, etc. Children learn to sculpt dishes . They are shown methods such as creating hollow shapes by pressing a finger into a spherical or cylindrical shape (cup, bowl, glass, mug), bending the edges of a flattened shape (plates, saucer, tray), overlapping rings from a long cylindrical shape and their fastening (basket, pyramid). The child completes details such as handles, decorations on the edges of mugs and saucers by attaching and applying individual parts to the overall shape. Having sculpted the dishes, decorate them well, making various patterns using stacks. If children worked with clay, you can dry the dishes, paint them, and then use them in the play corner. In order for children's games to be more meaningful, as well as to consolidate technical skills in modeling, it is good to conduct a series of classes on making pies, gingerbread cookies, cheesecakes, and boats. Gradually, children begin to freely use previously acquired skills. The theme of modeling is mainly related to observation of the world around us, the impressions that children received from excursions and walks in nature; children can depict beetles, caterpillars, and various animals. Increasingly, collective work is being carried out, the results of which are combined into a single plot. You need to devote time to sculpting decorative toys according to the folk type (bird-whistle, goat-whistle, etc.). Children decorate them by applying a pattern, or after drying they paint them. In the summer months, you need to use in combination with clay, plasticine and additional natural material - twigs, twigs, Christmas tree needles, cones. For example, having sculpted a hedgehog, the guys make needles for it from pine needles. Modeling classes should be closely connected with classes on familiarization with the environment, with teaching the native language, and with observations of living objects. Before modeling classes, the teacher, during walks and observations, organizes a targeted examination of objects, pays attention to the basic shape of objects, their individual characteristics, characteristic details, and also conducts didactic games and special classes that introduce children to the sensory qualities of objects. The guys get acquainted in advance with the sculpture and toys that they will sculpt. Preliminary work to enrich children's experience has a huge impact on the subsequent modeling process. A very important point in the manual is the explanation of the task and the highlighting of the learning task in it, that is, an explanation of what the children must sculpt, how and what to learn. In order to attract the attention of the children to the task, to arouse their interest in the work, the teacher himself must be passionate, interested, and emotional when explaining. Children in the middle group already understand that during class they need to listen carefully to the teacher, watch what he shows, and if he asks, answer. But the teacher still uses elements of the game, playful actions to interest the children and make them want to depict the object. The teacher’s explanations must be clear, laconic and precise, so that the children can understand what they need to do and how, in what ways, and what is the sequence of work. The explanation can be divided into three stages: Stage I - defining and naming the purpose of the sculpting. Various techniques can be used here, for example, playful ones (children sit down at the table, suddenly there is a knock on the door. A doll comes in and asks the children to fashion a treat, since the dolls have a holiday soon), or the technique of “surprises” and “guesses” (on the teacher’s table something is covered with a handkerchief, he invites the children to guess what is hidden, concentrates the children’s attention, and then opens the object). You can play a melody on a musical instrument and invite the children to think about who the melody is about. For example, the teacher plays the melody “Bird” (music by M. Rauchwerger). Each child sculpts the image that he imagined. At the end of the work, the teacher, together with the children, evaluates the correct perception of music. The song “Bug” (music by N. Kuklovskaya) can also suggest a characteristic image: Here is the dog Bug, Tail with a squiggle, Teeth sharp, Coat of motley hair. Woof! Woof! You can ask the children a riddle before sculpting. It should be simple and clearly create a characteristic image (for example, about a hare: “A quick, little animal with long ears and fleet of feet,” you can also remember and read a short poem. It is good to use the technique of reminding, referring to the past experience of children. For example, let a squirrel before sculpting children will remember who they fed nuts this morning, what impression the squirrel made on them. Sometimes the teacher simply tells the children what they will be sculpting, for example: “Children, today we will sculpt a tea cup,” or you can suggest a broader topic: “Today we will sculpt dishes," - then everyone will be able to sculpt one object (for example, a cup with a saucer, a vase, a glass). If children are offered plot modeling based on a literary work, a fairy tale, the teacher tells the name of the work and asks them to think about who wanted which episode The teacher clarifies the content of the plot with the child, pays attention to the conveyance of the characteristic features of the image, for example, when sculpting the episode “The Gingerbread Man Met the Hare”, he explains how to convey that the hare and the Gingerbread Man are talking or that the Gingerbread Man is singing a song to the hare, and he is listening. Tasks are very important, by completing which children can feel the benefits of their work. For example, a teacher offers to fashion gifts for children, for a sick friend, or to make dishes for dolls, etc. Thus, first of all, it should be clear to the children what they need to depict; from the first words of the teacher, this should sound very clear. Stage II - examination of the nature that children will sculpt, its active perception and examination, clarification of knowledge about its properties. This is necessary so that children not only clearly see and remember the object, but also imagine the sequence of visual actions, i.e., the method of modeling. Sometimes, instead of a real object, the teacher uses a sculpture, toys, dummy, stuffed animal, or sample. If nature is used, then its general appearance is examined, the teacher draws the children’s attention to its aesthetic and expressive qualities, the shape of the main parts, their location, size and proportions. Children examine it, answer the teacher’s questions, tell stories, feel the object with their hands, and talk about its shape. For examination, children can be offered a sample, i.e., a molded work done by the teacher. Sometimes the entire explanation is based on this sample. It must be executed competently and artistically, be larger than children’s work, more generalized, it must emphasize the main features that children pay attention to. Item details can be omitted. The sample is made from the same material that the children will work with. The child should not copy the sample in detail, but learn the basics - the structure, shape, arrangement of parts, sequence of work. Therefore, to avoid copying, it is better to remove the sample after the explanation, then the children will complete the task more independently and approach it more creatively. In the event that the children examined the object on the eve of the lesson or played it out in a didactic game, that is, the object is well known to the children, active perception of the object before the modeling process may not be carried out. The teacher simply reminds the children that they know this subject and they just need to see where to start modeling. When considering nature, special attention should be paid to the expressiveness of the image. And here questions that require an answer about the character’s character would be quite appropriate. For example: “Is the bunny funny? Do you think this bunny is brave or a coward? What is this bird doing? The requirements for nature and the method of using it are not much different from the method of using nature in the younger group of kindergarten. The only difference is in the content of nature, its complexity. Stage III is associated with explanation and clarification of how children should act, what technical techniques to use to fashion an object. Demonstration of image techniques is needed when it is necessary to use a new technical technique or when a complex object is given to complete. It is important to highlight the sequence of work here. The display of image techniques can be complete or partial. Full display is used when performing a new task or using new techniques. Partial demonstration is necessary when the teacher sees that children are performing some technique incorrectly, or wants to draw attention to some method of modeling, remind them how to do this or that part of the work. For example, he shows how to sculpt a dog’s face, its tail, ears, and children can do the body themselves, since they have already sculpted a cat. A partial demonstration of the modeling method can be done by a child, and he must explain how and what he is doing. Thus, gradually the child independently discovers that using one sculpting method it is possible to depict a number of objects, i.e., he comes to a generalization of the sculpting method. When explaining a new technique, children are shown it at a slow pace and told how to position their hands and fingers. Particular attention is paid to the quality of movements. Each time when performing a particular technique, the teacher explains how to regulate the pressure of the hands and fingers. At the same time, he uses the words a little, lightly, slightly, stronger, stronger, very strongly, etc. If the action is complex, then it is necessary to break it down into a number of simpler ones and name each one, define it with a term. For example, when making pies, children are given lumps of clay and asked to first roll a round ball, then roll it out lightly and squeeze it slightly with their palms, then, carefully, lightly pressing with their fingers, make the corners of the pie sharper. The last step is pinching, with the help of which a decoration is made in the middle of the pie - a scallop. Sometimes the child can be asked to repeat a sequence of movements, but this technique should not become a system. We need to teach children to be attentive and remember the way to work. Explaining a new technique, the teacher invites the children to make this movement with him, repeating his actions. After the explanation, the task execution stage begins. For some time, the teacher watches how the children begin the task, giving them the opportunity to start working on their own. Only after this can we help those children who are experiencing difficulties. During the lesson, the teacher shows the technique again and again to those who do not understand how to perform it. There are always children in the group who quickly complete the task. You can give them additional material and suggest how to complement the image. It is necessary to teach children to think about images during the modeling process; with advice and questions, help children make their figures more expressive: find the correct length of ears, beak, tail, their position, the state of the character (for example: “What is your chicken doing? Does it drink water?”). If most children make a common mistake, it means that the teacher missed something during the explanation. He can invite the children to listen to the explanation again and only after that start working again. Five minutes before the end of the lesson, you need to warn the children about this. This is how attentiveness and clarity in fulfilling requirements are cultivated, and a sense of time is developed. At the end of the lesson, an analysis of the work completed by the children is usually carried out. The content of the analysis depends on the type of modeling; it should not be of the same type. If object modeling was carried out, it is analyzed how correctly the children sculpted the object, whether they were independent, and what new things they added to the image. If plot modeling was carried out, then the main attention is paid to how the plot is conveyed and whether it is expressive. When sculpting according to a plan, attention is paid to whether the plan has been brought to completion and how interesting it is. The analysis can be carried out immediately after class, or it can be delayed, carried out after a walk or in the evening. Children need to be warned about this so that they know that their work will be appreciated. The teacher also involves children in analyzing work in the middle group. He can invite 2-4 children to choose works that they like and tell why. You can ask the children to exchange works with each other and talk about the work of a friend. At the same time, one should not lose sight of the main task of the lesson. When analyzing the work, the teacher notes not only their positive aspects, but also points out mistakes. Sometimes he chooses the best works, or one that was done well and the other weak, and says: “Think and tell me which bear turned out better and why.” It is not necessary to demand a complete answer from children, the main thing is that they reveal the content of the work performed and its features. In this group you can no longer limit yourself to a one-word answer: like it or don’t like it. It is necessary to ensure that the child explains exactly why he likes or does not like it. It is very important to draw children’s attention to the aesthetic expressiveness of the work. At the end of the lesson, you can invite everyone to play with sculpted toys. For example, having sculpted dishes, children feed dolls from it, after sculpting chickens they make a home for them, etc. Of the best works, it is good to organize an exhibition in a corner for parents, and children should be told about this before the lesson.
Summary of an integrated lesson in the middle group on modeling
Summary of an integrated lesson in the secondary preschool group “Funny Robots”
Author: Naidenysheva Larisa Anatolyevna, teacher, GBOU School No. 1373, Moscow Integration of educational areas: speech, physical, cognitive, artistic and aesthetic. Goal: To form aesthetic tastes, develop creativity and thinking. Objectives: - Continue to teach children to sculpt familiar objects in a constructive way. — To consolidate the ability to divide plasticine into parts of various sizes using a stack, to convey the proportions of parts of an object. — Learn to make objects stable. - Develop creativity. Material: Robot toy. Plasticine (two colors), stacks, a rag, a modeling board (for each child), sticks (tree branches - 2 cm - 5 pcs. and 1.5 cm - 2 pcs). Methods and techniques: surprise moment; mystery; conversation with children, song “Two Cheerful Geese”; fairy tale by K.I. Chukovsky “Hedgehogs Laugh”; physical minute.
Progress of the lesson
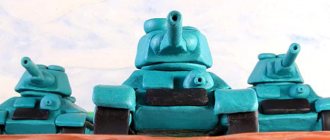
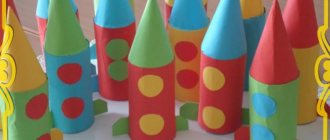
Educator: Guys, do you hear some strange sound? (turn on the robot sound) (If the children don’t guess right away, you can ask a riddle) Himself is metal, the Brain is electric. Children: It's a Robot! Educator: I wonder what happened to him. Let's find out. (The teacher takes the Robot and asks him) - What happened to you? Why are you so sad? Robot: I had a friend and he broke down. And I was left alone. Now I have no one to play with, talk to, walk with. Educator: Don't worry, Robot. The guys and I will definitely help you. I ask you not to be sad and smile! Robot: I can't laugh. I don't know how to do this. Educator: How is it possible to not be able to laugh? After all, laughter is such an interesting thing! Guys, let's teach Robot to laugh? Children: Let's go! Of course we will teach you! (The guys started to make Robot laugh: they showed him different funny faces, sang a funny song) Educator: Robot, but why aren’t you laughing. After all, the guys tried! Robot: I can only do what the inventors taught me. Educator: Then, I’ll tell you a fairy tale now, and you listen. (K.I. Chukovsky “Hedgehogs Laugh”) (And a miracle happened. Listening to a fairy tale about hedgehogs, the robot laughed merrily) Robot: Thank you very much! I learned to laugh! How - that's great! And I have a surprise for you. The robot conducts a physical exercise “Robot Dance” Educator: I always knew that laughter can work wonders! Thank you Robot for the fun dance! And now, the guys and I will help you meet new, cheerful friends! So that you have someone to play with, walk with, and just laugh with! Guys, please look at the robot. What is he like? What parts does it consist of? Children: Children's answers. Educator: That's right, guys. And today, I propose to fashion robots from plasticine. We will work with cut pieces of plasticine. Under no circumstances should they be rolled out. To create a robot we will need:
Plasticine (two colors), stacks, a rag, a modeling board, sticks (tree branches - 2 cm - 5 pcs. and 1.5 cm - 2 pcs).
Sequence of work: 1. Take a block of new plasticine and cut it using a stack into three parts: the largest part is the body; small rectangle - head; We cut the third part in half - the feet-stands.
2. We begin to assemble the robot using sticks (cut branches - 2 cm each). We attach the head to the body using a stick. We “put” the robot on its feet using sticks and foot stands. We add arms and “antennas” to the head, also from sticks.
3. Then we divide a small piece of plasticine into three parts and cut each part in half (six pieces are obtained). We use them to decorate small details: balls for the “antennas”, eyes, mouth and button on the body.
The robot is ready
Educator: Well done! Everyone can do it. (Move the Robot to the table on which the children will place the robot figures) Educator: Look, Robot, how many friends our kind and sympathetic children have made for you. Robot: Thank you very much, guys! I really liked my new friends! Educator: Thank you for your work, because you did a good deed - you made friends for our Robot. Now you can come up with a story about them: how they all met, became friends, and had fun together. (Writing a fairy tale) Summing up the lesson. Exhibition of children's works
We recommend watching:
Integrated music lesson in the middle group on the topic Spring Synopsis of cognitive direct educational activities in the middle group Integrated lesson in the middle group Synopsis of educational activities in the middle group. Unconventional drawing technique
Similar articles:
Summary of an integrated lesson in a middle group on the topic “How to find a path”
Math lesson “Rectangle” in the middle group of kindergarten
Mathematics lesson “Ordinal counting” in the middle group
Lesson 57. Modeling according to plan
Program content. To develop children’s ability to conceive the content of modeling and bring the idea to completion. Foster independence; develop creativity and imagination. Reinforce previously learned modeling techniques.
Methodology of conducting the lesson. Tell the children that today they will sculpt whatever they want. Ask the guys who usually come up with interesting content for modeling what they want to make.
Remind the children that if someone wants to sculpt an object consisting of several parts, or sculpt several objects, he must separate the required number of lumps from a large lump of clay.
Invite the guys to get to work. For those who find it difficult to determine the content of the modeling, help by recalling games and observations.
Examine all the sculpted figures with your children and rejoice at their diversity.
Materials. Clay (plasticine, plastic mass), boards, sticks for finishing details (for each child).
Connections with other activities and activities. Children's games, looking at illustrations.
Lesson 58. Drawing “Trees in the Snow”
(Option “Winter Forest” - team work)
Program content. Teach children to convey a picture of winter in a drawing. Practice drawing trees. Learn to place several trees on a sheet. Strengthen the ability to wash a brush. Develop aesthetic perception.
Methodology of conducting the lesson. Talk to the children about the fact that in winter the trees are covered in snow and offer to draw them. Remind them that the children looked at the trees on their walk and saw them in pictures.
Together with the children, show the trunk of a tree and the branches diverging to the sides by moving your hands in the air. Then call the children to draw a tree on a sheet of paper pinned to the board (one child draws the trunk, the other draws the branches).
Clarify where to start the drawing. Remind during the drawing process that the tree has many branches, there are long and short branches. Encourage drawing trees all over the paper.
Examine the finished works with the children and say that they painted a real winter forest.
Materials. Landscape sheets, gouache paints, jars of water, brushes, napkins (for each child).
Connections with other activities and activities. Observations on walks, excursions; looking at illustrations. Draw children's attention to trees, note their structure; include hand movements in the direction of growth of the trunk and branches; pay attention to the differences in trees (tall, short, thick, thin).
Lesson 59. Modeling “Big and small birds at the feeder”
Program content. Continue to develop in children the desire to convey images of birds in sculpting, correctly conveying the shape of body parts, heads, and tails. Reinforce sculpting techniques. Develop the ability to talk about what was blinded. Foster creativity, initiative, and independence. Develop imagination.
Methodology of conducting the lesson. Invite the children to remember observing birds on walks. Remind them how they made sparrows during the outdoor game “Sparrows and the Cat.”
Offer to mold the birds that flew in and sat on the feeder to peck at the crumbs. Then tell the children that each child can make the big or small bird they want. Specify the modeling sequence.
When the birds are ready, invite the children to mark the feathers on the wings with a stick; show how to pull the tail with your fingers and draw feathers on it with a stick.
Place the finished figures on a stand-feeder. Look at all the birds with the children, rejoice at the overall result, ask: “Are the birds the same size?” Ask the guys to tell who made which bird.
Materials. Toy birds (different, large and small), illustrations of birds. Clay (plasticine), boards, sticks for depicting details (for each child), feeding stand.
Connections with other activities and activities. Bird watching in the area, reading books about birds.
Lesson 60. Application “Flowers as a gift to mother, grandmother”
Program content. Teach children to compose an image from details. Cultivate the desire to make a beautiful thing (gift). Develop aesthetic perception, form imaginative ideas.
Methodology of conducting the lesson. Invite the children to draw a beautiful picture as a gift for their mother.
Ask how you can make a flower from round parts. If the children find it difficult, show on a flannelgraph how to arrange the petals around the middle of the flower.
For those children who quickly complete the task, advise them to glue another flower as a gift to their grandmother (aunt, nanny), using petals of a different color.
Display all finished works on the board, enjoy the bright, beautiful flowers; say that mothers and grandmothers will be happy with such gifts.
Materials. Paper mugs of different colors and shades (diameter 2–3 cm), a stick-stem and strips of green leaves, 1/2 landscape-sized paper of any soft tone, glue brushes, glue, napkins (for each child).
Connections with other activities and activities. Children's participation in preparations for the March 8 holiday. Looking at fresh flowers and illustrations.
March